big dots in an image tracing
Hello.
I spent the afternoon looking for a solution to my problem in this forum but I did not yet find.
I need to draw points to a picture on a picture 2D and until now, I tried with 'Trace XY VI', 'Attracting Point VI' and this one:
With the first VI I get lines instead of simple points. With the other, the drawn pixels are too small and I can barely see them. Even with the third argument.
Anyone know how to plot more big points?
Thanks in advance.
In the thread, you have access, CC suggested using the oval Overlay IMAQ VI to draw larger circles to these points. Have you tried that?
Also, should you use IMAQ or you can use the image control screws?
Tags: NI Software
Similar Questions
-
How to use a certain Image Tracing preset for automatic tracking of Image?
Hello
I use Illustrator CC.
I made a custom Image Tracing Preset and you want to use it on a folder containing a sequence of images I want all to vectorize automatically. Programming Action is not an option that the Action Recorder does not record what preset vectorization is used for tracing of the image. I've found that I can use the pre-installed Image Tracing Script (thanks to this great forum post - http://forums.creativecow.net/thread/2/1023487 ) in which I only need to specify the exact number of the Image Tracing Preset. And that became a big problem.
I tried to change the numbers from 1 to 25 and I thought that I've identified the Presets this path somehow, but after a while I discovered that I have not. I have no idea what Image Tracing Preset number and how to find out.
Does anyone know? Or someone has a different solution for what I'm doing? I thought that this should be pretty easy...
Thanks to all those who can help you.
(It's quite urgent).He traces via Adobe Bridge.
-
Wiped out STROKE does not not on the image traced Image?
So I am able to use the dotted normally if I create my own lines or shapes, but I use an image I have drawn, expanded and dissociated image and I'm able to change the weight of the race and the brush, but does not apply a dotted or a brush profile different, but I'm more concerned about the race. I have not forgotten the ditch... That is what it is? It works just not on stuff traced image?
What tracking method did you use?
If the trace produced tracks transparent, it is likely that you have duplicate paths.
You must analyze the trace to see where the problem lies.
There is nothing of stuff traced that prevents the use of dotted, but if he there composed the railways know that the compounds in their entirety will be RDR stokes.
You may need to free the transparent traces (with the hassle that involves) to get what you want.
-
Below my big file name icons (images and subfolders) disappeared.
There is no name in my pictures or my subfolders in all folders except one!
How can I get the computer to display the name of the file with the images?Thank you.
I created another user account.Thank you.Hi MichaelDraper,
· What operating system is installed on your computer?
· How long have you been faced with this problem?
· You did it last changes before the show?
Follow these methods in the order and see if the problem is resolved.
Method 1:
Step 1: Start in safe mode and check if the problem persists.
Start your computer in safe mode
http://Windows.Microsoft.com/en-us/Windows7/start-your-computer-in-safe-mode
Step 2: If the problem does not occur in safe mode, you can put your system to boot (in normal mode) to solve the problem.
How to troubleshoot a problem by performing a clean boot in Windows Vista or in Windows 7
http://support.Microsoft.com/kb/929135
Note: After troubleshooting, be sure to set the computer to start as usual as mentioned in step 7 in the above article.
Method 2: Try the SFC scan on the computer.
How to use the System File Checker tool to fix the system files missing or corrupted on Windows Vista or Windows 7
http://support.Microsoft.com/kb/929833
Method 3: If this does not work, create a new user account and check. If it works in a new user account, then probably your user account have been damaged and would need a fix.
Create a user profile
http://Windows.Microsoft.com/en-us/Windows7/create-a-user-account
Now search for the question.
Follow the below link to fix the user profile damaged.
http://Windows.Microsoft.com/en-us/Windows7/fix-a-corrupted-user-profile
I hope this helps.
-
Why can't I select ignore white for screening followed by image using the photo high fidelity? See you soon!
Due to this setting:

Check the left button and you can skip white.
And then see if it makes sense for you.
-
Big delay opening first image?:
First image of the opening, short sniffer_gpu, takes 30-45 seconds to query the gpu. And then he stops, and Photohop goes "not responding" mode for 30-45 seconds. After the first image, everything works fine. Extended PS6, I7, 64-bit processor, 32 GB of ram, beaucoup of available disk space, nVidia 680M GPU with 4 gig ram. Card added to the supported file, is instantly recognized by first and After Effects and everything to work well in Photoshop. It started a few weeks before, without apparent modification of the system or the software. Ideas please?
OK, so that tells us that something is wrong with your video card driver that is causing hang.
Have you updated your site Web de NVidia video card driver?
-
b & w to color images tracing.
Hello forumers.
I was informed by a graphic designer (don't know if its true or false) that the old black and white movies that we see today and are of color are given to
a team of designers who know how to use the pen tool exellently.and, they receive the frames and they draw the environment ppl inside & outside
and do like image by image, is this true? don't take ages to do? is there a way after fx can be addressed?Thank you.
This isn't how it's done.
Wikipedia has an article on the film colorization and I'm sure you can find more, but it is impossible that someone took the time to do it in photoshop
-
Wallpaper - images show too big to set as background
original title: substantive issue of screen
Hello
I had my computer for more than 3 years and no problems until recently. I wanted to change the image for my wallpaper and it is too big; in fact, any image I choose it turns out to be too big for my office. I have not had this problem before. I resized the image and now it does not show the full picture on the desktop. It displays the resized photo but it seems that there is a peak of 4 x 6 on the screen, the background is black. Any suggestions on how I can fix this?
Janice Smith Neve
Use your image over-sized as backdrop, then...
Right-click on an open sp [ace of desktop > Personalize > wallpaper ultimately > downstairs, under the Position of the image, click on the pointer, and then select FILL > click on save changes when finished.]
-
Using tracing image, and then replacing with background image
I am very new to Dreamweaver and am trying to put together a very simple site.
I use image tracing for the mode of disposal table - and it am followed exactly. However, when I put it off to test it in my browser,
nothing aligns how it shows in my work environment.
Am I missing something obvious 'very '? Thank you.
(1) never use the mode table layout. It's a terrible way to build web pages.
(2) no matter how hard you try, you can't make things stick to a large background image. It's like trying to nail Jell-o to a wall.
Have a look at the following tutorials. These will get on the right track.
Tables to CSS Web Design part 1-
http://www.Adobe.com/devnet/Dreamweaver/articles/table_to_css_pt1.htmlTables to CSS Web Design part 2-
http://www.Adobe.com/devnet/Dreamweaver/articles/table_to_css_pt2.htmlPost back if you have problems.
Nancy O.
ALT-Web Design & Publishing
Web | Graphics | Print | Media specialists
http://ALT-Web.com/
http://Twitter.com/ALTWEB
http://ALT-Web.blogspot.com -
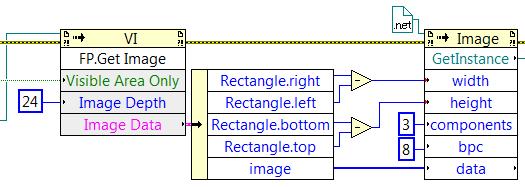
With the Get image method (Front panel, control,...), what is the resolution of the image? The resolution of the screen? It is possible to increase the resolution?
JM
J - M wrote:
Hi, Maxim,.
It's for details on table or chart. When I add some graphics image in a report, the result is not as good as I would like. If the method get Image pixel of the screen resolution, I have to live with that...
Jean-Marc
You could create a Subvi with graph and make it very big. Pull your image of this and resize to your report on the outside or if the report is HTML uses tags in size, while the raw image is stored and able to be looked at more in detail.
Just a note however, if you do this, in order to export the image, you need to open the Panel the Subvi front. What I've done, is to ensure that, when the front is open, that it is open off screen.
-
Question of dilation image trace
I need a lot of trace of image of small images of 6 colors. I think that once I am happy with the results of tracing I need to enlarge the image. The problem I have is that as soon as I did, it seems to take a lot of my machine and everything starts to slow down a bit. Is what I can do to an image traced and enlarged the image to make it simpler and therefore consume less processing power?
I thought I could re - save each image to a png or something, but it means everything twice.
Appreciate any help on this.
Bravo!
How many points/paths are you end up with? so that's not the hundreds of thousands, I would have thought you would be nice.
-
How to create these little dots?
I would like to know how to make these little dots on an image in PS.

See here on the left and right of the banner, these points that are fading a bit in the Center.

Or on the same points.
Please, I would like to know!
Try this:
File > new. 3 "x 3"
Draw a guide 1 "down from the top and 1" from the left.
Select the white box, Inverse the selection and editing > complete with gray or any other color green
It will look like the image below.

Reduce the size to 6.25% of original
It now looks like this

Edition > set the model and click OK
Open the new file.
Edit > fill > model and choose the model that you had saved.
This is the result, which can then be reduced and integrated in the design

-
On mac. Dreamweaver 2015.1 Build 7851.
In the menu display, rules, Guides, grids and Tracing Image is all grayed out.
I'm sure that it is a mistake of mine. Have you tried to modify - properties of the Page, etc. But can't get the image to display. Have tried Jpg, tiff, png etc. gift.
Any ideas?
Patrick
To use Image tracing options on the view menu, you can switch to Design view.

-
Sweetness of Causes LR on the corner of the Image
I have a very strange problem and wonder if anyone else has seen elsewhere.
I duplicate a table using my Canon 5Dmk2 and a few studio lights. I mounted the 22 x 28 inch painted on a flat wall. So, I mounted my camera on a tripod, perpendicular to printing and the exact axis even. I used two soft boxes on opposite sides of paint for uniform, non-reflecting light. Then, I measured with a light meter and turned the painting to 1/160 s, f11, ISO 100. I had a perfect exposure. I even used Live View on my camera zooms in tight to get a great point.
When I put the LR4 (or LR3) image, the lower left corner was pretty sweet, but the rest of the image was strong. I thought I've screwed something so I Redid the image. I remesuré everything to make sure that everything was case flast, square, right, etc.. Then, I took the picture with two very strong lenses - Canon 100 mm macro f2.8 and Canon lenses 70-200mm f4L, both set to 100mm, f11, 1/160 s, ISO 100.
When you look at the picture on my camera LCD, same zoomed to plan big max, all the image is sharp. When I import into LR, this corner will extend again! Initially, it displayed sharp, but as soon as the software zooms, it will tend and remains flexible. I tried to turn on and turn off lens Correction, but this lower left corner remains soft, no matter what I do. I really don't think it's the lens, the camera alignment or exposure, since it displays on the LCD of the camera with zoom tight. These lenses are very sharp, so much else, I left some room on its four edges to avoid the possible sweetness or vignetting.
Similar experiences? Any suggestions?
Thanks, Lou
Thanks for the suggestions, trshaner, but I didn't need to go there.
I solved my problem... and that was MY problem. Unbeknownst to me, I had already saved a develop preset that had a gradient blur (low clarity setting) in the lower part of the left hand of the image (from the image, I was working on). Duh... user error. It's the ONLY thing I had not checked, and that was the problem. I have eliminated the blur, re-recorded the preset and voila... strong all along!
Sorry for the wild goose chase.
Lou
-
Major change in the image in the transition to the 2012 process
When I change process 2012 on an image that was worked on in 2010 I see a big change in the image, much brighter, less contrast.
What happens here? Somewhat closely preserve the old look while updating the process?
Also I was wondering what the new 2012 process brings to the image, outside access to the new tools.
I see a better (or just different) rendering the image from older files?
soboyle2 wrote:
Also I was wondering what the new 2012 process brings to the image, outside access to the new tools. I see a better (or just different) rendering the image from older files?
It depends... PV 2012 can keep the highlight of the textures very much, much better that highlight recovery could in PV 2010. Shadows does a much better job of increasingly darker tones. The ranges of the different fundamental controls are now Adaptive image which means you can make changes more easily. The new PV 2012 clarity is no longer produced strong halos and is 2 x the strength.
Yes, images can indeed seem different when it is converted, usually for the better due to new adjustments. And Yes, it takes a while to adapt to the way the new controls work. But as Lee Jay said, do not expect a 1:1 correspondence in conversions...


Maybe you are looking for
-
Dear support, I seem to get an error message when loading. The computer asks me my password and then reveals all my favorites. However, before finishing loading, I see an error message about scripts. I have attached a screenshot. Can you suggest some
-
Suggestions as to how I could complete the activation of my iPad after iOS update? I tried for 2 days now to complete the update of iOS on my iPad. Everything was going fine until activation, as I tried to continue, the message "your iPad could not b
-
My Satellite M305-S4910 is unusable because of the screen flashes
After owning since February 2009 it my laptop Toshiba became unusable! The screen flickers and goes to white constantly. Technical support or customer relations offers any assistance whatsoever! Some would say that is under warranty and it is for thi
-
The HP AIO Windows 10 PC: strange unwanted music and talk
Usually when it's on the internet, I get these strange voices, unwanted, talking or singing people. I don't know where they come from. Is there something special about 10 Windows or new internet that could be the cause? I usually have to cut my volum
-
How to make two separate signals
Now I use NI 9215 with NBC to get the data. I have two channels I will, but the problem is when I using Assistant.vi of data acquisition, there is a single output, I want the two signals can be separated (two output channels). Can someone help me?