Center of gravity
Hello
I built optical tweezers, through a home made µscope and I measure the position of the balls of fluorescences (1µm to 200 nm) with function of centre of gravity of labview 8bits.
My images are a 16 bit and I have to cast in 8bits Image centroid pre-treatment.
I would like to know, why is not a 16-bit version?
Does anyone know if we can a 16-bit version of programming, or that there are other method exist to calculate the position in the image of 16 bits on Labview?
PS: I LV 8.0 and LV2010,
Thank you for everything,
Manu,
Thank you
I have LV2010 but I have not yet installed,... excellent thanks!
Tags: NI Hardware
Similar Questions
-
by comparing the average centroid location to the location of the center of gravity measured
I'm using labview 2015 to design a laser alignment system, using a contoller ag - uc2 and an optical mount piezo driven two webcams. The establishment, is that the webcams are positioned behind the mirrors, which are somewhat permeable, so the webcam will get a shot where the laser beam is pointed. The laser must be aligned manually first, and after that it is satisfied with the alignment, this program will be run once to run in the background. control the position of the laser a few times per minute to correct the thermal drift. After it is first of all, I would like the program to take maybe 10-15 images, to find a location to center of medium severity on each of the mirrors, then switching to compare new images of this center of gravity of the model. My problem is that I can't imagine a way to get a picture of model and have that info Reports to the next iteration of the while loop to the overall program be carried out. I have tried using the structures of the case, which, I imagine, will eventually be the solution, but it did not work as expected. I put the case structure to run based on the value of the indicator loop iteration of the main loop, and I got a while loop in there with registries to raise the center of gravity of this loop and store this information for the next loop to shift. I can see after running the program why my implementation does not work, but I don't know how I can design something that will have an average of several images. I think I should use learn and compare the model, but I don't know how I can convert a cluster (centroid) type of data appropriate for the model comparistion live if you have any suggestions for my existing code or want to offer a different approach, I appreciate it. Also let me know if you need any other screws included.
In the past, when I had to switch between two 'modes', if you do, I used two consecutive loops while, one for the first mode and one for the second, or I would put Boolean register to indicate that, two modes, the loop was offset. If you start in a mode, and then more later switch to another once and only once, then you can use a node 'OR' like a lock to power the old way, so the first true feed you of keeps it true until the next time that you run the VI and it returns false.
I would also add that I looked your VI and the method that you use on average 10 images, while innovating, is usually not a great plan. Instead of having 10 shift registers build an array of fixed size, just have a table in a shift register, add each new measure at the end and the VI means in the range of mathematics/statistics to calculate the average.
-
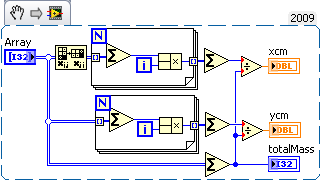
Center of gravity of a 2D array
Hello!
I want to do a sub - vi that calculates the center of gravity of the values in a table 2D (I32).
Entry:
2D-Array (I32)
Output
CentroidX (whole I32)
CentroidY (whole I32)
I found this code on the web:
FUNCTION centroid, array
Michèle = size (table /N_Dimensions)
Michèle IF NOT 2 before you BEGIN
Message, ' array must be two-dimensional. Back...', / information
RETURN-1
ENDIF
s = size (table, Dimensions)
totalMass = Total (array)
XCM = Total (Total (table 2) * Indgen (s [0])) / totalMass
YCM = Total (Total (table 1) * Indgen (s [1])) / totalMass
RETURN [xcm, ycm]
END
But I can't figure out that to Indgen() and Total().
You guys can give me some advice to help me on the way, it should be pretty easy.
THX in advance a Kudo will be given you!

First, in case you're wondering, the function's IDL. INDGEN as it is used, it generates an array of integers with each value is equal to its index. TOTAL (as you might guess) is the sum of a given table. The syntax can be difficult, unless you specify a dimension (1 or 2) of a 2D array, you get a 1 d array where each element is the sum on the other dimension. In this case, xcm has more columns than the sums of ycm on lines.
Knowing enough IDL translation LV gives me this:
-
coordinates of the vertices of the center of gravity
Hello!
I have a polygon geometry
and I would like to return only the coordinates X, Y of the summits of the centre of GRAVITY of the input geometry
If I do this returns the geometry
SELECT SDO_AGGR_CENTROID (SDOAGGRTYPE (GEOMETRY, 0.005)) OF LAND_AREA WHERE LAND_AREA.ID = 12725
(SDO_GTYPE, SDO_SRID, SDO_POINT_TYPE (X, Y, Z), ANSDO_ELEM_INFO, SDO_ORDINATES)
--------------------------------------------------------------------------------
SDO_GEOMETRY (3001, SDO_POINT (579940,339, 4998349,92, 0), NULL, NULL, NULL)
But if I do the query do not work
SELECT t.X, t.Y
Of
LAND_AREA,
TABLE (SDO_UTIL. GETVERTICES (SDO_AGGR_CENTROID (SDOAGGRTYPE (GEOMETRY, 0.005))) t
WHERE
LAND_AREA.ID = 12725;
Can someone help me with this please.
Thank you much in advance.This gives you what you want?
SELECT
    CENTROID_VERTICES.X,
    CENTROID_VERTICES.Y
FROM
    (
        SELECT
            SDO_AGGR_CENTROID(SDOAGGRTYPE(LAND_AREA.GEOMETRY, 0.005)) AS GEOMETRY
        FROM
            LAND_AREA
        WHERE
            LAND_AREA.ID = 12725
    ) CENTROID,
    TABLE(SDO_UTIL.GETVERTICES(CENTROID.GEOMETRY)) CENTROID_VERTICES
I hope this helps.
-
Why the centre of gravity is calculated incorrectly?
I have an image which is an int16 signed with no hanging mask (outwardly hidden). The center of gravity IMAQ vi reports the KING Center instead of the answer for the center of gravity. Why would he do that?
Steve_Block wrote:
You have a perfect image. The calculation of the centre of gravity works perfectly with a simulated Gaussian beam. This is when a real picture of a camera is used to ensure that the centre of gravity is calculated incorrectly.
Center of gravity is generally quite simple and straight forward - this should be independent of the content of the image.
If you get the feeling that, in some cases it calculates correctly, then you can calculate it with pure primitive LabVIEW something like that:
Compared to the IMAQ, it will be a bit slow, but you verify that centroid IMAQ calculated correctly or not for your images.
Andrey.
-
HP ENVY laptop - 15-k220nr: upgraded wireless HP ENVY laptop-15 k220nr.
Hello
My laptop came with Intel AC card 3160 WiFi, but it is buggy and fall on and outside. I think of him replacing Intel AC 7260, which should be better.
They are the same size, I don't know if there will be a few problems or not if I do this? In addition, the led are compatible? I get full speed AC1200?
Thank you
I can now confirm that the adapter Intel Wireless AC7260 sector works PERFECTLY in a HP Envy 15t, specifically an HP Envy 15-k220nr (4720MQ plant, 8 GB of Ram, Intel i7 installed Intel Wireless 3160 adapter). It works with Windows Pro 10 x 64 great - I can't speak for Windows 7/8/8.1 that I updated before installing (which I recommend), but I expect that it works on Windows 8/8.1 for sure and probably on Windows 7 without problem.
I bought the card on Amazon; the model is "Intel network 7260.HMWG. R' - the. R is important because it is a revised version of the chip with improvements on the original. It is, by the Intel reports, the same card SKU 7260.HMWWB. R - different SKUS simply represent different packages. Check it out at: http://www.amazon.com/gp/product/B00MV3N7UO
At the time I did, the cost of the card was $26.50. It is a Mini PCIe card, which is the type of the computer used.
It's a surprisingly simple upgrade. I have simply shut down my computer, which has been already upgraded to Windows Pro 10. As with all facilities, follow control measures for static (white room, wrist band), that screws follow-up go where (easier in this case because they are mostly identifcal when disassembly of the machine) and general practices for the maintenance of a system. I would not recommend this upgrade is done by an amateur - it's a more complex installation, since you need to access the motherboard and remove the housing rather than simply to open a port on the underside of the computer. That said, for having to open the base unit, it is a process very easy (relatively speaking) with this laptop. It is useful that the repair is very complete. Be careful, because if you are not an authorized service provider and your computer is under warranty, you may void your warranty by opening the machine. In addition, don't forget to keep the old card to allow you to reinstall and restore your computer to care factor if you need to send in warranty repair or want to sell it but keep the new card.
It took my about 20 minutes to take it apart, install, test and go back. Before you BEGIN, download the new drivers, you'll need - HP drivers are working, great and I always go with the current manufacturer on the OEM drivers drivers when possible because they are often optimized for the system. You can also download download.intel.com drivers, but I would recommend get the driver WLAN wireless network current HP download page (http://support.hp.com/us-en/drivers/selfservice/HP-ENVY-15-Notebook-PC-series/7527530/model/7685078#...). This card, looking for the same drivers regarding the AC-3160 card because they use the same drivers. Download the TWO the WLAN and Bluetooth drivers - to date, the drivers have been updated on 15/10/15 and are:
- Bluetooth of Intel driver, version 18.1.1525.1470 [email protected]
- Intel Wireless Driver, version 18.12.0.3 Rev.P
After downloading the drivers, put them on your desktop or somewhere else easy access that you will need them as soon as you restart the installation and the wireless NOT work initially, following so if you do not have the drivers you have given to get them through a wired connection or another computer.
I disassembled the machine by the Service Manual (http://h10032.www1.hp.com/ctg/Manual/c04510889). Remove the battery and basic housing, disconnect the cables in water for the fingerprint sensor, the mouse and the keyboard and back on top of the basic coverage and put it against the monitor. BE CAREFUL - this shifts the center of gravity of the computer and makes the computer to tip backward as I learned when I got mine from flipping back off of the table, I was working on - just be careful.
After opening to the top of the enclosure, installation is incredibly simple. The WLAN card is located at the back of the computer to the Middle - back where the hinges of the screen connect computer, centered between them. You just pop off the two wireless antennas (YES - this laptop, despite the expedition with AC only 1 x 1 wireless card options, IT has two antennas installed at the factory, so it can support fully a card 2 x 2), then remove the screw from the card in place. The map is displayed; bring him back (help little fingers - I have big hands and it was difficult because card is pressed against the back of the case) and pop out. Insert the new card, tap it down, screw and reattach the antennas, making sure that the wire connected to the 'hand' on the original card is connected to the 'hand' on the new map, and the wire of "to THE" relates to "to THE. On my computer, the black wire is the main antenna, the gray wire was the second antenna.
If you're like me, after installation, you can set reconnect the keyboard/mouse/finger print sensor and reboot the machine before screwing everything together to make sure it works. Just be careful if you do this. When you restart, wireless will not work. Run the installation programs for the drivers that you downloaded at the beginning of the year - I found install the dirver wireless, then bluetooth driver works better. After installation and reboot, everything should work fine, including bluetooth. I have had absolutely no problem with everything to work.
Now the fun part: performance. The map is hands down more quickly then the motherboard. 2 x 2 MIMO broadcast practically double your performance to download (assuming you have at least to AC1200 router that supports speeds of that card is). I use an ASUS AC1900 RT-AC68U, a great router is worth every penny. Speedtest.NET, my laptop on the wireless now easily continues with my internet service 60MBPS, going as fast as my wired connection (with the old card, he maxed out at around download 50MBPS; with the new card, it uses bandwidth full, closer to 70MBPS for us.) Download speeds were around 4, 5-5 Mbps, to be expected in view of our internet service.
File transfers are literally about twice as fast as prerequisites for the upgrade. I supported sustained more than 8 Mbps download speeds when there are about 40 feet from the router with 3 walls and other elements of the way. File transfer speeds are great, more 40MBPS transferring files to my NAS, compared to close to 20 with the original map (also from 40 feet with 3 walls and other obstacles).
Overall, the performance is much better that the original card, as expected, the installation is simple and quick, and everything works perfectly. I highly recommend this upgrade.
-
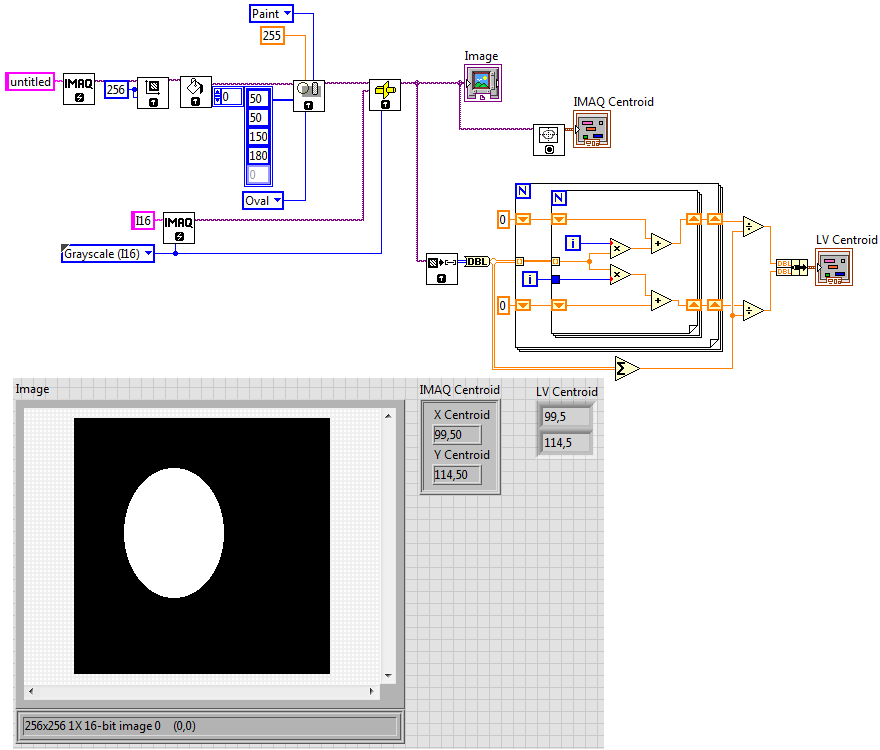
IMAQ-finding multiple centroids
Hello
I'm trying to find the center of gravity of two circular objects in a graph of intensity. My data type is floating point 64 x 64 pixels. Recently, I found a VI of further discussion which discusses the same thing. I have some minor changes and try to get the location of the center of gravity (x, y). The VI is almost achieve what I'm looking: it can identify objects and its center of gravity. I was wondering if the VI should be able to display the center of gravity of each objects, but it didn't happen. What is missing here? If anyone can guide me to do this, I would be grateful. I need to know the location (x, y) of each center of gravity. Here is the picture as an attachment to the VI.
Thank you.
Hi all
I finally found the solution! I used the local threshold IMAQ and circle find IMAQ for the locations of several detected circirls and his (x, y). I also used the table to the cluster for the data in the table.

Eric
-
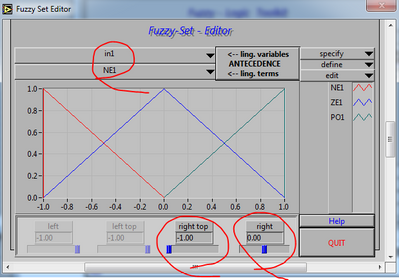
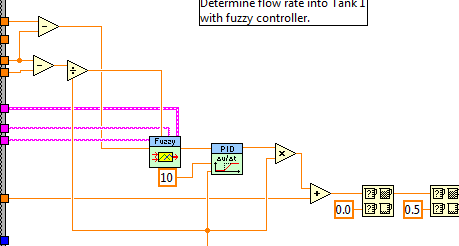
Oscillations in the logic controller output blurred
Hello
I recently implemented Fuzzy Logic Controller in Labview 8 for the control of a wide process station. I used Compact Point of field (PDC AIO 110) for it to interface with the hardware. Here are some other details
Entries to FLC: error, derived from the error of the Signal of the level transmitter
Fuzzification: Max - Min
Defuzzification: Center of gravity
Level sensor: capacitive Type level transmitter
FCE: Control valve
Data acquisition: cFP2020, PSC AIO110
Then, when I run the VI... I am able to control the water level in the tank successfully, but there are oscillations in fuzzy logic controller output. The oscillations are so intense and change very adbruptly. I need to fix this oscillations, as this may damage the equipment.
I am in need of a solution that makes the controller smooth response... Any suggestions? I need to solve this problem as soon as possible, as the deadline for my project work acad is almost
PS: I do not know if this post is in the right section, if not please move to the appropriate section. Please let me know I'f I need to provide any additional information
Thanks in advance
When you do the (k) e - e(k-1), it's an implementation of the oblique action, actually. You can implement by mistake or by using y (k) - (k-1) there also. This would avoid the effect of set point, when you change the target value, it is a mistake that is used by the derived variable.
To better describe what I mean, please open the example:
C:\Program Files (x 86) \National Instruments\LabVIEW 7.1\examples\control\fuzzy\tanks.llb\Tanks - control blur PI.vi
and try to see the screenshots below:
1 change the boundaries of your function of members associated with the derivative action will make the answer less susceptive to noise. This is where you should focus on the Fuzzy Editor.
2. the filter function is called: PID control entry Filter.vi and this implements a 5th order FIR filter. If you want more on the filtering option, you would have to use the LabVIEW functions for parsing > Signal Processing > filters. Here's how you should use the FIR filter:
3. the speed limiter is called PID output VI rate limit and it is used as:
These are the options that I was discussing.
-
How to detect multiple points of laser on the image
Consider I have a picture with several spots dark bright laser. I want to find the center of gravity of each laser spot and return the coordinates of each spot.
Currently, I managed to detect an single spot to grab an image, adjustment of the threshold (threshold IMAQ) and find the center of gravity (centroid IMAQ).
However, when I have several points of light, this method gives me the center of gravity of all tasks combined. Should what technique I use to detect the center of gravity of each individual laser?
Thanks in advance.
Try to use blob analysis. Make a fast threshold, which should give you a place for each laser. Blob analysis allows to get the center of each BLOB. Use the function of Center of gravity to locate the exact gravity Center, if the center of the BLOB is not good enough.
You should be able to save time by recording the previous values of the center of gravity. Lasers are moving very quickly, their new locations should be near their old location.
If it is still too slow, understand what part takes the most time. If it's the center of gravity, I am able to suggest other ideas.
Bruce
-
Hello
I want to locate clusters of the object in a .tiff image group. I would ilke to find the center of mass and the average value of pixels in each cluster (so that I can calculate the center of mass of the aggregate). In addition, I would like to draw polygon (sqiggly lines) indicating the perimeter of each cluster (similar to the example of MaginWand2). Each Image can contain one or more groups. I'm developing a stand-alone appliction using .net. I'd appreciate any help in this.
Thank you
Poop
That's what I did to get the center of mass of the cluster:
1 called method of CountAndMeasure on the KING to get a report on all objects in the KING
2 called LightMeterRectangle on each rectangle encompassing obtained in step 1.
3. get the average intensity of each rectangle of the report object returned in step 2
4 multiply the average intensity on the surface of the rectangle to get the total intensity. This isn't quite the full intensity it's only proportioal to the total intensity. This is acceptable in our application.
5 used this total intensity and the center of gravity of the rectangle to calculate the center of the total mass of all the objects that have been identified.
This solution seems acceptable for our application. Please make one commits. I have not found a way to reproduce the MagicWand feature in this console application again. I'll leave for later.
Suggestions for future improvements:
1 LightMeterRectangle will return the total intensity
2 CountAndMeasureObjects will return the total number of pixels in the rectangle.
Thank you
Poop
-
Then hike with a goal of two times as heavy as the body damage it?
I have an EOS 40 d and just bought the 70-200mm f / 2.8 - my first white lens! I tend to do a lot of hiking. Carrying this combo using the plant neck strap will be harmful for the frames? Thank you!
GrumpyMonk wrote:
Thanks for the reply, Bob! It is very true that I suffer often sore neck with just the 70-300 syndrome I have used so far. I thought about a Hip Holster system. If I leave with something like that, my concerns are if the movement of walking around (maybe sometimes strongly) with the camera suspended upside down to my hip to his tripod mounting mount would cause damage or undue stress to the frame of the lens/camera. You have experience with this type of configuration? Would it not be better to fix the plate to the tripod lens collar case instead? Thank you!I don't have such an experience. but I never tried the black fast system because of the reluctance to have a heavy camera dangling from the tripod mount. (Even one case where the point of attachment of BR gave, but I'm sure that BR has fixed that.) In the absence of a dedicated solution, your idea to attach the lens to the Mount of the case can be a good. My 70-200 seems to be much heavier than all the organs of the camera I used it on that. And the tripod collar will be closer to the center of gravity of the camera/lens system that would be the camera tripod.
-
Hello
I'm trying to calculate the position of the Center and the radius of the smallest circle containing a fraction (say 50%) intensity of the image in an assessment of the surrounding area, the center of gravity (ideally something like 200x200px).
I came with this VI which is definitely too slow (even taking into account only 10px area) that I need to constantly monitor the spot on the CCD sensor.
Is there a better (faster) way to solve the problem?Thanks in advance,
MaxHi Max,.
I think that the original VI 'myEW.vi' error in the inner loop. The top and left offsets are reversed. Double check my work, but I think that the two screws must ultimately return the same position of Center.
I should have clarified that I was describing a process of binary search, as opposed to linear increasing the size of the circle and not wearing is not on an analysis of the traditional binary particles. This binary search should return the same result, but in less than iterations.
In addition, the found location depend on the search order of pixels. There may be several sites with the same minimum size of circle and the final result may depend on where you start.
Finally, for improved accuracy, you can adjust the diameter of the circle research 1-pixel increments, rather than the RADIUS.
Thank you
Brent
-
Envy 15-k220nr: updated Intel 3160 AC card card Intel 7260 AC?
Hi-
I'm in the same boat as some other people and try to get the clearer a possible answer, before I move forward - I have a HP Envy 15 k220nr supplied with the intel 3160 1 x 1 AC card. I want to spend at least an AC 2 x 2 card, if this isn't a 3 x 3, to get the best possible rates of my AC1900 router. The safest bet on the outside using a USB 3.0 adapter external (which would be cumbersome and problematic) seems to be the Intel 7260 AC 2 x 2 card.
Does anyone do this? He settled without much trouble? It worked once installed? Have you seen a significant difference in speed? No problem with the new card? Tips for the installation? Have been able to confirm the K220NR you had two sons of internal antenna to support a card 2 x 2 (or, and I doubt that I have this chance, it has 3 antennas)? Please let us know - I want to upgrade, but to be sure it will work above all order and completely disassemble the laptop again (I already did once to install a 500 GB Samsung 850 EVO SSD and there wasn't a ton of fun).
Also, to you or anyone else to pay attention, because I'm going to open the laptop anyway, is there a reason I shouldn't update the RAM at the same time? It seems that the laptop supports the DDR3L 1600 ram; I think the upgrade from 8 GB to 16 GB - any anticipated problems with this, everything will work the RAM or is there a white list, is there a reason I should avoid it (above the RAM being the most difficult thing to access during dismantlement of this model)?
Any help, assistance, information on how it worked for you, things to watch, etc. would be much appreciated. I look forward to answers to the questions, that I have not like or thoughts in general about this. Thank you!
-Dan
HP Envy 15-k220NR
Intel i7 4720MQ
8 GB RAM
500 GB Samsung SSD 850 Evo
I can now confirm that the adapter Intel Wireless AC7260 sector works PERFECTLY in a HP Envy 15t, specifically an HP Envy 15-k220nr (4720MQ plant, 8 GB of Ram, Intel i7 installed Intel Wireless 3160 adapter). It works with Windows Pro 10 x 64 great - I can't speak for Windows 7/8/8.1 that I updated before installing (which I recommend), but I expect that it works on Windows 8/8.1 for sure and probably on Windows 7 without problem.
I bought the card on Amazon; the model is "Intel network 7260.HMWG. R' - the. R is important because it is a revised version of the chip with improvements on the original. It is, by the Intel reports, the same card SKU 7260.HMWWB. R - different SKUS simply represent different packages. Check it out at: http://www.amazon.com/gp/product/B00MV3N7UO
At the time I did, the cost of the card was $26.50. It is a Mini PCIe card, which is the type of the computer used.
It's a surprisingly simple upgrade. I have simply shut down my computer, which has been already upgraded to Windows Pro 10. As with all facilities, follow control measures for static (white room, wrist band), that screws follow-up go where (easier in this case because they are mostly identifcal when disassembly of the machine) and general practices for the maintenance of a system. I would not recommend this upgrade is done by an amateur - it's a more complex installation, since you need to access the motherboard and remove the housing rather than simply to open a port on the underside of the computer. That said, for having to open the base unit, it is a process very easy (relatively speaking) with this laptop. It is useful that the repair is very complete. Be careful, because if you are not an authorized service provider and your computer is under warranty, you may void your warranty by opening the machine. In addition, don't forget to keep the old card to allow you to reinstall and restore your computer to care factor if you need to send in warranty repair or want to sell it but keep the new card.
It took my about 20 minutes to take it apart, install, test and go back. Before you BEGIN, download the new drivers, you'll need - HP drivers are working, great and I always go with the current manufacturer on the OEM drivers drivers when possible because they are often optimized for the system. You can also download download.intel.com drivers, but I would recommend get the driver WLAN wireless network current HP download page (http://support.hp.com/us-en/drivers/selfservice/HP-ENVY-15-Notebook-PC-series/7527530/model/7685078#Z7_3054ICK0KGTE30AQO5O3KA30R1). This card, looking for the same drivers regarding the AC-3160 card because they use the same drivers. Download the TWO the WLAN and Bluetooth drivers - to date, the drivers have been updated on 15/10/15 and are:
- Bluetooth of Intel driver, version 18.1.1525.1470 [email protected]
- Intel Wireless Driver, version 18.12.0.3 Rev.P
After downloading the drivers, put them on your desktop or somewhere else easy access that you will need them as soon as you restart the installation and the wireless NOT work initially, following so if you do not have the drivers you have given to get them through a wired connection or another computer.
I disassembled the machine by the Service Manual (http://h10032.www1.hp.com/ctg/Manual/c04510889). Remove the battery and basic housing, disconnect the cables in water for the fingerprint sensor, the mouse and the keyboard and back on top of the basic coverage and put it against the monitor. BE CAREFUL - this shifts the center of gravity of the computer and makes the computer to tip backward as I learned when I got mine from flipping back off of the table, I was working on - just be careful.
After opening to the top of the enclosure, installation is incredibly simple. The WLAN card is located at the back of the computer to the Middle - back where the hinges of the screen connect computer, centered between them. You just pop off the two wireless antennas (YES - this laptop, despite the expedition with AC only 1 x 1 wireless card options, IT has two antennas installed at the factory, so it can support fully a card 2 x 2), then remove the screw from the card in place. The map is displayed; bring him back (help little fingers - I have big hands and it was difficult because card is pressed against the back of the case) and pop out. Insert the new card, tap it down, screw and reattach the antennas, making sure that the wire connected to the 'hand' on the original card is connected to the 'hand' on the new map, and the wire of "to THE" relates to "to THE. On my computer, the black wire is the main antenna, the gray wire was the second antenna.
If you're like me, after installation, you can set reconnect the keyboard/mouse/finger print sensor and reboot the machine before screwing everything together to make sure it works. Just be careful if you do this. When you restart, wireless will not work. Run the installation programs for the drivers that you downloaded at the beginning of the year - I found install the dirver wireless, then bluetooth driver works better. After installation and reboot, everything should work fine, including bluetooth. I have had absolutely no problem with everything to work.
Now the fun part: performance. The map is hands down more quickly then the motherboard. 2 x 2 MIMO broadcast practically double your performance to download (assuming you have at least to AC1200 router that supports speeds of that card is). I use an ASUS AC1900 RT-AC68U, a great router is worth every penny. Speedtest.NET, my laptop on the wireless now easily continues with my internet service 60MBPS, going as fast as my wired connection (with the old card, he maxed out at around download 50MBPS; with the new card, it uses bandwidth full, closer to 70MBPS for us.) Download speeds were around 4, 5-5 Mbps, to be expected in view of our internet service.
File transfers are literally about twice as fast as prerequisites for the upgrade. I supported sustained more than 8 Mbps download speeds when there are about 40 feet from the router with 3 walls and other elements of the way. File transfer speeds are great, more 40MBPS transferring files to my NAS, compared to close to 20 with the original map (also from 40 feet with 3 walls and other obstacles).
Overall, the performance is much better that the original card, as expected, the installation is simple and quick, and everything works perfectly. I highly recommend this upgrade.
-
Question about the roadmap WebWorks and Cordova
Hi, in the WebWorks Raodmap [1] is the following statement:
In order to make the promise of HTML5 cross-platform development even more real, we will be leveraging the Apache Cordova open source project as the heart of the WebWorks SDK for BlackBerry 10. This will allow BlackBerry web developers to more seamlessly leverage a much wider array of tools and frameworks being built around the "center of gravity" for mobile web applications.
What exactly is? Cordova will replace the Webworks API?
[1] https://developer.blackberry.com/html5/downloads/roadmap/
"To make the promise of cross-platform HTML5 development even more real, we will be relying on the open source Apache Cordova project as the heart of the WebWorks SDK for BlackBerry 10. This will allow BlackBerry web developers to more easily exploit a range much more wide tools and frameworks under construction around the 'centre of gravity' for mobile web applications. »
We'll disect this declaration and I'll add what I can:
'we will be relying on the open source Apache Cordova project as the heart of the WebWorks SDK for BlackBerry 10' - this means you can think of the future of WebWorks BB10 as being "built" on top of Cordova. So our API and support for the creation of webviews etc. will be built above the standards defined in the project of Cordova.
"This will allow BlackBerry web developers to more easily exploit a range much more wide tools and frameworks under construction around the 'centre of gravity' for applications web mobile."-there are currently groups creation tools to work on top of Cordoba; Maybe your favorite editor has already Cordova or PhoneGap support. This will mean that you can use in your development BB10, without worrying about the specific tools BB only.
At the end of this process should in theory be easier to work with WebWorks.
-
Hello people,
EE Oracle 11 GR 2 w / space
So I have this geometry that I work on. I use it as an intersection of basic and I want to be able to compensate for pretty much any direction. Image (a screenshot of geoRaptor) is less to:

As you can see there are the nodes and links representing an intersection of a road typing. The arrows indicate the direction of flow and nodes (pink doughnuts) indicate the points on which to join the other links. These links are defined as the linestrings and knots as 2D points. It's pretty simple forward I think.
So I used offset_geom_segment, making the conversion required for LRS and return. It all works very well. Can I return a new geometry left or right course following the direction (according to the order of the points). So my question is this:
Am I missing something or is there a LRS or the plain SDO to select a point in the linestring and point geometry of the node, or a center of gravity to shift to a new full point and have the lats and long adjusted in a similar way, as does the offset_geom_segment? I understand the concept of projection from a point to an azimuth and inclination to establish a new reference point is simple. So I am being dense or you are looking for simply not enough deep? I can't seem to find one was to "spend" geometry and summits have updated by the call. I have to manually take each point, a new point of her project then adjust? You are looking for a simple way to do it.
FlyingGuy,
I don't know if I followed your condition exactly, but assuming that you are looking for a way to move a whole geometry, then it would be worth looking at SDO_UTIL. AFFINETRANSFORMS().
http://docs.Oracle.com/CD/E11882_01/AppDev.112/e11830/sdo_util.htm#SPATL1220
Its a complete pig to use, then I would say looking wrapper of Simon:
http://www.spatialdbadvisor.com/oracle_spatial_tips_tricks/296/affine-wrappers-for-sdo_utilaffine
John


Maybe you are looking for
-
After the upgrade to ios 10: -my battery really fast (4 pm even if I don't use it) -my contact id does not work at all (it won't even let me set up) These problems came after updating to ios 10, before the update, everything was ok. Can someone help
-
Update of Mobile Satellite L750-1NJ
Hi allI hope you do well. Start with, two years ago I bought a laptop the L750 1NJ, a model for the Greece (among others I guess), and did not have updates on the software. I sometimes receive notification messages on the Bulletin Board, but every ti
-
Satellite P300-156. Rubber feet?
Not a very technical question I know, but anyone know where I can get the small rubber feet on the underside of the laptop? I lost a Thank you.
-
This week I'm having a problem when I type in Outlook, MS Office and online. suddenly the cursor goes back or forward, and what I am hits landed in another ' placeiddle of ' or in the Mr like that. I worry about the cause. This morning, I ran a full
-
I have an error 80070057 Ox I can't receive or send a mail
I have lve mail attached to Hotmail.