How to change the precision of cursor digital display control program
I want to change the precision of digital display of cursor control my Labview 2013 program. I find no property this slider changes digital display format.
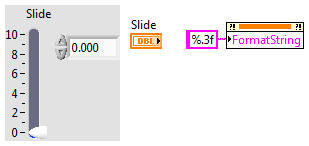
RT clk digital signage > create > property node >string format
you could also do the balance of the slide, if necessary...
in clk front panel properties: rt > goto display courrieronglet > goto drop-down list and choose 'digital display 0' and format
Tags: NI Software
Similar Questions
-
Can someone tell me please how to change the color of InDesignCS6 work/display space?
Workspace starts to really hurt my eyes a bright white. Can someone please, please tell me how to change the screen color and appearance
front I have no eyes to see the answers?
Thank you very much, SAH
I leave google out.
When you upgrade to CC, you can find it in Preferences > Interface.
-
How to change the frequency of images for an Actionscript program?
Hello
I read that the Timer() calls accuracy depend on the frame rate of the movie, they play in (which makes sense because they are Flash, after all!). I'm working on a project in pure ActionScript 3.0 and I wonder how I change the pace of this project, I don't mind to increase it to about 50 fps so the Timer() calls can be pretty accurate.
The base class, it is executable, currently in this project is an extension of the Sprite, but that could change if necessary.
Thanks in advance!
David
It is the Stage.frameRate property. You must Access the scene via a DisplayObject. There is also a compiler option: by default-frame-rate
-
A1 - 830 - how to change the life of Acer digital clock
A few questions... I would change the temperature on the Acer life widget display digital clock in degrees Fahrenheit. But I don't know how to do it. Can someone help me? I found the instructions for another model of Tablet online but my 830 A1 is not put in the same place.
In addition, anyone know if there is any app available that I could charge that would allow me to connect a webcam to the Tablet? I would use the Tablet occasionally as a backup for my car camera. I would like suggestions.
Thank you.

Sue
Hi, to change the temperature on Acer weather clock:
Press the 'time', a settings page, the first parameter is from F/C, after choosing your setting, press 'done' at the top right of the screen (just under the battery/time icon.
On an application to connect a cam, I can't help you.
Sorry
-
How to change the owner to synchronize with my desktop program bought palm z22
How can I sync my new palm that has an owner on her name. I want to synchronize with my desktop computer that has all my information. I can't seem to synchronize with the desktop version 4.2
The fastest way to remove the profile is to hard reset of the device: here is the link http://www.palm.com/cgi-bin/cso_kbURL.cgi?ID=887
Message edited by IrreducibleM31 on 05/28/2009 19:35 -
Animate dashboard. How to change the cursor of the animated symbol (no picture)?
Hi, could you tell me please how to change the cursor in internship at the animation symbol and label goto inside when click on and release.
For example, I want to create hammer striking the rock, my cursor should change when I'm on the stage and the hit, when I am pressing the button of the mouse and goto the first position when released.
Thanks for the help =)
Hello
This demo file can help you: can I use a symbol animated acting as a mouse cursor?
-
For Apple Watch, can someone please show me how to change the time on my watch when I travel to another country, like London or Singapore? Thank you.
Hello
When traveling to a different time zone, it is not necessary to manually change the time on Apple Watch.
After turning off the flight on each of your iPhone and Apple Watch, the time on your watch can be updated automatically to reflect the local time.
If it is not the case, try restarting your watch:
-To switch off your watch: press and hold the button side until you see the cursor off the power; slide it to turn off.
-To reactivate: press and hold the side button until you see the Apple logo.
-
How to change the tab order of an array of clusters?
How to change the tab order of an array of clusters? I have the cluster arranged into a table in the front panel. The element of the cluster passes horizontal and array element passes vertically. When I press the tab key, the cursor will move to the item next to the table instead of the next item in the cluster (down to the place overall).
so you have an array of clusters or cluster and the separate table?
-
How to change the text in the paint once I clicked outside of the text box?
How to change the text in the paint once I clicked outside of the text box?
How to change the text in the paint once I clicked outside of the text box?
====================================
I guess you could go to... Change / Cancel... then again...FWIW... the free Picasa software has tools to add text to photos.
Picasa
http://Picasa.Google.com/How to add text to your Photos using
Google Picasa 3
http://www.ehow.com/how_4599330_text-photos-using-Googles-Picasa.html John Inzer - MS - MVP - Digital Media Experience - Notice_This is not tech support_I'm volunteer - Solutions that work for me may not work for you - * proceed at your own risk *. -
How to change the format of a video that came off a cell phone. It was released the phone in 3GP format, it will play anything on my computer. It is a telecom xt
How to change the format of a video that came off a cell phone. It was released the phone in 3GP format, it will play anything on my computer. It is a telecom xt
=================================
Media Player Classic should read the .3gp files...Media PLayer Classic
http://download.CNET.com/Media-Player-Classic/3000-2139_4-10518778.htmlFor conversion... the following freeware can be helpful to try:
(FWIW... it's always a good idea to create a system)
Restore point before installing software or updates)Format Factory
http://www.pcfreetime.com/
(FWIW... you can uncheck
all the boxes on the last screen)After downloading and installing Format Factory...
Open the program and choose an output folder...
(this is where you will find your files when they are
converted)Drag and drop your video clips on the
main screen...Select "At?" / OK...
(the? is the format of your choice)Click on... Beginning... in the toolbar...
That should do it... John Inzer - MS - MVP - Digital Media Experience - Notice_This is not tech support_I'm volunteer - Solutions that work for me may not work for you - * proceed at your own risk *.
-
This is the 2nd time this same question, the 1st time that I was given an irrelevant answer which was not helpful at all. Please take the time to read and understand what I need to before you answer.
I just need to learn how to change the default PNG to JPG, so every time I save a screenshot using (only) the keyboard, it will already be showing JPG as the "Save as type". I am sure that it requires an edit registry so just point me in the right direction and guide me on how to do it, that's all I need.
To help you understand my dilemma, I take a lot of screenshots and Ctrl + V paste in Paint almost daily. Since my physical disability in my arms causing me pain and discomfort when I use the mouse, I avoid using the mouse I use the shortcuts as much as possible to help reduce the constant pain, I'm still in my right arm when using the mouse. I hope I have explained well enough details.
If it's in the wrong place, please move to a better place.
Thank you
Lee
I don't know of any registry value, but you can use the key sequence to "Save as jpg.
ALT
F
V
J
The F key may be pressed simultaneously with the ALT key or after him.
You can reduce the number of keys to just ALT plus a digital key by using the following, adapted from one method described HERE. Setup is much easier with a mouse, but can be done using the keyboard only. I showed you the controls and mouse shortcuts keyboard to add an icon "" Save as JPG"to the Quick Access toolbar.
Open Paint
Mouse Keyboard equivalent Click on the file Menu (upper-left) Press ALT + F to open the file Menu Hover mouse on ' Save as ' to open the list of file types Press V to view the list of file types Right click on JPG to open the context menu Use the TAB or down arrow key to select JPG and then press SHIFT + F10 to open the context menu Click "add to quick access toolbar. Press A to "add to the Quick Access toolbar. At this point, your installation is complete.
With open Paint, press the ALT key . This will display the keys associated with various actions. In my case, "" Save as JPG"icon that has been added to the Quick Access toolbar was the fifth icon (after save, undo, redo and print). So, to "Save as JPG," I would press ALT+5 (even once, you can press 5 either with or after you press the ALT key).
-
How to change the configuration of keyboard U.S. / UK?
Hello
I just bought a Lenovo G550 and very nice it is too. It is of course set up with a US keyboard and I'm in the United Kingdom. This means that on the keys of my @ is a "and the sign of my Sterling is a #." Yes I know that I can use the "make a @"
and I can't 0163 alt to create a symbol of the book, although it doesn't let me do in this post? Is there a way I can change the settings of the keyboard in the UK please.
When I type the cursor often also begins in another part of my document which means what I'm typing needs a constant correction. I thought at first it was just in the open office b
UT it does on th
is the forum see! It also does in my emails which is hotmail. Can someone help me please?
Moderator edit: matched subject to question.
I do not know if I understand, but you are looking for how to change the keyboard from US to UK in Windows? If this is the case, go into the control panel and the locale. There, you should be able to add any other keyboard layouts or remove them as well as set a default value. Under regional settings, there are other parameters that you can change if you are in the United Kingdom.
-gan
-
How to change the Spry CSS tab
I like to use these old screens provided with the former DW Spry tab. I just looked in DW CC and it looks like they aren't there and more. But anyway, I made one for my client. Now, they want to get one of the tabs on the far right of the margin. See the image below:

I don't know yet if it's possible to do and if someone has done this before, can you tell me what code I need to change in the CSS? I would have joined the CSS file, but it seems that you cannot attach files in this forum, so I've copied below.
Please offer any means to change the color of the tabs, etc. - I just need to know how - or at all - this tab can be moved to the right.
Thanks, Guy deaf
PS I'm sorry that the CSS code does not correctly appear in this forum. When I type this message, looks like it will display line-by-line, but it's not. I'm sorry.
---------------------------------------------
@charset "UTF-8"; /* SpryTabbedPanels.css - version 0.6 - Spry Pre-Release 1.6.1 */ /* Copyright (c) 2006. Adobe Systems Incorporated. All rights reserved. */ /* Horizontal Tabbed Panels * * The default style for a TabbedPanels widget places all tab buttons * (left aligned) above the content panel. */ /* This is the selector for the main TabbedPanels container. For our * default style, this container does not contribute anything visually, * but it is floated left to make sure that any floating or clearing done * with any of its child elements are contained completely within the * TabbedPanels container, to minimize any impact or undesireable * interaction with other floated elements on the page that may be used * for layout. * * If you want to constrain the width of the TabbedPanels widget, set a * width on the TabbedPanels container. By default, the TabbedPanels widget * expands horizontally to fill up available space. * * The name of the class ("TabbedPanels") used in this selector is not * necessary to make the widget function. You can use any class name you * want to style the TabbedPanels container. */ .TabbedPanels { overflow: hidden; margin: 0px; padding: 0px; clear: none; width: 100%; /* IE Hack to force proper layout when preceded by a paragraph. (hasLayout Bug)*/ } /* This is the selector for the TabGroup. The TabGroup container houses * all of the tab buttons for each tabbed panel in the widget. This container * does not contribute anything visually to the look of the widget for our * default style. * * The name of the class ("TabbedPanelsTabGroup") used in this selector is not * necessary to make the widget function. You can use any class name you * want to style the TabGroup container. */ .TabbedPanelsTabGroup { margin: 0px; padding: 0px; } /* This is the selector for the TabbedPanelsTab. This container houses * the title for the panel. This is also the tab "button" that the user clicks * on to activate the corresponding content panel so that it appears on top * of the other tabbed panels contained in the widget. * * For our default style, each tab is positioned relatively 1 pixel down from * where it wold normally render. This allows each tab to overlap the content * panel that renders below it. Each tab is rendered with a 1 pixel bottom * border that has a color that matches the top border of the current content * panel. This gives the appearance that the tab is being drawn behind the * content panel. * * The name of the class ("TabbedPanelsTab") used in this selector is not * necessary to make the widget function. You can use any class name you want * to style this tab container. */ .TabbedPanelsTab { position: relative; top: 1px; float: left; padding: 5px 20px; margin: 0px 1px 0px 0px; font: bold 12px sans-serif; background-color: #f1c185; list-style: none; border-left: solid 1px #CCC; border-bottom: solid 1px #999; border-top: solid 1px #999; border-right: solid 1px #999; border-radius: 5px 5px 0px 0px; -moz-user-select: none; -khtml-user-select: none; cursor: pointer; } /* This selector is an example of how to change the appearnce of a tab button * container as the mouse enters it. The class "TabbedPanelsTabHover" is * programatically added and removed from the tab element as the mouse enters * and exits the container. */ .TabbedPanelsTabHover { background-color: #ffd197; } /* This selector is an example of how to change the appearance of a tab button * container after the user has clicked on it to activate a content panel. * The class "TabbedPanelsTabSelected" is programatically added and removed * from the tab element as the user clicks on the tab button containers in * the widget. * * As mentioned above, for our default style, tab buttons are positioned * 1 pixel down from where it would normally render. When the tab button is * selected, we change its bottom border to match the background color of the * content panel so that it looks like the tab is part of the content panel. */ .TabbedPanelsTabSelected { background-color: #ffe9cd; border-bottom: 1px solid #EEE; } /* This selector is an example of how to make a link inside of a tab button * look like normal text. Users may want to use links inside of a tab button * so that when it gets focus, the text *inside* the tab button gets a focus * ring around it, instead of the focus ring around the entire tab. */ .TabbedPanelsTab a { color: black; text-decoration: none; } /* This is the selector for the ContentGroup. The ContentGroup container houses * all of the content panels for each tabbed panel in the widget. For our * default style, this container provides the background color and borders that * surround the content. * * The name of the class ("TabbedPanelsContentGroup") used in this selector is * not necessary to make the widget function. You can use any class name you * want to style the ContentGroup container. */ .TabbedPanelsContentGroup { clear: both; border-top: solid 1px #999; background-color: #FFF; } /* This is the selector for the Content panel. The Content panel holds the * content for a single tabbed panel. For our default style, this container * provides some padding, so that the content is not pushed up against the * widget borders. * * The name of the class ("TabbedPanelsContent") used in this selector is * not necessary to make the widget function. You can use any class name you * want to style the Content container. */ .TabbedPanelsContent { overflow: hidden; padding: 4px; } /* This selector is an example of how to change the appearnce of the currently * active container panel. The class "TabbedPanelsContentVisible" is * programatically added and removed from the content element as the panel * is activated/deactivated. */ .TabbedPanelsContentVisible { } /* Vertical Tabbed Panels * * The following rules override some of the default rules above so that the * TabbedPanels widget renders with its tab buttons along the left side of * the currently active content panel. * * With the rules defined below, the only change that will have to be made * to switch a horizontal tabbed panels widget to a vertical tabbed panels * widget, is to use the "VTabbedPanels" class on the top-level widget * container element, instead of "TabbedPanels". */ .VTabbedPanels { overflow: hidden; zoom: 1; } /* This selector floats the TabGroup so that the tab buttons it contains * render to the left of the active content panel. A border is drawn around * the group container to make it look like a list container. */ .VTabbedPanels .TabbedPanelsTabGroup { float: left; width: 10em; height: 20em; background-color: #EEE; position: relative; border-top: solid 1px #999; border-right: solid 1px #999; border-left: solid 1px #CCC; border-bottom: solid 1px #CCC; } /* This selector disables the float property that is placed on each tab button * by the default TabbedPanelsTab selector rule above. It also draws a bottom * border for the tab. The tab button will get its left and right border from * the TabGroup, and its top border from the TabGroup or tab button above it. */ .VTabbedPanels .TabbedPanelsTab { float: none; margin: 0px; border-top: none; border-left: none; border-right: none; } /* This selector disables the float property that is placed on each tab button * by the default TabbedPanelsTab selector rule above. It also draws a bottom * border for the tab. The tab button will get its left and right border from * the TabGroup, and its top border from the TabGroup or tab button above it. */ .VTabbedPanels .TabbedPanelsTabSelected { background-color: #EEE; border-bottom: solid 1px #999; } /* This selector floats the content panels for the widget so that they * render to the right of the tabbed buttons. */ .VTabbedPanels .TabbedPanelsContentGroup { clear: none; float: left; padding: 0px; width: 30em; height: 20em; } /* Styles for Printing */ @media print { .TabbedPanels { overflow: visible !important; } .TabbedPanelsContentGroup { display: block !important; overflow: visible !important; height: auto !important; } .TabbedPanelsContent { overflow: visible !important; display: block !important; clear:both !important; } .TabbedPanelsTab { overflow: visible !important; display: block !important; clear:both !important; } }!-[CodeBlockStart:dffe5525-a787-4a98-a87f-f24554b12141]-->@charset 'UTF-8'; / * SpryTabbedPanels.css - 0.6 - pre-release Spry 1.6.1 version * / / * Copyright (c) 2006] Adobe Systems Incorporated. All rights reserved. * / / * Horizontal tabbed panels * the default style for a TabbedPanels widget puts all the tab buttons * (stalled left) above the content panel. * / / * This is the selector for the main container of TabbedPanels. For our * style by default, this container does not contribute anything visually, * but it is floated to the left to ensure that all floating or compensation done * with any which of her children the elements lie entirely within the limits the * TabbedPanels container, in order to minimize any impact or unwanted * interaction with other floating elements on the page which may be used * for page layout. * If you want to limit the width of the widget TabbedPanels, define a * width of the container TabbedPanels. By default, the widget TabbedPanels * extends horizontally to fill the available space. * The name of the class ("TabbedPanels") used in this selector is not * necessary to make the widget service. You can use a class name, you * want to style the TabbedPanels container. */ . TabbedPanels {overflow: hidden;} margin: 0px; padding: 0px; Clear: none; Width: 100%; / * Hack IE to force the layout correct when preceded by a paragraph. (hasLayout bug) * /} / * this is the selector for the TabGroup. The container of TabGroup houses * all buttons on the tab for each tabs in the widget panel. This container * does not contribute to what both visually in the appearance of the widget for our * default style. * The name of the class ("TabbedPanelsTabGroup") used in this selector is not * necessary to make the widget service. You can use a class name, you * want to style the TabGroup container. */ . TabbedPanelsTabGroup {margin: 0px;} padding: 0px; } / * This is the selector for the TabbedPanelsTab. This container houses * the title of the Panel. It is also tab 'button' that the user clicks on * to activate the corresponding content panel so that it appears on top * of the other tabs in the widget panels. * For our style by default, each tab is positioned relatively 1 pixel down from * where it would normally. This allows each tab overlap content * panel that renders underneath. Each tab is rendered with a background of 1 pixel * border which has a color that corresponds to the upper edge of the current content * panel. This gives the appearance that the tab is drawn behind the * content panel. * The name of the class ("TabbedPanelsTab") used in this selector is not * necessary to make the widget service. You can use any class name you want * to style the tab container. */ . TabbedPanelsTab {position: relative;} Top: 1px; float: left; padding: 5px 20px; margin: 0px 1px 0px 0px; Police: bold 12px without serif. background-color: #f1c185; list-style: none; border-left: 1px solid #CCC; border-bottom: 1px solid #999; border-top: 1px solid #999; border-right: 1px solid #999; border-radius: 5px 0px 5px 0px; -moz-user-select: none; -khtml-user-select: none; cursor: pointer; } / * This selector is an example how to change the appearance of a button in the tab * container as the mouse enters in the it. The class is "TabbedPanelsTabHover" * programatically add and remove the element tab as the mouse between in * in and out of the container. */ . TabbedPanelsTabHover {background-color: #ffd197 ;} / * this selector is an example how to do to change the appearance of a button in the tab * container after the user has clicked on it to activate a content panel.} * The 'TabbedPanelsTabSelected' class is programmatically added and removed * the tab element as long as the user clicks button tab containers in * the widget. * As mentioned above, for our style by default, the tab buttons are positioned * 1 pixel down where he would normally. What is the tab key * selected, we change its bottom border to match the background color of the * content panel so that it looks like the tab is the content panel. */ . TabbedPanelsTabSelected {background-color: #ffe9cd;} border-bottom: 1px solid #EEE; } / * This selector is an example of how to make a link inside a tab button * look like normal text. Users may want to use the links within a tab button * so that when it gets the focus, the text * inside * the tab button gets a focus * ring around it, instead of the ring around the whole tab. * /. TabbedPanelsTab a {color: black;} text-decoration: none; } / * This is the selector for the ContentGroup. The ContentGroup container houses * all panels of content for each tabs in the widget panel. For our * style by default, this container provides the background color and borders that * surround content. * The name of the class ("TabbedPanelsContentGroup") used in this selector is * not necessary to make the widget function. You can use a class name, you * want to style the ContentGroup container. */ . TabbedPanelsContentGroup {clear: both;} border-top: 1px solid #999; background-color: #FFF; } / * This is the selector for the content panel. The content panel contains the * content for a single panel tabs. For our default style, this container * provides some padding, so that content is not pushed upward against the * widget borders. * The name of the class ("TabbedPanelsContent") used in this selector is * not necessary to make the widget function. You can use a class name, you * want to style the content container. */ . TabbedPanelsContent {overflow: hidden;} padding: 4px; } / * This selector is an example of how to change the appearance of the currently * active panel container. The class is "TabbedPanelsContentVisible" * programatically added and removed from the content as the Panel item * is enabled/disabled. */ . TabbedPanelsContentVisible {} / * vertical tabbed panels * following rules override some of the default rules above so that the * TabbedPanels widget is rendered with its buttons on the tab on the left of * the active content panel. * With the rules defined below, the only change that will be made * to move a widget panels to horizontal tabs to vertical tabbed panels * widget, is to use the 'VTabbedPanels' class on the top-level widget * element container, instead of "TabbedPanels. */ . VTabbedPanels {overflow: hidden;} Zoom: 1; } / * This selector floats the TabGroup so that the tab buttons it contains * make left of active content panel. A border is drawn around * the group container to make it look like a container from the list. */ . VTabbedPanels. TabbedPanelsTabGroup {float: left;} Width: 10em; height: 20em; background-color: #EEE; position: relative; border-top: 1px solid #999; border-right: 1px solid #999; border-left: 1px solid #CCC; border-bottom: 1px solid #CCC; } / * This selector disables the float property that is placed on each button of the tab * by the rule above TabbedPanelsTab default selector. He also draws a background * border for the tab. The tab button will get his left and right border of * the TabGroup and its superior border of the tab above it or button TabGroup. */ . VTabbedPanels. TabbedPanelsTab {float: none;} margin: 0px; border-top: none; border-left: none; border-right: none; } / * This selector disables the float property that is placed on each button of the tab * by the rule above TabbedPanelsTab default selector. He also draws a background * border for the tab. The tab button will get his left and right border of * the TabGroup and its superior border of the tab above it or button TabGroup. */ . VTabbedPanels. TabbedPanelsTabSelected {background-color: #EEE;} border-bottom: 1px solid #999; } / * This selector fleet contained signs of the widget while they * make it to the right of the tabs buttons. */ . VTabbedPanels. TabbedPanelsContentGroup {clear: none;} float: left; padding: 0px; Width: 30em; height: 20em; } / * Printing styles * / @media print {.} TabbedPanels {overflow: visible! important;}. TabbedPanelsContentGroup {display: block! important;} overflow: visible! important; height: auto! important; } . TabbedPanelsContent {overflow: visible! important;} display: block! important; clear: both! important; } . TabbedPanelsTab {overflow: visible! important;} display: block! important; clear: both! important; } }
Add the class like below:
- Open Ocean
-
How to change the date of transition to the jpuery.nivo.slider.pack.js (Dreamweaver template)
I have a slide show, and the time is 2 seconds. I wish I had a slide or fade right from one slide to another. How do I do that? I am able to change the pause time, but may not know how to change the transition. Here is the part of the code:
- a.fn.nivoSlider.defaults = {effect: 'fade', animSpeed:50, pauseTime:2e3, startSlide:0, directionNav:true, directionNavHide:true, controlNav:true, is controlNavThumbs:fal, controlNavThumbsFromRel:false, controlNavThumbsSearch: ".jpg", controlNavThumbsReplace: "_t humb.jpg", keyboardNav:true, pauseOnHover:true, manualAdvance:false, captionOpacity:.8, prevTex t:"Prev",nextText:"Next",randomStart:false,beforeChange:function() {}, event: function () {}, {slideshowEnd:function(){},lastSlide:function(){},afterLoad:function()}} "}
I can change the pause time (value 2 seconds now), but I tried to change the animSpeed for: 1 and: 100, but no change. I tried to change the effect: "default", "fade", and
"sliceDownRight" and others in the code below, which is beyond the performed: 'fade' code I'm working with.
if(d.Effect=="Random") {var i = new Array ("sliceDownRight", "sliceDownLeft", "sliceUpRight", "sliceUpLeft", "sliceUpDown", "sliceUp DownLeft", "fold", "fade", "boxRandom", "boxRain", "boxRainReverse", "boxRainGrow", "boxRainGrowR everse") }
Can anyone help?
Thank you
Most widgets have a constructor that allows you to apply changes to the functioning of the widget.
Here is the constructor for the Nivo Slider settings
$('#slider').nivoSlider ({}
effect: 'random', / / Specify defines as: "bend, bland, sliceDown.
slices: 15, / / for the animations of the slice
boxCols: 8, / / for the animations of the box
boxRows: 4, / / for the animations of the box
animSpeed: 500, / / speed of slide transition
pauseTime: 3000, / / how long each slide will show
startSlide: 0, / / Set from slides (index 0)
directionNav: true, / / next & previous navigation
controlNav: true, / / 1,2,3... Navigation
controlNavThumbs: false, / / use tiles for a control Nav
pauseOnHover: true, / / Stop animation while hovering
manualAdvance: false, / / hand strength of transitions
prevText: 'Prev', / / Prev directionNav text
nextText: 'Next', / / Next directionNav text
randomStart: false, / / Start on a slide at random
Beforechange: function() {}, / / triggers before a transition between slides
Event: function() {}, / / triggers a transition between slides
slideshowEnd: function() {}, / / triggers after all slides should have been disclosed
lastSlide: function() {}, / / when the last slide is indicated
postcharge: function() {} / / triggers when the cursor is loaded
});
The effect parameter can be one of the following:
sliceDownsliceDownLeftsliceUpsliceUpLeftsliceUpDownsliceUpDownLeftfoldfaderandomslideInRightslideInLeftboxRandomboxRainboxRainReverseboxRainGrowboxRainGrowReverse
-
How to change the font, color line, column and Grand Total labels in PivotTable
Hello Guru
Can you get it some one please let me know how to change the look and feel of the reports in Pivot table using css files. I want to have the dimension and the measure to be of different color columns and grand total different color. I want to achieve for all pivot table reports instead of manually change each report so I want to do in css files.under s_SRIKI\b_mozilla_4\views.css I've seen a lot of options but nothing has worked. So can you please exactly tell what class we need to change to make changes. Thank you!!!
Thank you
SR
For values
. OORT {}
text-align: right;
vertical-align: top;
color: Red;
}
For the product if you got hyper link
Code OOB is
. PTL {}
color: #039;
text-decoration: none;
cursor: pointer;
}
If brand aid

Delete the following in your css spry as file its in the ' query print media "and has no effect on the screen - have added you it to the wrong place."
{.alignRight}
position: relative;
Top: 1px;
float: right! important;
padding: 5px 20px;
margin: 0px 1px 0px 0px;
Police: bold 12px without serif.
background-color: #f1c185;
list-style: none;
border-left: 1px solid #CCC;
border-bottom: 1px solid #999;
border-top: 1px solid #999;
border-right: 1px solid #999;
border-radius: 5px 0px 5px 0px;
-moz-user-select: none;
-khtml-user-select: none;
cursor: pointer;
}
Add the below css just above the press query written:
{.alignRight}
float: right! important;
}
/ * Print styles * /.
@media print {}
Maybe you are looking for
-
I'm hoping for a solution to what has slowly turned into a nightmare, laptop came originally with Windows 7, upgrade to Win 10 online using an account of outlook.com as audit log. After a stay of 6 weeks, I inadvertently entered the password wrong ou
-
Compaq Presario SR5130NX: Cannot start Windows Vista after failure - HELP!
Hello! My building has undergone a complete failure so 4 days ago I used it. Power resumed 3 hours later, but I was not able to log on since. Normally, I turn on my PC, and about 30 seconds later, a window pops up asking you my password. After enteri
-
Laser mouse wireless connection PX1215E-1NAC
I bought one of the devices for a customer. Unfortunately, the documentation does not match the hardware. The bonding in the manual procedure is by pressing the selection button channel on the Receiver USB dongle and then pressing the mouse buttons.
-
Do I need an anti virus program?
I have a Macbook Air 13 ". I do not currently have an anti virus program and I was wondering if there is a program that apple sells or would recommend to use on Mac? I heard that anti virus programs are not required on macs, but I'm looking for clari
-
my wireless router appears to be defective
my century link internet service is not stay, even if I unplugged the modem for 15 minutes and much more. the lights indicate the wifi works, but I can't remember the internet service. I'm not technological, so I need a simple language. Thank you.