iMovie cut imported minidv is 520
I imported video from sony MiniDV trv38 using 4 pin firewire adapter for 9 pin apple macbook air el capitan running. I share under the theater, I think, and the info says it's 520 p. drunk, I think it should be 720 p because this is the resolution of my MiniDV. then when I it airlifts to my iPhone 5 and tried to have the iPhone says that he could not play because it was a format is. What I am doing wrong?
DV files are standard definition 720 X 480 in size.
An iPhone can not read a .dv file and you must export it to QuickTime formats.
Tags: iLife
Similar Questions
-
iMovie cut up and down video Quicktime
I use Quicktime for recording of the screen an opening statement. I add music to it later.
When I finish recording I imported into iMovie. In iMovie, I see that the top and bottom of the video is cut. Is it possible to adjust the format of a quicktime video in iMovie?
Thank you!
Looks like you have a problem of proportions. iMovie displays only in 16 x 9. Don't know what aspect of film Keynote is. What I would try is your clip in the timeline and in the tool bar, click the crop and select adjust. To display the whole clip if you have black bars.
-
How iMovie organizing imported video clips
I just imported quite a few video clips (c. 400) to a folder in my office in iMovie. Most of the clips are pretty short - maybe less than a minute.
I went in the screen of media project and began to watch the clips. I noticed that it doesn't seem to be any rhyme or reason to the way they are arranged.
Can someone tell me if iMovie organize or sort the clips imported somehow? Thank you.
You can sort the imported clips you want in iMovie 10.1.2. Use the "View menu > sort clips by. command.

-
I'm trying to import into FCPX. the keys O and I does not define points and exit. I am also unable to drag the yellow contour cutting.
Note - could be related or not - my window import missing buttons to select a list or icon view.
Weird stuff.
(PS - of course I use legit software downloaded from the Apple App store)
Suppose you import a video clip that is on your Mac. To import playlists of clips, you need to import from a camera or the copy of the map. Nor will see you the choice of list view or a clip.
Russ
-
can I import files from an SD card mts in Imovie
Hello
I'm looking for a good application, easy and cheap for my mac.
To edit video files and create a mp4 file.
I get cards sd with the MTS files and you want an application that can import directly.
I can't find any information if the latest version of Imovie supports importing MTS files from an SD card.
Someone on this forum can help me?
Or do you know a good alternative for Imovie import STDs, edit video, use the features of simple enchancing and export to mp4.
We hope to get a response.
Conrad
The Netherlands
.mts files are produced by recording AVCHD cameras. It is generally recommended to import from a full set of AVCHD (camera, SD card or copy of SD card) but the latest version of iMovie also allows drag-and - drop files individual .mts directly into iMovie or the project timeline event.
Geoff.
-
How can I prevent imovie 10 to delete clips from my camera when importing?
I just noticed that when I import my video into iMovie 10 clips get deleted from my camera. I don't want to do. How do you prevent iMovie to do this?
I can't find anywhere preferences.
Look in the iMovie > file > import media... window. Your imported clips may be hidden in iMovie rather than actually removed from your device:

Uncheck the box if necessary. If the files reappear to iMovie clips from your camera, your camera should be OK.
Post edited by: Jim EZ
-
I have an old version of iMovie - ' 09, version 8.0.6. (821), who nonetheless worked for several projects.
I am now wanting to just download a short clip - long less than 1.30 min - to give subtitles. Can't seem to be able to import it. I click file, import, import film, I select the clip from my computer, and then the window that opens the so-called optimizing the clip closes everything too fast and nothing happens. I can't also drag and drop.
I tried .mov and .mp4 (it does not even recognize importable mp4, so with the foregoing .mov arrives). I also tried to import different clips, in which case this file has been corrupted. No luck.
I appreciate all help. Thank you.
The fact that the video file is a .mov or .mp4 does not guarantee that iMovie can import because MOV and MP4 are containers that can hold movies in various different codecs, some including iMovie can't handle (although I have not found a comprehensive list of supported formats). Open in the brake hand and if it isn't already trying to convert to a format using video in the H.264 format. Also, be sure that it is fixed frequency.
Geoff.
-
Photos will import video from cameras, run them and even to give options to cut them. I find it more convenient to have my video clips and photos of events together in this way.
Is there really an advantage to use iMovie, unless you want to process or combine clips?
There are some changes that the Photos can't do, for example stabilize shaky videos.
I import my photos, video clips and if I need to stabilize or changes of edge, I opened the clips in iMovie, and import them back to Photos.
iMovie displays your library of Photos of system in the media section and open it right from there in iMovie,
I would add the animated maps and iMovie titles or the green to two clips screen screen, if I want to create a slide show.
Your photo library will appear in the 'My media' tab in iMovie 10.1.2:

-
iMovie is important and manages 4K, 100M, 30 p video from my Panasonic FZ1000 camera, but I don't get the option to select the elagueur or precision in the menu editor drop-down (they appear grayed out,) and I can't cut my files. IMovie is compatible with 4K or my camera? Is there another way to cut my files?
I don't know why that should be (unless you try to cut in the event of component). Can also do not cut you by selecting a clip in the timeline panel, and then dragging the edges?
Geoff.
-
There seems to be no have three methods for recording video on the computer.
1. connect the camcorder and navigate to the folder that contains the video and copy it and paste it into the computer. The problem is, the video is cut into short segments and they don't come together flawlessly when they are imported into Movie Maker.
2. remove the SD card in the camera and plug it into the computer. The same problem.
3. use the software supplied with the camcorder to import the video. In this case it is not chop her upward. However, it only allows me to export the video with an extension of file owner. There is no way for me to turn it into a MP4 or anything that can play any other software. Also, it compresses the file and reduces the quality of it. This is totally unacceptable.
What I want is to be able to take a video, upload them to my computer, edit and share. I want to edit video professionally. I will not be limited to the supplied software editing features. I want windows to be able to play. I also want my mac to play because I use imovie. The seller told me that this computer is compatible with mac. I just roll with it and spend hours to convert the types of files to get more files on my Mac, but this isn't an option. There is no way to do little matter how long I am willing to spend.
Am I missing something?
SOLUTION:
Here is a review for the future reader:
Problem 1: Video files download from the camcorder or a SD card to the Windows computer as to cut off shorts.
Problem 2: Mac is not 'see' the camcorder.
Solution:
STEP 1: transfer the whole BDMV to the camcorder or SD card on an external drive through the Windows computer.
STEP 2: Import through the software edition that you want to use. (In this case, iMovie) I did point iMovie to import from the external drive and it imported all it detected as a movie. It's good to anticipate, because it took a long time and it has imported more movies than what I'm trying to change. But it works!
I'm sorry for the confusion. I imported AVCHD files directly into iMovie 10.1 without converting them to another format first. I mentioned VideoStudio X 8 as a Windows program that allows you to edit directly without having to convert the video first.
If you want to edit with iMovie, and you have version 10.1, then you should not need to convert AVCHD files to another format before editing it. I understand not wanting to spend money while you should be able to manipulate the files. I have a MacBook Pro (late 2011) and used iMovie to import the AVCHD file.
A difference I saw between the Mac and the PC, is that the PC shows the files when you import clips separate way with the. Extension of the MTS and the Mac, importing into iMovie, displayed as a single file AVCHD clips.
When I copied the files to the SD card on the Mac, I copied the entire BDMV folder and then imported the clips in the stream folder.
Just out of curiosity, what version of OS X are you using?
-
Hi there - anyone know how to use live photos (ios 9.3.4) in imovie (10.1.2). I really want to use short extracts in a film that I'm doing rather than just a still or ken burns effect.
Thank you
Hi davidj123,
It is very easy to import your videos and photos into iMovie! Please, check this link for the import of the steps. iMovie (2013): import of iPad, iPhone or iPod touch If you experience any problems during the import of some files, you can use this link to untangle.
iMovie 11: a few video clips can import into iMovie using the camera import window
You can also start the project directly from your iOS device and then import it into your Mac! iMovie for Mac: import a project from iMovie for iOS
These tips should have to you using your Webcam Live pictures taken on your iOS device into your iMovie in no time projects. Please use the Apple support communities to report your problem/question.
Have a great day.
-
iMovie 10.1.2 new film and new gray trailer
used iMovie to import the media yesterday. When work on this tonight. New movie and new trailer are grayed out. Quit/relaunch and restarted. no effect.
What is going on?
They are grey in 10.1.2. To create a new movie, open the projects window and click on the white square at the top left that says: "make movie".
-
New videos appears in the Photos, but not in iMovie
Already when I imported video clips in iPhotos, the clips were made automatically available in iMovie so. Now, when I import video clips in Photos, it is made available in Photos but not in iMovie. Old clips still appear in iMovie, but not the new clips. It is not possible to import new clips with iMovie import function as iMovie cannot locate the file. Photo library only appears as a file in the Finder, and it cannot be opened with any program other than pictures.
How can I get the clips in iMovie?
OS X El Capitan 10.11.1 (B 15, 42)
Version 1.2 (340.4.0) of the Photos
iMovie 10.0.9
Hi a random string,.
The workflow I've always used is to create a folder for the videos and photos that I use in my video project and export (or drag) according to Photos or Aperture or iPhoto library in the folder. Then use the Finder application to import the files into iMovie.
The following resources explain why you can't see the Photos in the media browser:
If the media browser shows all your photo library
https://support.Apple.com/en-us/HT204669Sometimes the media browser, which allows applications like iMovie or Pages use images, pictures, shows all the available photos to your photo library.
This happens when you use iCloud photo library with the preference to optimize Mac storage enabled.
The media browser shows pictures that have the original image or a full preview size stored on your Mac. You can make a photo available temporarily for the media browser by double-clicking on it. This will download the original to your Mac, where it will be available in the media browser so that Photos optimizes still to save disk space.
If you want to take pictures in permanently available Photos in the media browser, follow these steps:
- Select file > New Album... from the menu bar of Photos. Name the new album.
- Click on the photos you want to make available in the media browser.
- Click the Add button.
- Click on the Albums tab at the top of Photos and find the new album you created.
- CTRL-click (or right-click) the album, then select Download this Mac originals.
This will download the full resolution of the images you have selected for your Mac, which makes them available at all times in the media browser.
Note: You can do all the photos in your photo library available at all times for the media browser allowing to download the originals of the Mac in the preferences of Photos, but you will lose the benefits of clutter in preference to optimize Mac storage.
Last modified: June 1, 2015
Take a look at this section of the iMovie User Guide:
Import on your Mac media
http://help.Apple.com/iMovie/Mac/10.0/#mov6fa10197dSometimes the media browser, which allows applications like iMovie or Pages use images, pictures, shows all the available photos to your photo library.
This happens when you use iCloud photo library with the preference to optimize Mac storage enabled.
The media browser shows pictures that have the original image or a full preview size stored on your Mac. You can make a photo available temporarily for the media browser by double-clicking on it. This will download the original to your Mac, where it will be available in the media browser so that Photos optimizes still to save disk space.
If you want to take pictures in permanently available Photos in the media browser, follow these steps:
- Select file > New Album... from the menu bar of Photos. Name the new album.
- Click on the photos you want to make available in the media browser.
- Click the Add button.
- Click on the Albums tab at the top of Photos and find the new album you created.
- CTRL-click (or right-click) the album, then select Download this Mac originals.
This will download the full resolution of the images you have selected for your Mac, which makes them available at all times in the media browser.
Note: You can do all the photos in your photo library available at all times for the media browser allowing to download the originals of the Mac in the preferences of Photos, but you will lose the benefits of clutter in preference to optimize Mac storage.
Last modified: June 1, 2015
Import media by dragging it from the Finder
Select a file, command-click to select several files, or select a folder of files and do drag the selection from the Finder to the event in the list of libraries in iMovie.
The clips appear in the event.
Import using the import window media
If the media you want to import is on an external hard drive, connect it to your Mac and turn it on.
Click Import on the toolbar.

In the devices section of the sidebar of the import window, select the drive or device you want to import media.
The contents of the drive or device is displayed in a list at the bottom of the import window. You can individually select the clipsin the list view, and a preview of the selected item appears at the top of the import window.
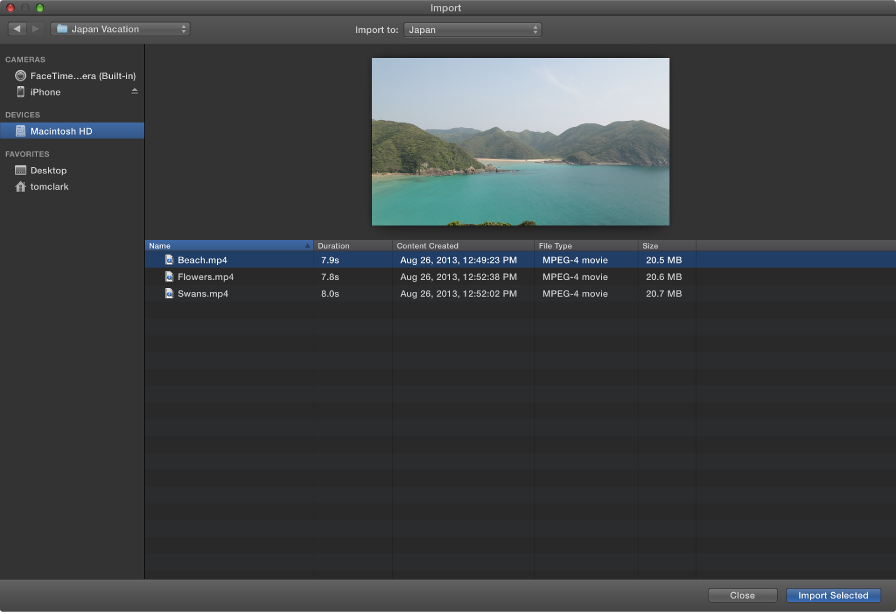
You can perform the following actions:
To sort videos in the view of list data such as time, creation date, size and so on: click on the column at the top of the display of the list headers.
To add a folder of press frequently used in the Favorites folder: drag a folder from the list on the right of the 'Favorites' header in the sidebar.
To remove a folder from the favorite section: Ctrl-click on the folder and select Remove from the context menu in the sidebar.
To quickly navigate between the clips, fast forward or rewind, move the pointer over the preview at the top of the import window, and do one of the following:

To play or pause the selected clip: click on the Play button (or press the space bar).
To access the next or previous item: click the next or previous button.
Note: If you are at or near the end of the selected item, you can click the back button to return at the beginning of the clip.
For fast forward: move the pointer over the following button and hold down the mouse or trackpad button.
To move backward: move the pointer on the back button and hold down the mouse or trackpad button.
Do one of the following:
Choose an existing event to import clips in: select the event in the context menu "import to" at the top of the import window.

To create a new event to import clips in: choose new event from the context menu "import to", type a name for the new event and click OK.
To learn more about the events, see organize the library.
Do one of the following:
To import all plans: click all import.
To import only some of the clips: command-click on each clip that you want to import, then click Import selected (the button import changes its name).
Close the import window, and your clips appear in the event. According to the length of each element and the number of clips that you import, you can see a progress indicator in the upper right of the window, while the clips are imported.

You can continue working in iMovie, then import finishes.
-
I'm looking for the best way to import pictures to my Mac. I currently use iMovie to import my images, because I come from the end of 'consumers users', but I'm looking for more professional way.
All of my cameras use SD cards and put all the images in a folder/quicktime file called "PRIVATE". It's all my research, AVCHD. When you import into iMovie, it seems what I push in 60 fps down to 29.97, that's why I was looking for another way. -Another question is also, when I import iMovie, which makes the 'Mac' images only until his change, that sucks. I need a good way to import images in case I ever need to use a Windows machine. iMovie puts the icon (AIC) on the files.
One of the cameras with which the footage was shot was a JVC GZ-HM35BUSD. (Some cheap Wal-Mart camcorder), but the other (same AVCHD Formate) images were shot using a really expensive sony camcorder. ($600). (Not sure of the name)
Thank you
David
I have directly from AVCHD editing all the time and it works fine for me on several systems, including an older macbook pro. I suggest avoiding if possible the transcoding. It takes a lot of time and if you don't do this right, you could surcompresse and a generational loss.
I would not go and delete unused items after I'm done editing, just to save space. Also, if it's projects, I don't care, I sometimes export final movie into something easily playable outside the Organization (like mov or mp4) and then delete all the media source. This is NOT recommended if you work in a professional manner. In this case, you must check in all. But for prosumers, there may be a lot of projects where you just want to put together a quick edit and then export it as a final movie for viewing online or elsewhere. In this case, you cannot hold on to all your layer to always source footage.
It really varies by user, but like I said, if you work professionally, or aspiring to, you'll need a way to archive and back up these archives. If you work from the band, then comes the labelling and store the tapes are an acceptable backup for the media associated with a certain project (of course, you will still need to save and save the project itself). But if you work from tapeless formats, then you will need several hard drives with lots of space, archive and everything back up. The good news is that hard drives get less expensive, bigger and stronger all the time. I had two lacie 1 TB hd for a few years now with zero problems (before there 2 lacie 500 GB for many years, also with 0 problems). But I'm still parnaoid that #1 will go while #2 is still in the Act of saving. Or they'll both go at the same time. Ouch.
-
I first items 10 and wanted to know if I can import miniDV tapes into the program without firewire, because my computer does not have in this regard. If not, is there a work around, my computer only has USB
Thank you
You can get a good IEEE-1394 card has FW for about US $10. They are easy to install and set up.
If we get an expansion with several connections card, I'd get one with a chip controller separated for each connection, even if the price increases slightly.
In addition, when entering through FW, it is preferable to NOT having anything to another FW on this controller chip and do NOT chain devices.
Good luck
Hunt


Happy holidays!
Maybe you are looking for
-
Downloaded latest version yesterday but start page says that I need to upgrade to a newer version.
When I start firefox an orange warning sign appears in the Google search box. The warning by the caution symbol indicates "Your'e not on the latest version of Firefox update today () to get the best of the web! «The web of the symbol (green circle) o
-
What price to change a battery in a macbook pro 15 retina in an apple store?
What price to change a battery in a macbook pro 15 retina in an apple store?
-
A few questions about Satellite P200 - 1FC
Hello I am planning to buy Satellite P200 - 1FC but I want to know:-What is the hard drive speed (RPM), is 4200 or 5400?-What is the capacity of the battery 6 cells, 9 cells and how many mAH?Does anyone have this laptop battery and haw do under norma
-
I HAVE A 64 I5 AND MY COMPUTER ME SAID NOT ACCEPTING MY ROUTER! WHY
I WOULD HANG MY SECURLEY TO SET PRINTER AND THE COMPUTER WIRELESS
-
Random disconnects Internet, Sony VAIO, Vista Home Premium 64-bit
I'm on a desktop VAIO with Windows Vista Home Premium 64 - bit, connection to the internet through a linksys wireless router. Although all of the other computers in my house connects perfectly (two macbooks, an Asus laptop, an xbox 360, a desktop Del