Programmatically create a free label on the front
To make the appearance of my nicer VI, I add a few free labels for a tab on the front panel control.
Then edit the free text in the tab control and by placing a free text on the block schema works very well with the attached VI. (Note: put the two in the same folder)
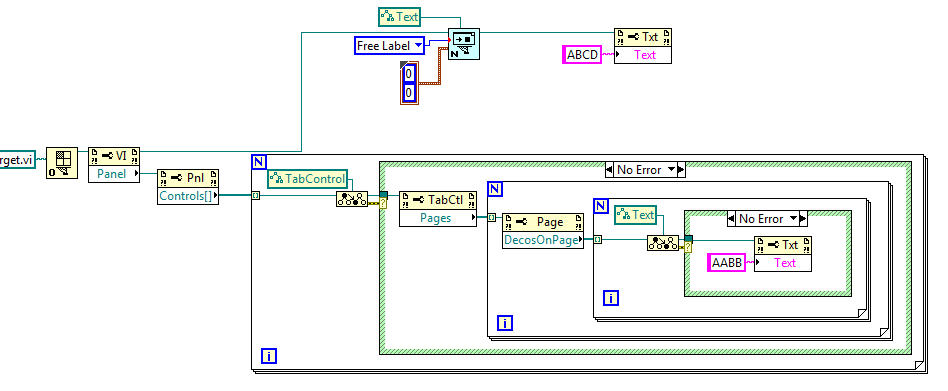
However if I am trying to add a label free control tab with Labview, the following code generates error 1060 "LabVIEW: object cannot contain (clean) specified object.»
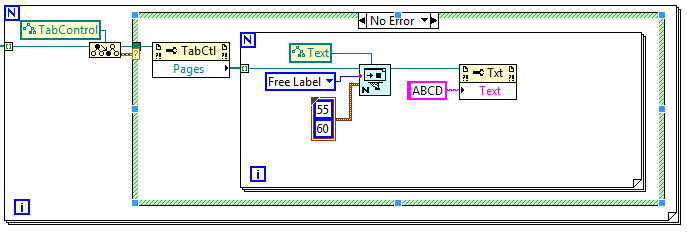
So now I'm wondering what I need to to to add text to the front with the help of scripts of VI.
Hope you can help.
@Yamaeda
On your 2nd thought: I do not think I need to add the label to the table decorations or is it possible, given that the setting is "read only".
@tst
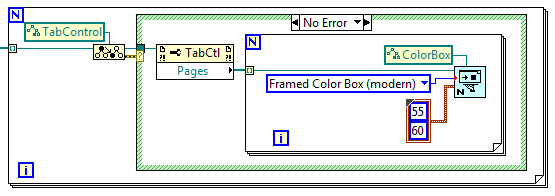
You got the indirect answer. First of all, I created the example below to check if I could create a color of the tab box
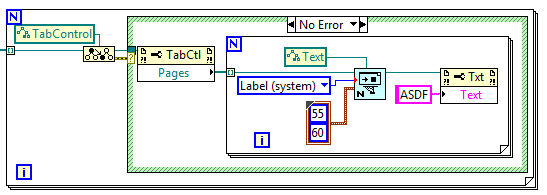
2nd I started browsing trough style options to see if I could find something that would allow me to bring another form of decoration. And by chance I found the style of "Label (System)" (ID = 21961). So the following code generates a nice label on the tab and solved my problem.
Tags: NI Software
Similar Questions
-
Can I programmatically change the default property to create for all elements of the front panel?
Can I programmatically change the default property to create for all elements of the front panel?
I need to make the logout button, when click on, takes care of all the default values of my fron Panel.
There is no way to programmatically call the functionality of an editor 'Use default' or 'Load Default'. To do it yourself, you will need to write your default values for each control explicitly in the diagram, when the user press the logout button.
-
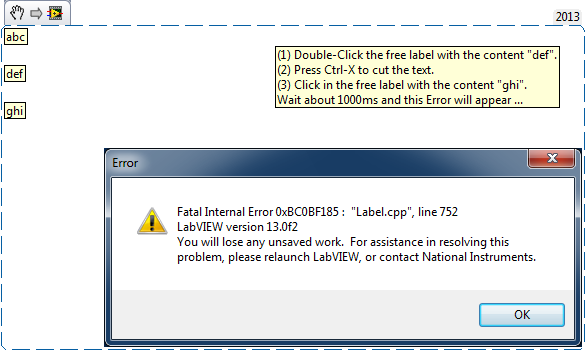
LabVIEW 13.0f2 crashes when text cut of some free labels on the block diagram
While reviewing the documentation of a VI, I faced a LabVIEW crash. I can reproduce it in LabVIEW 13.0f2 with the following code. Can anyone confirm that the content 'def' Cup free label and trying to stick to the free label with "ghi" produce error 0xBC0BF185?
I can't reproduce this problem by any other cut and paste between the free labels on the left side of the BD. The accident occurred only when 'def' cutting and trying to stick to the "ghi".
Hi all
I looked into this, and it is more general than just the madness in the label. I dropped the CAR 442743 for this behavior. It's an accident that can occur when cut and paste text between the free labels in 2013 of LabVIEW with the disabled automatic tool. This is related to the CAR 408955 (deadlock occurs when deleting a comment with the automatic tool off) that has been corrected in the Patch of f1 2013 LabVIEW. This case was not covered by that fix and will be fixed in a later version.
Thank you
Jeff Peacock
Product Support Engineer | LabVIEW R & D | National Instruments
-
How can I activate on labels in the block diagram, but not on the front panel?
This question may have been asked before, but searching the Forum did not.
In LabVIEW 2010, I have 16 indicators of chain on the front panel. I can't have the label for each Visible on the front panel, so I turned it off. But in the block diagram, I need distinguqish one of the other, so I need to make the label (name) visible.
In the block diagram, if I select indicators Sting all together and go to properties and make the label visible, it makes visible labels on the front but not visible in the block diagram. What good is that?
How the help of labels (name) of the indicators String visible in the block diagram, but not visible on the front?
dbaechtel wrote:
This question may have been asked before, but searching the Forum did not.
Don't remember already asked this question and get help in this thread?
Have you tried the things I said in that thread? How did they not work?
Right-click on the terminal of BD and make visible > labels.
It probably will be the FP control show its label as well. Then go to the FP control, right-click and go to Visible > labels and uncheck the box.
The terminal of the comics will have a label, and control of the FP will not.
-
Creation of a 'smart' to the front channel output
Hi all
I do not use that much of strings and I got myself in a coding which seems to be a bit beyond my skills at the moment.
Let me explain. At this moment I have a table 1 d of channels. Each string refers to an error with a sensor. If there is no error, the string is simply an empty space (the strings were generated in MATLAB and imported in LabVIEW. To set an empty string in MATLAB, I did just something like: error = ' ')
Currently, the strings are very generic and do not specify sensor who they want. I would like to change that by introducing a kind of data for these labels. (I considered to be one of the possibilities are import to a spreadsheet with the labels file in a column and saw the data converted into a table 1 d of channels, or something like that. Looks like there should be several ways to do this and I'm open to all solutions really.)
What I would do, is match these two sets together, and if there is no error, then the rank would disappear since the two bays. Ideally I would also merge the two tables so that I have a label followed what is the error for the release of this label on the front panel.
There may be an easier way to do all that I have not looked at. As I said, I'm open to any suggestion. But basically, I want to display only the sensors that actually have errors associated with them.
If I understand correctly what you want well, here's a solution (see attached png). The loop For traverses the berries and produces an output of strings table. If the error string is empty then nothing is added to the array of results. If the error string is not empty, then the error string is the concatenated string Label and the result is added to the table on this. For the figures provided, the output array would have 4 entries:
Name of the sensor 1 1 error
Name of the sensor 2 2 error
Name of the sensor 3 3 error
Name of the sensor 4 4 error
-
Error when changing the language of the front panel in Japanese
Hello world...
I'm changing the front panel of the English language to Japanese. To do this, first I exported the strings through the Tools->Advanced-> export channels. After that I changed one of the label in Japanese and saved with Unicode encoding (as with normal ASCII coding Japanese texts will not be read). I imported the same file I recorded in a Unicode encoding format. But it shows that the error given below
"Error analysis during the import of channels
to test Main.vi
of D:\Riyas\Work\X 520\28-11-15\X520 RT-Host 20151127\Strings\Test Main_Import 1. txt
"Saturday, November 28, 2015 11:09:14.(See the attached screenshot of error)
So I tried to import the same file ASCII coding mmee, then it is successful. But the problem is that the modified label is not in Japanese that it shows a few points mark. I'm able to import the channel file saved in ASCII format code but the channel with coding ASCII file will not read Japanese texts. So please help me to solve this problem.
I need to import a channel file saved with a Unicode encoding or in any case format to enable Japanese texts as ASCII coded format.
I modified the configuration settings to activate the Unicode format as follows "UseUnicode = TRUE'." I'm using Labview 2014.
Thank you...
racahmd wrote:
My requirement is to change the language of the labels on the front. Is it possible to export the settings of the legend and label parameters separately? Currently, I am only able to export the two together. Also when I import the unicode file that does not contain unicode characters, it shows the same error.
Perhaps the requirement is statesd as such because the people who wrote the requirement had no idea, you can keep the labels even but change the subtitles only. Changing labels is a massive effort that could have profound ramifications to the code itself. Not the same with a legend.
-
Is it possible to create a tag that lists the individual labels [keywords] for each position? The current {tag_blogtaglist} creates an endless list of tags.
If you can get hands on with the ID of blog post that you can list the tags assigned to this post particularly blog using module_data. It would be only possible with the new BC. Active following rendering engine. Here are some resources to point you in the right direction: how to activate the BC. Next - http://docs.businesscatalyst.com/developers/liquid/introduction-to-liquid#enable how to use module_data - odule_data http://docs.businesscatalyst.com/developers/liquid/consuming-apis-in-the-front-end-using-m install app BC API discovered to get you started on the syntax - http://docs.businesscatalyst.com/developers/apps/bc-api-discovery module data that lists the tags assigned to a blog post looks like this: {module_data = 'blogposts' version = "v3" field resource = subresource 'tag' = "tags" resourceId = collection "303870" = "myData"} resourceId is the blog ID to render tags for. Hope this helps, Mihai
-
Cannot use disk utility to create the partition of the free space on the external USB drive.
I have a red 3 TB Western Digital drive in a USB hard drive docking station.
The reader is GPT, and I have two volumes on it (a single volume is "Microsoft reserved", another volume is NTFS).
The other part of my drive is 1.5 TB of free space. I want to create a new partition with free space so that I can put backups Time Machine encrypted external hard disk.
I checked free space on the drive with my Windows machine:
DISKPART> list diskDisk ### Status Size Free Dyn Gpt-------- ------------- ------- ------- --- ---Disk 0 Online 167 GB 20 GBDisk 1 Online 465 GB 0 B *Disk 2 Online 2794 GB 1526 GB *DISKPART> select disk 2Disk 2 is now the selected disk.DISKPART> list partPartition ### Type Size Offset------------- ---------------- ------- -------Partition 1 Reserved 128 MB 17 KBPartition 2 Primary 1267 GB 129 MBDISKPART>DiskPart displays 2 partitions - a 128 MB and the other GB 1267 with 1526 MB of free space.
I took the hard drive of my MacBook Pro running OS X El Capitan 10.11.3 and pulled towards the high disk utility, but for some reason, that it does not resemble the disk utility it is to see the free space, so I can't create a new volume.
Here are a few screenshots:
... of the physical disk in disk utility (notice how it doesn't seem be all unallocated space on the disk to create a new volume):

... of the NTFS volume in disk utility:

... of information for the drive in disk utility:

... of information for the NTFS volume in disk utility:

... of the partitioning settings page. Notice how the sign is grayed out (I can't create another partition):


I'm a new Mac user. My company recently gave me a Mac, so the first thing I want to do is to create a new partition on this external USB drive to put backups Time Machine figures on it.
In the research I did find a way to do it on a mac computer without erasing the drive and starting over. But you can go to your windows computer and partition the free space of disks. Then use the mac to set the free space as mac os extended journaled. Here's what I found. http://www.PCWorld.com/article/2066191/how-to-partition-a-hard-drive.html the only other way would be to copy the file on the external drive, somewhere, so you can delete it and re partition for windows and mac. Then reinstall windows files. I'm not familiar with windows systems.
-
Create a button on the front for the diagram
Hello
I am looking to create a button on the front for the diagram.
Is this possible? If so, how?
Thank you!
-
Programmatically create an appointment: missing variable in the container of result
Hello world
For my purpose of tests, I need to programmatically create a sequence. In this sequence, I need to insert steps from Rendezvous.
Everything works very well when they are created, but when I run the sequence / stages created this error always appear for the appointment stage:
- Unknown variable 'TimeoutOccured '; Error in the item "Result.TimeoutOccured".
According to using TS, this variable must be created when I set up stage of the operation to date. Drag and drop step of inserting TS palette works very well, and the variable is created when you select the operation "appointment". But when you do the same thing through programming, the variable is not created.
Here are the steps performed to create the Appointment stage:
- I have create a new step by using the Engine.NewStep method
- I put the name of the step using Step.Name
- I put the properties of an appointment using a statement (Parameters.BranchesRendezVous.RDVStep is the variable holding the reference of step):
- Parameters.BranchesRendezVous.RDVStep.AsStep.Operation = 1, //A value that specifies the operation of the step to perform. Valid values are 0 = crΘer, 1 = Rendezvous and 2 = Get Status
- Parameters.BranchesRendezVous.RDVStep.AsStep.NameOrRefExpr = Parameters.BranchesRendezVous.RefName, //Contains the expression name Rendezvous for operation of creation and expression name Rendezvous or reference for all Rendezvous operations
- Parameters.BranchesRendezVous.RDVStep.AsStep.TimeoutEnabled = False, //The Timeout allowed for the operation of Rendezvous
- Parameters.BranchesRendezVous.RDVStep.AsStep.ErrorOnTimeout = True, //The Timeout causes Run-Time Error for the Rendezvous operation
- Parameters.BranchesRendezVous.RDVStep.AsStep.RendezvousCountExpr = Parameters.NbBranches, //The expression number of Threads by appointment for the create operation
- Parameters.BranchesRendezVous.RDVStep.AsStep.Lifetime = 3, //A value that specifies the lifetime setting to use for the create operation. Valid values are 0 = same as sequence, 1 = even as a thread, 2 = use reference object, and 3 = same as execution
- 4. then I insert the step in my current sequence by using the Sequence.InsertStep method
Everything works fine, the appointment stage is perfectly created and all the properties are set finely. However, the TimeouOccured variable is missing in the container Step.Result (help says TS that this furniture exists when the step is configured as a date (see operation = 1)).
I'm doing something wrong somewhere? Why did this variable missing?
You probably need to create the property programmatically using NewSubProperty().
-Doug
-
Binding the controls on the front panel programmatically
It seems that Programmatic binding the controls on the front panel do not work when they are located in a tab control.
Is this a known problem in LV 8.6?
If the control of the façade is already bound to a URL of PSP you can link to another URL using DataSocket URL property during execution of the VI.

If the front panel control is not bound to a URL of PSP, then you cannot attach it to the URL of the PSP when the VI is on. You can use the method AttachDataSocket of VI to change the link while the original VI is stopped (in edit mode).

-
I can't burn a label on the side front of the CD
We were told that our computer was "light scribe" (or something like that), so we can burn a label on the side front of the CD. I can't find this option anywhere when I burn.
We were told that our computer was "light scribe" (or something like that), so we can burn a label on the side front of the CD. I can't find this option anywhere when I burn.
=============================================
In addition to the LightScribe drive, you also need LightScribe
CD/DVD and a special software that may have been before
installed on your system...See the following article for more information.
Burn a label - LightScribe start-up
http://www.LightScribe.com/gettingstarted/index.aspx?ID=276 -
Create column for a YEAR on the front-end or Data Modeler?
You want to create a column of CDA in the Data Modeler or the front-end server. In the Data Modeler, the CDA is summarized by date opposed to the month which is a very large number. On the front, it gives an error of invalid syntax when you use date (expr, time_period).
The question seems to be a corrupt hierarchy of the time Dimension. It's working now.
-
create bookmarks for the front and the back of the cover
Go easy on me please I tried for two hours to do this simple thing! (At least, I assume it's simple).
I try to add bookmarks to the front and the back of the cover of documents. The coverage is obviously the first page (always!) but the rear hull could be any page number, according to the document. Curiously, I did a before work for the calculation of the last page and this isn't my problem.
In any case, of hackering autour with stuff in the javascript reference and some tutorial, I so far have this:
var plan = this.bookmarkRoot;
myRoot.createChild ({cName: "Front Cover", nIndex: 0});
myRoot.createChild ({cName: "Back Cover", nIndex: 99});
Thus, this creates two bookmarks where I need them, 'Coverage' at the beginning and the 'cover' at the end of the bookmarks already in the doc. Obviously this works only because the number of 'already' bookmarks will never exceed 99, but it seems to work ok!
In any case, my problem is that I can't work a way to set the destination - for the life of me I'm sorry I read the docs, but my experience is limited I think it's almost impenetrable. I think that this should be simple, because the cover should always point to page 0 (in a zero index) and I'm not only bothered about 'back' because I can reuse the code because I have to work on the number of the last page. So if someone could help me by telling me how to set the 'cover' down on the first page (0) when you click on - I can go to bed at a decent hour!
When you create a bookmark using a script you can define its action to a script, you can use something like that to the front page:
myRoot.createChild ({cName: "Front Cover", nIndex: 0, cExpr: "this.pageNum = 0 ;"});})
Moreover, instead of using '99', use this code to always create the bookmark back cover as the last of the list:
myRoot.createChild ({cName: "Back Cover", nIndex: myRoot.children.length});
-
Months ago, I created a free account but now the Church I work for a software how to install help it serial number?
What software you want to install?
If it is old software that comes on a DVD, then install from the DVD and enter the serial number when prompted.
Otherwise, you can download applications and install - this document provides more details. You can not require a serial number but must sign the software with an Adobe ID, which has the appropriate right.


Maybe you are looking for
-
How to print a list page or music cue?
I want to print the names of the songs in the music list Barry E-mail address is removed from the privacy *.
-
Once my PC restarted because "updates" of today, my sidebar is not more opaque when placed at the front. Is this a feature of the new update? How can I get him back to opaque?
-
Upgrade to Vista Business, want a total backup feature
I want to be able to do a full backup of the files AND PROGRAMS. Company lists complete PC Backup and restore. Can I switch to this Home Premium edition?
-
Configuration of the Beats of Dre headphones with windows 7 64 bit
I have configured my beat by Dre wireless with bluetooth via bluethoot logitech peripheral and its asking me to install the drivers for the headphones, I looked everywhere but could not find these drivers, is there a solution for this? Im running Win
-
BlackBerry Smartphones blackberry 8900 curve: call failure needed help
Hello. I have a curve 8900 that I got off of ebay from a seller who got very good food back. However the when I got on the phone he has an orange logo on the back of the phone. the seller has unlocked the phone. but everytime I make a call from the p