Resize the photo but not the vector mask?
If I use a vector for a picture of drawing as a mask, can I then change the picture and hide individually?
There is a point in the center of the photo which allows me to move the mask, but how can I resize the photo without resizing the mask and resize the mask without resizing the photo?
Thank you
Hold down the Alt/Option + click this point blue Center to move/adjust the mask without worrying if the thumbnail of the layer is active.
Regarding resizing regardless of them, I'm not aware of all the shortcuts except for:
Decouple (click/enable/disable the link between the thumbnail of the layer and the mask thumbnail)
Select the thumbnail of the mask.
Change the values (W/H) in the PI. (You can also do the same thing here for the active layer thumbnail)
Here is a tip that I use a lot of the time:
Use AutoShapes like masks. It is those who have points in the canvas "controller" that allow to resize, change the angles etc.
Example:
A. open/import an image file.
B. Edit > cut the image/bitmap to the Clipboard.
C. adding a Rectangle object rounded on the Web and have it active before moving on to the next step.
D. Edit > paste inside the contents of the Clipboard (the image).
The result is your image with the a vector mask was consistent with the auto shape (in this case, the rounded Rectangle).
That's the problem - select the vector mask thumbnail and you will see again "anchor controllers" there: resize and corner radius.
h
Tags: Fireworks
Similar Questions
-
New videos appears in the Photos, but not in iMovie
Already when I imported video clips in iPhotos, the clips were made automatically available in iMovie so. Now, when I import video clips in Photos, it is made available in Photos but not in iMovie. Old clips still appear in iMovie, but not the new clips. It is not possible to import new clips with iMovie import function as iMovie cannot locate the file. Photo library only appears as a file in the Finder, and it cannot be opened with any program other than pictures.
How can I get the clips in iMovie?
OS X El Capitan 10.11.1 (B 15, 42)
Version 1.2 (340.4.0) of the Photos
iMovie 10.0.9
Hi a random string,.
The workflow I've always used is to create a folder for the videos and photos that I use in my video project and export (or drag) according to Photos or Aperture or iPhoto library in the folder. Then use the Finder application to import the files into iMovie.
The following resources explain why you can't see the Photos in the media browser:
If the media browser shows all your photo library
https://support.Apple.com/en-us/HT204669Sometimes the media browser, which allows applications like iMovie or Pages use images, pictures, shows all the available photos to your photo library.
This happens when you use iCloud photo library with the preference to optimize Mac storage enabled.
The media browser shows pictures that have the original image or a full preview size stored on your Mac. You can make a photo available temporarily for the media browser by double-clicking on it. This will download the original to your Mac, where it will be available in the media browser so that Photos optimizes still to save disk space.
If you want to take pictures in permanently available Photos in the media browser, follow these steps:
- Select file > New Album... from the menu bar of Photos. Name the new album.
- Click on the photos you want to make available in the media browser.
- Click the Add button.
- Click on the Albums tab at the top of Photos and find the new album you created.
- CTRL-click (or right-click) the album, then select Download this Mac originals.
This will download the full resolution of the images you have selected for your Mac, which makes them available at all times in the media browser.
Note: You can do all the photos in your photo library available at all times for the media browser allowing to download the originals of the Mac in the preferences of Photos, but you will lose the benefits of clutter in preference to optimize Mac storage.
Last modified: June 1, 2015
Take a look at this section of the iMovie User Guide:
Import on your Mac media
http://help.Apple.com/iMovie/Mac/10.0/#mov6fa10197dSometimes the media browser, which allows applications like iMovie or Pages use images, pictures, shows all the available photos to your photo library.
This happens when you use iCloud photo library with the preference to optimize Mac storage enabled.
The media browser shows pictures that have the original image or a full preview size stored on your Mac. You can make a photo available temporarily for the media browser by double-clicking on it. This will download the original to your Mac, where it will be available in the media browser so that Photos optimizes still to save disk space.
If you want to take pictures in permanently available Photos in the media browser, follow these steps:
- Select file > New Album... from the menu bar of Photos. Name the new album.
- Click on the photos you want to make available in the media browser.
- Click the Add button.
- Click on the Albums tab at the top of Photos and find the new album you created.
- CTRL-click (or right-click) the album, then select Download this Mac originals.
This will download the full resolution of the images you have selected for your Mac, which makes them available at all times in the media browser.
Note: You can do all the photos in your photo library available at all times for the media browser allowing to download the originals of the Mac in the preferences of Photos, but you will lose the benefits of clutter in preference to optimize Mac storage.
Last modified: June 1, 2015
Import media by dragging it from the Finder
Select a file, command-click to select several files, or select a folder of files and do drag the selection from the Finder to the event in the list of libraries in iMovie.
The clips appear in the event.
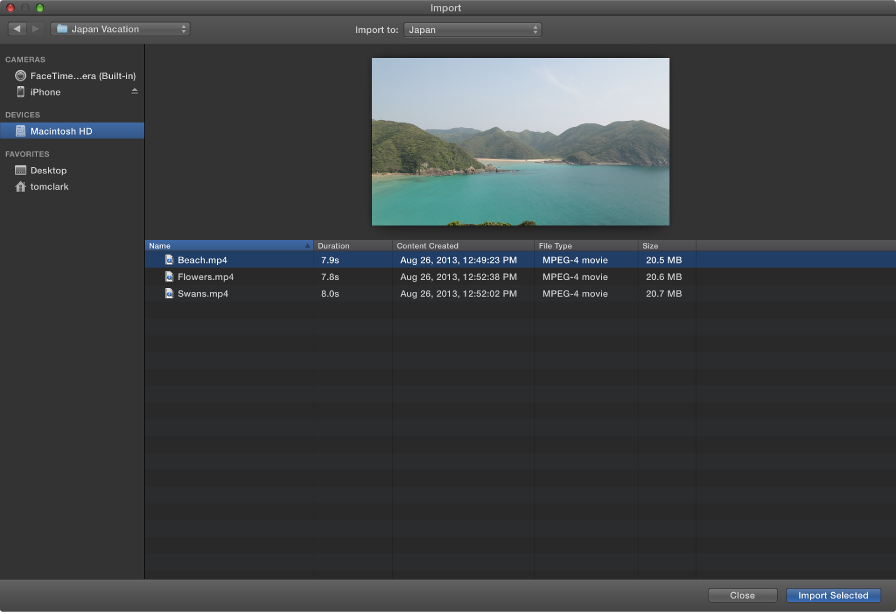
Import using the import window media
If the media you want to import is on an external hard drive, connect it to your Mac and turn it on.
Click Import on the toolbar.

In the devices section of the sidebar of the import window, select the drive or device you want to import media.
The contents of the drive or device is displayed in a list at the bottom of the import window. You can individually select the clipsin the list view, and a preview of the selected item appears at the top of the import window.
You can perform the following actions:
To sort videos in the view of list data such as time, creation date, size and so on: click on the column at the top of the display of the list headers.
To add a folder of press frequently used in the Favorites folder: drag a folder from the list on the right of the 'Favorites' header in the sidebar.
To remove a folder from the favorite section: Ctrl-click on the folder and select Remove from the context menu in the sidebar.
To quickly navigate between the clips, fast forward or rewind, move the pointer over the preview at the top of the import window, and do one of the following:

To play or pause the selected clip: click on the Play button (or press the space bar).
To access the next or previous item: click the next or previous button.
Note: If you are at or near the end of the selected item, you can click the back button to return at the beginning of the clip.
For fast forward: move the pointer over the following button and hold down the mouse or trackpad button.
To move backward: move the pointer on the back button and hold down the mouse or trackpad button.
Do one of the following:
Choose an existing event to import clips in: select the event in the context menu "import to" at the top of the import window.

To create a new event to import clips in: choose new event from the context menu "import to", type a name for the new event and click OK.
To learn more about the events, see organize the library.
Do one of the following:
To import all plans: click all import.
To import only some of the clips: command-click on each clip that you want to import, then click Import selected (the button import changes its name).
Close the import window, and your clips appear in the event. According to the length of each element and the number of clips that you import, you can see a progress indicator in the upper right of the window, while the clips are imported.

You can continue working in iMovie, then import finishes.
-
Remove the vector mask in Photoshop CC fill layer
I use Photoshop CC and I can not remove, disable or rasterize a vector mask that is applied to a layer of fill or gradient.
Am I missing something?
Delete the vector mask is to press the keys Alt + Ctrl (Option + Cmd) and
slide the bottom of the icon/pattern/gradient fill layer in the layers panel to the trash can at the bottom of the layers panel.
You can disable the "vector mask" Shift clicking the path icon in the properties panel.
A way to replicate the pixelation is a vector mask Ctrl (Cmd) click on the shape layer icon in the Panel layers, add a
layer mask and then delete the vector mask as described above.
-
1) called on a solid green rectangle
2) chose the shape once again the tool and the option value of path instead of shape layers
(3) draw an oval or rectangular trajectory
(4) in the layers panel, choose Add a vector mask
Even if the density is 100% and 0px feather in the mask Panel, I'm blurry / faded / or borders jagged/pixelated. Y at - it a setting I need to adjust to make this a vector mask strong. According to me, it seemed just before (with net borders) - do not know if I accidentally messed up something.
Thank you
According to what you try to hide, any pixel, crossed by the border of the vector mask will certainly be partially hidden in the interest to create a smooth edge.
But pace the image of a greater number of pixels and the edge of the remains of vector mask also crisp it was.
Maybe I don't understand what you expect to see.
This is normal:


-Christmas
-
I imported the images into the pictures and they are clearly there when I go into the photos, but when I go into an email and select last import of files th does not appear also I can not select the photo that I have to join - it's as it is not updated in horizontally or something
Stop iPhoto and open your iPhoto library package, as shown in this screenshot

And look for a folder called import or import. Move it to the desktop (tomake any other changes to the content of the library package) and launch iPhoto. This should stop the attempt to re-import.
Check the contents of this folder on the desktop to see if it contains pictures that not imported and you want to keep and import.

-
photos went to the Gallery of photos, but not in the folder of photos, why?
When I downloaded my photos from my camera SD card in my computer photos went just to the photo gallery, not to the folder of photos. This is why when I try to send pictures via my gmail account I gives me only the choice of the photos in the pictures folder. How can I get these photos in the photo gallery images folder? I'm using vista Home premium and I've never had this problem before.
Thank you, for some reason any, he went to my folder of Tasmania. Now, I found the photos how to make them out of this file and in another file?
=======================================================
Select (highlight) all the photos you want to move.Right-click on the selected group and from the menu, choose copy.
Navigate to the folder you want the files saved in and right click / Paste.
Once you are "positive" that the files are copied safely in the new location
You can delete them from the previous location. -
Change the path inside and outside areas in the vector mask
Hey all lovers of the PS/CS,.
This is probably an easy, yet, being pretty new to this, I have to ask.
I have so this vector mask on a layer, and singing along to the Beatles I'm changing tracks on this subject. Well, what it is is a rectangle to crop a photo, nothing crazy. This rectangle is too big for my taste - so I just draw another, smaller on the inside and plan on deleting one.
But! The second, smaller rectangle is considered to be a delicacy to take away the first (so its interior is considered to be 'black' mask-wise, that is cut out, and its outer part is 'white', which is kept in). Thus, when you remove that first, largest, the entire image will appear, except for the part that I want in the Middle, which is cut! Yes - it's the opposite of what I want.
Now, I tried to use the path selection tool and change the fill color of the rectangle, but you can not... So, how you reverse both inside and outside of a closed path? Thanks in advance!
Charles
So, how you reverse both inside and outside of a closed path?
Select the path with the tool Selection of track and in the Options bar change the path of the operations.

-
I lose effect of glass to Ai when I resize the vector
When I created the vector, I added the glass distortion effect. Now I need to resize a plu vector, I will lose it; as it has no effect at all.
I tried creating bigger from the beginning and then add the effect, but it's not the same.

Left one is the vector, right is when I resize to a bigger.
This is a limitation of all the effects of pixel. You must change the settings for the filter in the appearance palette it coincide with the release of your largest.
Mylenium
-
HDR modus wil trial photos but not appear in the library (or more)
No idea who anyone?
I did not change any setting that I could see. Day before yesterday, it works fine.
I think I had an update. Someone else in trouble because of their update?
Hi N0k0,
Please check if the option of sorting in the library module is set to the name of the file or something else?

Concerning
Sarika
-
I'm new to illustrator.
I designed a brochure is superb. cover has a picture framed by a blue rectangle with a text written on it. When I went to print the brochure to have someone to change, the photo of cover or the blue box below does not print. Only white space appears on the brochure where the block and image are supposed to be. What is the problem? I need to get there soon.
Robin
A layer can be designated as non-printing. DBL click on the layer containing the image for this excludes:

-
Vector mask thumbnails in the layers panel
In Photoshop CC, vector mask photos see room for files and raster layers, but they don't show up for layers of fill (i.e. layers of form). How can I get a feature similar to Photoshop CS5? There is a sort of thumbnail of the shape layer, but the square icon covers 1/4 tile that makes partially useless.
Choice you seems to be staying with an older version of dead of Photoshop or to adapt your workflow to the modified form of the Photoshop UI.
You can simulate a shape layer to some extent to get the vector mask thumbnail. However, you would not have layers of Photpshop shape and features.

-
Question about the functionality of vector mask
Hello everyone, I'm fairly new to Photoshop CS 5 so I apologize if I'm asking the wrong type of questions, here goes:
When you work with vector masks you can:
(1) "the link" or a vector mask with the other images? ' sharing ' a picture (for example) if I did 'A Building' then duplicated, but wanted to change what build a looked like, I have to only change the mask of the source, then the copies would be updated.
(2) move the independent image of the vector mask (it seems that I can only move the vector mask, not the image itself). Or in other words: I can move the image and have the mask to follow, instead of being only able to move the vector mask within the limits of the image?
My application of the question:
I do a top-down 2D layout of a zone of type "Paste". I did to fill the buildings, building A, B, C, etc. and use multiple copies of each building. Ideally, I would like to be able to 'link' or share say building has a vector mask with all other instances of building A (so that when I change the master, they all change to the new form of mask). The second behavior I have trying to find is the ability to move without moving layer where the vector mask is on this layer (since it seems that you can only move where the mask is, which means that even if I could share masks, they all finish by in the same sense of place I have to re - position each hand again.)
Any ideas are appreciated, thank you for reading.
When you work with vector masks you can:
(1) "the link" or a vector mask with the other images? ' sharing ' a picture (for example) if I did 'A Building' then duplicated, but wanted to change what build a looked like, I have to only change the mask of the source, then the copies would be updated.
Yes, it's possible, but not with the classic system layer vector mask in Photoshop. Layer masks are part of a layer and not the layers themselves, so that they can be converted into a reusable object.
The solution is to avoid vector layer masks and use a clipping/layer instead mask. A clipping/layer mask CAN be converted into a smart object that is reusable, and when you change one, all the other instances are also changing.
The second part of the solution is to convert the layers contained both the clipping/layer to a smart object mask. Then the batch group. By the way, if your buildings are made up of several elements simply to include these additional elements in the clipping group. Another advantage is that each of the elements may still have its own normal layer mask. Win win situation. And layer effects can be applied to layers/clipping masks, once again what is impossible for layer masks. It also opens the doors to a much less destructive workflow.
(2) move the independent image of the vector mask (it seems that I can only move the vector mask, not the image itself). Or in other words: I can move the image and have the mask to follow, instead of being only able to move the vector mask within the limits of the image?
This is also solved with the use of layers/clipping masks - the content and the mask can be moved independently in regular layers. Another advantage is that the two can also be transformed individually.
My application of the question:
I do a top-down 2D layout of a zone of type "Paste". I did to fill the buildings, building A, B, C, etc. and use multiple copies of each building. Ideally, I would like to be able to 'link' or share say building has a vector mask with all other instances of building A (so that when I change the master, they all change to the new form of mask). The second behavior I have trying to find is the ability to move without moving layer where the vector mask is on this layer (since it seems that you can only move where the mask is, which means that even if I could share masks, they all finish by in the same sense of place I have to re - position each hand again.)
Any ideas are appreciated, thank you for reading.
So here's my solution. I made a sample with two buildings, the view from above which could be reused as desired:
(1) first of all create groups for each building and place the content to those. Then trace layer vector shapes on the content. Set the transparency for layers of mask to a reasonable of opacity for masking easier.

(2) put the vector shape under the layer of content for each building. Then, for (1) and (2),
, click on the border between the content and the shape layer. ( BTW, the layer of Photoline system is much more logical and easier to use for this type of work. Layer masks behave like regular diapers. Layers, groups, masks, layers of external file and so forth can be practically cloned and instantiated as smart objects, but the main object is editable in the context, and all the other instances updated in real time. So, it is more convenient. At least this is my experience.
I hope this has been helpful! Now go build your cities. :-)
PS: I thought: isn't Illustrator or InDesign is a much more logical choice for this type of work where you need access to reusable blocks of content? It would also be a more efficient workflow and faster - Photoshop is not really designed for this type of work. Illustrator and InDesign provide potentially out of better quality. You can also divide your work into the pages and so on. Here again, you would probably lose the flexibility of smart objects.
-
Add the path to a certain vector mask
Hey all lovers of the PS/CS,.
Of course, my question is something that needs to happen a lot and a lot. I just created a vector mask on my bed, and then I went straight by making a path for him. But I did not notice that the mask was not selected... So my path removes nothing of my original layer! It's just a way of hanging around - and it disappears when I select the mask or another layer.
So, how preserve this path and it adds perhaps the vector mask, it was initially intended to? Thanks in advance.
Charles
To bring together the two paths
If they are not on the same layer plicque in the tracks Panel, select copy and paste it into the other.
Select the pen tool and hold down the CTRL (Cmd) key to temporarily select the direct Selection tool and drag on the outline of one of the paths. Release the Ctrl key to return to the pen tool and add a point on the path, and then delete this point. This creates a break in the path.
Do the same thing to the other segment of the path. Place the cursor on the end of one of the broken paths until you see the icon string (2nd in the table below) and add a point. Place the cursor on one of the ends broken the other way and repeat. Repeat for the other two endpoints.
Add, delete, change the path to what you want. Job done.

-
How to apply a vector mask to the background
In my tutorial, I was told to choose a flower with the pen tool and magnetic box checked. Then, hold down the command key, then press the vector mask button in the layers panel, with the path of the chosen flower. In the tutorial, the flower is left and the background has disappeared. But when I did, the flower has disappeared and the bottom remained. How can I remove the background?

I guess you checked the shape before subtracting, select combine forms instead.
Then apply the vector mask.
Fenja
-
Why the HDR toning work with some pictures, but not for others? I have CS6.
I have Photoshop CS6 and when I go to HDR toning, it is only highlighted for work with some photos, but not others, why? Thank you.
HDR toning does not work with CMYK images. Change the RGB color mode, and then you will be able to use HDR toning. It also works with the color to grayscale mode.
Happy holidays!


Maybe you are looking for
-
Firefox by opening several processes in the Task Manager.
This has happened for a while now and I tried a few things to fix, but I can't identify the cause of it. In the course of a session, Firefox will open processes additional http://i13.photobucket.com/albums/a253/ravenillusion/Screenshot2014-05-1414464
-
spell bound work 4.0 with the latest version of Fire Fox?
has anyone used spellbound 4.0 with new version of Fire Fox? I keep firefox 3.6 because it allows me to use the spellchecker charmed. I find that this spell works well for me. and when I try to upgrade to a newer version of firefox the spellbound pro
-
Read multiple files in the folder and add data to a file
Hello world Normal 0 false false false MicrosoftInternetExplorer4 / * Style Definitions * / table. MsoNormalTable {mso-style-name: "Table Normal" "; mso-knew-rowband-size: 0; mso-knew-colband-size: 0; mso-style - noshow:yes; mso-style-parent:" ";" ms
-
I have a HP Pavilion dv7 bought in 2010 runnung win7 64. The installed DVD is a HP DVDWBD TS LB23L. This player is compatible with DL discs?
-
I have a problem, try to determine whether my Win 7 Pro is an authentic, in order to get the free upgrade to win 10. I bought a PC refurbished which came with Win 7 Pro installed, a disc and literature that seems to come from a registered Microsoft