Size of the image in Illustrator to Photoshop
I'm new to Illustrator and can only be overlooking something here, but here's my background and the question:
I took a screenshot of an image and open in Photoshop CS3. I've clipped a part I want to use and save the file as a .eps file and open it with Illustrator. In Illustrator, I recreate the image at the same size as the image I opened (I look at the two images to 100% view). I save my new image in .eps format, and then open it with Photoshop. For some reason, the image is about 50% bigger in Photoshop that was in Illustrator. Any ideas? A percentage of 100% look at a watch not really the right size of the image? Or is the problem lies with how Photoshop CS3 interprets a file .eps Illustrator CS4?
Thanks in advance for any information or advice.
You've discovered just resolution image and its effect on the display of the pixel based images.
In Illustrator, there is no resolution. Objects have a set size and Illy requires a screen resolution of 72 dpi as a basis for hypotheses on the display of graphics as well as for its calculations of this 100%.
Then export to pixel based on the file formats, you can choose the resolution.
In Photoshop, the '100% ' has nothing to do with the actual size of things (as defined in Illustrator) but means that one pixel of the image is a pixel of your screen.
When you open an EPS, you get a dialog box in which specify you how to photoshop must calculate the pixels of the vector and the desired resolution. When you go to 72 dpi, you should get the size you expect. But that won't be enough to print.
BTW: the workflow to do a screen capture and convert your image here and there may be harmful for printing results.
Tags: Illustrator
Similar Questions
-
How re-size of the images in illustrator?
What I have copy and paste, or I draw directly on illustrator won't let me not re - size. He is a recent problem, so do not know if I clicked on something usually I want to resize anything? Any help really appreciated!
Cmd (Ctrl) - SHIFT - B is a toggle in artificial intelligence to show/hide the rectangle encompassing. You might have tried to make a false "BOLD" text.
-
Photoshop CS6: Change the default resolution for the 'Document size' in the Image Size dialog box?
I have a Canon EOS 40 d, Photoshop CS6 and Adobe Bridge CS6. I shot everything in RAW.
When it's time to change the images, I start by opening in RAW using Adobe Bridge. When I finished to make adjustments, I click the button open an Image that contains the image to Photoshop. When I put them to the top of the dialog box size of the Image, the size of the Document is still 240 DPI.
Is it possible to change this default? If so, how?
Click on the text in blue at the bottom of the Camera raw window and change the ppi there.

-
Photoshop 7 (Windows 10), when you select the size of the Image or the size of the canvas, he now is suspended and does not bring the selector upwards.
It works fine, but I suspect that some Win 10 update in the last couple days has skewed anything. Any ideas?
I know it of old, but even after the upgrade to Windows 10 4 weeks, Photoshop 7 installed always OK, so I'm happy with it.
It worked until yesterday.
I could start by resetting the photoshop preferences file and see if that solves the problem.
Press on and hold Shift + Ctrl + Alt just after the beginning of the launch of photoshop 7
(you have to be fast while pressing down or you won't get the dialog box)
Keep possession of the keys down until you get a dialog box asking if you want to delete the adobe photoshop settings file
Press Yes

Also, if you have not applied the update of photoshop 7.0.1 you should do the same.
Adobe - Photoshop: For Windows: Adobe Photoshop 7.0.1 update
-
Can't find the preview in the size of the image window in photoshop cs6
Hey guys, I have photoshop cs6, when I go to the size of the image I see no dialog box size image of the pixel dimensions and the size of the document, but I can't see the photo 'window preview', how can I show it?
Your reference, with the preview image size dialog box, is a new feature from photoshop cc and not photoshop cs6.
-
Is it possible to see the size of an image in millimeters in the room light? I can see that the size of the image in pixels in the metadata so is possible to change this? Of course, I can move the image to Photoshop to see the size of the image.
Digital photos do not have a length in millimeters or inches. Only, they are measured in pixels. If Lightroom does not report millimeters or inches.
Prints can be measured in millimeters or inches.
In Photoshop, the inches or millimeters shown is a hypothesis that you want to print to a specific ppi, when in fact there is a large number of PPI values you can print, even while the Photoshop numbers are meaningless, you can still print the picture to a different size.
-
Change the size of the image, no res
Hello
How can I change the size of an image in Photoshop without changing the resolution?
My original image is 300 res, I lowered to 72, and it decreased the size.
I want to keep to 72, but expand.
Also be involved; How can I make 1000 pixels or more on the long side (of the image)?
Thank you
If you want that the print size to change without changing the actual size of the image, uncheck resampling and enter the desired size of your image to print - say 5 "impression rather than 3". This will change the dpi, because both are related to the sizing non-re-sampled. If you want to keep the 3 "which was 300, but you want it to 72, then click on resample and change the resolution to 72, but this will change the actual pixels of your image dimensions.

To make 1000px, select resample and pixels in the drop-down list and enter 1000 for the long side.

-
When I try to do a CC update I get an error message U44M1I210, "failed update - impossible to extract the downloaded files. Try to press to redownload again. (U44M1I210) ' - help please - re-don't download makes no difference, applies to the latest Indesign, Illustrator and Photoshop CC, others seem to be updated without problems. I can see the disk image files in the AAMUpdater folder, but they will not open and come up with message ' could not be opened - busy resource.
Another thing that makes everything work ultimately (after I finally properly installed all Apps CC etc - I couldn't get the Apps to save my preferences for each of them and Indesign would not open yet).
Make yourself as a user in the users and groups on "Admin", is added and with privileges "read and write" and "Apply to the clos etc.", when you 'get Info' on the hard drive if you can access/modify all the files and folders on the hard drive.
-
Resize photos to the long side in the size of the Image
I want to use the size of the Image in the Image Menu to resize photos on the longer side (example: 3000 x xxxx). I know that I can do this in the processor for Image and Photo to adapt, but I want to enjoy the new resample in CC2014, preserve the details. Is it possible to do it in the size of the Image. Second question is if this is not possible what method of resampling Image Processor and Photo Fit uses it to resample images to a larger size.
Thanks for the help.
W Thorne wrote:
I want to use the size of the Image in the Image Menu to resize photos on the longer side (example: 3000 x xxxx). I know that I can do this in the processor for Image and Photo to adapt, but I want to enjoy the new resample in CC2014, preserve the details. Is it possible to do it in the size of the Image.
Check her resample, interpolation together to preserve the details have a width and height link to force the image resize it current aspect ratio, use of the width or the height of the menu drop down click pixel, set the side you want to be 3000 to 3000. Cannot be batch without a small script to set the long side to 3000

Second question is if this is not possible what method of resampling Image Processor and Photo Fit uses it to resample images to a larger size.
The standard image of the processor which is part of the Photoshop Image uses made the adjustment to resize the image always interpolation bicubic user. There is a process of image better second plugin script that you can download from the web once installed you will find in the file menu > Automate > Image Processor Pro. With Image Processor Pro, you can define which method of interpolation should be user for each resized image used. If the script is better then the standard image processor and works under Photoshop CC X got fed up with Adobe and will support no CC in order to preserve the details cannot be resolved. It would be possible to add an option if the version of Photoshop using the script supports the details preserved, it can be easy to add to the menu drop down and in the code. As you can choose one of the other methods

The Image Photoshop plugin is being implemented in a Photoshop script written in javascript. It would be very easy to change your copy of "If Image.jsx" always use preserve detail in CC. The must be changed line is an app.activeDocument.resizeImage '(newWidth, newHeight, resolution, ResampleMethod.BICUBIC); «Change it will only work if Adobe updated the scripting support cc to preserve detail.» In Adobe CS6 forgotten update scripts to support BicubicAtomatic fix in the superscription CS6 but not the perpetual CS6. I also note that preserve the details is not an option to interpolation in Photoshop CC preferences for the interpolation of the image.

-
Loss of the size of the image when exporting .tif
I have a series of .tif images that have original dimensions of ~ 4700 x 4700. However, when I open them in illustrator, they invariably under ~ 1750 x 1750. TIF, even if no changes have been made. How to preserve the size of the image?
Lol Illustrator will always respect the resolution setting. You will need to put the image in Illustrator, if you want to keep the resolution.
-
canvas size changes with the size of the image
I am just placing several small pictures on a postcard. When I go to change the size of the image, it narrows the whole canvas.
Is there some sort of setting I need to uncheck? I don't do anything with the size of the canvas. I want it to stay the same.
Thank you
As nickna12 said, if the resolution of the picture you want to insert in the model is less than the resolution of the model, it will be re-size to fit the resolution of the new location.
To insert images without having to worry about the size or resolution: insert images into the postcard file, each on a separate layer and transform each layer in dynamic object (right click on the layer containing each picture and select convert to smart object). In this way, you can resize images from top to bottom and upward once again without worrying about degrading image quality. On each layer, use the recommended that Noel command (Edit - transform - scale or Edit - free transform) to re - scale each image as you wish. You can use the move tool (black arrow) to move each image in place.

If you want to "away from the cultures' parts of the inserted picture, you can do so with a layer mask. One way to do that is:
- Select the layer with the image that you want to "crop".
- Add a layer mask: layer - layer mask - reveal all the (adds a layer mask filled with white, so that you can always see your image)
- Select the layer mask in the layers panel
- Use a tool like the rectangular selection tool to select the part of your image that you wish to be visible.
- Invert the selection: Select - Inverse. This selects everything except the part of the image you want to remain visible.
- Fill the selection with black to hide it away: Edit - fill - (select black as the fill color)
- Get rid of the selection: select - deselect

You can use the move tool to move your image hidden anywhere you want on your postcard. If you decide you want it is larger or smaller, you can use the Edit - Transform command to resize it, rotate, etc.
In Photoshop, there are always several ways to accomplish tasks, and there may be better ways to achieve this way
-
Opening files jpg as raw... size of the image
My desktop color correct thousands of images per day for newsprint. These come in mainly sub form of files jpg and some eps targets. Most of them need a lot of work in color correction, and I found that the jpg with the dialog box open THOUGHT and tweaking them it can be a huge time saver (a menu with a bunch of sliders, against the opening of the curves, shadow light, hue/sat, color balance, etc.)
However! There are two things that prevent us from using the opportunity to open jpg files and using the raw dialog box:
1. size of the image. It is images of several clients who need us to preserve their original image size and dpi, whatever it is. Other customers want to keep us the width/height and rasample the image to 200 dpi. (example: take this 3 x 5 "@ 956dpi and make 3 x 5" @ 200 dpi) If I open one of their images in raw, I don't know what the original width/height were because the file has been resized to what I used on the last image. I noticed defaults to 240. The changes of dpi original jpg with each image we get. Is it possible to do the first dialog does not change the size of the image? Which brings me to...
2. once I opened a jpg using the raw dialog box it will always open in raw (always change the size of the image.) If I want to just open my jpg as an ordinary image in photoshop, I have to go in camera raw preferences and turn off the ability to use raw to jpg. Is there a faster way to ignore the parameters of raw on a jpg, once it has been changed as raw?
That is why we do not believe, even if it would be a huge advantage for us to be able to make these color corrections. If anyone has any ideas how to get around this, or even an easier workflow, I would appreciate it!
# 1, if you look at the image in Bridge, you can note the dimensions and the resolution... then you put this same resolution resolution of the cab.
# 2, none... as you note the preference of ACR, control or not Camera Raw will serve to open the image. You can use the SHIFT key by double clicking in Bridge to open the image directly into Photoshop and bypass ACR dlog, but Camera Raw will still be used if it is set to be used in the preferences...
You will need to keep your image resizing in Photoshop because Camera Raw is not designed to do this kind of resize/resampling...it's designed initially as a raw processor and more later added the ability to open and process the camera JPEG and TIFF. Put those kind of controls in Camera Raw would not make sense since the end result of an open in Camera Raw image is supposed to be an image processed and opened in Photoshop. So, what you are wanting is really outside the scope of the concept of development... I'm sorry.
-
Size of the image in relation to the size
I'm just trying to get my head around the size of the image in relation to the size and an answer to my question can resolve once and for all! Save a jpg file, I say 1000 pixels wide and 100 ppi 10 quality of file. But if I save the file even to 1000 pixels wide and back to 100 ppi but this time to the quality 5 - What is happening in the file? I have the same number of pixels in the picture, but what actually makes the quality slider?
Thank you very much
Sue
The size of the image and the JPEG quality are not the same thing.
Resizing of an image without "resampling" will only change the size of the dimension compared to the size of resolution, but not the size of the overall picture. In other words, you end up with an image low resolution greater or a small image high resolution. But the number of pixels remains the same. Although pixels can be more or less important, the pixel and data remain the same. However, when you resample an image it affects (based on interpolation methods) actual pixel data.
When you save a file in JPEG format, you use a lossy compression encoding format (i.e., the lower the setting, the image of several data are removed in favour of a reduced file size). It has really nothing to do with the pixel size, but rather of pixel information. This compression method is based on the algorithms of compression JPEG data, interpolation and pixel. If you do not want to lose any information data and then use the level of highest quality available (12) when you save your files. Or alternatively, save it in a format like TIFF, EPS or PSD lossless. However, at least two formats are generally larger and may not be recognized by applications or PCs. DSP is a proprietary format of Photoshop and although she uses compression methods it is not generally considered lossy.
The cursor in the JPEG dialog box examines essentially given in pixels and neighbors of pixels when you apply the size of compression rather than pixel (or size).
-
You are looking for an extension in order to reduce the size of the image
I often need to reduce the size of the screenshots. Looking for an extension that would allow me to do this in Photos, without the need to export, and then import them back. It's a simple task, but I could not find a way to solve this problem. There are many applications with extensions that allow cropping images, but the apps/extensions similarly dedicated screenshot cannot reduce the size.
The feature I need, it's essentially the only preview offers under the menu set the size as a percentage or in pixels change. Special bonus for an app/extension that would work also on the pictures for iOS.

This is not possible - you can never make any change to the contents of the library - the only way to reduce the size of the image is by exporting using different size options in the window export
You can use a preview an external editor with external publishers for extension of pictures - I have no idea of what would be the results with that
LN
-
Size of the image in the quiz?
I have pictures of 1028 x 768 and drop them as part of image in the quiz questions. A part of the image presented in the cross-slot and generally that it's Ok. But sometimes the image cannot be used as the required detail is not displayed. Is the size of the image better and has everyone optimized this feature?
Hi kenfromUK,
The resources below explains an option for your photos. The mask tool will allow you to choose which part of the image you want to see the image.
iBooks author: Add and edit photos and other images
Mask (crop) photo
You can crop photos without changing the original image by masking the edges to hide the unwanted parts.
Select the picture you want to hide.
Do one of the following:
Hide the picture with a rectangle shape: click the button mask
 in the bar of the formats. If the format bar is not visible, choose View > show the Format bar.
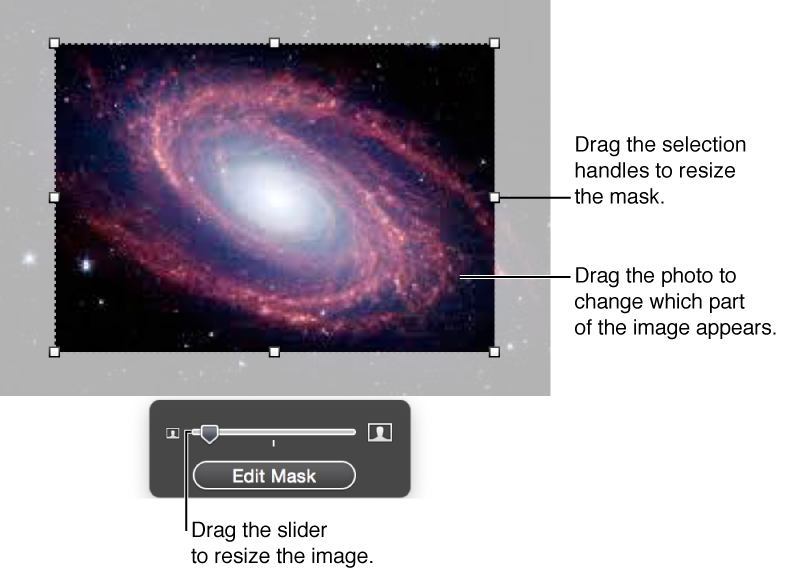
Hide the picture with a form: choose Format > Image > mask with shape > shape.
Do one of the following:
Resize the photo: drag the cursor over the button Edit mask.
Reposition the photo in the frame: drag the photo.
Move the mask: drag the edge of the mask dotted.
Resize the mask: drag the selection handles on the edge of the mask dotted. To constrain the proportions of the mask, hold down the SHIFT key when you drag.
Rotate the mask: hold down the command key when you drag a selection of angle on the master handle.
When you are satisfied with the position and the size of your picture and the mask, do one of the following ways to complete:
Double-click the mask or the photo.
Press return.
Click outside the photo.
Click the input mask.
To remove the mask of the photo, choose Format > Image > unmask.
Hope that helps...


Maybe you are looking for
-
After going into hibernation (light orange), the computer does not meet the mouse or the keyboard. Need to press the power button. After this will not feed. I disconnected the decision-making and pressed the power switch for 15 seconds to perform.
-
Hello I have a few questions in the following way: 1. After installing the Switch Executive 3.6 (evaluation software), I have very large window for OR Soft Front Panel SWITCH to cover all 4 monitors. It is difficult to see. Do I have to uninstall 3.6
-
writing the file text in while loop
Here's my question about writing data to a file in a text while loop... better written as I can. I have a case of Init where I have the user choose a path and a name. I go out the ref and then I gave, which are written to the file. The loop will take
-
Internet Explorer puts me in offline mode
IE8 sometimes when I try to access sites go offline. How to stop what is happening, please
-
Restore 'My Documents' and 'Public records' alias after moved folder
I moved my folder "Documents" of the user, as long as the public 'Documents' of my boot drive to a new drive for storage of files, I added. To do this, I opened the properties of the folder, the location tab and used the move... button to direct to t