DPP 4 cut and reframe the Question to the tool
When using DPP 4 setting / Crop tool I can't paste changes to multiple images. When you use the old version of DPP 3, there is a button "apply to all". It was a very useful feature. I hope that it has not been removed in the latest version of the software.
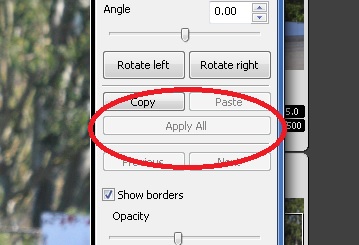
I don't have the time this minute to check it out, so don't take that as gospel until you've tried. But I believe that in V4, unlike his predecessors, cropping is included in the recipe for the picture. So I think that you can do your changes to an image, save in a recipe file, and then apply this file to recipe for as many other images as you want. (Of course you could always do. The question is whether cropping is included in the recipe file, and I think that in the V4's.)
Tags: Canon Camera
Similar Questions
-
Where is the copy or cut and paste the toolbar?
Where is the copy or cut and paste the toolbar? How can I register my toolbar with the bold, italic, buttons etc.?
Hello
1 are. what application you referring?
If you use word, then check out these links and check if it helps:
http://Office.Microsoft.com/en-us/Word-help/create-a-custom-toolbar-HP003085155.aspx
http://Office.Microsoft.com/en-us/Word-help/customize-your-toolbars-and-menus-RZ001003635.aspx
It will be useful.
-
With previous versions, I could press control (mac) and click on a layer, and he would choose this graph, what form it was. Then I could go to image-culture and reframe the entire file down to that size. Now, this feature is missing. What is the new way to do this?
This is the command key, not the control key for a Mac that you use on the layer.
Gene
-
In one of the inDesign tutorials instructor pulls up what looks like an application bar that contains among other things a text editor to cut and paste the copy into the inDesign project. That is a feature of inDesign, and how is it accessible?
The instructor used the App Switcher on Mac to switch to a text editor and copy this text editor text. InDesign is not the active application.
-
It seems that wrapped text will not host photo resizing without cutting and pasting the image resized, is - what the Muse way is suppose to work?
It would be the default path to wrap the text with the image when you work in Design view.
This document explains more:
https://helpx.Adobe.com/Muse/using/wrapping-text-image.html
Thank you
Sanjit
-
Cut and pasted the code does not
Help!
I created a quiz slide - déposer following a tutorial online. It has worked well. Then I made another. I cut and pasted the code of the job file in the new and changed the names of the instances of clip. When you export (control + enter) I can pick up the MCs I want but I can't give up. they just get stuck on the slider until I click on another MC. I went through the code and I can't find anything wrong. It simply doesn't get it. I'm puzzled. Here is the work and no working versions:
DOES NOT WORK
var counter: Number = 0;
var startX:Number;
var startY: number;
volume_mc.addEventListener (MouseEvent.MOUSE_DOWN, Pick-up);
volume_mc.addEventListener (MouseEvent.MOUSE_UP, dropIt);
poids_mc.addEventListener (MouseEvent.MOUSE_DOWN, Pick-up);
poids_mc.addEventListener (MouseEvent.MOUSE_UP, dropIt);
temperature_mc.addEventListener (MouseEvent.MOUSE_DOWN, Pick-up);
temperature_mc.addEventListener (MouseEvent.MOUSE_UP, dropIt)
vitesse_mc.addEventListener (MouseEvent.MOUSE_DOWN, Pick-up);
vitesse_mc.addEventListener (MouseEvent.MOUSE_UP, dropIt)
consomation_mc.addEventListener (MouseEvent.MOUSE_DOWN, Pick-up);
consomation_mc.addEventListener (MouseEvent.MOUSE_UP, dropIt)
pression_mc.addEventListener (MouseEvent.MOUSE_DOWN, Pick-up);
pression_mc.addEventListener (MouseEvent.MOUSE_UP, dropIt)
surface_mc.addEventListener (MouseEvent.MOUSE_DOWN, Pick-up);
surface_mc.addEventListener (MouseEvent.MOUSE_UP, dropIt)
function pickUp(event:MouseEvent):void {}
event.target.startDrag (true);
reply_txt.text = "";
event.target.parent.addChild (event.target);
startX = event.target.x;
startY = event.target.y;
}
function dropIt(event:MouseEvent):void {}
event.target.stopDrag ();
var myTargetName:String = "target" + event.target.name;
var myTarget:DisplayObject = getChildByName (myTargetName);
If (event.target.dropTarget! = null & & event.target.dropTarget.parent == myTarget) {}
reply_txt.text = "very well!"
event.target.removeEventListener (MouseEvent.MOUSE_DOWN, Pick-up);
event.target.removeEventListener (MouseEvent.MOUSE_UP, dropIt);
event.target.buttonMode = false;
event.target.x = myTarget.x;
event.target.y = myTarget.y;
counter ++;
} else {}
reply_txt.text = "try again!";
event.target.x = startX;
event.target.y = startY;
}
if(Counter == 7) {}
reply_txt.text = "Congratulations!"
}
}
volume_mc.buttonMode = true;
poids_mc.buttonMode = true;
temperature_mc.buttonMode = true;
vitesse_mc.buttonMode = true;
consomation_mc.buttonMode = true;
pression_mc.buttonMode = true;
WORK
var counter: Number = 0;
var startX:Number;
var startY: number;
phalanges_mc.addEventListener (MouseEvent.MOUSE_DOWN, Pick-up);
phalanges_mc.addEventListener (MouseEvent.MOUSE_UP, dropIt);
metacarpiens_mc.addEventListener (MouseEvent.MOUSE_DOWN, Pick-up);
metacarpiens_mc.addEventListener (MouseEvent.MOUSE_UP, dropIt);
carpiens_mc.addEventListener (MouseEvent.MOUSE_DOWN, Pick-up);
carpiens_mc.addEventListener (MouseEvent.MOUSE_UP, dropIt)
cubitus_mc.addEventListener (MouseEvent.MOUSE_DOWN, Pick-up);
cubitus_mc.addEventListener (MouseEvent.MOUSE_UP, dropIt)
radius_mc.addEventListener (MouseEvent.MOUSE_DOWN, Pick-up);
radius_mc.addEventListener (MouseEvent.MOUSE_UP, dropIt)
humerus_mc.addEventListener (MouseEvent.MOUSE_DOWN, Pick-up);
humerus_mc.addEventListener (MouseEvent.MOUSE_UP, dropIt)
omoplate_mc.addEventListener (MouseEvent.MOUSE_DOWN, Pick-up);
omoplate_mc.addEventListener (MouseEvent.MOUSE_UP, dropIt)
function pickUp(event:MouseEvent):void {}
event.target.startDrag (true);
reply_txt.text = "";
event.target.parent.addChild (event.target);
startX = event.target.x;
startY = event.target.y;
}
function dropIt(event:MouseEvent):void {}
event.target.stopDrag ();
var myTargetName:String = "target" + event.target.name;
var myTarget:DisplayObject = getChildByName (myTargetName);
If (event.target.dropTarget! = null & & event.target.dropTarget.parent == myTarget) {}
reply_txt.text = "very well!"
event.target.removeEventListener (MouseEvent.MOUSE_DOWN, Pick-up);
event.target.removeEventListener (MouseEvent.MOUSE_UP, dropIt);
event.target.buttonMode = false;
event.target.x = myTarget.x;
event.target.y = myTarget.y;
counter ++;
} else {}
reply_txt.text = "try again!";
event.target.x = startX;
event.target.y = startY;
}
if(Counter == 7) {}
reply_txt.text = "Congratulations!"
}
}
phalanges_mc.buttonMode = true;
metacarpiens_mc.buttonMode = true;
carpiens_mc.buttonMode = true;
cubitus_mc.buttonMode = true;
radius_mc.buttonMode = true;
humerus_mc.buttonMode = true;
omoplate_mc.buttonMode = true;
When you about to reg alignment are you slam away them? to test using:
var counter: Number = 0;
var startX:Number;
var startY: number;volume_mc.addEventListener (MouseEvent.MOUSE_DOWN, Pick-up);
volume_mc.addEventListener (MouseEvent.MOUSE_UP, dropIt);poids_mc.addEventListener (MouseEvent.MOUSE_DOWN, Pick-up);
poids_mc.addEventListener (MouseEvent.MOUSE_UP, dropIt);temperature_mc.addEventListener (MouseEvent.MOUSE_DOWN, Pick-up);
temperature_mc.addEventListener (MouseEvent.MOUSE_UP, dropIt);vitesse_mc.addEventListener (MouseEvent.MOUSE_DOWN, Pick-up);
vitesse_mc.addEventListener (MouseEvent.MOUSE_UP, dropIt);consomation_mc.addEventListener (MouseEvent.MOUSE_DOWN, Pick-up);
consomation_mc.addEventListener (MouseEvent.MOUSE_UP, dropIt);pression_mc.addEventListener (MouseEvent.MOUSE_DOWN, Pick-up);
pression_mc.addEventListener (MouseEvent.MOUSE_UP, dropIt);surface_mc.addEventListener (MouseEvent.MOUSE_DOWN, Pick-up);
surface_mc.addEventListener (MouseEvent.MOUSE_UP, dropIt);function pickUp(event:MouseEvent):void {}
event.currentTarget.startDrag ();
event.currentTarget.parent.addChild (event.currentTarget);
startX = event.currentTarget.x;
startY = event.currentTarget.y;
}function dropIt(event:MouseEvent):void {}
reply_txt. Text = "John";
event.currentTarget.stopDrag ();
var mycurrentTargetName:String = "currentTarget" + event.currentTarget.name;
var mycurrentTarget:DisplayObject = getChildByName (mycurrentTargetName);
If (event.currentTarget.dropcurrentTarget! = null & event.currentTarget.dropcurrentTarget.parent == mycurrentTarget) {}
reply_txt. Text = "very well!"
event.currentTarget.removeEventListener (MouseEvent.MOUSE_DOWN, Pick-up);
event.currentTarget.removeEventListener (MouseEvent.MOUSE_UP, dropIt);
event.currentTarget.buttonMode = false;
event.currentTarget.x = mycurrentTarget.x;
event.currentTarget.y = mycurrentTarget.y;
counter ++;
} else {}
reply_txt. Text = "try again!";
event.currentTarget.x = startX;
event.currentTarget.y = startY;
}
if(Counter == 7) {}
reply_txt. Text = "Congratulations!"
}
}
volume_mc.buttonMode = true;
poids_mc.buttonMode = true;
temperature_mc.buttonMode = true;
vitesse_mc.buttonMode = true;
consomation_mc.buttonMode = true;
pression_mc.buttonMode = true;
surface_mc.buttonMode = true; -
All of hell
I'm looking for a method to find out,
How many users have logged in (user id and time of connection) to HFR and using the tool?
I tried to explore the tables in database (HFR tools internal tables), but to no avail
Any idea on this?
Best regards,
Amit Porwal
I know that John Booth is a tool that loads the information into a relational table and produce a report.
I know that Mike Henderson recently shared his macro to analyze this information and it is here Essbase users: did someone properly analyze newspapers EN?
Concerning
Celvin Kattookaran
-
I've updated the plan of the photographer and since the download, I had problems with non stop with fluidity and now the bridge is not displayed large previews, a few thumbnails. I restarted and reset the tool, is there anything else I can do or do I cancel my subscription to the CC and return to the CS6?
The problem of fluidity can be the result of a graphics card problem:
Try to uncheck the box in the preferences > performance > graphics processor use, then by restarting Photoshop. If this solves the problem, check with the manufacturer about a possible update.
On the bridge: when you select an image and press the space bar, what happens?
-
I need to download and improve the tools of the DPS. My version of InDesign CC 2015 isn't tools DPS that I need. I just upgraded to CC 2014 and found that (generator of folio) tools are missing. Can someone help me?
I have a new MacBook Pro 15 "with all of the memory/speed I need to work on folios. I am developing several folios.
Downloads fail in case of success or not, do not load the Folio Builder I'm use to.
Paul
Post edited by: Neil Enns, edited to remove personal contact information.
DPS is not supported in InDesign CC 2015. You will need to install InDesign 2014 CC-by-side to use DPS tools, that you have used. See download and install Adobe Creative cloud applications to learn how to install the previous version of InDesign.
Digital Publishing Solution (aka DPS 2015) is supported in InDesign CC 2015.
Neil
-
How to cut and paste the image of the body of the received email
I'm trying to cut and paste an image included in the bottom of an email and insert it into a Word document so that you can size and print. I can highlight, cut it with Ctrl C, paste it into the document Word with Ctrl V, but the image doesn't show, although the picture frame appears when I click on the place where the photo was pasted. Framework, but empty, no image. Any thoughts?
Thanks to everyone for their help.
The problem has been resolved - to try and finally understand everything.
If you encounter this problem, it is perhaps because, unless you know the file format of the inserted picture, programs can not figure it out for you. Place your cursor on the image, right click and save the image under a .jpeg instead of simply copying. Then work with the file .jpeg in any photo management program you use normally - or even insert it in Word.
-
Service existing AppleScript Automator to cut and paste the same image in a conversation of Messages
New to Applescript/Automator-
I want to be able to have a simple shot that will allow me to paste a particular image in a conversation in Messages... It is the same image that I want every time. But I want to avoid having to go to Messages, search for image copy and then turn over Messages to paste. I didn't need the script to automatically display the message, simply cut and paste of the pictures folder so that I am in Messages in a new message to the existing message thread (it makes no sense to me). Be good for this service in the Messages and be available to a hot key combination!
You might want to try the following script to copy and paste an image in the images folder. To launch the script with a quick access key, use FastScripts (free up to 10 keyboard shortcuts).
the value thePictureName to "Test.jpg".
value thePicture to (path to the folder images as text) & thePictureName as alias
say application 'Finder '.
activate
thePicture reveal
end say
delay 1
say application 'System events' to hit 'c' using {control down}
say application "Messages".
activate
if not visible from the window 1 then
say application 'System events' to hit '0' using {control down}
end if
end say
delay 1
say application 'System events' to hit 'v' {control down}
-
The use of paint to cut and paste the face and body in photo?
Original title: need to paint support
I want to use the face of a person to a photo, cut and paste on another body. Any suggestions on how to do it? I am trying to create a flyer for a birthday partyCut it out, open the other image, paste it in, edit by pixel until it seems as you want.
Paint is not sophisticated enough to do much more than that. Heh
Probably something similar to what you want (video)
In case you thought that my answer has been simplified...
http://www.WikiHow.com/change-the-look-of-faces-in-Microsoft-Paint -
Cut and paste the model part of the Photoshop image to .csv
Hi all
I have my own javascript to determine what portion (coordinates) of an image I want to cut.
But what codes can I add to my javascript to paste the image into a model of excel (.csv) that I've prepared on the desktop?
And if the above is possible, how then to control which row/column in excel (.csv) will be the image stuck in?
That's because excel (.csv) is a model, so I need the image to be stuck only in certain rows/columns...
Can someone help me?
Thank you very much in advance.
Very strange, I created the relevant folders and everything seems to work ok here, so don't know what is wrong?
#target photoshop function main(){ if(!documents.length) return; var paper_no=900; var Excel = File("~/desktop/myfolder/records/"+Number(paper_no)+".xls"); var Cell ="C22"; if(!Excel.exists){ alert("SpreadSheet does not exist!"); return; } try{ var SB = app.activeDocument.selection.bounds; }catch(e){return;} app.activeDocument.selection.copy(); var Width = SB[2].as('px') - SB[0].as('px'); var Height = SB[3].as('px') - SB[1].as('px'); var doc = app.documents.add(UnitValue(Width,'px'),UnitValue(Height,'px'),72); app.activeDocument.paste(); doc.flatten(); var tmpFile = File(Folder.temp +"/deleteMe.jpg"); if(tmpFile.exists) tmpFile.remove(); SaveForWeb(tmpFile,60); app.activeDocument.close(SaveOptions.DONOTSAVECHANGES); var VBS = File(Folder.temp +"/VBS.vbs"); VBS.open('w'); VBS.writeln('Set objExcel = CreateObject("Excel.Application")'); VBS.writeln('Set objWorkbook = objExcel.Workbooks.Open("'+decodeURI(Excel.fsName)+'")'); VBS.writeln('objExcel.Visible = false'); VBS.writeln('Set mypic = objWorkbook.ActiveSheet.Pictures.Insert("'+decodeURI(tmpFile.fsName)+'")'); VBS.writeln('mypic.Top = objWorkbook.ActiveSheet.Range("'+Cell+'").Top'); VBS.writeln('mypic.Left = objWorkbook.ActiveSheet.Range("'+Cell+'").Left'); VBS.writeln('mypic.Width = objWorkbook.ActiveSheet.Range("'+Cell+'").Width'); VBS.writeln('mypic.Height = objWorkbook.ActiveSheet.Range("'+Cell+'").Height'); VBS.writeln('objExcel.ActiveWorkBook.Close True'); VBS.close(); VBS.execute(); } main(); function SaveForWeb(saveFile,jpegQuality) { var sfwOptions = new ExportOptionsSaveForWeb(); sfwOptions.format = SaveDocumentType.JPEG; sfwOptions.includeProfile = false; sfwOptions.interlaced = 0; sfwOptions.optimized = true; sfwOptions.quality = jpegQuality; activeDocument.exportDocument(saveFile, ExportType.SAVEFORWEB, sfwOptions); } -
Cut and paste the text of the anchored text box?
CS4, Mac G5, Leopard.
I've recently been investigating scripts in InDesign and I have a problem to solve that exceeds my, base, understand.
I used Rorohiko "Lightning Brain text exporter" to extract text (rtf) of a book.
The text contains countless anchor text blocks. I would like to be able to select all the text in the block of text anchored, cut and paste it into the document where the anchor element is referenced, and then remove the anchor text (now empty) block.
Any help would be accepted with gratitude
Thanks Steve
A full javascript (from the previous post on the forum):
myDocument var = app.activeDocument;
Inlines (myDocument);
function inlines (doc) {}
var doc.stories = St;
for (var i = doc.stories.length - 1; I > - 1; i--) {}
While (st [i].textFrames.length > 0) {}
var ix = st [i] .textFrames [-1].parent.index;
St [i] .textFrames [-1] .texts [0] .move (LocationOptions.after, st [i] .insertionPoints [ix]);
St [i] .textFrames [-1] .locked = false;
St [i] .textFrames [-1]. Remove();
}
}
} -
Cut and paste the tables of a project to another
When cut and paste existing tables from one project to another, the weight of the line for the cell borders appear to vary randomly - some are the original line weight and some are heavier when pasted.
I tried to unravel with the properties of the table, but without result dialog.
Is there a quick fix or I'm better import in all subjects, then changing any theme?Hi Colum/Peter,
It is not a custom table, I just need to copy a table from one project to the other.
Blasted my developers (may the fleas of a thousand camels, etc), recently decided to change toolbars in one of our applications. As this toolbar appears in slightly different forms in about 6 tabs, I tried to update the table that shows which icon does what and cut and paste this table in all subprojects that I. Each table then needs only a minor modification for some this subproject-specific icons.
Peter on the right track. When I cut and glued to the table, it is also stuck in a number of lines of HTML associated with styles in the other project. If I delete these lines, the table will appear as it should.
Thanks for the quick reply
Maybe you are looking for
-
I reinstalled the version 4.01 thinking 5.0 could be the problem. No difference. On the same pages, IE shows no problem.
-
IPencil works with air more old Ipad?
I have and older IPad and I wanted to get the pencil. He says he and the apps like 53 Studio and Notes?
-
I recently watched the new Moto Defy XT at US Cellular. I like the phone, but more important still, there are some OEM applications on the phone I want for my Electrify. They are: eCompass Dashboard MediaSee Any ideas on how I can get these for my El
-
Given the wording and the value setting method
Given a name/value pair, how to set a Panel control with the label name for a value of value? This seems like it should be simple, but I can't.
-
How add/install disk 16 GB SSD setting cached?
Hi all I just bought the HP Envy 700QE Costco desktop computer. I found the guide on this desktop/Tower computer (www.nhangraphic.com/HP-Envy-700QE-Upgrade.pdf) , but nothing is mentioned on how to install/config the extra 16 GB SSD drive caching.