Flip the image
Anyone have idea on how to rotate an image?Roadman730,
If you want to rotate around a point, you may need to use the method of matrices 'translate()' before and after rotation.
For instance, before rotation, translate() to-img.width/2 and - img.height/2. Then rotate, and translate() to + img.width / 2 and + img.height/2.
Who is? Basically, move the image by half the width and height and then back after that the invocation of the rotation is completed.
For more information on the matrix manipulations you can consult the documentation of http://livedocs.adobe.com/flash/9.0/main/00000188.html (there are a few pages of documents, so hit the 'next page' button a couple times), and Senocular.com has an excellent resource on to the http://www.senocular.com/flash/tutorials/transformmatrix/.
Hope that helps. Happy flexing!
Peter
Tags: Flex
Similar Questions
-
Flip the image reversed to laptop?
I tried using a Handycam DCR-TRV320 as a webcam (because of the zoom) connected to a Dell laptop running windows 7 via Firewire. It works fine EXCEPT the laptop shows a mirror image of the camcorder. I'll send the image to Google liked it, if that makes a difference.
Is there a setting in windows or on the camcorder to "reverse" the image on the laptop?
Thanks for any help or advice you have!
Thank you.
I just found the 'solution' - Google + shows all images in reverse video to the sender, but all receivers see the video normally. Nothing wrong with the camera or laptop - only with Google +! Here is the discussion of tris - https://productforums.google.com/forum/#! Searchin'/google-more-discuss/mirror/google-more-discuss/1LC... -j' was able to confirm viewers see things the right way, too.
Weird, but at least I know what is happening!
-
Creation of a Script of Action to cut individual corners on the images in a document.
Hi all
I am a wedding photographer and my album designs involve changing the images to round individual corners according to the flow of the page. Currently, it takes much more time than I like it too and I was looking for a way to contribute to this process take less time.
I currently use the rectangle tool, change to the size of the image and round up the necessary angles with the properties box, then hide the image with the selection of one.
Would it not possible to create an action that could automate this process for each design corner that I use? (IE every single corner, the two upper corners, etc.).
I tried looking everywhere and for the life of me cannot understand it at all.
Hope it makes sense.
Kind regards
Kelsey.
The solution proposed by JJMAck is probably best suited to your needs, if the creation of album pages.
However, to answer your direct question - it is possible to create an action that will apply to every angle of an image little matter the size of the image.
The principle is to save a path in an action that makes a curve at the top left - then invert the whole mask, regardless of the image and repeat the curve at the top left of each time until you get the corners you want.For example, to get the curves on the leash across (up and down) record measures include:
1. Add a layer mask to the layer revealing all
2. click on the link (between the image and the mask) to untie the mask
3. draw a path on the left in the form of a curve - once closed and drawn by clicking on the top right of the palette actions and click "insert the path." This will put this path in your action.
4. click on this way of work in the palette traced, and then on the way to loading as a playlist
5. click on the mask
6 change the black fill (which will create a curve in the mask at the top left
7 edit transform Flip Vertical-(cela sera retourner le masque uniquement, quittant la courbe en haut à gauche en bas à gauche)8. click on the way to work in the palette
9 load path as a selection
10 click mask
11 edit black fill (which will create a new curve on the mask to what is now upper left
12. click on the link to reissue the mask to the image
Variations on that can be used to update the rounded corners in any of the four corners (although it is always drawn on the mask at the top left) - so be independent of the size of the image.
I hope that helps

Result:

Dave
-
Hover over the images in a slide show
I am doing a slideshow of images before and after for a customer.
Rather than having just all one after the other, I want all the images after to display as usual and the front to display the overview of each slide.
I can do this job in a basic slide show when, rather than add a picture to the area of the Image of heroes, I use the fill and the States.
However it only allows me to make one, that I can not add any more empty hero Image boxes (or I don't know how to do, is it possible?)
When I add a picture from the slide show menu, it appears on top of the fills, and I can't give pictures added in this way a roll on the State.
Can someone tell me how to add either extra blanks to hero Image, or how to apply the effect, I want to the images in the areas of the Image of heroes.
Thanks in advance, if there is no additional info I can provide my problem, please let me know!
M
Hello
You cannot add several boxes of hero image in the slideshow even. Now you can use different slideshows for your different images but usually you give the effect of the slide show but you'll be able to see all your images at once and then after if you flipping them you would be able to see the images before.
Now, in order to create the effect you want, what I suggest is to use "Composition something". In the widget of composition, you can the triggers as small thumbnails for your images in the target, you can set the fill as your image after and in the rollover state you can use the image before. After that, you can use the feature of AutoPlay available in the widget of composition, and you will get the desired result.
Hope this helps
Kind regards
Rohit Nair
-
Problem with duplication of the images during distillation
I have an announcement that I created in InDesign. When I export to PDF for proofing it very well. But when I distill to edit it strikes the color of the images overlap. I enclose the images so you can see what I mean.
That's what it should look like:

This is what he does after distillation:

Here's a screen Cap parameters distiller:

And here is my print settings:
Print preset: Dist color
Printer: PostScript® file
PPD: Acrobat Distiller
PPD file: C:\WINDOWS\System32\spool\DRIVERS\W32X86\3\ADIST5. PPDGeneral
Copies: 1
COLLATE: n/a
Switch: Off
Pages: all the
Sequence: All Pages
Spreads: Off
Print templates: Off
Impression of the layers: visible and printable layers
Print nonprinting objects: Off
Print blank Pages: Off
Print visible guides and baseline grids: n/aSetup
Paper size: Custom
Paper width: Auto
Paper height: Auto
Page orientation: Portrait
Paper Offset: 0P0
Paper gap: 0P0
Cross: n/a
Graduation: 100%
Constrain Proportions: on
Page position: centered
Thumbnails: Off
Tiling: OffMarks and bleeds
Crop marks: Off
Brands of purge: Off
Registration: Off
Color bars: Off
Information page: Off
Type of printer brand: default
Brand harvest weight: 0.25 pt
Brand of offset from the Page: 0P6
Use Document bleed settings: on
Top of purge: 0P0
Bottom purge: 0P0
Serving inside: 0P0
Serving outside: 0P0
Slug area: OffOutput
Color: CMYK test
Black text: n/a
Trapping: n/a
Flip: no
Negative: n/a
Screening: default
Simulate overprint: OffGraphics
Send data: all the
Download: full
Download PPD fonts: on
PostScript®: Level 3
Data format: ASCIIColor management
Document profile: US newsprint (WINK 2007)
Color management: Let InDesign determine colors
Printer profile: Document CMYK - US newsprint (WINK 2007)
Keep the CMYK numbers: on
Profile of the evidence: n/a
Simulate paper color: n/aAdvanced
Print as Bitmap: n/a
Bitmap resolution: n/a
OPI Image Replacement: Off
EPS: Off
PDF: Off
Bitmap images: Off
Transparency flattening preset: [medium Resolution]
Ignore spread overrides: OffWe use Distiller 5.0 and InDesign CS5.
Is that affected the color (gold/yellow) a Spot color by chance?
-
Is it possible to sort the images by file name?
I imported a record of 200 images in Photos for OS X (El Captain). Image files have been appointed in the order - I want them to appear in a slide show: photo_01, photo_02 etc...
Once I imported the images - I found them all out of order - and the only options I can find in the view menu are somehow 'oldest first', 'newest first' or ' title '. Please, someone tell me I'm missing something obvious - he and not that Apple chose to omit the possibility to sort the images by name? If this is the case - I'm speechless - how is f - ing stupid!
Sort by file name is not an option in the Photos. Albums and smart albums you yourself set can be sorted by name, date of capture, or manually.
Sorting through the predefined albums is automatic:
- 'Photos' display with moments and collections is sorted by date of capture and the location.
- 'All the Photos' display is sorted by the date of the import session.
- Other built-in smart albums are sorted by the date of capture.
You can see the current sort order, preset, if it is grayed out in the "view > sort ' menu.
As a workaround:
- If you need to want pictures to be sorted by file name, copy the name of the file in the title field. Then, create a smart album of the items and sort by title. We have posted a trick to copy the name of the file in the title field for the selected photos: Script: change the title filename without Extensionor: Script: batch change the titles of the Extension/w
- Or view your photo library in pictures of power. This versatile tool lets you browse photos as a list or thumbnail while looking the other metadata under the thumbnails or displayed as list with columns selected and sorted by columns.
You can do a lot with the free trial: download PowerPhotos here: Fat Cat Software-PowerPhotos
-
Update to iOS 10 stops to record the Image of emails
After the upgrade to iOS 10, I can to is no longer tap and hold on an image received and displayed within an e-mail message to save the Image from my camera in a context menu. Instead, it seems to only be able to save the text of the URL associated with the image. Ditto for images of websites in Safari.
Here's how 'save image' is done 10 IOS:
- Tap and hold the photo (or video)
- Press "Quick Look".
- Tap upward facing arrow coming out of the box (lower-left)
- Press 'Save Image'.
-
is it possible to remove the camera given the number of image and replace it (in a change of badge) with a personal number (is it possible in Aperture)?
No - you can add a title that can be displayed below the image
LN
-
When I click on "Copy picture", when I use the dough, it's to show the image URL
Hello
I'm having a problem about the exemplary Image resource. I need to copy and paste a lot of images to work.
I click on an image, holding control and then press "copy picture". But when I paste, it shows the URL of the image and not the image. I tried on different browsers and apps, but the same error occurs.
Can someone help me please? How should I do? It has changed from one day to the other.
Thank you
It looks like you use context Menus to copy your images. Depending on your machine or software, each user will have different contextual shortcuts.
You might do better to use an application like SnapnDrag, which is free in its basic mode.
-
How can I get the images to display in order of filename on my iPad?
I have about 800 images I use in teaching Kinesiology, and their file names provide the structure (they are named by the chapter number then the image). How can I get to display in order of file name in 'photos' on my iPad?
Second, how can I check the file name while I look at the pictures (so I can see where I am in the bridge of 800 and also inform students what image I'm referencing)?
Thank you!
I'm sorry but there is no way to do this. The iOS system is currently not able. This article can help explain how iOS displays images. Order of Photos in iOS
The only alternative would be to create an Album in the Photos App (you can rearrange manually) or use a 3rd party App. None Displays the names of files. You may need a MacBook to do what you want.
-
I have a HUD following my cursor with info on the image. How can I get rid of him?
One of my Mac Pro, there's a HUD display with information about the image. It sticks to my cursor, and making it difficult to work. I'm sure there must be a command to stop this, but I'm not. I have another Mac Pro at work, and he does not. Any help would be appreciated.

It's probably the Tooltip Metadata.
You switch on and off with the key combination command-T or the browser and menu overlay metadata visualization:

-
- Thunderbird v.38.4.0 *.
Not sure if the title makes sense, but I'm trying to find out if there is an option for Thunderbird display images as thumbnails, when you search for an image to be inserted into the body of an email? In other words, is possible that I can see what the images are, through Browse, before I "insert" in the body of the email. IE: thumbnails?
Usually, it would be somewhere in the display options, where you can choose the size of icons, but the look on things, I don't think there are a thumbnails option, but I wanted to confirm this.
If this isn't the case, it is a great option for future generations. It just makes so much more easier if embed you images, rather than tie them.
Kind regards
b1rdIt shows the photos here for large or medium-sized icons, win 10. Open File Explorer and look at the display settings under Options files (see photo).
-
When I'm working on a project of e-mail, why the images keep disappearing?
Sometimes, I'm working on a project of an e-mail for a long time. Sometimes I'll still send it to me and then continue my work with Ctrl-E.
In the process, the images I inserted in the e-mail often disappear. Or sometimes it loads even the false image.
Thank you very much.
Peter
-
Why the images in my file not loading not when I load file to a HTML doc?
I produce a HTML e-mail announcement that I discovered on a web browser. Firefox to view everything correctly, but he ceased to show the images. That's happened? I pasted in the code below. Please let me know what the problem is. The doc is displayed properly in Chrome. Thank you!
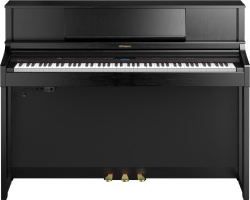
<!DOCTYPE html PUBLIC "-//W3C//DTD XHTML 1.0 Transitional//EN" "http://www.w3.org/TR/xhtml1/DTD/xhtml1-transitional.dtd"> <html> <head> <meta content="text/html;charset=UTF-8" http-equiv="content-type" /> <title></title> </head> <body alink="#0000ff" bgcolor="#e5dcd3" link="#000000" style="font-family: Verdana,Arial,Helvetica,sans-serif; font-size: 10pt;" vlink="#0000ff"> <div style="width: 650px; margin: 0pt auto;"> <table align="center" bgcolor="#ffffff" border="0" cellpadding="0" cellspacing="0" width="650"> <tbody> <tr> <td width="650"><img align="none" alt="SmallBCGVRHeader2" border="0" height="85" hspace="0" src="https://9c0b1b2065-custmedia.vresp.com/82f64e030c/SmallBCGVRHeader2.jpg" style="width: 690px; height: 85px;" title="SmallBCGVRHeader2" vspace="0" width="690" /></td> </tr> <tr> <td style="padding: 10px; background-color: rgb(242, 242, 242);"> <div style="color: rgb(255, 255, 255); font-size: 13px; color: rgb(218, 165, 32); text-align: center; text-decoration: none;"><a href="http://baychoralguild.org">HOME</a> <a href="http://baychoralguild.org/aboutbcg">ABOUT</a> <a href="http://baychoralguild.org/concer" t="">CONCERTS</a> <a href="http://baychoralguild.org/tickets">TICKETS</a> <a href="http://baychoralguild.org/contribute">CONTRIBUTE</a> <a href="http://baychoralguild.org/press">PRESS</a> <a href="http://baychoralguild.org/contact">CONTACT</a></div> </td> </tr> <tr> <td valign="top"> <table border="0" cellpadding="0" cellspacing="0" width="100%"> <tbody> <tr> <td style="padding: 20px; border-color: rgb(102, 51, 0);"> <div style="text-align: center;"><img align="none" alt="Carmina Burana" border="0" height="162" hspace="0" src="https://9c0b1b2065-custmedia.vresp.com/library/1443560363/a7f3fa88e9/VRNov2015Header150DI.jpg" style="width: 640px; height: 160px;" title="Carmina Burana" vspace="0" width="648" /></div> <div style="font-size: 12pt; color: rgb(230, 161, 14); font-family: arial,helvetica,sans-serif; text-align: center;"><strong><em>November 20, 21 and 22 in Campbell, Palo Alto and San Francisco</em></strong></div> <!--Body text--> <table align="center" width="610"> <tbody> <tr> <td style="text-align: left; font-size: 10pt; font-family: arial,helvetica,sans-serif;"> <p>Dear Friends,<br /> <img align="right" alt="Instruments3" border="0" height="494" hspace="2" src="https://9c0b1b2065-custmedia.vresp.com/library/1447378200/ea6bce95dd/Carmina Instruments.jpg" style="width: 104px; height: 494px;" title="Carmina Instruments" vspace="2" width="104" /><br /> Our <strong><em>Carmina Burana</em></strong> concert series begins next Friday, at the Campbell United Methodist Church. Rehearsals have been wonderful and great fun! We're really enjoying singing this piece, and are very much looking forward to dress rehearsals next week with soloists, percussionists and the Ragazzi Boy's choir! <br /> <br /> It's not often that we perform with as many different kinds of percussion instruments as are called for in <em>Carmina</em>. Since the percussionists are typically in the back of the orchestra, it may not be easy to see what the instruments look like, especially when they are small or unusual. Just in case you are curious, I have included some images of some, at least, of the percussion instruments. Top to bottom down the right side are triangle, raganella (ratchet), glockenspiel, sleigh bells, snare drum, suspended cymbal, castanets, tubular bells, and the last image is xylophone with crotales (antique cymbals) across the top. Our performance will not have an entire orchestra between the audience and the performers, so you will be able to easily see the percussionists and pianists at work, not to mention the soloists.<br /> <br /> <img align="left" alt="RolandHP605 2" border="0" height="141" hspace="10" src="https://9c0b1b2065-custmedia.vresp.com/library/1447378275/6d53328fbb/RolandHP605.jpg" style="width: 175px; height: 141px;" title="RolandHP605 2" vspace="10" width="175" /><br /> The instrument list also calls for two pianos and a celeste. The pianos will be two Roland HP605 professional level electronic pianos, lent for this performance by two of our Bass choir members, David Goodman and Kim McCall. We rehearsed with the pianos this week - not only do they have amazing sound but with a flick of a switch they turn into the celeste, or the flute or the horn!<br /> <br /><br /> <strong><em>Carmina Burana</em></strong> performance dates, times and <a href="http://baychoralguild.org/contact/directions/"><span style="color:#000000;">locations</span></a> are listed below. Sanford's program notes are posted to the BCG <a href="http://baychoralguild.org/concert/"><span style="color:#000000;">Concerts</span></a> page. Tickets for all concerts will be available <a href="http://baychoralguild.org/tickets/"><span style="color:#000000;">online</span></a> or at the door.</p> <div style="font-size: 9pt; font-family: arial,helvetica,sans-serif;"> <table align="center" height="50" width="615"> <tbody> <tr> <td align="left" width="32%"><b>Friday, Nov. 20, 8:00 pm</b><br /> Campbell United Methodist Church<br /> <a href="http://baychoralguild.org/contact/directions/#campbell">1675 Winchester Blvd, Campbell</a></td> <td align="left" width="33%"><b>Saturday, Nov. 21, 8:00 pm.</b><br /> First Baptist Church<br /> <a href="http://baychoralguild.org/contact/directions/#fbc">305 North California Ave, Palo Alto</a></td> <td align="left" width="34%"><b>Sunday, Nov. 22, 4:30 pm</b><br /> St Gregory of Nyssa Episcopal Church<br /> <a href="http://baychoralguild.org/contact/directions/#sf">500 De Haro Street, San Francisco</a></td> </tr> </tbody> </table> </div> <!--Signature, etc.--> <span style="font-size:10pt;"> Please join us! It's going to be a fantastic concert!<br /> <br /> Mary Holzer<br /> Bay Choral Guild Publicity </span></td> </tr> </tbody> </table> <br /> <a href="https://www.facebook.com/BayChoralGuild"><img align="middle" alt="find_on_facebook" border="0" height="44" hspace="250" src="https://9c0b1b2065-custmedia.vresp.com/7f464ae81d/find_on_facebook.gif" style="width: 144px; height: 44px;" title="find_on_facebook" vspace="0" width="144" /></a></td> </tr> </tbody> </table> </td> </tr> <tr> <td colspan="3" style="text-align: center; background-color: rgb(244, 221, 187);"><span style="font-size: 8pt;">Bay Choral Guild: <a href="http://baychoralguild.org">http://baychoralguild.org</a> | P.O. Box 597, Los Alto, CA 94023 | [email protected]</span></td> </tr> <tr> <td colspan="3" style="text-align: center; background-color: rgb(244, 221, 187);"><img align="none" alt="footer" border="0" height="48" hspace="0" src="https://9c0b1b2065-custmedia.vresp.com/61f94d1e13/footer.jpg" style="width: 600px; height: 48px;" title="footer" vspace="0" width="600" /></td> </tr> </tbody> </table> </div> </body> </html>
I see a lot of images in your message in Firefox 42 (screenshot attached), so I think that the code works.
You view the message in a private window? If so, could you verify content blocked, that is, a shield icon on the left end of the address bar. More information: Tracking in private browsing Protection.
Otherwise: the problems that cause to not show images.
-
Hallo why? When I update ios. When the image has finished error itunes and usb
Hallo why? When I update ios. When the image has finished error itunes and usb
Connect the iPhone to the computer that you are synchronizing usually with
and follow the prompts to iTunes on this computer. If you
do not generally in sync with a computer, you should always use
iTunes on a computer to complete the update.


Maybe you are looking for
-
Problem opening of 8 OALD and HOT 3 when one of them is already running.
I have a dictionary Oxford Advanced learner 8th edition and Cambridge Advanced learner Dictionary 3rd edition installed in my computer. If a dictionary is running, then when I try to open the other, it does not work. I want to use both dictionaries
-
Upgrade Windows 8.1 of Windows 7 Home Premium on Acer Aspire X1420G Compatible question?
Upgrade Windows 8.1 Windows 7 Home Premium on Acer Aspire X1420G Compatible issue with UEFI followed the v2.3.1 Errata B and has the authority of Certification Microsoft Windows in the base of signatures UEFI What I have to do a clean install of Wind
-
Is there a way to disable the controls to change fonts
Is there a way to disable the controls to change the fonts, patterns and other elements of color like that? I work with kids that I need to make them practice their typing but they are more interested in changes all these features they don't type. TH
-
WMP only streaming media in the same folder
IM using wmp to transmit to my av receiver and have all of my music stored in the folder music defult. all files show in wmp on my pc, but only 1/4 show on my receiver.
-
Impossible to get WebVPN working on chassis VPN 3030
This v4.1.7P chassis works perfectly for our installation of the client vpn Cisco, no problem. We have decided to extend its usefulness by turning on and configuring WebVPN. I did it on a router IOS, Cisco 1841, works very well, so I'm following the