The passage of the part of an image that shows through a clipping mask?
In CS5, after having has been using text clipping mask to mask an image, is there a way to move the image to a new location, so a different part of the image shows the text?
Thank you.
Web.Boards,
You can select the image with the direct Selection tool, or through the palette layers/panel and move it (with the arrow keys, ClickDragging, with object > Tramsform > Move, or something else). or just ClickDrag it from the beginning.
Tags: Illustrator
Similar Questions
-
I try to download my previously purchased Creative Suite 6. I get a message that the archive parts are missing. Download all the parts. What does that mean?
Hey Bailey,
Please see this link:
Download Creative Suite 6 applications
I hope this helps.
Concerning
Megha Rawat
-
Isolating and expanding the part of an image
I have CS4 and that you want to isolate a small part of an image and expand then superimposed on the original image with a border and an arrow pointing to the original location.
Dave
Hello
I've set up a quick tutorial showing how to get the result that tman posted. If I CS6, the process should be about the same.
Isolate / expansion of a portion of an image:
(1) here is my original image:

(2) use the Rectangle or the elliptical selection tool to draw a rectangle around the area you want to isolate and enlarge.

3) press Control C to copy the selected area of the image and the Command V to paste. The section will be duplicated on a new layer, but it won't be easy because it sticks exactly in place.

4) press the V key to select the move tool and reposition the isolated part where you want.

(5) hit Command T to switch to Change Mode. Hold down the SHIFT key and drag one of the corners of the box to scale the image proportionally. Pressing enter will be out of the way of transformation and leave the image in place.

Adding a line to an object:
(1) decisions that you have the correct layer selected (the one that contains the isolated image), click the icon below marked effects to open a launcher. Choose the race.


(2) in the dialog box change options as desired, and then click OK.


Create an arrow:
(1) select the line tool, which can be hidden under the Rectangle tool.

(2) at the top of the Photoshop window, there will be options to apply to the line that you draw. Choose a background and outline, and then click the gear icon to open the option of arrowheads . Select end and set your desired weight.

(3) draw an arrow by clicking and dragging.

Note: where the CS4 interface seems very different for the arrow options, try using the directions in this link.
I hope this has been helpful and please let us know if you have trouble with these instructions. We are happy to help you!
-
Levels, curves and exposure do not work on the parts of my image. Why?
I have an image that I made in 3ds Max 2013 using iRay. There is a visible horizon line present in the image I am trying to change. However, levels adjustment, curve or an exhibition does absolutely nothing for the part of the image that I'm trying to change. However, they work on the parts im not trying to change. I don't know that what explains very little, then here is a lower res version showing whats up. Try to change the levels on the layer of TV; Matt shadows and the horizon line remain the same, then the TV adjusts as expected.
http://www.sendspace.com/file/u38sdr
What happens here?
Edit: Photoshop CS5 x 32 / x 64
There is no "mess." The horizon on the ground have been reported as something superior perfectly transparent using any process used to create the image. Either you need to return back to the original rendering process to change that, or you pouvez adjust as a layer mask...
Choose layer - layer mask - transparency.
Then you can do at the edge of the black mask - for example, with the tool burn shadows - the value to make them transparent.
-Christmas
-
What is the maximum number of images that you can import as a sequence in first Pro CC
I do a lot of big engineering according to time is lapses that may include anything between 3 and 12 thousand images. When I import into Premiere Pro CC as a sequence - only about a 1/3 rd seem to be included in the imported sequence.
Has anyone previously met and is it possible that I can work around the problem.
Thanks in advance.
OK... after having looked closely for files that are created by the GOPRO it would seem that the problem all by using the original sequential file names. I found that if I rename the files during import (Lightroom) to something simple like TL1, TL2.jpg etc, then I can import the entire sequence without any problem.
Thanks to Shooternz and Jim for their suggestions.
-
I created a file of projection for a cd-rom. In the project file, we have added buttons to display full-screen or return to the screen 800 x 600. I imported our company logo which is only available as a bitmap. In the flash program, I put across the 1200 dpi at reduced size logo. However, I noticed that the logo is horrible when scaled to small. But you click on the button to enlarge to full screen, the logo looks great. Flash seems to understand that big logo real size will be read better in full screen, but cannot manage the bitmap well when you scale to a smaller size. So I did a test where I saved the logo in Photoshop at the small size. It looks very small, but when you expand to full screen, the logo appears blurry. In other words, I don't get the best of 2 worlds. Is it possible to have a bitmap image appear visually crisp at full screen or smallscreen? I tried to save at different resolutions such as 500 dpi, 400 dpi and 300 dpi. 300A almost what I want, but seem sweet when you cut them in full screen.
Depends on a lot of things. Have you tried the 'use smoothing' option in the import of bitmap window? A logo is also still vector exactly due to similar reasons. If you can recreate it in a vector format you wouldn't have problems.
Another way to take is to calculate for the highest resolution at which the flash runs (usually 1920 x 1200) (very few people have higher resolution screens, and even 1920 x 1200 is a rare case, 1680 x 900 - more likely) and adapted the logo in Photoshop to this resolution.
This could also be a bug in the version of Flash you use. Another option is to have 2 images to 800 x 600 and full screen and change them accordingly with ACE (you can detect if the player goes to fullscreen or not with ACE)
But the most likely reason is that you have a bug in your version of Flash... 1200 dpi also seems too gigantic to purposes not printing, maybe the reason why you encounter the bug.
-
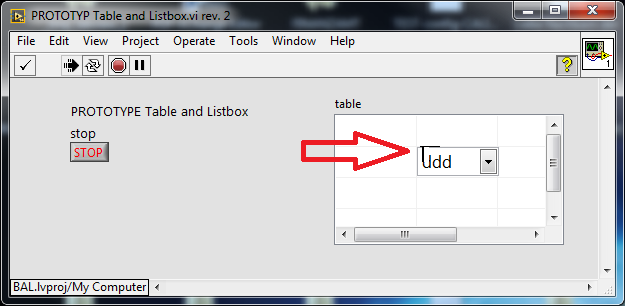
Control ring during the cell table, but cell entry shows through
Hello world!
I have a control panel with a control of the ring which is placed above the active cell on MouseUp.
Unfortunately the input query (or the old value) of the cell is shown through the ring-control,.
that's not pretty.
screenshot:
I tried different ring-controls, but they all have the same behavior.
Try to find answers, but the guides to build the configuration of the table-ring that I found it.
does not mention a solution.
I hope that some of you have seen the same problem
and could point me in the right direction.
: cheers: thx for your time and
jwscs
PS. : If the sample code is required I'll gladly provide
OK, shortly after the display of my question, I had another idea
I disabled the front table and that did not work, because the rows and columns of the selected cell
cannot be determined,
But turning off right after the selection and then later reactivation, resolved at present.
I would be happy to know that any other method that you guys came.
: cheers:
-
How to close a form image drawn to create a clipping mask?
Hi friends,
I hand - drew a skirt, took a picture of my design and trace the image to create a vector of my image. I now use the clipping mask to fill my skirt with a pattern of drawing. See my skirt of drawing and model below.

The only problem is that my drawing is not closed. In the upper left corner of the skirt, there is this opening in the drawing (detail shot below). What is the best way to bridge that gap, so I can use the image as a clipping mask?
Thank you!

Use the shapebuilder tool to fill the inside of the skirt with a color (any color)
To close the gap, first double-click the tool in the tools Panel to enable detection of space.
The colorful filling can be used as a clipping mask.
-
How to describe the part of an image with color
Can someone walk me through how to describe this logo in color? It has jagged edges, which are difficult to see in white, but I want to expose the logo all in yellow. No idea how. Thank you!

autumns33771245 wrote:
Can someone walk me through how to describe this logo in color? It has jagged edges, which are difficult to see in white, but I want to expose the logo all in yellow. No idea how. Thank you!
- Open the file
- Activate the selection tool while holding the SHIFT key, drag on a circle to embrace the logo and elliptical
- Go to Image > culture
- Place the logo cropped on its own layer (CTRL + J)
- Set your foreground to yellow color chip
- Press CTRL + left click the thumbnail of the layer on the layer with the logo (not the name) to load the logo
- Go to Edition > selection of contour (outline). Place of the race inside, try 4 px width, ok it
- Activate the tool magic wand and left-click on a white box, then hit delete on the keyboard
- Place a layer of vacuum between the background layer and the layer with the logo. I filled in black for the demonstration.

-
Make the text appear in the box when the user clicks on the part of an image
Is there an easy way to do this in the Muse?
(1) do different areas of an image map.
(2) automatically type the letter 'A' in a text box when the user clicks the area 'A' and so on.
Thank you!
Essentially, you want a keyboard on the screen? This is not possible with the standard tools of Muse. It would be quite simple with Javascript, however.
David
-
Can I set the points in an image that I want the corners?
Hello
There is a screen with perspective comped in the shot. I want to zoom and make sure the display full screen.
I see not a way to compensate the angles of the corners--like changing the UV coords - put them in the corners of the screen, so I can then just drag their XY to the actual corners of the screen.
Is there a different effect to that perhaps?
See you soon
The only way to attach the corner to something else than the corner would be to use NULL values and expressions. You must place the NULL values on the corners of the screen and then attach each null to the appropriate angle by calculating the difference between the position of the null values and the angle of the video. You would then move NULL values at the corner of the model. I don't have the time to write the expression for you, but if you're all good mathematical language and expression of java, it shouldn't be too difficult.
Here's the problem with your idea, when you use corners like that you're effectively amplify the image and text and fine lines in a normal UI on a computer will quickly disintegrates and look horrible. A better option would be to take a screenshot or a video screenshot of the computer screen and then attach to the screen using corners. This would reduce the screenshot in the first part of the picture and then return it to scale to 100% at the end. It will produce a much more credible compound. You still have problems with fine lines and text as they are rendered in the video, but they will be much easier to manage.
-
Unhappy with the quality of an image that I fired
Hello. I have an AdobeStock_60091673 license. When I saw the file in photoshop to 100% of the size of the background image is not not strong, its like if they used some lowres elements in their edition, and I can't use this image of quality, if I need to expand it a bit, it's just starting to look horrible. There are also some pixelation in the color gradients. Please could you credit me - I'll get another rather appropriate Imaging. Thank you.
Hello
Please try the image of the license.
In case you're just clicking on preview, you will get only a low resolution image. Please click the link highlighted in the screenshot below:

I hope this helps!
Kind regards
Sheena
-
IE 7 and 8, the photos does not, image slide show works not
I invested hours and hours and hours on my site, only to discover that what I see on my computer, it is not what others (users of versions of IE 7 and 8) see. I decided to read other requests on this forum that the Spry Image slideshow widget is a problem for just about everyone. If this widget does not work in IE 7 or 8, is there another widget or another solution so that the photos can be displayed on the Web site?
I would also like to know why some simple pictures on different pages do not load correctly.
The site is:http://nhcstar.org
I don't know in what circumstances you found the error; I tried IE7/8, and see no problem.
The only problem I see is in IE9 which is caused by
You might do well to change this for
This will indicate the IE rendering engine to use the latest version of IE or use the add-on for Chrome, as appropriate.
GRAMPS
-
Reg: Url of the Image that passes through CSS class
Hello
How can I pass the image through Css class?
Thanks in advance.Hello
I don't know if this can be done in the css file as well.
I assume that you use the bean of support for setting the skin (just read your old thread). If so, you can add two images on the page and set the visible property according to the skin. Something like
If I select the second CSS file so the logo will change according to the style class defined in the CSS file first.
As far as I KNOW, the logo of the company would be static;).
Arun-
-
Hello everyone does any one know how to increase the pixels in a picture, the reason is a website I use to develop pictures said I need to increase the pixels to enhance clarity in the photo? Thank you
To increase the pixels, you can try to resize the pictures. But it is important to note that the clarity of a photo, especially when you try to resize, depends mainly on the camera from which you took. If you clicked on the pictures from a low resolution camera, there are limits on the resizing, them and their resizing too can actually blur. However, you can try the options below and see if it works.
You can resize your photos by using Windows Live Photo Gallery. Learn more about Windows Live Photo Gallery and download it to your computer (if you do not already), you can consult the following link:
http://Windows.Microsoft.com/en-us/Windows-Live/Photo-GalleryYou can follow the steps below to resize your photos:
1. click Start and then select all the programs.
2. in the list that appears, navigate to the Windows Live Photo Gallery program.3. Locate and click on the photo you want to resize. Click file and select the option to resize.
4. Select your new size in the drop down "Select a size. Then, click the "resize and save" button to resize and save the photo with its new resolution. Follow the instructions to save the picture resized in your computer.The following link may be useful:
http://Windows.Microsoft.com/en-us/Windows-Live/Photo-Gallery-edit-photos-FAQ


Maybe you are looking for
-
So first open. How do illimate the new show!
It's right there, and I don't want to hear!
-
Is there a way to select all emails, at the same time to delete them all? Microsoft and Gmail have a box in the banner above to check to select at least 10 mails.
-
I have a right click on the area of the taskbar, then properties, then notification where the icons are but when I click on the volume area, nothing happens, no box. Does not also customize.
-
I lost my spell checker in my toolbar
I've lost my spell checker in my toolbar and can not figure how to get this back