Creation of MapTiles in jpeg
Hi allWe try to reduce the amount of data used by MapTiles. Customer, I used for my tests is about 100 GB of MapTiles for now.
Storage size is not a problem, but it display the theme through the internet. To decrease the amount transferred I am looking at ways to reduce the sizes of MapTiles file.
Currently, all our MapTiles are created as png - results are very good.
-The file size is max 180 kb
-Zoomlevel 5
-256 x 256 pixels
-tiles have correct colors
-MapTile gdalinfo:
Pilot: PNG/Portable Network Graphics
Files: 0_17.png
The size is 256, 256
Coordinate system is "
Structure of the image metadata:
INTERLEAVE = PIXEL
Contact angle:...
1 block = 256 x 1 Type = byte, ColorInterp = Red
Hide flags: PER_DATASET ALPHA
Band 2 block = 256 x 1 Type = ColorInterp = green byte
Hide flags: PER_DATASET ALPHA
Band 3 block = 256 x 1 Type = byte, ColorInterp = blue
Hide flags: PER_DATASET ALPHA
Band 4 block = 256 x 1 Type = byte, ColorInterp = Alpha
Creating a new layer of tile map using the same definition but jpeg instead of png causes problems:
-The file size is max 25 KB (would be a nice size, but not very realistic)
-The colors are false: pale, seems as if the color depth has been reduced to 8-bit or lut with few entries
-MapViewer does not display tiles, shows that empty images containing an x
-MapTile gdalinfo:
Pilot: JPEG/JPEG JFIF
Files: 0_17.jpeg
The size is 256, 256
Coordinate system is "
Structure of the image metadata:
SOURCE_COLOR_SPACE = CMYK
INTERLEAVE = PIXEL
COMPRESSION = JPEG
Contact angle:...
1 block = 256 x 1 Type = byte, ColorInterp = Red
Structure of the image metadata:
COMPRESSION = JPEG
Band 2 block = 256 x 1 Type = ColorInterp = green byte
Structure of the image metadata:
COMPRESSION = JPEG
Band 3 block = 256 x 1 Type = byte, ColorInterp = blue
Structure of the image metadata:
COMPRESSION = JPEG
tested with MapViewer-Versions
-1033p5_B080908
-11_B071001
-11_1_1_B090416
Am I missing a setting or something, is that what I can do to fix this problem or is already a known issue?
Thank you
NilsO
Edited by: NilsO the 17.09.2009 09:45
Hi again.
Here is the problem I think:
You bgcolor = 'none' in the definition, it means, that in the layer of maptile edition page you specified the background to be transparent, but jpeg does not support transparency.
try disabling the checkbox
Best regards, michael
Published by: MickleSh on September 17, 2009 13:07
Tags: Fusion Middleware
Similar Questions
-
Creation to keep present during export to JPEG
I shoot raw and then develop and export images in jpeg format in OSX, new files show the date of export as the dates of creation and modification.
How can I keep the date of shooting as the creation date to sort the images in the finder properly?
(using LR 4.1 and OS10.8)
Dates of 'Création' and 'Change' have no relationship whatsoever to the 'Capture' day image, alias "Date time Original". The first two are the dates (and times) created by the operating system and reflect the time that the file was written to the disc and has been modified. Initially, these two dates will be the same. The date of "Capture" is created behind closed doors and remains in the part of the Exif header of the file on your original files and also included is a derived file (for example, a jpeg export) unless you specifically choose NOT to include metadata when you export.
Assuming that you do not include the metadata when you export, then the date of the "Capture" will continue to be available in the header of the exported file and can be viewed with a viewer. Using WIndows Explorer, it is possible to modify the view to details of 'standard' file to also include many other data from the header of the file, including the date, that the image was taken. See here:

I don't know if the viewfinder has the same ability to indicate the date of the "Capture", but... you may need a file browser specialized for this. But first you must make sure that you include the metadata of files to export...
-
Hello friends! I'm new to every suite design CS5, but I had a blast creating media in CS5. It is much better than a lot of the software that we used in the past.
In any case, I have a question. I have a web button that is two layers, (button is a layer, then logo layers above it). I want to create a rolling button with the layer Layer/logo button as normal button, then the same button layer with a layer of text that says: "Coming Soon" when the cursor passes over it.
I tried using youtube and google searches to find my answer. But none of the tutorials help to make this work.
The following buttons:
Normal

Place the cursor on

Thanks for any help you can give!
What you do is define a
HTML tag that refers to your base image and also include onmouseover and onmouseout attributes that define small excerpts from script code that each charging a different image URL in the src attribute.
-Christmas
-
Hello, I have a question about the creation of Photo of HP software. East - the possible result of photo Edition of project save a graphic file (JPEG, BMP, etc.)?
Hello
You can download the ways that you can save them as:
You can download .bmp, .gif, .png and .jpg file formats to use in your photo creations.
and:
Change or edit the saved project files is not recommended or supported. If you try to Edit a project with third-party software, your project could be damaged. -
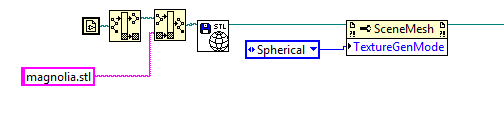
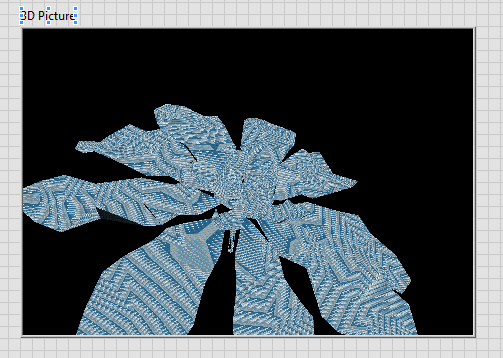
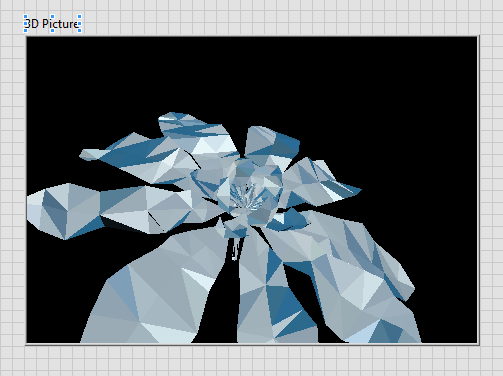
Can I use a jpeg image to define the texture on an object in scene I created from a stl file?
I want to create an object in a 3D scene, whose shape is defined in an stl file. Then, I want to put a picture of a jpeg on the surface of the image by using the texture property. If I create the object by using, for example, the Box.vi creation, instead of the stl file, I can apply the jpeg format. But as soon as I create the object of the stl file, the jpeg format can be applied. Any ideas or is it just not possible?
Example VI, stl and jpeg attachments.
By default, the texture of the stl is disabled. You can activate the texture by using this property.
Now, you must also set horizontal and vertical mode for the decal to apply packaging. Below, I repeated and linear and spherical. It applies to the texture, but there is work to map to the polygons.
-
XP Media Ctr ' 05-03 student Office - make a Pic of 2 x 2 of. JPEG?
I have an old Photo Shop Elements 2.0 that I would prefer not not re-install just to Mod a photo JPEG/do a pic of 2 x 2 for a credit card.
I don't have 03 Office Visio as a result of Google allowing to do, I'm so good that I have to spend $15 or re-install the elements?
Thank you, Kim. I doubt it works as the best I've done is open Paint, Image/attributes, and note that the data showed 180 pixels per inch. I changed to 360 x 360 (2 inches) and opened and located to a JPEG of existing desktop which is actually smaller than 2 x 2 when it appears in the paint box 360 x 360 pixels. The image is not active, so I can't stretch it to fill the space of 2 x 2.
I'm not stupid computer, but do not have the expertise to get much further. Appreciate the answer!
=====================================
The next free site should work for you:Try this online site to create passport photos.
You can create a page of 4 x 6 with 6 photos and
Then download it to your computer and print it out
as a 4 x 6 picture.
http://www.epassportphoto.com/Follow these steps:
(1) get my free Passport Photos.2) browse to the image / next /.
(3) when the image is uploaded...
Drag a box around the face / following /.(4) download and print.
(5) save the photo in a folder on your hard drive
and print it as a 4 x 6.Or you could try the freeware FastStone Image Viewer:
Creation of a Photo ID:
You need to crop your image to 2 x 2 "
and print it exactly this size...The free FastStone Image program
Viewer can do what you ask.(FWIW... it's always a good idea to create a system)
Restore point before installing software or updates)FastStone Image Viewer
http://www.FastStone.org/FSViewerDetail.htmFirst, you will need to download and
install the program.Now, open the program and select
the image that you want to create the
Photo ID with. The selected
image is displayed in the lower left corner of
your screen.Now, go to... Edit / Council of cultures. (or type... (X)
Click on the button 'Set Ratios of paper'.
(it's just to the right of the proportion of paper
fall of window)Click on the 'Add' button and enter... 2 x 2 "
Click on... Ok...Open the "Ratio of paper' drop window
and select 2 x 2 ".Left click / drag a rectangle around the exact
portion of the image that you want to include
in your photo ID done. You can
resize by dragging corner handles
and replace it by dragging the 4 channels
arrow. At the end... Click the "crop".Now... to... File / print...
Open the 'Size' drop window and choose
'Normal '.Click on 'print '.
Volunteer - MS - MVP - Digital Media Experience J - Notice_This is not tech support_I'm volunteer - Solutions that work for me may not work for you - * proceed at your own risk *.
-
How can I change a photo in JPEG mov format
I accidentally took some photos to the mov format, not knowing what I was doing... (do not ask)... but now I can't do anything with them. I tried to put them in movie maker, but it said I needed a codec, it's... I just make them regular images...
Thanks, teri
I accidentally took some photos to the mov format, not knowing what I was doing... (do not ask)... but now I can't do anything with them. I tried to put them in movie maker, but it said I needed a codec, it's... I just make them regular images...
Thanks, teri
=========================================
Most of the digital cameras... even cell phones, have an option for
creation of video clips. MOV is the Format QuickTime video.So... instead of stillshots, you have created video clips. The
best way I know to create even a shot of a video clip is
for a screenshot. The resulting photo won't equal
in its resolution of ordinary digital photos but it will be your
best option.The free VLC Media Player can read your. MOV files
and it has an option to make the screenshots and recording
them in JPEG format in the folder of your choice.(FWIW... it's always a good idea to create a system)
Restore point before installing software or updates)VLC Media Player
http://www.filehippo.com/download_vlc/
(works on XP/Vista/7)
(the name of the file to download is: vlc - 2.0.3 - win32.exe)Once you have downloaded and installed... VLC go to
the folder of your. MOV files are saved in the and right-click
a thumbnail or file name... in the menu... Choose...
Open with / VLC Media Player.For the installer for your screen Capture... Open VLC and
Reach... Tools / Preferences / video button / video
Instant image section.In the directory field... Search for and select a folder
to save your captures po (for example... you could
Create a new folder on your desktop and select)TO... Prefix... check the box... Sequential numbering.
TO... Format, choose JPEG or PNG.
Finally... on the left, click on the Save"" button.
Now... Play the video and pause by pressing on your
SPACEBAR when you see a screen you want to capture.To capture the screen... type... SHIFT + S
Press space to advance to the next photo...
ect... etc... -
What is best soft CC for the creation of a DVD of a slide show, please?
Hello team!
I have nine jpeg images I need to run a simple loop on a 32 '' tv with crossfade. I am subscribed creative cloud so I have access to the most recent CC applications. I usually make videos in Premiere Pro, so I tried body for my project, exported a via Media Encoder .m2v file and created a DVD using Encore CS6. I don't have any white Blu ray so I have not tried export/creation of a comic book. Reading through the SD DVD resolution is not acceptable. I need the sharp images, without unwanted artifacts. I even tried Lightroom, but had even worse results.
I've provided, I hope, the necessary information below to help you help me determine the best application/settings/etc to make a DVD of high quality of these images.
My system:

My typical asset:


(image is 90 degrees on purpose;) TV will be mounted vertically)
My sequence:

My agency export settings:

I noticed that the Width and Height parameters are locked; don't know if this is part of my problem.
Is anyone able to help? Thanks in advance!
Hello
Resolution of the images you use in this project is 8250 x 4650.
And that you export MPEG 2 DVD, which will give you a resolution of 720 x 480.
This option (width & height) is not locked, it is a limitation with this format.
Video high definition may be stored on Blu - ray discs with up to 1080 p resolution (1920 × 1080 pixels), to up to 60 (59.94) field or 60 frames per second.
However, DVD discs had been limited to a maximum resolution of 480i (NTSC, 720 × 480 pixels) or 576i (PAL, 720 × 576 pixels).
Thus, you degrade the quality of the images of 8250 x 4650 up to 720 x 480.
In addition, Adobe Encore is the only option for DVD/Blu-Ray.
Thank you
Ilyes Singh
-
I need to create a contact using Lightroom sheet. I get this error message when I try. I had just created one, and then when I tried to create another I could not. He always says "Adobe PDF creation cannot continue because Acrobat is not active."
Could you please install the trial version of Acrobat times compared to the creative clouds and then try to save the file in Jpeg format.
-
How to use a .jpeg .bmp file saved as an aspect of signing in Adobe Reader XI
Hello
I try to use a picture file .jpeg, .bmp which has my Signature look to create my digital signature appearance, I can do this in Standard or pro versions, however if my users have only Adobe reader 11.0.12 that allows them to GIS using a digital certificate Andin the field signature apprance if they want to select a .bmp or .jpeg file that has their signature appeareance there does not provide an option the only type that it provides is .pdf format. You can see under Edit > Preferences > signature > creation and preferences > New > imported graphics > file > Browse
This is possible in Standard or pro.
Appreciate advice or any difficulty about that.

Hi bossombritto,
If you want to scan your handwritten signature, then use the native application of the scanner where you will find an option to detect the sign as PDF. Or you can use Acrobat Pro as a trial for 30 days.
Thank you
Abhishek
-
JPEG 2000 4 k Digital Cinema Export Settings grey and 2 k bitrate used
Hello!
For the creation of a FAD, I need to export a sequence of 4 k JPEG 2000.
With version 2 k it worked correctly, but I need a high 4 k data rate.
Using Premiere Pro SOUL JPEG 2000 export digital cinema export settings are grayed out and limited to the k transmission speed 2 (125 MB/s).
JPEG 2000 settings-> method: Digital Cinema.
There is a profile of DCI (in the advanced parameters of JPEG 2000 tab) for 2 k and 4 k cinema that can not be activated (settings are grayed out).
Y at - it a trick to change the settings to 4 k?
I'm on first Pro CC 2015.0.2 (version 9.0.2) on Win 8.1.
The STC should be flat 4 k 3996 x 2160 (1: 1.85) so j2c 12 bit files for coding are required.
Anyone having the same observation or a solution?
Kind regards
Marcus
Hello world!
Looks like Premiere Pro older systems recognized j2k so I thought export is part of the Adobe standard JPEG2000.
The v2.7 j2k plugin has been updated and solved the problem. J2K
Mentioned on the blog of fnord software but not on the Web site to download and install again to see the difference.
Now it works as expected in 2015 CC as well.
4 k DCI standard 12-bit JPEG2000 export files in the correct color space with mb/s data rate 250 for the use of the DCP right out of first Pro CC 2015...
Kind regards
Marcus
-
I record in JPEG, large file size, but the file saves about 3 MB? Then, when my clients want to put my images on a canvas, etc. image false. But when I use to shoot just JPEG saving used to increase the size of the file and the photos were very good to put on a canvas, etc.
Please help and thanks in advance.
Mark
I'm not a user of the Canon system, so I'm not familiar with their cameras. But I googled your resolution and found a link.
http://www.learn.USA.Canon.com/resources/articles/2011/eos_qt_small_raw_images_article.htm lp
Apparently, you pull something Canon mRAW calls, which is a 10.5MP raw file designed for 4 K devices. In other words, you set your camera to produce small size raw files, less than half of a JPEG full size. Then you use Camera Raw to artificially enlarge these files in order to compensate by using a workflow setting widens. I hope that I don't need to explain the futility in this!
You need to go back to your camera settings, consult the manual and find out how to produce full raw files standard size. This way you do not throw in detail and then the creation of extensions pixelated.
In short, your camera settings are wrong to produce raw files full size. You are then enlarge the images of 2.4 times and that is why they have air c * p.
You must change the setting of the camera RAW, and therefore you should not expand in Camera Raw.
-
HOW TO CHANGE A JPEG DOCUMENT IN AN ILLUSTRATOR DOCUMENT?
HOW CAN I EDIT A JPEG DOCUMENT IN AN ILLUSTRATOR DOCUMENT?
THANK YOU VERY MUCH FOR THE HELP.
farolim,
If you (really) need to change the image into vector illustrations, you can use Live/Image Trace with the best possible settings for the appearance of photolike/skrtchlike or you can use the pen tool and possible other tools for the creation of a piece of clean (er) on top of the locked image, using the latter as a model.
-
Creation of the folios for Android
Dear Adobe community,
before this started, I get:
- I'm using InDesign CS6 Digital Publishing Suite,
- running on a Professional subscription
- and I'm not a native speaker. So please take pity with me ;-)
Some time ago, I created ten folios through an application multi-folio with in-app purchases for the Apple iStore, ran into some issues (which have been resolved by Bob Bringhurst, thank you once again) and now I want to develop for Android. The creation itself was easy, that slips are already online, but do not without falling on key issues.
To define my problem:
- The splash screen does not. Only, it takes as much space as possible and grows around a third of the screen. Is there a "fit screen" - box, I missed?
- The graphics look "rough", naked pixels in a sort of 8-bit-look without the edges soft (or feathers), even if they are PDF. I can't convert them to JPEG format, because I use the same folios as I do for Apple.
- The effects of the erasure of all overlays are also rough. Slide shows, for example, are punching through their content, without letting that images fade out in the next. Maybe it's important to mention: they were created through the slide show option in the Folio Overlay-menu. The same problem occurs with all the contents that appear and disappear. For example: If you activate a card with a button (i.e. telling the app, to pass the object to the empty state 1 in filled State 2), the application takes one second and the map appears hard, smashing into the window from one moment to another, without the bland smooth as it does on Apple products.
- And after some time, a minute or two, the application crashes, leaving the customer blocked for a moment, before him eject to the main screen of his camera.
So far, this is my problem. Honestly, I feel that I missed a few easy step, but necessary for the expansion of Android. Now, the look of folios as some pre-pre-alpha release an Android (with dull graphics and blocks every 60 seconds), while they work fine and smooth on Apple.
I would be grateful for any advice.
BIS denn of Germany,
Maximilian
This article should help:
Digital Publishing Suite help | Development of DPS native apps for Android devices
Depending on your content, you can use a different account for your Android application.
-
Why things look better in PDF format before converting to the JPEG/PNG/TIFF format
He always intrigues my why it looks better in a pdf preview and then when I choose to convert it into Indesign or Adobe Acrobat it immediately loses quality/hues turn gray.
I have had several success screenshotting things and turning them manually and sticking them in a document in fireworks and then saving it as image format.
Is there a better way to convert without using this method? Plug-ins may or explanations on how to stop this?
Thank you
Daniel K.
This is not the appropriate forum, but let's see if we can see what you are doing and why. An overview of the pdf should not look better than exporting InDesign to PDF. This may depend on your settings file that determines the quality of your export to PDF.
Whenever you convert Acrobat or InDesign to JPEG, PNG, or TIFF, you are likely to loose quality. This is particularly true for the JPEG as it is a lossy format (it's supposed to lose quality in order to ensure a smaller file size). Conversion of InDesign or Acrobat in JPEG, PNG or TIFF format involves a change in a format that includes the actual fonts and possibly other vector information (including quality is beyond resolution because it is derived from mathematical formulas describing the content) to form a frame (jpg, png, tiff) which is only based on the creation of points at a certain resolution to create an image. When the resolution of the image file is different from the compromise resolution look a way are made. It is the loss you see.
Why do you need to convert raster images InDesign documents?


Maybe you are looking for
-
Daily crossword to Yahoo do not work in ff, but do so in chrome. Why?
Win7x64 Sp1 FF 13.0.1 I tried to delete the cache and cookies and then upgrade to 13.0.1 nothing seems to have worked. Somewhere along the line I got a message that xw_control.xml had disappeared, but I think that isn't true because chrome seems to w
-
Given that I have install iOS 9.3.1 my iPhone 6 Plus is very slow, in the speakers and keyboard, I can't watch videos in YouTube or Facebook and sometimes do not work the volume buttons and the lock. I rebooted my phone like 10 times and it does not
-
Mini Mac lack of space - 209GB private folder?
Hello. Someone please help. My user folder uses only 150 GB, my hard drive is 500 GB and yet I have 50 GB left! FDI all sorts I tried 'disk inventory X' and "Disk space" but no one could find the data so after some searching on Google I came across a
-
Brand new AXC-115-UR20 produces continuous long beep when turned on, never boots. What gives?
It's the other, I get like this, returned the first. This is a whole new AXC-115-UR20. I press the power button and I get a continuous long beep, display lights never, ever computer of messages. Monitor, keyboard and mouse are connected.
-
Open the homepage of Dell printer gives the error: "Dashbord error has occurred."
Dashboard error message Although my printer works fine when I go to open the "Dell printer Home Page" I get the message "Dashbord error has occurred" and open the page does'nt. " It is the first time I had this problem so if someone can tell me what