How to change the cell height in the apex 5, g-> o, j.-i.
Hi all
When I type a g in the inputfiled, I see o and when I type a j in the inputfield, I see that I have.
My settings:
Type: Text field
When I save the data, the g and j are registered oke in the database.
How can I change the height of the cell in the apex 5?
Thanx.
Best regards
Vinay
Why would you use javascript?
@OP go to the definition of your page > css inline and copy this
input[type="text"] {
   height: 20px !important;
}
Adjust the height of your taste.
There is a chance that you have tried to adjust the font size. This could be the reason why you can not see the parts of letters.
Tags: Database
Similar Questions
-
How to change the APEX 5.0 to an older version of the APEX. ORACLE
Hello
Can someone please help me change APEX 5.0 view older.
Concerning
AnimeshHi Anne,.
Animesh Tripathi says:
Hello
Can someone please help me change APEX 5.0 view older.
Concerning
AnimeshYou mean component mode?
You can switch between the display of component and the designer of the Page.
Edit your page and check the icon at the top right of the page.
Please check the screenshot.
 Kind regards
Jitendra
-
How to change the cell in a data grid
Hai
I pasted the mxml below.
I need how to change a cell in a datagrid control.
1. run the mxml, enter values in the text box and click Add.
2. then click on the button, AND now you can see the values displayed in the grid.
3. can change the second combobox and enter values in the text box and click Add
4. now, I need to change the values for a cell in the datagrid control.
In the code below you can see the column value,
I need to edit oly this cell in a particular row.
Can someone help me.
Thanks in advance<? XML version = "1.0" encoding = "utf-8"? >
< mx:Application
' xmlns:mx = ' http://www.Adobe.com/2006/MXML "layout =" " absolute "
>
< mx:Script >
<! [CDATA]
ActionScript file
import
mx.rpc.events.FaultEvent;
import
mx.controls.Alert;
import
mx.managers.CursorManager;
import
mx.collections.ArrayCollection;
[
Bindable
]
public var adhoc:ArrayCollection = new
ArrayCollection();
[
Bindable
]
public var serverString = ""
;
private function initImage(event:MouseEvent):Sub
{
If
(adhoc.length > 0) {
CursorManager.setBusyCursor ();
}
}
private function onChange():Sub
{
If
(comboBox.selectedIndex == 0) {
}
on the other
{
}
}
private function onChange1():Sub
{
if (combo2.selectedItem == 'DATEDEPLOYED' | combo2.selectedItem == 'DATEUPLOADED' )
){
datepick.visible =
true
txt.visible =
fake
}
on the other
{
txt.visible =
true
datepick.visible =
fake
}
}
private function add():Sub
{
var
Txt.text = str:string;
if (str.length == 0 & & txt.visible == true )
){
Alert.Show)
'Value cannot be empty.
);
return
;
}
if (combo2.selectedItem! = 'DATEDEPLOYED' : combo2.selectedItem! = 'DATEUPLOADED' )
){
if (txt.visible == true )
){
var temp: Object = new
Object();
Temp.fname = combo2.selectedItem;
Temp.Opera = combo1.selectedItem;
Temp.Val =
"'" + txt. Text+ "'"
;
adhoc.addItem (temp);
txt. Text =
""
;
}
}
var
str1:string = datepick.text;
If
(comboBox.selectedIndex == 1) {
if (combo2.selectedItem == 'DATEDEPLOYED' | combo2.selectedItem == 'DATEUPLOADED' )
){
if (str1.length == 0 & & datepick.visible == true )
){
Alert.Show)
"The date cannot be empty.
);
}
on the other
{
var temp: Object = new
Object();
Temp.fname = combo2.selectedItem;
Temp.Opera = combo1.selectedItem;
Temp.Val = datepick.text;
adhoc.addItem (temp);
datepick. Text =
""
;
}
}
}
AddButton.Enabled =
fake
;
addopenbracket. Enabled =
fake
;
combo2. Enabled =
fake
;
Combo1.enabled =
fake
;
}
private function querydelete():Sub
{
If
(AdHoc.selectedIndex > 0) {
If
(AdHoc.selectedIndex == (adhoc.length - 1)) {
ad-hoc [AdHoc.selectedIndex - 1] = .cond
""
;
addopenbracket. Enabled =
fake
;
addclosebracket. Enabled =
fake
;
AddButton.Enabled =
fake
;
combo2. Enabled =
fake
;
Combo1.enabled =
fake
;
}
combo2. SelectedItem = ad hoc [adhoc.length - 2] .fname
Combo1.SelectedItem = ad hoc .opera [adhoc.length - 2]
adhoc.removeItemAt (AdHoc.selectedIndex);
adhocdetailgridcompilance.dataProvider = null;
adhocdetailgrid.dataProvider = null;
}
else if
(adhoc.length == 1) {
adhoc.removeItemAt (AdHoc.selectedIndex);
adhocdetailgridcompilance.dataProvider = null;
adhocdetailgrid.dataProvider = null;
addopenbracket. Enabled =
true
;
addclosebracket. Enabled =
true
;
AddButton.Enabled =
true
;
combo2. Enabled =
true
;
Combo1.enabled =
true
;
}
on the other
{
Alert.Show)
"Select the lines to remove."
);
}
}
private function andSubmit():Sub
{
for every()var obj:Object in
Adhoc) {}
If
(obj.fname == combo2.selectedItem & & obj.opera == combo1.selectedItem) {
if (combo2.selectedItem! = 'DATEDEPLOYED' : combo2.selectedItem! = 'DATEUPLOADED' )
){
if (txt.visible == true )
){
trace ()"2 is equal to '
);
var temp: Object = new
Object();
obj.cond = and.label
adhoc.setItemAt (obj, adhoc.getItemIndex (obj));
}
on the other
{
trace (obj.fname + « : »
(+ combo2.selectedItem);
trace (obj.opera + « : »
(+ combo1.selectedItem);
trace (obj.val + ":" + "'"+txt.text+"'"
);
}
}
}
else if
(obj.fname is addclosebracket.label) {
if (combo2.selectedItem! = 'DATEDEPLOYED' : combo2.selectedItem! = 'DATEUPLOADED' )
){
if (txt.visible == true )
){
trace ()"2 is equal to '
);
var temp: Object = new
Object();
obj.cond = and.label
adhoc.setItemAt (obj, adhoc.getItemIndex (obj));
}
on the other
{
trace (obj.fname + « : »
(+ combo2.selectedItem);
trace (obj.opera + « : »
(+ combo1.selectedItem);
trace (obj.val + ":" + "'"+txt.text+"'"
);
}
}
}
If
(obj.fname == combo2.selectedItem & & obj.opera == combo1.selectedItem) {
if (combo2.selectedItem == 'DATEDEPLOYED' | combo2.selectedItem == 'DATEUPLOADED' )
){
if (datepick.visible == true )
){
trace ()"2 is equal to '
);
var temp: Object = new
Object();
obj.cond = and.label
adhoc.setItemAt (obj, adhoc.getItemIndex (obj));
}
on the other
{
trace (obj.fname + « : »
(+ combo2.selectedItem);
trace (obj.opera + ': ' )
(+ combo1.selectedItem);
trace (obj.val + ":"
(+ datepick.text);
}
}
}
else if
(obj.fname is addclosebracket.label) {
if (combo2.selectedItem == 'DATEDEPLOYED' | combo2.selectedItem == 'DATEUPLOADED' )
){
if (txt.visible == true )
){
trace ()"2 is equal to '
);
var temp: Object = new
Object();
obj.cond = and.label
adhoc.setItemAt (obj, adhoc.getItemIndex (obj));
}
on the other
{
trace (obj.fname + « : »
(+ combo2.selectedItem);
trace (obj.opera + ': ' )
(+ combo1.selectedItem);
trace (obj.val + ":"
(+ datepick.text);
}
}
}
}
AddButton.Enabled =
true
;
addopenbracket. Enabled =
true
;
combo2. Enabled =
true
;
Combo1.enabled =
true
;
}
private function orSubmit():Sub
{
for every()var obj:Object in
Adhoc) {}
If
(obj.fname == combo2.selectedItem & & obj.opera == combo1.selectedItem) {
if (combo2.selectedItem! = 'DATEDEPLOYED' : combo2.selectedItem! = 'DATEUPLOADED' )
){
if (txt.visible == true )
){
trace ()"2 is equal to '
);
var temp: Object = new
Object();
obj.cond = or.label
adhoc.setItemAt (obj, adhoc.getItemIndex (obj));
}
on the other
{
trace (obj.fname + « : »
(+ combo2.selectedItem);
trace (obj.opera + « : »
(+ combo1.selectedItem);
trace (obj.val + ":" + "'"+txt.text+"'"
);
}
}
}
else if
(obj.fname is addclosebracket.label) {
if (combo2.selectedItem! = 'DATEDEPLOYED' : combo2.selectedItem! = 'DATEUPLOADED' )
){
if (txt.visible == true )
){
trace ()"2 is equal to '
);
var temp: Object = new
Object();
obj.cond = or.label
adhoc.setItemAt (obj, adhoc.getItemIndex (obj));
}
on the other
{
trace (obj.fname + « : »
(+ combo2.selectedItem);
trace (obj.opera + « : »
(+ combo1.selectedItem);
trace (obj.val + ":" + "'"+txt.text+"'"
);
}
}
}
If
(obj.fname == combo2.selectedItem & & obj.opera == combo1.selectedItem) {
if (combo2.selectedItem == 'DATEDEPLOYED' | combo2.selectedItem == 'DATEUPLOADED' )
){
if (datepick.visible == true )
){
trace ()"2 is equal to '
);
var temp: Object = new
Object();
obj.cond = or.label
adhoc.setItemAt (obj, adhoc.getItemIndex (obj));
}
on the other
{
trace (obj.fname + « : »
(+ combo2.selectedItem);
trace (obj.opera + ': ' )
(+ combo1.selectedItem);
trace (obj.val + ":"
(+ datepick.text);
}
}
}
else if
(obj.fname is addclosebracket.label) {
if (combo2.selectedItem == 'DATEDEPLOYED' | combo2.selectedItem == 'DATEUPLOADED' )
){
if (txt.visible == true )
){
trace ()"2 is equal to '
);
var temp: Object = new
Object();
obj.cond = or.label
adhoc.setItemAt (obj, adhoc.getItemIndex (obj));
}
on the other
{
trace (obj.fname + « : »
(+ combo2.selectedItem);
trace (obj.opera + ': ' )
(+ combo1.selectedItem);
trace (obj.val + ":"
(+ datepick.text);
}
}
}
}
AddButton.Enabled =
true
;
addopenbracket. Enabled =
true
;
combo2. Enabled =
true
;
Combo1.enabled =
true
;
}
public function addOpenBracket():Sub
{
var temp: Object = new
Object();
Temp.fname = addopenbracket.label
adhoc.addItem (temp);
addopenbracket. Enabled =
fake
addclosebracket. Enabled =
true
if (adhoc.length > 1 & & addopenbracket.enabled == false )
){
AddButton.Enabled =
true
}
}
public function addCloseBracket():Sub
{
var temp: Object = new
Object();
If
(adhoc.length > 1) {
Temp.fname = addclosebracket.label
adhoc.addItem (temp);
addopenbracket. Enabled =
true
addclosebracket. Enabled =
fake
}
if (adhoc.length > 1 & & addclosebracket.enabled == false )
){
AddButton.Enabled =
true
}
}
private function dateChange(date:Date):Sub
{
if (date == null )
){
}
on the other
{
txt. Text = date.getDate () +.
'/' + m:System.NET.SocketAddress.ToString () (date.getMonth () + 1) + '/'
+
date.getFullYear () m:System.NET.SocketAddress.ToString ();
}
}
public function saveadhoc(event:Event):Sub
{
var AdhocRows:String = ""
;
var
i: int;
var
selectedType = comboBox.selectedItem;
If
(adhoc.length == 0) {
Alert.Show)
"Enter the query."
);
}
on the other
{
for
(i = 0; i < adhoc.length; i ++) {
if (ad-hoc .fname [i]! = null )
){
AdhocRows = AdhocRows + ad hoc [i] .fname +.
" "
;
}
if (ad-hoc .opera [i]! = null )
){
AdhocRows = AdhocRows + ad hoc [i] .opera +.
" "
;
}
if (.val adhoc [i]! = null )
){
AdhocRows = AdhocRows + ad hoc [i] .val +.
" "
;
}
if (ad-hoc .cond [i]! = null )
){
AdhocRows = AdhocRows + ad hoc [i] .cond +.
" "
;
}
}
var Parameters: Object = {adhocquery:AdhocRows, FlexActionType:'ADHOCQUERYSUBMIT' }
adhocType:selectedType};
adhocClick.send (parameters);
}
}
private function retrieve():Sub
{
datepick.visible =
fake
txt.visible =
true
}
[]] >
< / mx:Script >
< mx:Array id=" model "
>
< mx:String > TYPE < / mx:String >
< mx:String > AUDITRESULT
< / mx:String >
< mx:String > CATEGORY
< / mx:String >
< mx:String > CHILDRULE < / mx:String >
< mx:String > PARENTRULE
< / mx:String >
< mx:String > AUDITGROUP
< / mx:String >
< mx:String > LOCATION
< / mx:String >
< mx:String > Name of the SELLER
< / mx:String >
< mx:String > DEVICECATEGORY
< / mx:String >
< / mx:Array >
< mx:Array id=" inventories "
>
< mx:String > Name of the SELLER
< / mx:String >
< mx:String > DEVICETYPE
< / mx:String >
< mx:String > SERIES
< / mx:String >
< mx:String > MODEL
< / mx:String >
< mx:String > SUP/CPU
< / mx:String >
< mx:String > CODEVERSION
< / mx:String >
< mx:String > IMAGENAME
< / mx:String >
< mx:String > DATEDEPLOYED
< / mx:String >
< mx:String > LOCATIONNAME
< / mx:String >
< mx:String > Address1
< / mx:String >
< mx:String > Address2
< / mx:String >
< mx:String > CITY
< / mx:String >
< mx:String > STATE
< / mx:String >
< mx:String > COUNTRY
< / mx:String >
< mx:String > FLOOR < / mx:String >
< mx:String > CABINET
< / mx:String >
< mx:String > CATEGORYNAME
< / mx:String >
< mx:String > DEPARTMENT
< / mx:String >
< mx:String > CONTACTNAME
< / mx:String >
< mx:String > CONTACTNUMBER
< / mx:String >
< mx:String > VERSION
< / mx:String >
< mx:String > FILE name
< / mx:String >
< mx:String > DATEUPLOADED
< / mx:String >
< / mx:Array >
< mx:Accordion x=" 13 " y=" 55 "width = » 230 "height = » 492 "
>
< mx:Form
" label = ' AdHoc Query Analyzer "width =" " 100% " 'creationComplete ="retrieve ()' height = ' 100% "color =" " #F2F8F9 "backgroundColor =" " #020202 "
>
< mx:Canvas " label = ' Query "width =" " 204 "height =" 440 "backgroundColor =" #020202 "" "
>
< mx:ComboBox x=" 66 "y =" 287 "width =" "id =" comboBox 134 "dataProvider =" [COMPLIANCE, INVENTORY] color "change ="onChange ()"=" #050505 " " > "
< / mx:ComboBox >
< mx:ComboBox x=" 5 "y =" 344 "width =" "id =" Combo1 109,25 "dataProvider =" [=!, "" =, >, > =, & lt; & lt; = AS] "color =" #010101 " "
> < / mx:ComboBox >
< mx:TextInput x=" 119,25 " y=" 344 "width = » 77,75 " id=" txt "color = » #050505 "
/ >
< mx:Button x=" 3 "y =" 401 "label =" Add "width =" "click ="Add()"id =" AddButton 59 "color =" #FFFEFE "fillAlphas =" [0.6, 0.4, 0.75, 0.65] "fillColors =" [#FFFFFF, #CCCCCC, #EEEEEE #EEEEEE] "borderColor =" #B7BABC "themeColor =" #009DFF "" "" "" "
/ >
< mx:Button x=" 66 "y =" 401 "label =" Remove "width =" 63,25 color "click ="querydelete ()"=" #FFFEFE "fillAlphas =" [0.6, 0.4, 0.75, 0.65] "fillColors =" [#FFFFFF, #CCCCCC, #EEEEEE #EEEEEE] "borderColor =" #B7BABC "themeColor =" #009DFF "" "" ""
/ >
< mx:Button x=" 2 "y =" 373 "label =" ()"id ="addopenbracket"click ="addOpenBracket ()"width ="45"color ="#FFFEFE"fillAlphas ="[0.6, 0.4, 0.75, 0.65]"fillColors ="[#FFFFFF, #CCCCCC, #EEEEEE #EEEEEE]"borderColor ="#B7BABC"themeColor ="#009DFF"" "" ""
/ >
< mx:Button x=" 51 "y =" 373 "label =" ( )"id ="addclosebracket"click ="addCloseBracket ()"width ="45"color ="#FFFEFE"fillAlphas ="[0.6, 0.4, 0.75, 0.65]"fillColors ="[#FFFFFF, #CCCCCC, #EEEEEE #EEEEEE]"borderColor ="#B7BABC"themeColor ="#009DFF"" ""
/ >
< mx:Button x=" 134.25 "y =" 401 "label =" submit color "click ="saveadhoc (event); initImage (event)"=" #FFFEFE "fillAlphas =" [1.0, 0.69, 0.75, 0.65] "fillColors =" [#77B97A, #77B97A, #EEEEEE, #EEEEEE] "borderColor =" #77B97A "themeColor =" #009DFF "" "" "
/ >
< mx:ComboBox x=" 66 "y =" 317 "width =" "id =" combo2 "change ="onChange1 ()"dataProvider =" {comp} 134 "color =" #010101 "" "
>
< / mx:ComboBox >
< mx:DateField x=" 122.25 "y =" 344 "width =" 74.75 "initialize =" dateChange ((event.target) .selectedDate) "" id =" datepick " color =" #050505 " " "
/ >
< mx:DataGrid x=" 1 "y =" 1 "width =" 203 "height =" "id =" AdHoc 282 "dataProvider =" {adhoc} "allowMultipleSelection =" true "color =" #020202 "" ""
>
< mx:columns >
< mx:DataGridColumn " headerText =" Name "dataField =" " fname " id=" FNAM "
/ >
< mx:DataGridColumn " headerText =" Operator "dataField =" " Opera " id=" OPE "
/ >
< mx:DataGridColumn " headerText =" Value "dataField =" " Val " id=" earned "
/ >
< mx:DataGridColumn " headerText =" Condition "dataField =" " cond " id=" condt "
/ >
< / mx:columns >
< / mx:DataGrid >
< mx:Button x=" 99 "y =" 373 "label =" AND "width =" 52 "click ="andSubmit ()"id =" and "color =" #FFFEFE "fillAlphas =" [0.6, 0.4, 0.75, 0.65] "fillColors =" [#FFFFFF, #CCCCCC, #EEEEEE #EEEEEE] "borderColor =" #B7BABC "themeColor =" #009DFF "" "" "" "
/ >
< mx:Button x=" 154 "y =" 373 "label =" OR "width =" 49 "click ="orSubmit ()"id =" or "color =" #FFFEFE "fillAlphas =" [0.6, 0.4, 0.75, 0.65] "fillColors =" [#FFFFFF, #CCCCCC, #EEEEEE #EEEEEE] "borderColor =" #B7BABC "themeColor =" #009DFF "" "" "" "
/ >
< mx:Label x=" 7 "y =" 291 "text =" TYPE "width =" 59 "fontWeight =" "BOLD" "" ""
/ >
< mx:Label x=" 5 "y =" 319 "text =" DISPLAY "width =" 59 "fontWeight =" "BOLD" "" ""
/ >
< / mx:Canvas >
< / mx:Form >
< / mx:Accordion >
< / mx:Application >
You can enable editing in a DG to the entire DG or only some columns
http://blog.flexexamples.com/2008/05/11/creating-an-editable-DataGrid-control-in-Flex/
If you want to enable editing of a very specific cell then you use the itemEditBegin event to prevent modification of a cell who meet your criteria
http://livedocs.Adobe.com/Flex/3/HTML/Help.HTML?content=celleditor_7.html
-
How to change the runtime of height and width of the front panel
How to change the front height and width during execution. Basically, I want to decide height or width according to some parameters that I'm in the moment of execution.
Ed johnsold was first

-
How to change the format of a video that came off a cell phone. It was released the phone in 3GP format, it will play anything on my computer. It is a telecom xt
How to change the format of a video that came off a cell phone. It was released the phone in 3GP format, it will play anything on my computer. It is a telecom xt
=================================
Media Player Classic should read the .3gp files...Media PLayer Classic
http://download.CNET.com/Media-Player-Classic/3000-2139_4-10518778.htmlFor conversion... the following freeware can be helpful to try:
(FWIW... it's always a good idea to create a system)
Restore point before installing software or updates)Format Factory
http://www.pcfreetime.com/
(FWIW... you can uncheck
all the boxes on the last screen)After downloading and installing Format Factory...
Open the program and choose an output folder...
(this is where you will find your files when they are
converted)Drag and drop your video clips on the
main screen...Select "At?" / OK...
(the? is the format of your choice)Click on... Beginning... in the toolbar...
That should do it... John Inzer - MS - MVP - Digital Media Experience - Notice_This is not tech support_I'm volunteer - Solutions that work for me may not work for you - * proceed at your own risk *.
-
How to change the row height in tableLayoutManager?
HIII all,.
I used TableLayoutManager in my application but don't know how to increase the row height.
I use this reference for the TableLayoutManager link.
How - to create a presentation of the rich UI at TableLayoutManager
Article number: DB-00783and I want to make the size of the entire line 68 px...
any body can help me how to change the RowHeight in tableFieldManager?
@peter
Thank you Peter for your answer.
I solved the problem as you indicate in the Tablelayoutmanager.java change before 5 months.
I asked you our post reply you as soon as possible...
I don't care
Thank you.
regaurds,
Albert_anks
-
How to change the cup of cups on a recipe by the numbers
I create a recipe in number and I wish it was a plural version of Cup. I do not know how to change the existing resize options. So instead of read 6 cups he would say 6 cups.
Select Cup in recipe > formats bar opens on the right & the cell will be selected blue.
Pop-up menu + - below in the list. Click on + and add cups.
Best
-
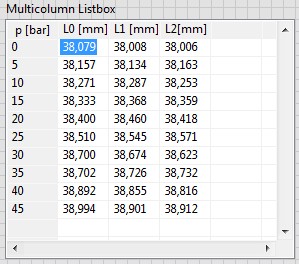
How to change the upper-left corner of the multicolumn listbox?
Can I change the properties of the cell (-1, -1), but I don't know how to change the text.
Is it too simple or impossible?
Kind regards
Ljubo.
In Excel, you cannot change the headers of columns (A, B, c...) and headers of lines (1, 2, 3,...).
I have a 2D data table Y a 1 d of data table X. data of X are the same for all the columns of Y. The first idea was to use X values as row headings to give him special attention. There should be a header above the data of X (name, quantity, unit,...). See the example below.
The solution is very simple: I created a label and put it on the upper left corner of the listbox.
Good day
Ljubo.
-
Hello
Happy New Year to ALL
On the Login area:
I would like to know how to change the size of the region of Login and its place.
For example: Login area should have a = 600 height and width = 100 and should be on the right side, not in the center of the screen.
This problem concerns oracle12, apex 4.2 and html5 theme.
Ziut
Ziut wrote:
Hello
for example: apex.oracle.com
workspace: tb2, tb2/tb2
App = 23705
My comp (for example):

style = "height: 600px;" Width: 100px; »
This is only an example. Theme 26.
Ziut
Ziut,
This is the closest I could come to your comp. The simplest implementation, I found was:
- A region has added to the Information
- Place the Login area in a Sidebar area model
- Kept the two regions in the same Point on the screen and the same grid.

I have attempted to substitute the CSS for the Login region but made very little progress and make a slurry in a perspective of support. You should always keep in mind that another person will have to support your claim, a day, and play the more you with him, it may be more difficult to maintain if it is not well documented.
Here's my demo:
Username and password are all two - demo
https://Apex.Oracle.com/pls/Apex/f?p=11956:101
Jeff
-
How to change the Spry CSS tab
I like to use these old screens provided with the former DW Spry tab. I just looked in DW CC and it looks like they aren't there and more. But anyway, I made one for my client. Now, they want to get one of the tabs on the far right of the margin. See the image below:

I don't know yet if it's possible to do and if someone has done this before, can you tell me what code I need to change in the CSS? I would have joined the CSS file, but it seems that you cannot attach files in this forum, so I've copied below.
Please offer any means to change the color of the tabs, etc. - I just need to know how - or at all - this tab can be moved to the right.
Thanks, Guy deaf
PS I'm sorry that the CSS code does not correctly appear in this forum. When I type this message, looks like it will display line-by-line, but it's not. I'm sorry.
---------------------------------------------
@charset "UTF-8"; /* SpryTabbedPanels.css - version 0.6 - Spry Pre-Release 1.6.1 */ /* Copyright (c) 2006. Adobe Systems Incorporated. All rights reserved. */ /* Horizontal Tabbed Panels * * The default style for a TabbedPanels widget places all tab buttons * (left aligned) above the content panel. */ /* This is the selector for the main TabbedPanels container. For our * default style, this container does not contribute anything visually, * but it is floated left to make sure that any floating or clearing done * with any of its child elements are contained completely within the * TabbedPanels container, to minimize any impact or undesireable * interaction with other floated elements on the page that may be used * for layout. * * If you want to constrain the width of the TabbedPanels widget, set a * width on the TabbedPanels container. By default, the TabbedPanels widget * expands horizontally to fill up available space. * * The name of the class ("TabbedPanels") used in this selector is not * necessary to make the widget function. You can use any class name you * want to style the TabbedPanels container. */ .TabbedPanels { overflow: hidden; margin: 0px; padding: 0px; clear: none; width: 100%; /* IE Hack to force proper layout when preceded by a paragraph. (hasLayout Bug)*/ } /* This is the selector for the TabGroup. The TabGroup container houses * all of the tab buttons for each tabbed panel in the widget. This container * does not contribute anything visually to the look of the widget for our * default style. * * The name of the class ("TabbedPanelsTabGroup") used in this selector is not * necessary to make the widget function. You can use any class name you * want to style the TabGroup container. */ .TabbedPanelsTabGroup { margin: 0px; padding: 0px; } /* This is the selector for the TabbedPanelsTab. This container houses * the title for the panel. This is also the tab "button" that the user clicks * on to activate the corresponding content panel so that it appears on top * of the other tabbed panels contained in the widget. * * For our default style, each tab is positioned relatively 1 pixel down from * where it wold normally render. This allows each tab to overlap the content * panel that renders below it. Each tab is rendered with a 1 pixel bottom * border that has a color that matches the top border of the current content * panel. This gives the appearance that the tab is being drawn behind the * content panel. * * The name of the class ("TabbedPanelsTab") used in this selector is not * necessary to make the widget function. You can use any class name you want * to style this tab container. */ .TabbedPanelsTab { position: relative; top: 1px; float: left; padding: 5px 20px; margin: 0px 1px 0px 0px; font: bold 12px sans-serif; background-color: #f1c185; list-style: none; border-left: solid 1px #CCC; border-bottom: solid 1px #999; border-top: solid 1px #999; border-right: solid 1px #999; border-radius: 5px 5px 0px 0px; -moz-user-select: none; -khtml-user-select: none; cursor: pointer; } /* This selector is an example of how to change the appearnce of a tab button * container as the mouse enters it. The class "TabbedPanelsTabHover" is * programatically added and removed from the tab element as the mouse enters * and exits the container. */ .TabbedPanelsTabHover { background-color: #ffd197; } /* This selector is an example of how to change the appearance of a tab button * container after the user has clicked on it to activate a content panel. * The class "TabbedPanelsTabSelected" is programatically added and removed * from the tab element as the user clicks on the tab button containers in * the widget. * * As mentioned above, for our default style, tab buttons are positioned * 1 pixel down from where it would normally render. When the tab button is * selected, we change its bottom border to match the background color of the * content panel so that it looks like the tab is part of the content panel. */ .TabbedPanelsTabSelected { background-color: #ffe9cd; border-bottom: 1px solid #EEE; } /* This selector is an example of how to make a link inside of a tab button * look like normal text. Users may want to use links inside of a tab button * so that when it gets focus, the text *inside* the tab button gets a focus * ring around it, instead of the focus ring around the entire tab. */ .TabbedPanelsTab a { color: black; text-decoration: none; } /* This is the selector for the ContentGroup. The ContentGroup container houses * all of the content panels for each tabbed panel in the widget. For our * default style, this container provides the background color and borders that * surround the content. * * The name of the class ("TabbedPanelsContentGroup") used in this selector is * not necessary to make the widget function. You can use any class name you * want to style the ContentGroup container. */ .TabbedPanelsContentGroup { clear: both; border-top: solid 1px #999; background-color: #FFF; } /* This is the selector for the Content panel. The Content panel holds the * content for a single tabbed panel. For our default style, this container * provides some padding, so that the content is not pushed up against the * widget borders. * * The name of the class ("TabbedPanelsContent") used in this selector is * not necessary to make the widget function. You can use any class name you * want to style the Content container. */ .TabbedPanelsContent { overflow: hidden; padding: 4px; } /* This selector is an example of how to change the appearnce of the currently * active container panel. The class "TabbedPanelsContentVisible" is * programatically added and removed from the content element as the panel * is activated/deactivated. */ .TabbedPanelsContentVisible { } /* Vertical Tabbed Panels * * The following rules override some of the default rules above so that the * TabbedPanels widget renders with its tab buttons along the left side of * the currently active content panel. * * With the rules defined below, the only change that will have to be made * to switch a horizontal tabbed panels widget to a vertical tabbed panels * widget, is to use the "VTabbedPanels" class on the top-level widget * container element, instead of "TabbedPanels". */ .VTabbedPanels { overflow: hidden; zoom: 1; } /* This selector floats the TabGroup so that the tab buttons it contains * render to the left of the active content panel. A border is drawn around * the group container to make it look like a list container. */ .VTabbedPanels .TabbedPanelsTabGroup { float: left; width: 10em; height: 20em; background-color: #EEE; position: relative; border-top: solid 1px #999; border-right: solid 1px #999; border-left: solid 1px #CCC; border-bottom: solid 1px #CCC; } /* This selector disables the float property that is placed on each tab button * by the default TabbedPanelsTab selector rule above. It also draws a bottom * border for the tab. The tab button will get its left and right border from * the TabGroup, and its top border from the TabGroup or tab button above it. */ .VTabbedPanels .TabbedPanelsTab { float: none; margin: 0px; border-top: none; border-left: none; border-right: none; } /* This selector disables the float property that is placed on each tab button * by the default TabbedPanelsTab selector rule above. It also draws a bottom * border for the tab. The tab button will get its left and right border from * the TabGroup, and its top border from the TabGroup or tab button above it. */ .VTabbedPanels .TabbedPanelsTabSelected { background-color: #EEE; border-bottom: solid 1px #999; } /* This selector floats the content panels for the widget so that they * render to the right of the tabbed buttons. */ .VTabbedPanels .TabbedPanelsContentGroup { clear: none; float: left; padding: 0px; width: 30em; height: 20em; } /* Styles for Printing */ @media print { .TabbedPanels { overflow: visible !important; } .TabbedPanelsContentGroup { display: block !important; overflow: visible !important; height: auto !important; } .TabbedPanelsContent { overflow: visible !important; display: block !important; clear:both !important; } .TabbedPanelsTab { overflow: visible !important; display: block !important; clear:both !important; } }!-[CodeBlockStart:dffe5525-a787-4a98-a87f-f24554b12141]-->@charset 'UTF-8'; / * SpryTabbedPanels.css - 0.6 - pre-release Spry 1.6.1 version * / / * Copyright (c) 2006] Adobe Systems Incorporated. All rights reserved. * / / * Horizontal tabbed panels * the default style for a TabbedPanels widget puts all the tab buttons * (stalled left) above the content panel. * / / * This is the selector for the main container of TabbedPanels. For our * style by default, this container does not contribute anything visually, * but it is floated to the left to ensure that all floating or compensation done * with any which of her children the elements lie entirely within the limits the * TabbedPanels container, in order to minimize any impact or unwanted * interaction with other floating elements on the page which may be used * for page layout. * If you want to limit the width of the widget TabbedPanels, define a * width of the container TabbedPanels. By default, the widget TabbedPanels * extends horizontally to fill the available space. * The name of the class ("TabbedPanels") used in this selector is not * necessary to make the widget service. You can use a class name, you * want to style the TabbedPanels container. */ . TabbedPanels {overflow: hidden;} margin: 0px; padding: 0px; Clear: none; Width: 100%; / * Hack IE to force the layout correct when preceded by a paragraph. (hasLayout bug) * /} / * this is the selector for the TabGroup. The container of TabGroup houses * all buttons on the tab for each tabs in the widget panel. This container * does not contribute to what both visually in the appearance of the widget for our * default style. * The name of the class ("TabbedPanelsTabGroup") used in this selector is not * necessary to make the widget service. You can use a class name, you * want to style the TabGroup container. */ . TabbedPanelsTabGroup {margin: 0px;} padding: 0px; } / * This is the selector for the TabbedPanelsTab. This container houses * the title of the Panel. It is also tab 'button' that the user clicks on * to activate the corresponding content panel so that it appears on top * of the other tabs in the widget panels. * For our style by default, each tab is positioned relatively 1 pixel down from * where it would normally. This allows each tab overlap content * panel that renders underneath. Each tab is rendered with a background of 1 pixel * border which has a color that corresponds to the upper edge of the current content * panel. This gives the appearance that the tab is drawn behind the * content panel. * The name of the class ("TabbedPanelsTab") used in this selector is not * necessary to make the widget service. You can use any class name you want * to style the tab container. */ . TabbedPanelsTab {position: relative;} Top: 1px; float: left; padding: 5px 20px; margin: 0px 1px 0px 0px; Police: bold 12px without serif. background-color: #f1c185; list-style: none; border-left: 1px solid #CCC; border-bottom: 1px solid #999; border-top: 1px solid #999; border-right: 1px solid #999; border-radius: 5px 0px 5px 0px; -moz-user-select: none; -khtml-user-select: none; cursor: pointer; } / * This selector is an example how to change the appearance of a button in the tab * container as the mouse enters in the it. The class is "TabbedPanelsTabHover" * programatically add and remove the element tab as the mouse between in * in and out of the container. */ . TabbedPanelsTabHover {background-color: #ffd197 ;} / * this selector is an example how to do to change the appearance of a button in the tab * container after the user has clicked on it to activate a content panel.} * The 'TabbedPanelsTabSelected' class is programmatically added and removed * the tab element as long as the user clicks button tab containers in * the widget. * As mentioned above, for our style by default, the tab buttons are positioned * 1 pixel down where he would normally. What is the tab key * selected, we change its bottom border to match the background color of the * content panel so that it looks like the tab is the content panel. */ . TabbedPanelsTabSelected {background-color: #ffe9cd;} border-bottom: 1px solid #EEE; } / * This selector is an example of how to make a link inside a tab button * look like normal text. Users may want to use the links within a tab button * so that when it gets the focus, the text * inside * the tab button gets a focus * ring around it, instead of the ring around the whole tab. * /. TabbedPanelsTab a {color: black;} text-decoration: none; } / * This is the selector for the ContentGroup. The ContentGroup container houses * all panels of content for each tabs in the widget panel. For our * style by default, this container provides the background color and borders that * surround content. * The name of the class ("TabbedPanelsContentGroup") used in this selector is * not necessary to make the widget function. You can use a class name, you * want to style the ContentGroup container. */ . TabbedPanelsContentGroup {clear: both;} border-top: 1px solid #999; background-color: #FFF; } / * This is the selector for the content panel. The content panel contains the * content for a single panel tabs. For our default style, this container * provides some padding, so that content is not pushed upward against the * widget borders. * The name of the class ("TabbedPanelsContent") used in this selector is * not necessary to make the widget function. You can use a class name, you * want to style the content container. */ . TabbedPanelsContent {overflow: hidden;} padding: 4px; } / * This selector is an example of how to change the appearance of the currently * active panel container. The class is "TabbedPanelsContentVisible" * programatically added and removed from the content as the Panel item * is enabled/disabled. */ . TabbedPanelsContentVisible {} / * vertical tabbed panels * following rules override some of the default rules above so that the * TabbedPanels widget is rendered with its buttons on the tab on the left of * the active content panel. * With the rules defined below, the only change that will be made * to move a widget panels to horizontal tabs to vertical tabbed panels * widget, is to use the 'VTabbedPanels' class on the top-level widget * element container, instead of "TabbedPanels. */ . VTabbedPanels {overflow: hidden;} Zoom: 1; } / * This selector floats the TabGroup so that the tab buttons it contains * make left of active content panel. A border is drawn around * the group container to make it look like a container from the list. */ . VTabbedPanels. TabbedPanelsTabGroup {float: left;} Width: 10em; height: 20em; background-color: #EEE; position: relative; border-top: 1px solid #999; border-right: 1px solid #999; border-left: 1px solid #CCC; border-bottom: 1px solid #CCC; } / * This selector disables the float property that is placed on each button of the tab * by the rule above TabbedPanelsTab default selector. He also draws a background * border for the tab. The tab button will get his left and right border of * the TabGroup and its superior border of the tab above it or button TabGroup. */ . VTabbedPanels. TabbedPanelsTab {float: none;} margin: 0px; border-top: none; border-left: none; border-right: none; } / * This selector disables the float property that is placed on each button of the tab * by the rule above TabbedPanelsTab default selector. He also draws a background * border for the tab. The tab button will get his left and right border of * the TabGroup and its superior border of the tab above it or button TabGroup. */ . VTabbedPanels. TabbedPanelsTabSelected {background-color: #EEE;} border-bottom: 1px solid #999; } / * This selector fleet contained signs of the widget while they * make it to the right of the tabs buttons. */ . VTabbedPanels. TabbedPanelsContentGroup {clear: none;} float: left; padding: 0px; Width: 30em; height: 20em; } / * Printing styles * / @media print {.} TabbedPanels {overflow: visible! important;}. TabbedPanelsContentGroup {display: block! important;} overflow: visible! important; height: auto! important; } . TabbedPanelsContent {overflow: visible! important;} display: block! important; clear: both! important; } . TabbedPanelsTab {overflow: visible! important;} display: block! important; clear: both! important; } }
Add the class like below:
- Open Ocean
-
How to change the default orientation?
Hello
I am new to Adobe Flash Builder and am currently a mobile application for a school project. I was wondering how to change the default application in landscape mode orientation. I tried to go into my app.xml and change the proportions in mode landscape with no luck, and it is very difficult to find answers on the internet. I would greatly appreciate your help.
Code HomeView.mxml:
<? XML version = "1.0" encoding = "utf-8"? >
" < = xmlns:fx s:View ' http://ns.Adobe.com/MXML/2009 "
xmlns:s = "library://ns.adobe.com/flex/spark".
actionBarVisible = "false" tabBarVisible = "false" title = "HomeView" >
< fx:Declarations >
< / fx:Declarations >
< s:Image left = "0" right = "0" top = low "0" = "0" scaleMode = 'zoom' smooth = 'true '.
smoothingQuality = 'high' source="@Embed('file:///C:/Users/Owner/Downloads/48127-solarsystem-teaser.jpg')" / > "
< s:Button = "-5" x = "0" width = "410" height = "1504.
skinClass = "spark.skins.mobile.TransparentNavigationButtonSkin" click ="navigator.pushView (Sun)" / > "
< s:Button = "444" x = "852" width = '80' height = '80 '.
skinClass = "spark.skins.mobile.TransparentNavigationButtonSkin" click ="navigator.pushView (Mercury)" / > "
< s:Button "628" = x y = "742" width = "120" height = "124".
skinClass = "spark.skins.mobile.TransparentNavigationButtonSkin" click ="navigator.pushView (Venus)" / > "
< s:Button "836" = x y = "632" width = "127" height = "117".
skinClass = "spark.skins.mobile.TransparentNavigationButtonSkin" click ="navigator.pushView (Earth)" / > "
< s:Button "994" = x y = "506" width = "99" height = "96".
skinClass = "spark.skins.mobile.TransparentNavigationButtonSkin" click ="navigator.pushView (March)" / > "
< s:Button "1255" = x y = "464" width = "298" height = "279".
skinClass = "spark.skins.mobile.TransparentNavigationButtonSkin" click ="navigator.pushView (Jupiter)" / > "
< s:Button "1626" = x y = '302' width = '274' height = '270 '.
skinClass = "spark.skins.mobile.TransparentNavigationButtonSkin" click ="navigator.pushView (Saturn)" / > "
< s:Button "1965" = x y = "196" width = "175" height = "174".
skinClass = "spark.skins.mobile.TransparentNavigationButtonSkin" click ="navigator.pushView (Uranus)" / > "
< s:Button "2201" = x y = "66" width = "175" height = "174".
skinClass = "spark.skins.mobile.TransparentNavigationButtonSkin" click ="navigator.pushView (Neptune)" / > "
< / s:View >
App.xml code:
<!-the original proportions of the application at the launch ('portrait' or 'landscape').
As an option. Mobile only. By default, it is the natural orientation of the device->
<!-landscape < aspectRatio > < / aspectRatio >->
<!-if the app will start to auto-orienter the launch. As an option. Mobile
only. Default value false->
<!-false < autoOrients > < / autoOrients >->
I need to make sure the app is constantly in the landscape.
Thanks again.
8 student
In XML, while is a comment. You must remove the :
landscape fake -
How to change the length of line objects
Hi all
How to change the length of the line objects.
I know how to change the width or height of the elements.
Utils < Facade::IGeometryFacade > ()--> (ResizeItems)
itemList,
Transform::PasteboardCoordinates (),
Geometry::OuterStrokeBounds (),
refPoint, Geometry::ResizeTo (newWidth, newHeight)
);I know the new length and PMrect of the line item before moving.
What I want to know is how to get the new width and height of this.
Thank you.
Fujimori - Satoru
Find your old address of trigonometry and read the part about the Pythagorean theorem. This will give the scale factor you need to get the old PMRect to the new
-
How to change the iPhone camera shutter sound 7
How to change the iPhone camera shutter sound 7?
Hello
To adjust the volume of the sound of the camera shutter:
- Use the settings ringer and alerts:
- On iPhone 7 and iPhone 7 more, go to: settings > sounds and haptic.
- (Other models, go to settings > sounds).
- Or turn mute off / on using the switch on the side of your iPhone's ring/silent.
- (The mute function is disabled in some countries).
- Use the settings ringer and alerts:
-
How to change the number of minutes for the exercise of the activity of the application
How to change the number of minutes for the exercise of the activity of the application
Hello
It is not currently possible to change the goal of daily exercise.
If you want to suggest that Apple consider adding this option, you can submit a request here:
-
Our phone will make more phone calls, and we do not know how to change the settings to restore the capabilities of phoning.
Greetings jenniferfrom46,
From your post, I see that you are unable to make phone calls. I count on the ability to use my phone a lot to make calls, so I can understand your concern. I will be happy to provide you with some information for you.
If you can not make or receive calls on your iPhone, this article goes on measures to take to help with the issue you are experiencing.
Have a good!
-
How to change the color of pre-rendered screen.
My question is how to change the color of the page that is displayed before a site is fully charged. So let's say I go to a site where the background color is red. Before the end of Firefox loading it will appear as white. Also yes I have known that I have an add-on which changes the default color of YouTube. However the first picture comes on all websites no matter if their background is white or not.
You can try the userChrome.css code or elegant.
Add code to the file userChrome.css below default @namespace.
@namespace url("http://www.mozilla.org/keymaster/gatekeeper/there.is.only.xul"); /* only needed once */

browser {background-color:#f0f0f0!important}
The file userChrome.css (UI) customization and userContent.css (Web sites) are located in the folder of chrome in the Firefox profile folder.
You can use this button to go to the current Firefox profile folder:
- Help > troubleshooting information > profile directory: see file (Linux: open the directory;) Mac: View in the Finder)
- http://KB.mozillazine.org/Profile_folder_-_Firefox
- Create the folder chrome (lowercase) in the .default < xxxxxxxx > profile folder if the folder does not exist
- Use a text editor like Notepad to create a userChrome.css (new) file in the folder chrome (file name is case sensitive)
- Paste the code in the userChrome.css file in the Editor window
- Make sure that the userChrome.css file starts with the default @namespace line
- Make sure that you select "All files" and not "text files" when you save the file via "save file as" in the text editor as userChrome.css.
Otherwise, Windows can add a hidden .txt file extension and you end up with one does not not userChrome.css.txt file


Delete the following in your css spry as file its in the ' query print media "and has no effect on the screen - have added you it to the wrong place."
{.alignRight}
position: relative;
Top: 1px;
float: right! important;
padding: 5px 20px;
margin: 0px 1px 0px 0px;
Police: bold 12px without serif.
background-color: #f1c185;
list-style: none;
border-left: 1px solid #CCC;
border-bottom: 1px solid #999;
border-top: 1px solid #999;
border-right: 1px solid #999;
border-radius: 5px 0px 5px 0px;
-moz-user-select: none;
-khtml-user-select: none;
cursor: pointer;
}
Add the below css just above the press query written:
{.alignRight}
float: right! important;
}
/ * Print styles * /.
@media print {}
Maybe you are looking for
-
Hello, I have a joint vi where I am building an application to install on the computer of anthers without a permit. I use Labview 7.0 and that you have installed 7.0 runtime on the machine target. The only problem is that when I try to run the built
-
Director of presentation (Fn + F7) defective keyboard shortcut.
In Director presentation fn + f7 settings I chose to show me the menu system to choose display. But whenever I connect a wire outside display port and try the keyboard shortcut does not show me the menu, it automatically traverses the various options
-
How to stop the shockwave flash crashing?
I start Google chrome for Facebook and I have a problem with the shock wave flash crashing all the time, any suggestions on how to prevent this?
-
Google earth always indicates "there is an error and needs to close." Windows XP
Could not access Google Earth.the same message "Google earth needs to close" I sent the report every time to microsoft and downloaded the latest Google Earth but still have the same problem.
-
Vista won't start does not correctly
I just reinstalled Vista OS because my computer just kept a loop saying a recent hardware or software installation may cause a problem but I haven't installed hardware or software. After the reinstallation of Vista, I still get the same loop, but it