How to change the "Timing" on individual pictures of dry 10 / ea. -to - 5 dry/ea.
I use PreEle 10, Win-7. Images .jpeg individual used to have a timing of 5 seconds ea. When you drag in the timeline. Now, they give you 10 dry. CAH I prefer 5 dry/ea. How can I change them back to 5 dry/ea. ? If said - I know I can n-click-drag to their time no matter how long, but prefer the original default of 5 seconds / ea. in order to avoid this concern... Don't know how; Why - or - when the calendar setting changed...
Thank you very much, Mr President!
Tags: Premiere
Similar Questions
-
How to change the "timing" for the slide show
How can I change timing for the slide show?
Hello
a. on which application would you like to change the "timing" slide show?In the windows photo viewer, you can change the speed. When the slide show is running, right cick anywhere on the image and choose slide show speed slow, normal or fast.See your pictures as a slide show
http://Windows.Microsoft.com/en-us/Windows7/see-your-pictures-as-a-slide-showIf you want to change the timing of wallpaper slideshow see article below.
Create a desktop background slide show
http://Windows.Microsoft.com/en-us/Windows7/create-a-desktop-background-slide-showHope this information was useful.Thank you, and in what concerns:
Shekhar S - Microsoft technical support.Visit our Microsoft answers feedback Forum and let us know what you think.
If this post can help solve your problem, please click the 'Mark as answer' or 'Useful' at the top of this message. Marking a post as answer, or relatively useful, you help others find the answer more quickly. -
How to change the aspect ratio of pictures
I use iPhoto to create a slide show that is exported to a MPEG-4 file and burned to a DVD. It is not possible for some of the photos to crop to a ratio of 16:9, so I thought I could use Photoshop to change the proportions. Here's what I did:
- Photo open in Photoshop
- Select Imageecurrent height and size of the note. Multiply the height of 1.77.
- Enter a new dimension with the same height and width calculated in step 2. Leave the box checked for parent.
- Optional: change the extension of the zone.
- Click OK.
- Configure tool Selection Rectangle Fixed Ratio style with a width of 16 and a height of 9.
- Use the Marquee Selection tool to select photo from top to bottom, which will leave an extra canvas on the side. A purple guide line appears when the top and the bottom of the photo match exactly.
- Move the selection area so that the sides are evenly spaced. A purple guide line appears when the photo is exactly centered.
- Select ImageeCrop.
- Select fileeeQuick Export to JPEG export.
- Save the photo. Confirm that you want to replace it.
- Select file closeeand validate without saving.
These new images seem to create when they are imported into the slide show, but when I export the slide show as a MPEG-4 video file, each photo that has been resized in Photoshop displays as a blank, black slide. Is there something I'm doing wrong that corrupt these images and made them unreadable? Any help would be appreciated. Thank you.
PS - I use Photoshop CC (2015) on a Mac.
Just use the crop tool.
In the Options bar set Ratio and put 16 in the field width and height 10. Do not specify steps and units.
Make sure the background color is black and drag the crop tool in the image.
When he arrives on the edges, keep dragging, and any extra fabric created will be black.
BTW, I don't know how it works with the Mac systems and apps like speech, but PowerPoint in Windows is a PITA when it comes to changing the proportions. One might think, it could be done in a few clicks, but you need to change the size of the Page, then go to each image in turn and reset it, and then drag to fill the screen. And yes I realize that you produce a DVD to watch on a TV. Windows uses applications like ProShow Gold and professional for that. I've never used them (I use Premiere Pro) but I recently had a short play with Proshow Gold, and I was very impressed.
-
How can I change the resolution of my pictures stored in Google Reader?
How can I change the resolution of my pictures stored in Google Reader? I want to have received their approval, but they were taken with a phone and the resolution is not large enough to produce a clear image.
Hello
You cannot add true / resolution of the details of an image that is not captured when the photo was taken. Photo editing applications can adjust the sharpness, remove noise, etc., but they can't add true / resolution details and results may vary, massively, the photo and the filter/tool used (and configuration for tools).
If you have reduced the resolution of the original image to store it on Google Drive, then I suggest that go back you to the use of the original image (if you still have a copy).
-
I signed on XP Pro SP3 as an administrator but you cannot change the timing of Windows Update to 03:00. All options are not enabled. How can I change the time that updates are made?
Hi imoffshore,
Welcome to Microsoft Answers Forums.
We would like to get some more information from you to help solve your problem. You better, please answer the following questions.
· When was the last time it worked?
· Remember to make changes to the computer recently?
· You have security software installed on the computer?
· You get the error message?
When you open the tab automatic updates in the control panel or My Computer property sheet, all options of configuration of the automatic updates may be grayed out. This happens due to one of the following reasons:
- You are not logged as administrator (or equivalent)
- Strategy of automatic updates is enabled
- Automatic updates (and Windows Update) access is blocked by group policy
The options available for automatic updates.
You must make some changes in the windows registry.
Important: this section, method, or task contains steps that tell you how to modify the registry. However, serious problems can occur if you modify the registry incorrectly. Therefore, make sure that you proceed with caution. For added protection, back up the registry before you edit it. Then you can restore the registry if a problem occurs. For more information about how to back up and restore the registry, click on the number below to view the article in the Microsoft Knowledge Base:
How to back up and restore the registry in Windows
http://support.Microsoft.com/kb/322756
- Click Start, run and type REGEDIT to . EXE
- Go to this location:
HKEY_LOCAL_MACHINE-SOFTWARE-policies-Microsoft-Windows------WindowsUpdate------AU
- In the right pane, delete the two values AUOptions and NoAutoUpdate
- Go to this location:
HKEY_CURRENT_USER-SOFTWARE-Microsoft-Windows-CurrentVersion------policies------WindowsUpdate
- In the right pane, delete the DisableWindowsUpdateAccess value
Using the Group Policy Editor - for Windows XP Professional
- Click Start, run and type gpedit.msc
- Navigate to the following location:
=> Configuration of the computer
==> Administrative templates
===> Windows components
===> Windows Update- In the right pane, double-click Configure automatic updates and set it to not configured
- Next, go to this location:
=> User configuration
==> Administrative templates
===> Windows components
===> Windows Update- In the right pane, set to remove access to all Windows Update features on not configured
Change how Windows installs or notifies you of updates
Halima S - Microsoft technical support.
Visit our Microsoft answers feedback Forum and let us know what you think.
-
How can I change the color of individual tiles directly on the start of MS Surface RT screen?
How can I change the color of individual tiles directly on the start of MS Surface RT screen?
Hello again Angela H.UR.,.
Whether or not something special is filled in a tile pinned to the start screen is determined by the site itself. See this link, it may have information you are looking for:
When I select Pin to Start, it shows me that the tile will look like and gives a text box. I found everything that I type in the text box appears on the home screen tile.
-
How to change the style of picture frame
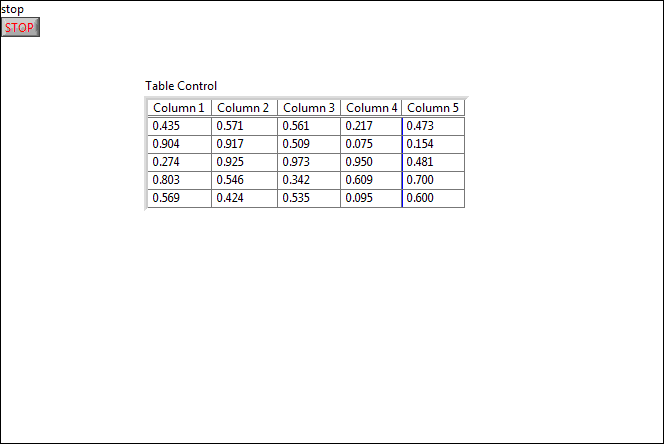
I would like to know how to change the style of table on the front. For the example below, I would like to remove the covered framework of gray color.
I could not find the table style editor.
First option: use the table on the classic controls palette, which has no border.
Second option-
- Select the painting tool.
- Right click on the border.
- With open color dialog box, click the space bar. This toggles the color picker to work on color FG, the background color, or both. It is also described at the bottom of the color picker.
- When the two have been selected, you can make the frame completely transparent by selecting the color of T.
-
Hello everyone does any one know how to increase the pixels in a picture, the reason is a website I use to develop pictures said I need to increase the pixels to enhance clarity in the photo? Thank you
To increase the pixels, you can try to resize the pictures. But it is important to note that the clarity of a photo, especially when you try to resize, depends mainly on the camera from which you took. If you clicked on the pictures from a low resolution camera, there are limits on the resizing, them and their resizing too can actually blur. However, you can try the options below and see if it works.
You can resize your photos by using Windows Live Photo Gallery. Learn more about Windows Live Photo Gallery and download it to your computer (if you do not already), you can consult the following link:
http://Windows.Microsoft.com/en-us/Windows-Live/Photo-GalleryYou can follow the steps below to resize your photos:
1. click Start and then select all the programs.
2. in the list that appears, navigate to the Windows Live Photo Gallery program.3. Locate and click on the photo you want to resize. Click file and select the option to resize.
4. Select your new size in the drop down "Select a size. Then, click the "resize and save" button to resize and save the photo with its new resolution. Follow the instructions to save the picture resized in your computer.The following link may be useful:
http://Windows.Microsoft.com/en-us/Windows-Live/Photo-Gallery-edit-photos-FAQ -
Animate dashboard. How to change the cursor of the animated symbol (no picture)?
Hi, could you tell me please how to change the cursor in internship at the animation symbol and label goto inside when click on and release.
For example, I want to create hammer striking the rock, my cursor should change when I'm on the stage and the hit, when I am pressing the button of the mouse and goto the first position when released.
Thanks for the help =)
Hello
This demo file can help you: can I use a symbol animated acting as a mouse cursor?
-
How to change the position or timing of a video ads in a video player?
I want to change the "timing" when the ads will be playing in a video player. Currently, there are rollers (played before the beginning of the video), mid-roll (played between the two) and post-rouleaux (played end of the video). To change the position, I am not able to. Help, please!
Kind regards
Nandini
If you use cuepoints, change their location.
-
How to change the color of pre-rendered screen.
My question is how to change the color of the page that is displayed before a site is fully charged. So let's say I go to a site where the background color is red. Before the end of Firefox loading it will appear as white. Also yes I have known that I have an add-on which changes the default color of YouTube. However the first picture comes on all websites no matter if their background is white or not.
You can try the userChrome.css code or elegant.
Add code to the file userChrome.css below default @namespace.
@namespace url("http://www.mozilla.org/keymaster/gatekeeper/there.is.only.xul"); /* only needed once */

browser {background-color:#f0f0f0!important}
The file userChrome.css (UI) customization and userContent.css (Web sites) are located in the folder of chrome in the Firefox profile folder.
You can use this button to go to the current Firefox profile folder:
- Help > troubleshooting information > profile directory: see file (Linux: open the directory;) Mac: View in the Finder)
- http://KB.mozillazine.org/Profile_folder_-_Firefox
- Create the folder chrome (lowercase) in the .default < xxxxxxxx > profile folder if the folder does not exist
- Use a text editor like Notepad to create a userChrome.css (new) file in the folder chrome (file name is case sensitive)
- Paste the code in the userChrome.css file in the Editor window
- Make sure that the userChrome.css file starts with the default @namespace line
- Make sure that you select "All files" and not "text files" when you save the file via "save file as" in the text editor as userChrome.css.
Otherwise, Windows can add a hidden .txt file extension and you end up with one does not not userChrome.css.txt file
-
Change the location of several pictures at the same time?
I see how to change the location of a photo at a time. Is it possible to change the location of several pictures at the same time?
Thank you
Phil
Select the photos and info - enter the location (or any other field of the info) and it is applied to all photos
This is described in using Photos - a good place to get help with Photos
View and add information about the photos
To view or change information for the photos, you select one or more photos, and then open the information window.
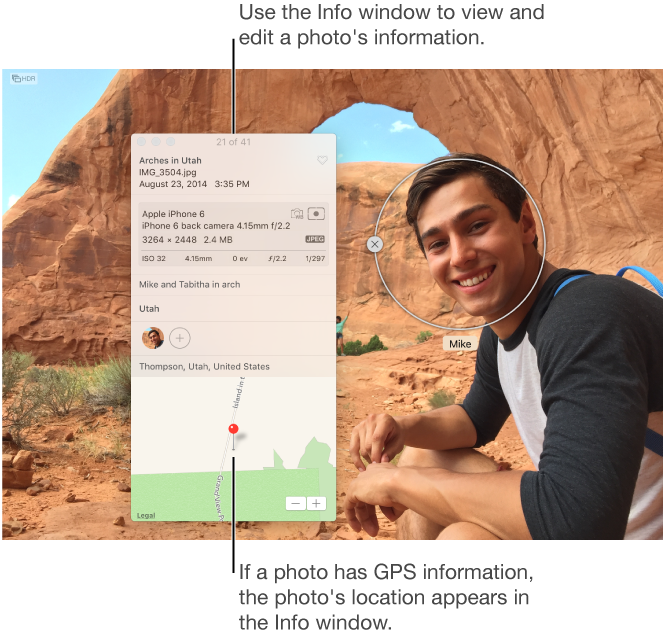
- Open the Info window: Double-click a photo to view it, and then click the Info button
 in the toolbar or press on command I.
- Add or change information: Change the following.
- Title: Enter a name in the title field.
- Description: In the Description field, type a caption.
- Favorite: Click the Favorites button
 to mark the photo as a favorite. Click the button again to deselect.
 - Keywords: Enter the keywords in the keywords field. When you type, Photos suggest keywords that you have used before. Press enter when you have finished a keyword. To remove a keyword, select it and press DELETE.
- Faces: Click on
 and type a name to identify a face. Click on several times, and then drag the identifier of the face different faces to identify many faces in a photo.
 - Location: Enter a location in the location field. When you type, Photos suggest places you can choose. To change a location, you can search a different location or change the location by dragging a PIN on the map. To remove location information, delete it or choose Image > location, then choose Remove location or back to the original location. You cannot assign a location if your computer is not connected to the Internet.
LN
- Open the Info window: Double-click a photo to view it, and then click the Info button
-
How to change the brightness, contrast, and color in the photo viewer in Windows 7?
Change the brightness, contrast, and color in the photo viewer in win 7?
How to change the brightness, contrast and color in the windows photo viewer 7 (I used the fix option in xp and vista)
Thanks for any help.Hi epse30,
In Windows Vista Windows Picture and Fax Viewer has been replaced by the Windows Photo Gallery and there was an option to set the brightness, contrast, etc by using the Fix as you said.
Unfortunately, this option is not available with the Windows Photo Viewer in Windows 7.
However, Windows Live Photo Gallery has a number of easy to use tools for things like red eye fixing or clearing exposure and low light situations. Windows Live Photo Gallery gives you more creative control over your photos. You can download Windows Live Photo Gallery for free from the link below;
http://download.live.com/Photogallery
Access the link below for more information about editing photos with Windows Live Photo Gallery
http://Windows.Microsoft.com/en-us/Windows-Vista/editing-photos-with-Windows-Live-Photo-Gallery
The above article is for Windows Vista, but it remains valid for Windows 7 as well.
Varun j: MICROSOFT SUPPORT
Visit our Microsoft answers feedback Forum
http://social.answers.Microsoft.com/forums/en-us/answersfeedback/threads/ and tell us what you thinkIf this post can help solve your problem, please click the 'Mark as answer' or 'Useful' at the top of this message. Marking a post as answer, or relatively useful, you help others find the answer more quickly.
-
How to change the username on the computer?
Original title: change username on Windows 7 laptop
I recently bought a laptop from a friend of mine and I will try to find how to change all the user names that I learned how to do something. But today I tried to post a photo and I noticed that he was in a file, that is to say: c\user\friendsname\pictures I need to get all of his name changed to mine. help please!
Hi Heather,
Thanks for posting your query in the Microsoft Community.
Want to know how to change the name of the user account. It's pretty simple and we are here for you help.
I would have you look at the article-
http://Windows.Microsoft.com/en-us/Windows7/rename-a-user-account
I hope that my suggestions to answer your question.
Back to us for any issues related to Windows in the future. We will be happy to help you.
-
How to change the image field captures screenshots automatically from BMP to JPEG
How to change the image field captures screenshots automatically from BMP to JPEG
I want to say, when I tap on the screenshot on my keyboard and paste this image in microsoft photo editor or picasa 3.0 areas of the bitmap .bmp. instead of asking the witch I´d field prefer.So, I open that image on the brush to convert it to. JPEG.It's hick very!is it possible to easily me this step and save or paste pictures in JPEG on my files automatically?Hello
I saw that article when I was looking for one that I posted...
I understand your problem, and the answer is that, to the best of my knowledge... NO..
Windows records the capture in memory as bitmap, along with, even if you can paste it directly into a folder, it would be in the form of bitmap...
The best I could find is to use the suggestion in the link I've included which refers to the
Windows Key + PrintScreen to automatically record is in PNG format in your pictures folder...
The only way to do what you want is with a 3rd party capture program that can be configured to save in a directory as a specific file type...
Personally, I use a program called print screen Deluxe for this... it is a purchased program...
I'm sure you could find something free to do what you need...
You may need to use a different key for print screen, but the software can allow you to reprogram the PrntScrn key...
Maybe you are looking for
-
After you download several updated files (.dmg) - none will open more: for example; How can I solve this problem? BR -Larry
-
How can I see the number of messages in each folder
I just installed TB 24.4.0 on a new desktop of Windows 8.On my older Windows 7 Desktop running TB 24.4.0, the folders pane is set to display the number of messages and the use of space in each folder.Both machines are on the same "Classic view", but
-
Printer all in one, loss of network connection
I have a Photosmart HP 5510. This is only about a year, but is now always lose the network connection. I configured correctly (it actually worked!) to the wireless router. Most of the time now when I need to print, it tells me that the printer wil
-
Canon PowerShot S2 IS. The camera window does not work on Windows 7
On my old computer I installed software for the Canon PowerShot S2 IS and it allowed me to download the photos by using the function "window of the camera." Let me clarify that I wanted the date taken in the name of the file of the photo. On my new
-
How to set horizontal scrolling to horizontal field Manager when fields are added using a loop for?
The following code snippet contains a horizontal field Manager to which are added five buttons. 1. I can't the value of horizontal scrolling to horizontal management Manager because of who I am not able to access the keys 4 and 5. 2. usually, we put