How to convert the pulse signal line single layer
Hello
I tried to create a VI that will allow me to convert a pulse signal (generated by a tachometer) in a line single layer, indicating that a revolution succeeded. I would like to overlay this line on other signals generated.
I am able to detect the falling edge of the signal, but I could not make a suitable line. I tried to create a new waveform, and juggle the markers, but no method worked for me.
Does anyone have ideas for a good way to do this?
Below is my test VI.
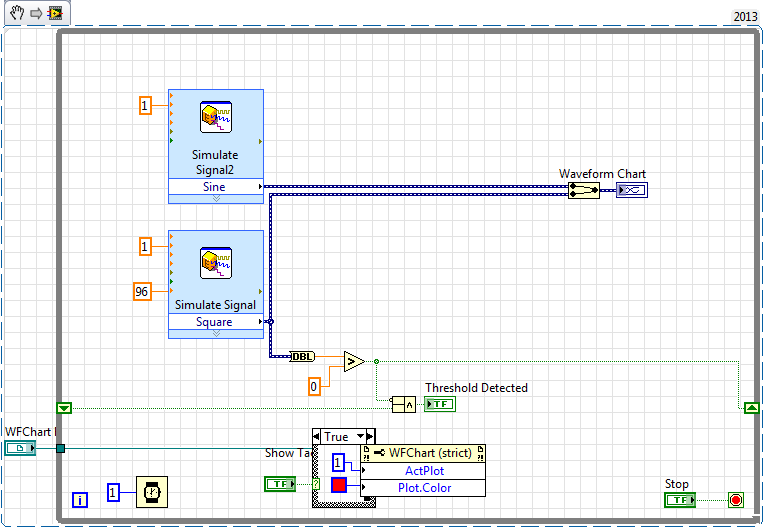
Make the second vertical lines style trace (trace style: no points, no interpolation, fill - inf). a NaN whener you don't want a power cable and a '+ inf' when you want a vertical line.
Here's a simple example:

Tags: NI Software
Similar Questions
-
Count the number of 1 is present in digital waveforms obtained by converting the pulse signals.
Hello
I use Analogtodigital.Vi to convert the pulse of the sequences in digital.signals.I am able to get the representation of digital waveforms of impulses.
But how to count the number of 1 is present in the converted digital waveform. I want to count the number of 1 is present in the digital waveform converted.
Thanks in advance.
Have you tried the block scheme of similar to the Digital.vi of opening?
It creates an array 2D uncompressed 1 and 0, which is the binary 16 bits A/D conversion of each element in the array Y of the input waveform. You can use the DWDT digital Array.vi Boolean to convert a 2D Boolean table. Then convert Boolean values to 1.0 and summarize the array of integers. The sum must be the number of 1 bits in the digital waveforms.
Lynn
Note: The VI attached is saved in version 8.6. When I have it saved for the previous Version a warning was generated about the possible differences in the versions. Let me know if it doesn't work, and you are using which version of LV.
-
Could someone tell me how to convert the digital signals in table 1 d of digital waveforms
I use 9474 for drving an engine. for that I have uses 2 ports - to activate and another for running. These signals in the form of Boolean values. I am to convert these signals to a table and since iam doing a digital waveform. but when iam connecting these to the module 9474, it show an error "source is a digital waveform and sink is 1-d array of digital waveform... any body can help in these issueee please...»
Pop - up on the thread and choose Insert...
Build the table.
Ben
-
How to convert an analog signal into digital signal
Hello
How to convert an analog signal into digital signal, such that each sample of the analogue signal corresponding to 1.2V will be represented as '1' digital signal and other samples of the analog signal (which are not 1.2V) will be represented (converted) ' 0' in the digital signal.
And how to view the wavefroms or graphical indicators signals.
Thank you.
If you have 1000 samples and you want to convert to digital, you get 1000 digital values. Attached, that's what I mean.
-
How to control the number of lines of text below the image in the slideshow module?
Lightroom 3.3
How to control the number of lines of text below the image in the slideshow module? I have an image with 36 words in the caption field which exports like two lines GOOD.! I have another image with 57 words in the field of legend who runs the page and shows only a VERY BAD line. With 57 words I can't do the single-line text box small enough to keep the text does not spread out of the page.
Ideas?
On the Mac platform and I expect similar under Windows, just hit enter or return key will not help. Instead, you will have to hit the keys Ctrl + Enter or Ctrl + return. This forces a new line. Windows may use a different modifier key. The screenshot below shows that it is possible. Unfortunately, you need to add the text via the caption or Description field in the library module.

-
How to convert the precision extended float to float in C++
Hello
Could someone me please how to convert the extended precision (floatExt) float normal float in C++?
What is the difference in the float between Labview and C++ data type?
When I tried to receive a range of float of a function of the DLL generated by Labview in C++, data are bad.
Thank you
Victor King
You can search for numeric data types in LabVIEW help for more information on the different types of data. Before sending the data to the C++ application, you can use the function of Double precision on digital / range of Conversion to convert number to Double precision.
-
Paint or Windows Photo Gallery
I try to combine a picture of my sister with a picture of a poem beside it, how to combine the two into a single photo?
If you have the poem recorded in an image format,
the following freeware can create a side by side
Panorama.(FWIW... it's always a good idea to create a system)
Restore point before installing software or updates)Download IrfanView
http://MajorGeeks.com/IrfanView_d4253.html
(filename: iview433_setup.exe)
(uncheck if you don't want Google Chrome)Download plug-ins too...
IrfanView plugins
http://MajorGeeks.com/IrfanView_PlugIns_d4908.html
(filename: irfanview_plugins_433_setup.exe)When the program is installed... read more...
Open IrfanView and go... Image / create the Image of the Panorama...
(this will open the screen to "Create a panorama image")On the screen to "Create a panorama image"... left click on the add images"" button.
(Displays the 'Open' screen. Now, drill down to the
the folder that contains your saved Photos of veterinarians.Now... click left (highlighted), the two images, you want to join.
(you can select more than one if you hold down your Ctrl key)
The two images highlight... left click on the button 'open '.
(Or... you can add the images one at a time... which is always easier)Now, go back to the screen "Create the panorama image.
and the file names of the selected pictures need to be in the
Field "Input Images.Now with the names of two files in 'Images of entry' field...
You can left click on the button 'create Image '.(the positions left and right of these images can be swapped in)
selection of a file name and using the "mount image" / "Move."
Images down"buttons...)Now you should see a display of the combined image.
Reach... File / save as...Choose a backup location / enter a file name / choose a format...
On the left, click on the button "Save..." -
How to convert the date in milliseconds?
Hi all
Can I know how to convert the date in milliseconds?
My current datetime like this Formate
QDateTime::currentDateTime (m:System.NET.SocketAddress.ToString ("MMMM dd, yyyy HH"))
Seconds since January 1, 1970
http://Qt-project.org/doc/Qt-4.8/QDateTime.html#toTime_t
Sinds milliseconds January 1, 1970
http://Qt-project.org/doc/Qt-4.8/QDateTime.html#toMSecsSinceEpoch
-
Please how to convert the photo to the second


Please guys how to convert the kia rio pictures the second perfect like this, and with any program, I know that all steps in details please its very important
That looks just like you would use the tool pen to redraw on the image and create shape layers (black areas). It could be done in Photoshop or Illustrator.
-
Hello, I have a full desktop in Adobe Muse, site and I want to convert it into a version Tablet & phone, then, how would convert the site Office to Tablet & phone to copy the entire office content and site structure? Thanks for any help.
You can not automatically convert. Click on the "tablet" or "Phone" at the top of your plan view to create these versions.
You can then copy and paste on any content you want has more of your office.
-
How to convert the following code in as3?
As the title says... How to convert the following code to as3?... Thanks in advance.
import flash.display.BitmapData;
linkageId = "landscape";
myBitmapData = BitmapData.loadBitmap (linkageId);
MC = this.createEmptyMovieClip ("mc", 1);
mc.attachBitmap (myBitmapData, 1);onMouseMove = function() {}
myNewColor = "0 x" + myBitmapData.getPixel(_xmouse,_ymouse).toString (16);
newColor.setRGB (myNewColor);
selectedColor.colorValue.text = myNewColor;
}
selectedColor.swapDepths (_root.getNextHighestDepth ());
newColor = new Color (selectedColor.sample);:
var myBitmapData:landscape = new landscape (0,0);
var bmp:Bitmap = new Bitmap (myBitmapData);
addChild (bmp);stage.addEventListener (MouseEvent.MOUSE_MOVE, f);
function f(e:MouseEvent):void {}
var myNewColor:String = "0 x" + myBitmapData.getPixel(mouseX,mouseY).toString (16);
newColorTransform.color = uint (myNewColor);
selectedColor.sample.transform.colorTransform = newColorTransform;
selectedColor.colorValue.text = myNewColor;
}
addChild (selectedColor);
var newColorTransform:ColorTransform = selectedColor.sample.transform.colorTransform; -
How to fill the canvas with lines
< mx:Canvas id = "b1" x = "10" y = "10" height = "40" width = "300" borderStyle = "solid" borderColor = "black" / >
When I want to draw lines with difference of 15 pixels to fill the entire canvas I wrote the following
for (var i: int = b1.x + 15; i < b1.x + b1.width; i = i + 15)
{
var line1:UIComponent = new UIComponent();
var lineThickness1:Number = 1;
var lineColor1:Number = 0 x 000000;
var lineAlpha1:Number = 1;
LINE1. Graphics.LineStyle (lineThickness1, lineColor1, lineAlpha1);
LINE1. Graphics.MoveTo (i, B1.y);
LINE1. Graphics.LineTo (i, B1.y + B1. Height);
this.addChild (line1);
}It works very well
LLY,
< mx:Canvas id = "b4" x = "600" y = "200" height = "60" width = "300" borderStyle = "solid" borderColor = rotation "black" = "40" / >
I have the canvas above with the "b4" id only difference is that this canvas rotation
How to fill the canvas with lines that I just did above?
Hope this code will help you,
for(var i: int = 15; i < b4.width; i = i + 15) { var line1: UIComponent = new UIComponent(); var lineThickness1: Number = 1; var lineColor1: Number = 0x000000; var lineAlpha1: Number = 1; line1.graphics.lineStyle(lineThickness1, lineColor1, lineAlpha1); line1.graphics.moveTo(i, 0); line1.graphics.lineTo(i, b4.height - 1); //Add line in canvas instead of main container b4.addChild(line1); } -
How to convert the hierarchical query of SQL Server (CTE) to Oracle?
How to convert the hierarchical query of SQL Server (CTE) to Oracle?
WITH cte (col1, col2) AS
(
SELECT col1, col2
FROM dbo. [tb1]
WHERE col1 = 12
UNION ALL
SELECT c.col1, c.col2
FROM dbo. [tb1] AS c INNER JOIN cte AS p ON c.col2 = p.col1
)
DELETE one
FROM dbo. [tb1] AS an INNER JOIN b cte
ON a.col1 = b.col1Hello
Something like this maybe:DELETE FROM dbo.tb1 a WHERE EXISTS ( SELECT 1 FROM dbo.tb1 b WHERE a.co11 = b.col1 AND a.col2 = b.col2 START WITH b.col1 = 12 CONNECT BY b.col2 = PRIOR b.col1)Although you need to do here is to check that CONNECT it BY SELECT, returns records you wait first, then the DELETION should work too.
-
Apply the feather to a single layer
Hello
I am created an announcement of both parties. One of the two parties (on two different layers) has a background image I want only the center appears and the rest I would bleach (about 90% opacity, leaving 10% of the visible background image) using feathering, as described in the pen in Photoshop with quick mask Selections
So, does anyone know how to apply these feathers on a single layer?
Thank you!
-Ron
Create a layer mask and apply the pen in the properties panel.
Could you please post a screenshot with the Panel visible layers?
-
How to change the angle of a gradient layer without changing anything else?
How to change the angle of a gradient layer without changing anything else?
When I try it myself my gradient everything turns black.
To add to the above, you can just set the angle. If you want to use other existing parameters, you need to get from the layer. The code in this other thread shows a way to get them.
But if you do not have the values for any other reason, you can get the handle to the layer, make a duplicate of it with all the settings and just crush those you want to change.
It is a way to just change the angle while keeping the other existing settings.
// helper function for working with descriptors
function getProperty( psClass, psKey, index ){// integer:Class, integer:key
    var ref = new ActionReference();
    if( psKey != undefined ) ref.putProperty( charIDToTypeID( "Prpr" ), psKey );
    if(index != undefined ){
        ref.putIndex( psClass, index );
    }else{
        ref.putEnumerated( psClass , charIDToTypeID( "Ordn" ), charIDToTypeID( "Trgt" ) );
    }
    try{
        var desc = executeActionGet(ref);
    }catch(e){ return; }// return on error
    if(desc.count == 0) return;// return undefined if property doesn't exists
    var dataType = desc.getType(psKey);
    switch(dataType){// not all types supported - returns undefined if not supported
        case DescValueType.INTEGERTYPE:
            return desc.getInteger(psKey);
            break;
        case DescValueType.ALIASTYPE:
            return desc.getPath(psKey);
            break;
        case DescValueType.BOOLEANTYPE:
            return desc.getBoolean(psKey);
            break;
        case DescValueType.BOOLEANTYPE:
            return desc.getBoolean(psKey);
            break;
        case DescValueType.UNITDOUBLE:
            return desc.getUnitDoubleValue(psKey);
            break;
        case DescValueType.STRINGTYPE:
            return desc.getString(psKey);
            break;
        case  DescValueType.OBJECTTYPE:
            return desc.getObjectValue(psKey);
            break;
        case  DescValueType.LISTTYPE:
            return desc.getList(psKey);
            break;
        case  DescValueType.ENUMERATEDTYPE:
            return desc.getEnumerationValue(psKey);
            break;
    }
};
function duplicateDescriptor( descriptor ) {
    var newDescriptor = new ActionDescriptor;
    newDescriptor.fromStream( descriptor.toStream() );
    return newDescriptor;
};
function localizeDescriptor( desc ) {
    var stream, pointer, zStringLength, zstring, localized_string, newZStringLength, previousStream, followingStream, newDesc;
    stream = desc.toStream();
    while( true ) {
        pointer = stream.search(/TEXT....\x00\$\x00\$\x00\$/);
        if( pointer === -1 ) {
            break;
        }
        zStringLength = getLongFromStream( stream, pointer + 4 );
        zstring = readUnicode( stream.substr( pointer + 8, ( zStringLength - 1 ) * 2) );
        localized_string = ( localize( zstring ) ) + '\u0000';
        newZStringLength = localized_string.length;
        previousStream = stream.slice( 0, pointer);
        followingStream = stream.slice( pointer + 8 + zStringLength * 2);
        stream = previousStream.concat( 'TEXT', longToString( newZStringLength ), bytesToUnicode( localized_string ), followingStream );
    }
    newDesc = new ActionDescriptor();
    newDesc.fromStream( stream );
    return newDesc;
};
function getShortFromStream( stream, pointer ) {
    var hi, low;
    hi = stream.charCodeAt( pointer ) << 8 ;
    low = stream.charCodeAt( pointer + 1 );
    return hi + low;
 };
function getLongFromStream( stream, pointer ) {
    var hi, low;
    hi = getShortFromStream( stream, pointer) << 16;
    low = getShortFromStream( stream, pointer + 2);
    return hi + low;
};
function readUnicode( unicode ) {
    var string = "";
    for( i = pointer = 0; pointer < unicode.length; i = pointer += 2) {
        string +=String.fromCharCode( getShortFromStream( unicode, pointer ) );
    }
    return string;
};
function longToString( longInteger ) {
    var string;
    string = String.fromCharCode( longInteger >>> 24 );
    string += String.fromCharCode( longInteger << 8 >>> 24 );
    string += String.fromCharCode( longInteger << 16 >>> 24 );
    string += String.fromCharCode( longInteger << 24 >>> 24 );
    return string;
};
function bytesToUnicode( bytes ) {
    var unicode = "", char_code, charIndex;
    for( charIndex  = 0; charIndex < bytes.length; charIndex ++ ) {
        char_code = bytes.charCodeAt( charIndex );
        unicode += String.fromCharCode(char_code >> 8 ) +  String.fromCharCode( char_code & 0xff );
    }
    return unicode;
};

function setGradientAdjustmentAngle( angle ) {
    var adjustmentDesc = getProperty( charIDToTypeID("Lyr "), charIDToTypeID( 'Adjs' ) ).getObjectValue(0);
    var newAdjustmentDesc = duplicateDescriptor( adjustmentDesc );
    newAdjustmentDesc.putUnitDouble( charIDToTypeID('Angl'), charIDToTypeID('#Ang'), angle );

    var desc = new ActionDescriptor();
        var ref = new ActionReference();
        ref.putEnumerated( stringIDToTypeID('contentLayer'), charIDToTypeID('Ordn'), charIDToTypeID('Trgt') );
    desc.putReference( charIDToTypeID('null'), ref );
    desc.putObject( charIDToTypeID('T   '), stringIDToTypeID('gradientLayer'), newAdjustmentDesc);
    executeAction( charIDToTypeID('setd'), desc, DialogModes.NO );
};
var newAngle = 45;
setGradientAdjustmentAngle( newAngle );


Maybe you are looking for
-
Find my iPhone does not connect
I have a 6 s iPhone and an iPad and a macbook pro. All my devices are visible if I login to iCloud on the Mac, but find my iPhone app does not work on the iPad or the iPhone. Devices are listed, but cannot be found. I am connected to iCloud on all de
-
How delete/disable the option 'start private browsing' in the Firefox Menu/button?
I don't want the incognito on this computer option. Please help me to disappear! I have Firefox 6.0. Thank you.
-
Wireless display on VPCZ 1390 X under WINDOWS 7 Ultimate
Does anyone know if Sony Vaio VPCZ 1390 X under WINDOWS 7 Ultimate a WIDI. The card says it does. When I called SONY tech support said there and it just needs to be activated. A second tech support says that this isn't. can someone tell me how to che
-
HOpw to resolve a device i/o error?
Original title player: media What is a device i/o error related to access to my device portable drive 'F '? How to solve this error of attachment so that I can see the video captured on a 4 GB SD card?
-
We get c:\windows\prefetch\taskmgr.exe-06144c13.pf when I open the Task Manager.
Original title: c:\windows\prefetch\taskmgr.exe-06144c13.pf every time I hit him ctrl alt del, I get the Task Manager, but I get a pop up that says c:\windows\prefetch\taskmgr.exe-06144c13.pf I tried everything... y at - it software that I can buy or