Make a zoom + setting line
Is it possible to get lines of text adjusted after a zoom before (Firefox for Mobile)?
I can't do it now, then text lines exceed the width of the screen and it is very difficult to read.
Hello alejandrorango, I think it's currently not working when you double click on a section of text to zoom.
Tags: Firefox App
Similar Questions
-
Touchpad too sensitive in Windows 7 HP laptop. Makes the text skips lines while typing.
Touchpad is too sensitive in Windows 7 HP laptop. Makes the text skips lines while typing. No sensitivity setting... Help
Have you tried to contact the manufacturer of your computer as suggested by Paul Bab?
You can go to this link to contact HP Support: HP - Contact customer support.
Kind regards.
-
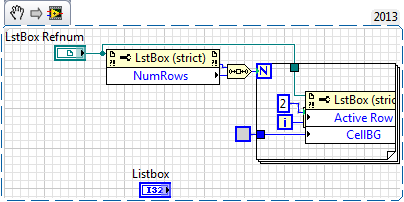
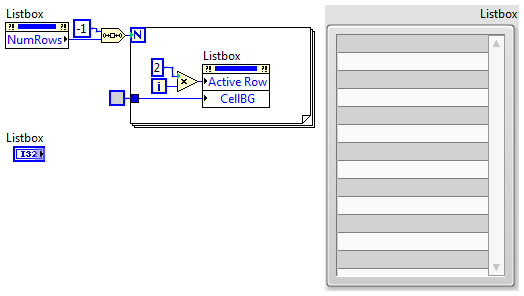
Quick help: how to make grey, white, gray lines in listbox?
Hello
As in the subject. How to make gray, white, gray lines in listbox?
See you soon
Apparently, Jim and I feel the same (and I need a new CTC for 2013)
Best
-
How can we change the default zoom setting so that when you open a PDF the size of the displayed document zoom is that you need it to be?
Hi CKWAZTRANSINC,
Open Acrobat Reader DC, navigate to the Edit-> Preferences-> Page Display menu-> set your required Zoom percentage.
Click OK to confirm the change.
Restart the Acrobat Reader DC to test.
Let me know if it solves your problem.
Kind regards
Nicos -
Is it possible to change the zoom setting, when I opened one opens and documents automatically using Adobe I don't have to hit the button + to be able to read?
Hello
Yes, there is probably a value of zoom like this. Follow the steps to set the same.
Launch a PDF file > go to Preferences > categories > Page Display > under Zoom to choose suits you. If you select automatic, the document will be automatically adjusted according to the size of the page.
There are several options including data, choose according to your requirement. Once selected, close the document and restart the same pdf and you will see the paper size that you selected.

Concerning
Sukrit diallo
-
Best way to make drawings from scratch line
Hi and I apologize if one fundamental question, but I created a complex illustration, and I wonder if there is a faster way to go of are first attached image to the second transparent. I feel like I spend a lot of monotonous time, following a model less before and make a compound path to set the black background for a new series of carvings. All black in the picture is a filled shape, encompassing the whole of the back of the hotel, while white is white fill blocking the black space, or other white objects below.
How can I clean up my Act? Or what would be a better strategy from the beginning to achieve a transparent line drawings?
I sincerely thank you for your answers, I'm losing too much time here, I know. Happy to clarify any details left!


Your basic problem is you aren't working methodically and planning as you go. You draw a large number of paths willy-nilly until the whole drawing is "done" just in terms of how it looks on the screen and thinking you look just with how inevitiable decisions it revolves on a technical level subsequently. You discover that you have created a number of unwieldy and confusing objects that you hope to solve in constructions more simple (so predictable) understandable in last step.
It is much better to have in mind what kind of constructions and General Organization, you want to end up with and work toward that, completely finishing (cutting, Union, etc.) each developed in consequence article you go. This way you avoid the confusion between yourself and creating extra work later when you think you are finished with the line work and wishes to draw the fills. While you work, always keep in mind what type of objects you create: every path is either open or closed, filled or unfilled, striped or contour, simple or compound.
Drawings like this can be organized in different ways. None are 'good' or 'bad '; but you created frustration are time consuming when you are unable to plan for her:
- All the line drawings fully trimmed, without resorting to the fillings in a box 'hide' unwanted portions of the book of the line in another area. A stack separated from outline of the objects behind the line work to create the color fill. (This method can greatly simplify the issue of trapping). Some users still prefer to create all the fillings on one or more separate layers (although it is not necessary to do so).
- The linework drew more willy-nilly, intending to use the LivePaint make adjusting, completing later. Some users live and die by this method. I have not, because all these invariably automated routines create what would otherwise be unnecessary additional anchorPoints, and resulting simply fills "kiss" of their work to the adjacent string, rather than their base. Which may require more elaborate trapping.
- Work to the chain and shared by the same paths fillings. Sections of the work dealt with in distinct groups (Group of helmet, visor group, etc.) An advantage to work in this way, it is that the overlaps resulting allow the relative position of the parts to be tweaked later.
Yet once, it is not a method of organization is good or bad; the fact is that, like it or not, the vector drawing is all about creating a battery of independent objects. It is fundamentally different from the "painting" in a raster imaging program. By its very nature, it imposes a need intelligent Organization of this stack. So you are always much better at least generally this inevitable organization planning, no matter which scheme you choose. Unceremoniously to the design approach is antithetical to the nature of the vector drawing.
For example, consider the designs of the sheet on the visor. You attract them (evident in your screenshot of second and third), spread in an adjacent area where you intend to be partially hidden by a white fill in front of them. There is nothing of strictly 'evil' to work in this way (although I think it is messy), but it suggests that you want to build your drawing according to the third organizational scheme described above. But that conflicts with your tent to correctly solve your line work through automated routines (mode strokes, Boolean path operations plan) later whidh is more suitable for the first method of organization described above. To use these automated features will result in some places, the unwanted portions to re - appear as the stack object changes (as you can see it occurred in your third-party screenshot). So now you have things to cut away. You have created extra work for yourself.
Where you are, based on your first screenshot, you can try this:
- Select all
- Object > path > outline strokes
- Select all
- Pathfinder palette: Merge (unions touch fills with the same color and overlapping objects of a different color in punch)
- Make the necessary adjustment and correction of the unwanted stuff that was previously hidden.
- Make the necessary corrections of the sense of the trace or winding or mixture to return rule fills voids or vice versa.
- Create your objects to fill behind the line work, or use trace to create.
Due to the number of runaway from the paths that you drew, you have lot to do all of the steps above. If so, try to work in several "sections". for example, with the black marquee pointer select through a half or a third of the drawing, do the steps, then repeat for the other third, and so on.
And don't worry... After you did this kind of tedious cleaning afterwards on a few projects, you will begin to understand the principles of advance planning in the organizational structure of your drawings and start that keeping in mind as you proceed. We've all been there.
IE7
-
Setting lines bleed and crop marks
I'm developing a postcard 4 x 6 on a 4.5x6.5 document. I want my crop marks and bleed the lines to 4 x 6 to indicate to the printer where to cut the extra. I'll put my bleeding pour.25 on each side to give me lines that make up a finished product of 4 x 6, but it does not work. Crop marks are not yet near I would like it. I set up to 4 x 6 guides to compare the where they are landing and it's far away. I don't know what I'm doing wrong. Help, please!
Make your 4 X 6 size document and use the purge setting to put in place additional purge (Document format > more Options).
-
I added zoom and zoom to my toolbar yahoo and one of the sites that allow you to choose buttons to add to your toolbar, and now he's disappeared. And I can't find zoom anywhere. Have you heard of this happening before? If so do you have a resolution for this? Thanks in advance. Dan
Note that there are keyboard shortcuts for this, which is faster than the GUI of the keys.
- To make things bigger, press Ctrl and + at the same time.
- To make things smaller, press Ctrl and - at the same time.
- Pour reinitialiser to reset the size of return to normal, press Ctrl and 0 at the same time.
-
How to make a backup set full of files that you selected (in Windows 7)?
If I click on 'save now' in Windows 7 will do a backup full of selected files?
I've finally found out of backups scheduled in Windows 7 because I could never determine what was a 'set' as there are has no indicators.
So the question is: in the future, I just want to complete backups of all the files I've selected every time I want to (since I still find the options for others) to perform a full backup what I do in the backup and restore window?
I'm sorry to say this, but the function of backup on Windows 7 is one of the worst I've ever seen - taking control of the user for what type of backup, they are done but never explain what is contained in a 'set '. "Windows periodically make a new backup set...". ', they say. Really? When? Why do I see a game with 250 GB, a second 'package' with 35 GB and when I click on 'save now' the file was 197 GB? What is contained in these 35 GB? Incremental? Differential? The secret of the Dead Sea Scrolls?
I'm not the first user to this problem, that is why users will third-party backup programs. But it amazes me that MS cannot go down this basic procedure and explain it to the user.
Backup programs work very well with the following options:
Ask the user if they want to (1) create a 'complete' backup of the selected data, (2) create a "premium" with the files changed, or (3) "incremental" with the added files. Indicate what kind of file the user seeks to him once it was created. Is it so difficult? . In an attempt to "dumb down" the process there desperately ready to confusion with the result that if you delete a 'set' to clear a space not sure what you are deleting - very dangerous.
If the user wants to simplify and give software MS control software HAS yet to tell them what a 'set' is and what it contains. (full/differential/differential) Otherwise, you cannot delete all files or sets for fear of erase something essential. And you won't find until you crushed.
Hello
Windows Backup allows you to make copies of data files for all people who use the computer. You can let Windows choose what to back up or you can select individual files, libraries, and drives that you want to save. By default, your backups are created on a regular basis. You can change the schedule and you can manually create a backup at any time. Once you have configured Windows backup, Windows keeps track of the files and folders that are new or modified and adds them to your backup.
Reference items to learn more about this topic.
What backup settings should I use to maximize my disk space?: http://windows.microsoft.com/en-us/windows7/what-backup-settings-should-i-use-to-maximize-my-disk-space
Back up your programs, system settings, and files: http://windows.microsoft.com/en-us/windows/back-up-programs-system-settings-files#1TC=windows-7
Backup and restore: http://windows.microsoft.com/en-us/windows7/products/features/backup-and-restore
Response with the State of the question and we will be happy to offer you our help.
-
HP Officejet Pro 8000 printer range makes the vertical white lines
My HP Officejet Pro 8000 printer makes white vertical lines around text and photos. What can I do? I use Windows 7. As far as I can see, the print heads don't need to be changed. Cleaning them would help? If so, how can I clean them? Thank you.
Hello
You can try the steps listed in this document:
Troubleshooting print quality problems
Let me know if it helps
-
dynamically setting lines displayed in the advanced table
Hello
I want to give the user the ability to change the number of lines displayed in a table.
I can do it with the following:
The results of table reference
OAAdvancedTableBean = tableBean
(OAAdvancedTableBean) webBean.findChildRecursive (resultsTableName);
Set of displayed rows
tableBean.setAttributeValue (UIConstants.ROWS_ATTR, 10);
I'm running it in the processRequest.
It does not seem to do. It does not change the default lines is 20
Is it possible to do this?
Thank you
Ronny
Try this
tableBean.setNumberOfRowsDisplayed (10);
-
How can I make the invisible pencil lines?
I did a lot of changes with the pen tool, and I noticed that the pen lines are a different color than what the form is I did. Is there a way to make these lines of the invisible pen?
Thanks much for any help!
The lines seems to be the limits of your selfmade forms (blue is normally on layer #1). They are invisible.
Check it by pressing the [W] - key---> the lines disappear now?
-
Zoom setting by default Google Map
Hello.. is it possible to change the default setting in Google map, so it appears in the suburbs level rather than what (almost say level) currently. Thanks DC
Come here folks, gather around, solution of community fees to come!
He eats when he's hot!
Add after the tag module webappsmap.
Adjust the zoom level of 0 to 10 by changing the number.
-
Make a drawing transparent line
I have an image file of a detailed line drawing and complex. The drawing is black on a white background. How can I make transparent white background so I can post in a blog Wordpress page and it will have the same background color as the page is on that? I choose the drawing using the color range, but I can't understand how to stick it on a background that is transparent.
with white background selected, delete and you should see
squares grey/white for transparent areas.
Save as a .png file to preserve transparency (not jpg)
-
make a zoom like browser in photoshop
Hi all
I'm stuck in the last days to apply to zoom in. I get no help with google too.
It's like browser in photoshop. example of this application link given below.
Click on any image, a pop-up window open, and then click "zoon in" then flash application opens this is the exact example
that I want to do.
I don't get any help from anywhere and I've never done any such request, but I have to do.
So please help me, any idea, any code, any concept, any example anything you have. Please, I beg you.
Thank you.
Hello
You applied the mobile box in the browser with the scale of the big picture?
OK, remember, its better to have the registration point to top left of the page, make it a rule of thumb... It will save your life
Now, coming to the problem, it is difficult for me to go through all of the code, but I'd like to suggest how the problem:
var diffX:Number = smallImage.width - movableBox.width;
var MoveBigImageXTo:Number = ((BigImage.width-StageWidth) /diffX) * movableBox.x;
Now for horizontalScrollSize, the default value is 4, so calculate accordingly and move the component to this amount.
I hope this helps.
Best regards
Etienne Das


Maybe you are looking for
-
How to add a page to landscape in a Portrait in the Pages document
Hello!I need to add a page to landscape in a Portrait in the Pages document and cannot find how to do that for a single page and any thing. Thanks in advance for your clues! Camille.
-
Hi, I'm not familiar with Mozilla or Firefox.He said that it will replace a program such as Norton virus protection and tastes.Question is, is Firefox anti-virus protection, firewall, anti-phishing and all, download us the wrong product, or does it d
-
I have a mini laptop Dell Expiron 1012 and want to read ebooks on it. Mirosoft ereader soft ware will work on this subject. I tried to get it installed and activated, but it is not acgtivate. Refered me F & Q. well this work on my computer or I'm doi
-
Windows Media Player Security upgrade 2.5.01 need upgrade button does not work
Trying to get the Update 2.5.0.1 DRM for Windows Media Player 11 in always unsuccessful XP regardless of what I do. The upgrade button is grayed out in Google Chrome to http://drmlicense.one.microsoft.com/Indivsite/en/indivit.asp and although she is
-
How can I connect my Xbox Live Bluetooth Headset for Windows 7?
I'm trying to connect my Xbox Live headset in Windows 7. It connects but cannot be used because there is no drivers. Anyone know of a solution for this? The broadcom software will not work because the headset disconnects after failing to get drivers.