Adding static to display criteira LOV
How can I add a static list of values to a view criteia which is used as < af:query > Panel and table on the JSF page. I have an ActiveStatus column on table DB that contains values such as 'Y' and 'n'. I created a static display object that has an attribute list static 'Yes' and 'no '. I am trying to add this as LOV to the column of ActiveStatus but it does not allow me to add and gives the error message saying THAT LOV has no primary key.
I use query and table Panel, and I don't want values as of the 'Y' and 'n'.
JDev - 11.1.2.4.
Your static vo needs to at least two attributes, a key and description of Inge. Key must correspond to 'Y' and ' no description is 'Yes' and 'no '. Mark the key as a primary key, then select the description tab hint ui as a display value.
Then you should be able to use the vo as lov. A sample so that it is to a ViewObject use for global consultation data | JDev & amp; Goodies ADF
Timo
Tags: Java
Similar Questions
-
I added third monitor display windows on it but the mouse is not going on the third screen
I added third monitor display windows on it but the mouse is not going on the third screen
Hello
1. what operating system is installed on the computer?
2. What is the brand and model of the computer?
3. does the problem occur when you are working on a particular application?
We will define the third monitor as primary monitor and check the functionality of the mouse.
Link:
http://www.Microsoft.com/athome/organization/twomonitors.aspx#fBid=XT_Tjm0Ldrb
Please return to the State of the question.
-
Problems when adding static routes to esxi 5.5 c
Hello
I read this KB on adding static routes:http://kb.vmware.com/selfservice/microsites/search.do?language=en_US & cmd = displayKC & externalId = 2001426
But I'm unable to add static routes to my esxi 5.5. host. am I missing something here?
~ # esxcfg - road - l
VMkernel itineraries:
Interface of network gateway subnet mask
10.238.187.0 255.255.255.0 subnet local vmk0
10.238.188.0 255.255.255.0 subnet local vmk1
by default 0.0.0.0 10.238.187.1 vmk0
~ # esxcli network ip route add - 10.238.188.1 - network 10.238.188.0/24 gateway ipv4
In double track 10.238.188.0/24 found in the network. Please remove first the old road.
Kindly help.
You cannot add a new gateway for a subnet exists in the vmkernel as you can't have two default gateway.
-
Apex 4.2.2 tabular form display using LOV works not
Hello
I created a tabular layout with 3 columns (that one is be a checkbox but I think it's irrelevant)
If I update a row with the other 2 columns as standard columns or selection lists, and then the page updates correctly and my data are engaged.
However if I change the 2 columns to "display text (LOV, light does not save state)" and then I can not update these lines?
I get the error "1 error. " Column must have a value. (Row 2) »
I use the same LOV I was for the select list and no other changes have been made.
Is there a solution to this?
Thank you very muchRichard
I worked around this by creating another column of the same type as the broken and leaving that as hidden, requires that this hidden column to be the default and I renamed my base as the column 'column2' LOV and show this, and everything works now.
-
My situation:
I have a DisplayObject (objA) added to the display list and a DisplayObjectContainer (objB) not added to the display list. When objA receives a MouseEvent.CLICK event, is it possible to use the localX and localY to the event of objA to get objects under the same point in objB?
Sample:
var objA:Sprite = new Sprite();
objA.graphics.beginFill (0);
objA.graphics.drawRect (0, 0, 100, 100);
objA.graphics.endFill ();
addChild (objA);
var objB:Sprite = new Sprite();
var childA:TextField = new TextField();
childA.text = "This is the child.";
objB.addChild (childA);
objA.addEventListener (MouseEvent.CLICK, handlerClick);
function handlerClick(e:MouseEvent):void {}
var pt:Point = new Point (e.localX, e.localY);
var objs:Array = objB.getObjectsUnderPoint (pt);
trace (objs. Length);
}
so your test/trace environment can deliver it.
Use the following code, publish your swf file and test the swf file in your standalone player (or publish a html and swf and test it in your browser).
package {}
import flash.display.Sprite;
import flash.events.MouseEvent;
to import flash.geom.Point;
import flash.text.TextField;
SerializableAttribute public class extends Sprite {Main2
private var _objA:Sprite = new Sprite();
private var _objB:Sprite = new Sprite();
private var childA:TextField
public void Main2() {}
_objA.name = "a";
_objA.Graphics.beginFill (0xdddddd);
_objA.Graphics.drawRect (0, 0, 100, 100);
_objA.Graphics.endFill ();
addChild (_objA);
_objB.name = 'B ';.
_objB.Graphics.beginFill (0xdd0000);
_objB.Graphics.drawRect (0, 0, 100, 100);
_objB.Graphics.endFill ();
_objA.addEventListener (MouseEvent.CLICK, handlerClick);
Stéphane = new TextField();
childA.name = 'tf ';
_objA.addChild (childA);
childA.multiline = true;
}
private void handlerClick(e:MouseEvent):void {}
var pt:Point = new Point (e.localX, e.localY);
var objs:Array = _objB.getObjectsUnderPoint (pt);
childA.text = "";
for (var i: int = 0; i
childA.appendText(objs[i].name+"\n");
}
}
}
}
-
Adding static button in a drop-down list
Hi all
I add a list to verticalFieldManager with vertical scrolling function, and in the same crib from the bottom, I need to add a button (after clicking on the button I have to go on the other screen).
Here, my problem is that whenever I scroll the list, the button does not scroll, it should look like the button on the top of the display to scroll and the list in the background. But whenever I scroll the list, list a scroll at the bottom of button.
For more information, I add a screenshot, please find the attachment.
I'd have a play with this, the thought took a little more time than I expected and there are a few "curve balls.
In any case, here's some code that can do what you want. There's some stuff in there, but see how you get on the revision of the code and the doc and the items I gave you to, to see if you can understand what is happening.
Tested on OS 6.0 Simulator 9800, not on anything else.
package mypackage; import java.util.Vector; import net.rim.device.api.system.Display; import net.rim.device.api.ui.Color; import net.rim.device.api.ui.Font; import net.rim.device.api.ui.Graphics; import net.rim.device.api.ui.Manager; import net.rim.device.api.ui.ScrollChangeListener; import net.rim.device.api.ui.TouchEvent; import net.rim.device.api.ui.XYRect; import net.rim.device.api.ui.component.ButtonField; import net.rim.device.api.ui.component.LabelField; import net.rim.device.api.ui.component.ListField; import net.rim.device.api.ui.component.ListFieldCallback; import net.rim.device.api.ui.component.SeparatorField; import net.rim.device.api.ui.component.Status; import net.rim.device.api.ui.container.MainScreen; import net.rim.device.api.ui.container.VerticalFieldManager; public class StaticButtonTestScreen extends MainScreen implements ListFieldCallback{ private static int NUMBER_OF_ROWS_TO_ADD = 50; private static int NUMBER_OF_COLUMNS_TO_DISPLAY = 6; private Vector _listElements = new Vector(); // We use a pretty crude method to supply the items to be displayed private ListField _listField; private int _requiredColumnWidth; StaticButtonTestScreen(){ //! how wide will we make the columns? Font ourFont = this.getFont(); _requiredColumnWidth = ourFont.getAdvance(" column 8 "); //! this example has fixed column widths. They do not have to be. Fixed is just simple to demonstrate. this.add(new LabelField("Above ListField", LabelField.FOCUSABLE)); this.add(new SeparatorField()); //! Add the ListField to a HorizontalFieldMaanger that can scroll horizontally. //! It is this that does the scrolling for us. StaticButtonManager myMan = new StaticButtonManager(); //! Note the overridden methods in our ListField. _listField = new ListField() { //! OVerride layout so that you get the ListField defined the width that you want. protected void layout(int maxWidth, int maxHeight) { int requiredWidth = Math.min(maxWidth, this.getPreferredWidth()); super.layout(requiredWidth, maxHeight); } }; VerticalFieldManager vfm = new VerticalFieldManager(Manager.VERTICAL_SCROLLBAR | Manager.VERTICAL_SCROLL); // Put ListField in here so that it scrolls _listField.setCallback(this); _listField.setSize(NUMBER_OF_ROWS_TO_ADD); // setSearchable(true) so a key stroke will invoke indexOfList(). Try it _listField.setSearchable(true); for(int count = 0; count < NUMBER_OF_ROWS_TO_ADD; ++count) { String listItem = Integer.toString(count) + "."; _listElements.insertElementAt(listItem, count); } vfm.add(_listField); myMan.add(vfm); ButtonField bf = new SpecialButtonField("test"); myMan.add(bf); this.add(myMan); this.add(new SeparatorField()); this.add(new LabelField("Below ListField", LabelField.FOCUSABLE)); } // Following methods are required by the ListFieldCallback interface public void drawListRow(ListField listField, Graphics graphics, int index, int y, int width) { int columnWidth = width/NUMBER_OF_COLUMNS_TO_DISPLAY; //! Use the width that we have, not the width we requested. //! There is a chance that they might be different, though I suspect this would only //! be seen during development when perhaps changes have not be made consistently. int xpos = 0; // First column test data supplied from program String suppliedData = (String) this.get(listField, index); graphics.setColor(Color.BLACK); graphics.drawText(suppliedData, xpos, y); xpos += columnWidth; // Dummy up the other columns..... graphics.setColor(Color.RED); for ( int i = 1; i < NUMBER_OF_COLUMNS_TO_DISPLAY; i++ ) { graphics.drawText("c" + Integer.toString(i), xpos, y); xpos += columnWidth; } } public Object get(ListField listField, int index) { return _listElements.elementAt(index); } //! In theory, the "framework" can call this, so it should return the same //! value as the overridden getPreferredWidth(). But my testing suggests this is //! is actually never called. But for consistency, set it correctly! public int getPreferredWidth(ListField litfield) { return _requiredColumnWidth * NUMBER_OF_COLUMNS_TO_DISPLAY; } // People don't know how to use this, so I'm coding this up as an example // In the sample code you can use the digits to find things... public int indexOfList(ListField listField, String prefix, int start) { // Search from where we currently are forward. for ( int i = start; i < _listElements.size(); i++ ) { String element = (String) this.get(listField, i); if ( element != null && prefix != null ) { // Just being careful if ( element.startsWith(prefix) ) { return i; } } } // Not found, search from beginning to where we are currently for ( int i = 0; i < start; i++ ) { String element = (String) this.get(listField, i); if ( element != null && prefix != null ) { // Just being careful if ( element.startsWith(prefix) ) { return i; } } } // Didn't find it, don't move.... return start; } // Special Manager so that we can overlay the Fields // and because the standard optimised paint does not // cope with this, we need to invalidate() the Field on scroll to get // it repainted. // We also have a bit of work around class StaticButtonManager extends Manager implements ScrollChangeListener { // Implement ScrollChangeListener so tha on a scroll, we repaint // because the default action is optimised and does not cope // with the overlaid Fields. boolean scrollListenerSet = false; SpecialButtonField bf = null; XYRect ourExtent = new XYRect(); public StaticButtonManager() { super(Manager.NO_VERTICAL_SCROLL | Manager.USE_ALL_HEIGHT); } // Override paintBackground just so we can see the extent of this Manager // Not necessary, just done to make it easier to see. public void paintBackground(Graphics g) { int currentBackgroundColor = g.getBackgroundColor(); try { g.setBackgroundColor(0X00CCCCCC); g.clear(); } finally { g.setBackgroundColor(currentBackgroundColor); } } // Only expect two Fields // 1) A VFM which will scroll to handle the ListField // 2) A button that we will stuck at the bottom right protected void sublayout(int maxWidth, int maxHeight) { maxHeight = Display.getHeight()/2; // Set the Height that the ListField will use when scrolling. if ( this.getFieldCount() != 2 ) { throw new RuntimeException("Incorrect number of Fields added"); } VerticalFieldManager listFieldManager = (VerticalFieldManager) this.getField(0); if ( !scrollListenerSet ) { scrollListenerSet = true; listFieldManager.setScrollListener(this); } super.layoutChild(listFieldManager, maxWidth, maxHeight); super.setPositionChild(listFieldManager, 0, 0); if ( listFieldManager.getHeight() < maxHeight ) { maxHeight = listFieldManager.getHeight(); } bf = (SpecialButtonField) this.getField(1); super.layoutChild(bf, maxWidth, maxHeight); super.setPositionChild(bf, maxWidth - bf.getWidth(), maxHeight - bf.getHeight()); setExtent(maxWidth, maxHeight); } public void scrollChanged(Manager manager, int newHorizontalScroll, int newVerticalScroll) { this.invalidate(); // repaint everything.... } /* * Might be needed, comment out code just in case public int getFieldAtLocation(int x, int y) { if ( x >= this.getWidth() - bf.getWidth() && y >= this.getHeight() - bf.getHeight() ) { return 1; } return super.getFieldAtLocation(x, y); } */ // Just used to allow the user to use the trackpad to go horizontally and select the button. // Not really needed protected boolean navigationMovement(int dx, int dy, int status, int time) { boolean buttonInFocus = bf.isFocus(); if ( dx > 0 && !buttonInFocus ) { bf.setFocus(); return true; } else if ( dx < 0 && buttonInFocus ) { this.getField(0).setFocus(); return true; } return super.navigationMovement(dx, dy, status, time); } // Because the Button keeps moving in relation t the manager // and the manager does not expect this, // We have to check the touch location ourselves protected boolean touchEvent(TouchEvent message) { int x = message.getX( 1 ); int y = message.getY( 1 ); getExtent(ourExtent); if( x < 0 || y < 0 || x > ourExtent.width || y > ourExtent.height ) { // Outside the field return false; } if ( x >= ourExtent.width - bf.getWidth() && y >= ourExtent.height - bf.getHeight() ) { bf.onClick(); return true; } return false; } } // Special Button so that the Button can be clicked from the // Manager's touchEvent class SpecialButtonField extends ButtonField { public SpecialButtonField(String label) { super(label); } protected boolean navigationClick( int status, int time ) { onClick(); return true; } public void onClick() { Status.show("Clicked: " + Integer.toString(_listField.getSelectedIndex())); } } } -
Customize display of LOV attributes
Hi all
In normally, when creating the list of attribute values:
Once we have selected the attribute list, following the tips UI tab we select available display attribute, for example: I select two attributes: CountryID and %provinceName%%-> means it's multiple values are separated by white space like this: England 1... The question is how can customize to: 1. England
I want to replace '. 'instance of 'space'. " Thank you
The trick is that you add an attribute that is calculated for the sql like
Select country_id, country_name, country_id | ' ' || country_name as country LOV
COUNTRY_ID, COUNTRY_NAME LOV
---------- ---------------------------------------- -------------------------------------------
AR Argentina AR Argentina
To THE Australia in THE Australia
BE Belgium Belgium BE
BR BR Brazil
you use the country_id to store the selected value and the LOV column to display the user interface options.
Timo
-
Hello!
Is it possible to compare a lov display value with a string of characters in dynamic action?
So, I need a dynamic action to trigger based on the displayed value of point lov. For example when I select "1" from point lov I want to trigger an action...Setup an example on apex.oracle.com
-
How to display a LOV display attribute in a read-only table?
Guys and girls,
With the help of Studio Edition Version 11.1.1.3.0.
It seems that there is a certain messages on the forums about something similar to this, but nothing (that I can find) involving really read only tables.
I have a tree table which shows a BOM. A BOM is a list of raw, subassemblies, assemblies, intermediate, sub-components, components, parts and the quantities of the two required for the production of a finished product.
In this table tree, PARENT, CHILD, and QTY columns are displayed and are held in the BOM table. PARENT and CHILD have a LOV defined with a NAME attribute, which comes from the object View of PARTS. When I view the table tree on my. JSFF, PARENTS and CHILDREN show their number of DBSequence which had been assigned to them and is stored in the Schedule table, as opposed to the value of NAME through their LOV. A user would probably as the component name, rather than the sequence number.
I could simply add this attribute of NAME in my view BOM with a JOIN clause object and display it like that, but it feels as if I am needlessly complicate my view object.
How can I display the Display NAME attribute in a read-only table?
Thank you
Will beHi Will,
I'm sure you'll be stuck with that in a situation of read-only. You can bring in the description as a reference attribute in your VO, and it should work.
John
-
display 2 lov on the same page?
I can: on the proposed transfer screen, when the employee leaves the company, the LOV will not show LOV resigned employee used: select name d, r id emp1oyee where superior (status) = 'ACTIVE' order by 1Table:employee ID Name Status 1 emp active 2 emp2 active 3 emp3 terminated 4 emp4 terminated ....
do not know how: need to show the name employees resigned using the report link. The report link is back to the same page that created the assignment. How I accompolish cela by displaying the laid off employee name not the ID?
Ex: p10 (shape) has the lov with active employees. P11 has a report of all project assignments. When I jump from the link provided in p11 P10, the recovery must display the name of the (unidentified) employee the same topic is complete.
I use APEX V4. Can you help me? Thank you.
MunsharMunshar,
Ah, I've got get it now.
My thought would be to change your LOV code to something in the sense of the following:
select name||' ('||status||')' d, id r
from employees
where id = :P10_ID
  and upper(status) <> 'ACTIVE'
union all
select name d, id r
from employee
where upper(status) = 'ACTIVE'
This should give you what you are looking for.
-David
-
Need help on automatically display values LOV
The current functionality - user clicks on the icon of the lov lov screen opens and the user should click on 'Go' and displays the values of lov
The features you want - the lov icon is clicked, lov screen opens with the displayed values. The user must NOT push the button 'Go '.
Gurus of the OFA - please let know us how this desired features can be achieved
Thank you
JuliusHello
There is only one way to do this...
While the page is loading in process request, just put the text in LOV entry '% '.
OAMessagelovInputBean lov = (OAMessagelovInputBean) webBean.findIndexedChildRecursive ("lovid");
If (lov! = null)
{
lov.setText(pageContext,"%"); "
}Thus, when you open the lOV now it will display all values.
Thank you
Gerard -
dear friend
I use 3 Tables of Department for ex
Print
Accounts
Engineering
Created 3 Lov, now I want a trigger when the user will
Select print only
lov impression should open
best regards
SandyAccording to using forms:
Show_LOV
Displays a list of values (LOV) window to point given coordinates and returns TRUE if the user selects a value in the list and FALSE if the user cancels and rejects the list.Declare bRtn Boolean; Begin IF :TODEPT='EXTRUSION' THEN bRtn := SHOW_LOV('LOVEXTRUSION'); ELSIF :TODEPT='PRINTING' THEN bRtn := SHOW_LOV('LOVPRINTING'); END IF; End;I hope this helps.
-
How to display three LOVs for a single name
I have an obligation to indicate three LOVs in a form to be displayed alongside (instead of each item in a separate column). The name is common for all three LOVs cascading and I also have other items of apex in the same form that appears as two components of apex by each line. The display format is something like...
Item1: Tex Item2 field: text field
Item3: Radio button Item4: text field
Item5: Text box
Item6: LOV1 LOV2 LOV3
any ideas are appreciated.
Thank you
SuryaSurya:
It's easy to do. Here's how
Set the first LOV as you normally would.
For the second and third LOVs define the following attributes
Label: Leave it blank
Start on a new line: NO
Field: NOCITY
-
I have a static and inspiring list display object that I let fall the component selectonechoice in my popup.
When I click a button on the home page, it opens a popup and I want to show a default value. The following code executes without any problems
but does not set the value. He stresses that the first value in the selectonechoice. What could be the problem?
String df = "Hello";
DCIteratorBinding iter is getBindingsForDCB () .findIteratorBinding ("SampleViewObj1Iterator");.
ViewObject dvo = iter.getViewObject ();
Drow line [] = dvo.getAllRowsInRange ();
for (int i = 0; i < drow.length; i ++) {}
String dval = drow (String).getAttribute ("DataAttr");
If (df.equals (dval)) {}
iter.setCurrentRowIndexInRange (i);
}
}
AdfFacesContext.getCurrentInstance () .addPartialTarget (selectOneChoice2);As Frank said, you set the property value correctly, not the default row as the current row. So, if your choice of selecetOne is like this,
getDefaultValue() of the bean should return the key of that particular line which you want to set as default. So if you want to 'Élément Label2' as a default, your getDefaultValue() should return 'val2 '. Just to test, you can even set
It will be useful,
Julian. -
I note in calendar help, under "manage your schedule", there is a small example showing several days screenshot (see months) with assorted background colors. I can't find any way to add these colors to my own view of the calendar. Is this possible?
I'm running the Mavericks, version 7 of schedule.
Hi Jack,
Thanks for your question. The different colors you see represent different calendars (home, work, etc.). The resources below provides more information on the use of the calendar in Mavericks application. I've highlighted the key here information. Click on the link for more details.
The basics of the Mac: calendar keeps your appointments
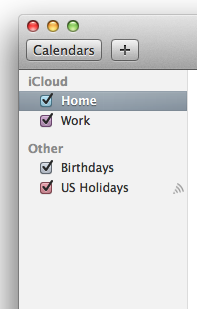
To change the color or the name of a calendar, select it in the calendars list, and then choose the command Edition > read the information.
To the right of the name of the calendar, you will see a color box, click the current color to display more options.
See you soon!
Maybe you are looking for
-
Firefox has becomes slow and unresponsive after that I tried to install the addons (not installed)?
I recently format my computer and reinstall windows 7, since it was the only way I know of to solve the problem with Firefox (I already had this problem too). I download the latest version of firefox 33.0.2 and install it. This version was super fast
-
Using the Satellite A100 without battery
My laptop Satellite A100, the battery is almost dead. Is it bad to use the computer like this?Should I remove the battery and use the computer? When using on current alternative computer runs slowly when the battery does not work. Thank you
-
Update the BIOS on Satellite A30 303
Having a Satellite A30-303.With no intern work DVD.Have a usb DVD boot. I wonder if I can update Bios from Ubuntu. I need execute a .exe. Or if I can take a floppy and run the file BACK.
-
When printing in color the picture or page is OK at first but turns to the rose before finishing it also did the same thing on copy
-
CONFIGURE WINDOWS LIVE MAIL WITH GMAIL AND WINDOWS 7
I get this error (server: 'smtp.gmail.com' Windows Live Mail error ID: 0x800CCC78 Protocol: SMTP Port: 25 secure (SSL): No.) can someone please tell me what I'm doing wrong.