Adjust the width of the text to the width of the image
Sorry if my English is not 100%.
Is it possible (and if so, how?) to adjust the width of a text to the width of my image?
For example: I want to have the text 'Sample Text' in my picture that is the width of 500px. The text that must also be 500px in width. But I have another image, which is the width of the 1800px and that the text "Sample Text" must be addepted over a width of 1800px. So is there an option in Photoshop (I have CS5) which addepts the width of a text to the width of the image?
Thanks in advance.
Yes it is possible by using a script, here's an example that will resize the text to the width of the document and place it 5 pixels from the bottom.
The text layer MUST be the active layer.
main();
function main(){;
if(!documents.length) return;
if(activeDocument.activeLayer.kind != LayerKind.TEXT) return;
var startRulerUnits = app.preferences.rulerUnits;
app.preferences.rulerUnits = Units.PIXELS;
var Percent = 100; //Percentage of width
var myDoc = activeDocument;
var LB = myDoc.activeLayer.bounds;
var docHeight = myDoc.height;
var docWidth = myDoc.width;
var LHeight = Math.abs(LB[3].value) - Math.abs(LB[1].value);
var LWidth = Math.abs(LB[2].value) - Math.abs(LB[0].value);
var percentageWidth = ((docWidth/LWidth)*Percent);
myDoc.activeLayer.resize(percentageWidth,percentageWidth,AnchorPosition.MIDDLECENTER);
align('AdCH'); align('AdBt');
activeDocument.activeLayer.translate(0,-5); //move the text 5 pixels from the bottom
app.preferences.rulerUnits = startRulerUnits;
}
function align(method) {
activeDocument.selection.selectAll();
   var desc = new ActionDescriptor();
           var ref = new ActionReference();
           ref.putEnumerated( charIDToTypeID( "Lyr " ), charIDToTypeID( "Ordn" ), charIDToTypeID( "Trgt" ) );
       desc.putReference( charIDToTypeID( "null" ), ref );
       desc.putEnumerated( charIDToTypeID( "Usng" ), charIDToTypeID( "ADSt" ), charIDToTypeID( method ) );
    try{
   executeAction( charIDToTypeID( "Algn" ), desc, DialogModes.NO );
   }catch(e){}
   activeDocument.selection.deselect();
};
Tags: Photoshop
Similar Questions
-
How can I adjust the images in acrobat format without affecting the text?
I get a variety of analyses - news print, logos, etc., and whenever I try to change anything in Acrobat format he rips the text and image of Mischa.
I just try to convert it to grayscale for crying out loud!
How to avoid this?
I had the same problem. After you open the editing tool to "Return to the image", and now he will remember this preference. See here for a better explanation: Edit scanned PDF, Adobe Acrobat DC format
Once you get to the editor at the stage of Photoshop, I'll be very curious to know if you encounter the same problem that I described here: Edit PDF using the Photoshop file size problem
Matthew
-
Satellite C660D-14W - Webcam application: Impossible to adjust the Image Preview size
I recently bought a Satellite C660D-14W, and then activation of the application of the webcam, I can't increase the size of the image of 160 * 120.
The size of the image (i.e. the image of myself I see when the webcam is activated) used to be much larger, but when I select the drop-down list menu resolution to see that I can enlarge the preview image, the only option I gave is 160 * 120.
A couple of times before this problem started, when I started the laptop I got an error message saying that the application of the webcam could not be enabled; I've uninstalled and reinstalled the driver for the webcam, but no luck.
Any help would be appreciated.
Best wishes
Andy
Hello
Even if reinstalling driver webcam didn t help you, I would recommend when even that check once more.
You must uninstall the first webcam software!Then you must clean the registry because the registry still contains entries.
You can use the CCleaner it s clean good software keep the register and the OS.After that, restart the device several times and then download the software of the webcam from the Toshiba page then install it and restart the device.
Now check the features of webcam!Note: to install 3 software (Skype, etc.) that may affect the webcam feature to verify the webcam before install you the software.
-
Changing the order of the results to adjust the images in space
Hi all
How would I go about displaying images stored in a database in a grid when the images in various sizes and will be added in any order? All images will be either 100 x 50 or 300 x 50 and the display area will be 400 wide. What I need is a way to SEE to recognize that if 2 consecutive images are 300 large, followed by 2 wide 100 images, it should one of 100 images wide slot after each of the 300 wide images.
So, if the actual order of the stored images has been:
300 x 50
300 x 50
100 x 50
100 x 50
100 x 50
300 x 50
He should show one to fill the gaps left by the larger images, for example
300 x 50
100 x 50
300 x 50
100 x 50
100 x 50
300 x 50
Is this possible with CF? If not, if not, how is it achievable?
Thanks in advance.
PaulIn case anyone needs it in the future, the final working code is attached.
Paul
-
Slow keynote: adjust the Image
Meeting with a critical question with Keynote (6.6.1; OS X 10.11.4. MacBook Pro 2.6 GHz.)
When you edit images in Keynote, using Image settings, performance is extremely slow.
Selection of an image, the extreme slowness and delay occurs when you adjust any of the following sliders in Image settings:
Exhibition.
Contrast.
Saturation.
Highlights.
The shadows.
Sharpness.
Noise.
Temperature.
Hue.
The offset is serious enough to greatly affect modulation, and even my ability to set attributes to specific values directly.
(Speaking of which, I also wonder why there is no digital field for each attribute (given that in colors, for red, green and blue).
Interestingly, the cursor opacity for images (or objects) is perfectly without lag. And Keynote (and other applications) runs decently fast on my Mac, other than this issue. Images were pasted with pictures of the camera on my iPhone 5.
All the light shined on it very appreciated!
This isn't normal behavior for Keynote, none of our Macs show this through all Mac models.
Try the following two procedures:
1 reset the Keynote
Perform all the steps in the order listed
Keynote, you must use a request to work procedure removal tool uninstall
AppCleaner is free and works well for this procedure, it can be download here: Appcleaner
- uninstall the Keynote
- empty the trash
- Shut Down the Mac (Apple menu > turn off)
- Wait 10 seconds, then press the power button
- as soon as you hear the startup tone, hold down the SHIFT key
- release the SHIFT key when you see the gray Apple screen, start-up will take a few minutes longer than usual as the Mac performs a software repair
- After the repair and the Mac is completely started, restart the Mac normally (Apple > restart)
- install Keynote from the Mac App Store
2. download, install and run Etrecheck, and then copy and paste the results into a response to this discussion.
Etrecheck is a script notification, it does not repair or modify your system, the website gives full information.
-
Adjust the image format (cropping)...?
Tried a search, but was unable to find anything...
As a former user of Vegas Pro, I have a challenge in the use of this new software to get accurate results. I need to adjust my original aspect ratio (1920 x 1080) 16:9 to 4:3 (1440 x 1080). How this is done in Premiere Pro?
Thank you!
Why would you do that? You can use Crop to cut to the right and to the left if you want to keep the SQUARE.
-
Anyone with adjusting the image transfer/export issues to develop library Modules in LR 2.5?
I have problems of transfer of image files in the mod to develop library mod. I did the original DNG files image adjustments in the develop module in LR 2.5. Once I have make the adaptations in the mod to the point and press 'G' Brown in the library module, adjustments do no more transfer to the library and displays and image with washed out colors, contrast, etc. Also, I tried to export the file corrected from the module development of library such as TIFF, JPEG and PSD. The resulting export files arrives and poster with faded color, contrast, etc.. In both cases, if you press "D" key and go back to the develop module the adjusted image file is there.
I have original TIFF files which are adjusted in the develop module and the transfer/Export without problem. No idea what could be the solution with LR 2.5 and DNG? I use LR 2.5 on iMac 64 bytes Snow Leapard OS. Thank you.
It sometimes takes a little time before a new preview is generated for use in library view. Usually a few seconds. Zoom in and out in the grid to see if that is the question. Another problem may be that you have an image with a lot of specific details of the colors, for example, a field of grass with flowers, neon lights, etc. In the develop module, the preview with zoom out does not show the result of color noise reduction. It will only show you the color with zoom 1:1 noise reduction or more. The result is sometimes a saturated picture to develop. So when you go to the library grid view, a new preview is generated that the color noise reduction will take into account and you end up with less saturated images. To check if this is the case, reduce the default color noise reduction 25 to zero and return to the display of the library.
-
adjust the image for the full photo format?
I use Lightroom 6. Not very teckie so pls be gentle. When I work on culture, my proportions shows as feasible in only half of the picture, not all the way around it like
most of my fellow photographers that use lightroom. Is there something I can do to fix this?
Thank you
Ruth
Please click the Option tools > tool Overlay > never show.
Please select this option to never show, then you will not see this Option Overlay when working with the crop tool.
-
. How to adjust the appearance of the image on the screen when you use the projector
I just got my new laptop with Windows 7 Professional. When you use a projector the screen image does not fully cover the screen. How can I adjust? I would like to watch when you use a projector like the screen of my laptop screen is normally. Thank you
Hi Dana51,
You may need to change the settings in the projector to adjust the image to the screen.
You can refer to the manual of the projector for the same.
-
Adjust the size of the frame of the focus when you use Pan and zoom tool in first 14?
I'm learning to use the pan & zoom tool through Adobe's Classroom in a Book for first elements 11. The book is excellent, but as his writings for a generation of software of creation that is 3 years old, I'm trying to tackle a smaller image section that lets you control the default structure more small bowl size. (using the angle of the image update)
Is it possible to adjust the image to a size smaller than the smallest default size allowed? Thanks for your help!
provlima
I am not 14 as being different from 11 regarding the resizing of the workspace Pan and Zoom focus frame (by clicking on - or +). And I have not found a way to adapt a framework of development less than its smaller default size allowed using the-. or otherwise.
RTA
-
I created a page HTML 5 custom based on the layout Theme1_Standard layout. Our logo is rectangular and does not fit in the default image area. I want the logo to the right of the header. I don't see how to do this in the customization of the Layout dialog box. Is there a way to do this in the HTML somehow? Moreover, the logo looks great in the office and the table overview of the customization of the Layout dialog box. It is the right size and the header title fits right so that there is enough space for the rectangular logo. However, in the preview of the phone, the logo is tiny. And when I generate the layout of reactive source HTML5 with the new theme, the logo is tiny in the preview of Chrome, even for the office.
Thank you.
Gina
You can change this behavior in the main.css file. It's a little more work that you know well;
Open the file with a text editor and search for "table.headertable td.logo". You can find parameters for the width of the logo, something like:
Width: 4;
Simply make it wider to adjust the image. Note that you need to do this several times as several devices have different widths for the logo.
Kind regards
Willam
-
Scale a layer so that it matches the size of the image. (Automation)
I need to scale a layer so that it matches the sizeof the image.
The problem is that I need to automate this procedure and apply on a series of images with different resolutions. (That's why I can't use CTRL + T and just drag the corners of the layer to adjust the image)The layer I need to resize is 2000 x 1500 pixels.
The images I need layer to match varies from 3000 x 2000 pixels and 5000 x 4000 pixels. (I know all about loss of quality when I step up please don't give me a lecture this).No matter if the layer changes in proportions.
I use Photoshop CS5.
If you select the layer you want to resize, you can run the following script to do the resizing...
var startRulerUnits = app.preferences.rulerUnits; var startTypeUnits = app.preferences.typeUnits; app.preferences.rulerUnits = Units.PIXELS; app.preferences.typeUnits = TypeUnits.PIXELS; var doc = activeDocument; var docWidth = doc.width.value; var docHeight = doc.height.value; var LB = doc.activeLayer.bounds; var LHeight = Math.abs(LB[3].value) - Math.abs(LB[1].value); var LWidth = Math.abs(LB[2].value) - Math.abs(LB[0].value); var percentageHeight = ((docHeight/LHeight)*100); var percentageWidth = ((docWidth/LWidth)*100); doc.activeLayer.resize(percentageWidth,percentageHeight,AnchorPosition.MIDDLECENTER); align('AdCH'); align('AdCV'); app.preferences.typeUnits = startTypeUnits; app.preferences.rulerUnits = startRulerUnits; function align(method) { app.activeDocument.selection.selectAll(); var desc = new ActionDescriptor(); var ref = new ActionReference(); ref.putEnumerated( charIDToTypeID( "Lyr " ), charIDToTypeID( "Ordn" ), charIDToTypeID( "Trgt" ) ); desc.putReference( charIDToTypeID( "null" ), ref ); desc.putEnumerated( charIDToTypeID( "Usng" ), charIDToTypeID( "ADSt" ), charIDToTypeID( method ) ); executeAction( charIDToTypeID( "Algn" ), desc, DialogModes.NO ); app.activeDocument.selection.deselect(); }; -
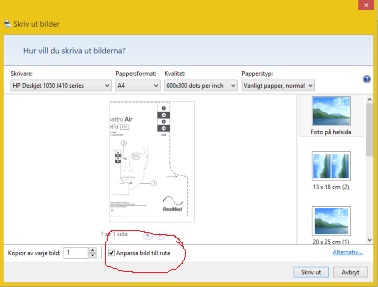
DeskJet 2130: The size of the image on the paper...
When you try to print an image of my Deskjet 2130 I get the following window. On the stands of low (marked): adjust the image in the frame. What this really means? What image is lying?
My problem is: I want to print an image exactly in the size I chose in my program of paint.net. And not on the overall size of the document. How to handle that?
Peter /Hans
Paint.net is perhaps in the control of its installation. If this is the case, you need to make changes of the program from the Paint.net software behavior.
If the operating system can set the defaults outside the program itself, so maybe it's that you can adjust the default settings for which is called print program.
Control Panel > display icon > Default Programs > set your default programs >
Scroll down, find and click on Paint.net > choose defaults for this program >
view the default values and select
Publishes:
I just downloaded the program paint.net, installed and opened a test image.
The program wants to use Windows Photo Viewer, when you click on print from print.net software. Too bad. From now on, I have not found a way to change this unfortunate behavior.
My suggestions you can set the image as you wish, save this image and open the image in MS Paint to set print settings and submit for printing.
Reference:
Paint.NET - User Documentation
When you see a job that can help,
inspires, gives a cool idea
or you learn something new.
Click the 'Thumbs Up' on this post.
Fixed / responded? Click this post accept as Solution to help others find answers.
-
How to add a video option to capture the image
Use a CCD camera to capture the image. I need to add the ability to capture the video image (live) so that I can focus and adjust the image and then capture it for treatment. Y at - it an option. I searched the SDK as well as the camera but did not.
I guess you want to adjust the focus see streaming in labview (correct me if otherwise). You can easily do this by using a 'acquire' inside a while loop. Use a capture button to exit the while loop and process/save the captured image.
-
Cannot COPY and PASTE the image into the image folder in PICTURE IT. How to do this?
Have Windows & Home Premium. I can't COPY a picture in my photo folder and paste it in "Picture It" in order to adjust the image to my likeing. How can I do this? I would like to use the copy / paste functionality.
Gene
If you can't find the file in Picture it, drag the file in Picture it.
-
The appearance of sharpness of the Image on the monitor / cropping picture
Question n ° 1
It is a problem I've had with all versions of Photoshop.
Sizing up a picture on the monitor has a strong influence on the sharpness of the image appears.
If you click on the button of the screen adjustment, the image always loses considerable sharpness.
However, if you click on the little top and down sizing triangles under Image Navigator (side of the app), it chooses sizes that faithfully reproduce the sharpness of the image (what it will look like when printed). The problem is that it is too small (less than "screen adjustment"), or too large (larger than "screen adjustment").
Has anyone experienced this frustrating niggle and found a solution?
2nd edition
Cropping
When cropping a picture, the image appears to move non-adjustable in increments, which means that sometimes you cannot the frame on site exactly where you want. Does anyone know how to fix or configure this?
Thank you!!
There is something basic that you should take into consideration. The only time where Photoshop displays your actual images when pixels you zoom in you picture view to 100%. If the Image zoom level is not not 100% that you don't look at your actual image. Your viewing a version to scale your image. Photoshop quickly scaling allows you to work on your image. Its rapid scaling, not a fact using the best possible interpolation. Indeed to some values of percentage of zoom that you see sounds quite bad. It's not your image. When you work on a Photoshop image scales that you do the sized to your image size image real. That's how the scale works. Don't judge sharpness of the image, unless you look at one of your pixels real images zoom 100%.
You should be able to reframe the exact size you want. You must know how the rectangle selection tool use and the crop tool and manually type in the exact size you want. You must be careful with the crop tool, it can easily crop and resize the crop. No matter when you resample a picture, you lose image quality, or throw you have images you create details you have no details.
Maybe you are looking for
-
ibdev() returns EDVR after repeated successful calls.
After between 800 and 1400 repeated successful calls, ibdev() returns EDVR I have a DLL that makes a single call to ibdev(). Communications to the instrument using the unique Deviceid returned by ibdev() until the release of the DLL. The DLL can be
-
BlackBerry Smartphones Viber on 7.1 OS
GUY! Help? Is it me who can not download viber on my bold 9900 since update to 7.1? Or is it really not available on this OS?
-
Dell968w printer will not connect to the network.
It drives me crazy. I recently had to change the security key on my DLink router But this printer is not connecting How do I change or update the connection for the printer wireless?
-
How can I define Shape object colors and thickness of the line in windows 7
When I use my insert, ease the shape fill color is blue, I need it to be white. also the outline color is blue I need to be black with line 1 pt.
-
filmmaker will not run on my computer windows 7
I downloaded direct esseintails on my comp. everything works except the Director. How wrong what? Movie maker is all I want.