Background should go
I'm trying to remove the red background, so I can put the cables on a easier to see the bottom. The picture is not very clear and the Red bleed more on cable material. Any thoughts on how to go about this clean and make the images sharper and cleaner?
Thank you


Use an Image-> calculations between the red and green channels with the blending mode set to the difference. The resulting mask should be very close to the final version, you'll need to do is apply a bit of levels/curves and some Dodge/Burn there where it is needed.
Tags: Photoshop
Similar Questions
-
My background WHITE in After Effects
Hello - I'm desperate-
I completed my Intro - brand and end - for my video in the after affects. I made the background WHITE, when I started the "new Composition". When I go to render in Adobe Media Encoder, my video has a BLACK background in place. It is white in After Effects, but in Adobe Media Encoder and Premier Pro, the background is pitch Black. How can I make my rest WHITE background as I said at the beginning. I want not melted to the dark, I want my background to be WHITE. Help, please. [FYI just a bit more - I take this intro, and add it to my video edited in Premiere Pro.] Please notify.
If you want a white background should be a solid white or an image in white on the background of your comp. Adobe background color does not alter the fact that it is an alpha channel, unless there is always pixels on it and alpha channels, I repeat, always make it black.
You are not the first beginner to would take by this.
The only possible reason that you would ever change the background color in the composition settings would be if you were going to render an alpha with a multiplied pre color channel. The standard for all non-linear editing systems and compositing apps is to treat everything as straight Alpha. And less you know exactly what you are doing and have a custom workflow set up there is no reason to change the background color of a layout.
-
When the alpha element group influence all elements, but the text remains 100%
I try with the Group of elements and no group, but include elements in the 'State' of the widget library button. Nothing!Explain dough my problem and please excuse my English...
I need to have a transparent background with text (name and job) at the start. When I rollon with the cursor of the mouse on the button background should take a color with 60% alpha, required text full color stay, but if I group or insert State of the item on Rollo button mouse everything take alpha 60%I need to regroup or insert in elements went State button because if they are ungruoped to mouse Rollo on bottom its all is ok, but when the mouse passes over the background of text out you of you initial state.
Can someone help me please?
I think I know your problem - are you using the opacity of the 'effects' rather than opacity to "fill" - one of the effects will affect the entire element rather than just the rectangle.
Use this opacity

not this one

-
Replace the background image of the disc Menus
Hello
My current project is set to PAL HD 1920 x 1080.
As a base, I used the slideshow HD disc menu template.
In the main menu, I've traveled to a still image to replace the background and selected a picture size 1920 x 1080 pixels.
The new background appears but does NOT fill the frame (on the left and right side bars). Looking at the picture, it appears that the image was squashed horizontally (not as wide as it should). Items I cannot enlarge the picture.
I tried to create DVDs and HD content, all menus have bars on the side.
Why?
I see the behavior that you're talking about here. Not sure of the exact cause immediately, be we study in it. For now, your method to open the PSD file which is the basis for the menu and add your picture as background should work just fine. Just make sure you're not add all the layers and maintain structures and layer names. That means that copying using merge down from the menu and your new image, which will be in its own layer, move this layer just above the layer "background" layer (Command / Ctrl + E).
-
How do you make the layer mode will be implemented with no background in elements?
I have a picture of the water splashing on a black background (like this:)
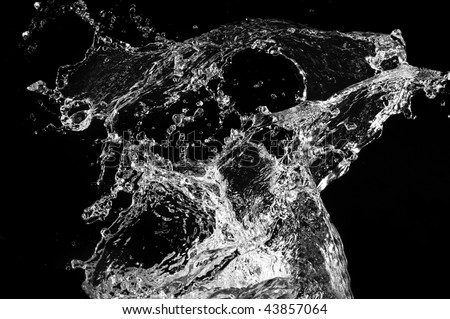
Although it is not the exact). By activating the "screen" blend mode, I get the effect I want: basically it seems that water is splashing on my image. The thing is, I need to save it in a file .png with some water "sink" the edge of my picture on a background transparent (the background should be transparent). The problem I have is that the image hits the transparent background, black comes back.
I need a way to remove either all black photography or, more ideally, to find a way to make the image I see in 'normal' blend mode identical to the image I see mode 'screen '. Any ideas? (I have Photoshop Elements 7.0, btw)
Thank you!
I don't understand how you use 'screen' mode on a single image of fusion, but it's the effect you're trying to get (I used a blue color to show the transparent area at the bottom of the image):

I used the free plugin KillWhite (http://mikes3d.com/extra/scripting-plugins/killwhite/) with your image:
- Convert the image to RGB. (Image... Moye... RGB color)
- Duplicate the background layer (Ctrl + J).
- Reverse the colors on this duplicate layer (Ctrl + I), so that the black background becomes white.
- Used KillWhite to... Well... to kill the white on this layer.
- Invert the colors once again.
- Used improve... Lighting... Brightness/contrast and levels to darken the lapping of water.
- Added my flower image below the layer of water splash and raised the lower edge of the image of the flower to leave a transparent area.
My diapers in liquidation that looks like this:

Ken
-
How can I make my Logo appear after 10 seconds of loading in the background?
Hello
I have a Logo flash animation film that I want to appear after 10 seconds to load the background image (Panel_mc)?
I am using Actionscript 3 to load the film Logo.swf . Here is all the code that I have on my page of action script:
Stop();
Import fl.transitions.Tween;
Fl.transitions.easing import. *;var PanelTween:Tween = new Tween (Panel_mc, "y", Elastic.easeOut,-400, 20, 5, true);
var l:Loader = new Loader();
addChild (l);
l.Load (new URLRequest ("Logo.swf"));
x = - 20;
l.y = - 20;l.contentLoaderInfo.addEventListener (Event.INIT, growLoader);
function growLoader(evt:Event):void {}
l.Width = 320;
l.Height = 185;
}Note: I need because first the background will animate so nobody can pay attention to my Logo. Once the stop animation, my logo background should be start (animation)?
How can I do using Actionscript 3.
Hope someone will help me.
Thank you.
Add a TweenEvent.MOTION_FINISH event listener to the interpolation and have its event handler function to call a setTimout function that is set for 10 seconds (or everything you really intend). In the function called by the function setTimeout place your line of code for the loader to load.
-
How to make a background blur realistic looking to show that behind a dialog box?
I'm prototyping a Flex in Fireworks CS4 application & have some pop up dialog boxes to display. When they show the background should be blurred. I know how to make them appear, but I can't get a nice blur effect that looks like the one you see in Flash. I tried a transparent layer with different blur filters, but no aspect than realistic. The information?
Just go to the filters section in the property inspector Panel, first select your object on the Web (for example, the bottom), then click on the [+] sign sign in Filters > a small menu opens, select blur > Gaussian blur and change the value (0 = zero blur, 4 or more = a lot of blur). Later, you can change or remove the effect, which is good.
I often use a Gaussian blur, especilly if I need make a blurry image...
I hope this will help you!
-
What external case for HARD drive do I need for my Portege 2010
I have a corrupted windows XP, but fear using the repair option due to the large number of photos of my children who have yet to be backed up or displayed in a photo etc store.
I found that you can buy a hard drive enclosure that can then be used via the USB port to download these important files before any repair option. I bought a standard encolsure 2.5 "from Maplin but the connection is a woman on both ends (enclosure and hard drive) and a few shorter pins on the drive of Toshiba wants the encolsure.
How I progress - my wife won't let me live if I can't get these photos off the coast and professional background should not be necessary.Help!
Hi Andrew
Problem is that your Portege has 1.8 HDD and I found just this page where you can pick up some http://www.addonics.com/products/io/aks218ide.asp Info
I hope that you will be able to backup your data.
Good luck!!!
-
Portege R600 - exchange of HARD drive
We are very impressed by our new R600-S4201, among the first to be released in the American market. But we would like to exchange an SSD for the 160 GB conventional hard drive. CSR Toshiba says that we can do it - that it will not void the warranty - but unfortunately the disassembly procedure did not he still Manila.
R500 instructions do not help the R600 is a unique piece, with only applies for memory, etc., but not for the hard drive.
We have removed all the screws (really ALL), including the screw of one side, but the background is not 'free '. It is hung up by the projection of the ports, etc. on the eSATA (side not the DVD). It is too thin and fragile to take a lot of strength, then we're stuck.
It seems that the background should move outwards if he wants to overcome these obstacles. We should remove the top panel, paved touchscreen and keyboard, but there is no obvious way to do it.
Any ideas?
Thank you!
AFAIK swap the HARD drive, you must remove the cover on the bottom side.
On this laptop it s a little more delicate and you need to remove a large number of screws to exchange the HARD drive. If you go to a local ASP and ask a technician for help.
-
Satellite C660-117 crashed on the update of the BIOS
A customer with a C660-117 has received a message from Tempro saying updating the BIOS. He did what he was told, but the update crashed in Block 8 and would go no further.
Laptop will not start now. Y at - it a BIOS recovery tool or should he be returned to Toshiba to be fixed. Client not happy because it was Tempro who told him to put the BIOS updated.
Any help much appreciated.
Hello
Generally, the BIOS update procedure is security.
But some before performing a BIOS update, all applications and software as antivirus software, firewalls that work in the background should be closed.However, for as far as I know that BIOS flash ROM must be flashed/repair using a disc of crisis
See also this thread:
http://forums.computers.Toshiba-Europe.com/forums/thread.jspa?threadID=54395But if it wouldn't be useful, you need to contact a Toshiba ASP in your country for repair.
-
Titles or subtitles of the file name?
Is it possible to automatically generate the titles or subtitles of the file name? I have a video made up of several small files and you need to insert their names under the name of a chapter, or at least as a subtitle. FCPX only supports to support the generation of TC.
The short answer (obtuse) is not. Not in FCPX alone.
I seriously doubt you will be interested in this procedure, but someone might be.
You need movement (this is the only expense here), TextWrangler and a droplet of Automator (see below).
First, gather all your files of clips in a folder.
Drop the file on the files in the folder (the automator app/drop) that will create a text file with the names of all files in the folder. When you are prompted to save the file, you can name it and save it wherever you want.
Gout Gets the names of files from the Finder, and they are complete paths, such as:
/ Users/fx/Desktop/txtLicenses/Aardvark Cafe readme.txt
[You can download a copy of the 'Files in the folder' drop HERE ]
Open a window in TextWrangler, and then drag the text file to a blank page (very cool - TextWrangler automatically opens the file with drag and drop.) [TextWrangler is FREE of Barebones.com (http://www.barebones.com/products/textwrangler/) software, everyone should have a copy! The most recent version is 5.0.2 in date 25/12/2015]
Type the command + F to open the Find/Replace dialog box. Make sure that Grep is checked.
To find them, use this regex:
.*\/(.+)\.. +
[translated: find everything up to and including the last ' / ' character, can find everything up to the last period and save it as a game (the parenthesis) and then find everything at the end of the line]
As an alternative, use:
\1\n
[Translated: prints the substring and adds a newline character - it will be double space lines of text]
In the drop-down menu with the label of 'g', save... (model - something like Remove Path and FileType) so you can find it again easily.
The text from the above example will become:
Aardvark Cafe readme
[and will follow an empty line]
[I recommend you do all your spelling at this point.] Make sure that all text is as you want it to appear in FCPX. Repair later gets a bit dicey. and generally it is a good idea to start over if you need to make changes to the text file.]
Save the file with another file in TXT format.
On the move:
Create a project generator. It can be almost any length, so accept the default value of 10 seconds. You will be stretching out in FCPX in any case.
Add: Generators > text > file
[You can use the Inspector to Format to choose the font, size, etc. and the inspector looks for color and 3D options].
In the Inspector of the generator, find the section, load your text file
Set the speed to Custom
Reset the Custom speed setting
Publish the speed of Custom setting slider
Save in FCPX (and create a category called subtitles)
When you save the generator in FCPX, the file being used is hard-copied in the media for access folder. You cannot publish the setting browse generator, so all files subtitles prepared in this way are projects of "One Shot". You can throw away them once your project is completed because their utility essentially died with the FCPX project.
In FCPX, apply the generator to the plot and develop it to adapt to the length.
Keyframe of the lines of text to match the timing of your video. This is where double spacing will be useful because it is a real pain in simple lines of keyframe and you will need a bit of space for a step-by-step. You can, of course, import the audio portion of your story in motion, create a project for quite a long time for the entire length and key image subtitles in movement. You can export as, eventually, the subtitle project as ProRes (if you do not use 4444, then you can apply the Composite blend mode add to the layer that you use in FCPX as the background should be black.)
If all of your clips are the same length of time, then using the subtitle generator is a snap. Set a keyframe at 0 for the appearance of the first line and in the end, the last line should appear, simply drag the speed until the last line shows control (should be at or close to 100%). The generator systematically displays a single line both throughout the progression of his 'read'
I found that the faster is to import the audio in motion and create a Motion project, the length of the audio used for subtitles + a little extra at the end. Listen to the audio, and for each line that you display, add a keyframe... little whatever it is. When there is a keyframe for each line, listen again and adjust keyframe values to display the line. This will leave you with linear transitions from one image to another key (and overlapping in some cases, or the appearance of lines before image real key because of "Rounding errors") - is NOT a problem! Just select 1 keyframe, type command + A to select all the keyframes, and then right-click on a keyframe and select constant on the menu drop down. This will create a step-by-step through each value and you give the * discreet * timing you have need for the text to appear at the right time. Remove the audio track and save the project as a generator of FCPX... it is faster and easier to export a track video overlay.
You need movement 5.1.x or better (there are serious problems with 5.0 versions and file generator.)
I know it doesn't look like it, but this method of captioning is much easier than ANY other software of captioning I've tried in the past... NO timecode or the special formatting is required... other recommended spacing to double.
HTH
-
I use the trial version of Ultiboard 10.1 Pro with permissions to export Gerber files for insurance before buying the product. I think I'm already sold on the package that I am also an owner of LabView and big fan.
The idea of exporting the drill symbol Table is a great idea, but in Gerber format it is kind of useless for me. I really need the table of symbols in DXF format. Can I export all the layers very well - it works great!
I can't see to get Table Drill symbols in DXF format.My policy on the companys on the AutoCAD drawing drill formats requires the drill symbol table & plot Board and each layer for inspection of PCB incomming.
I hope that this issue will be addressed in a future release. At the moment, I have no way to meet the requirement for the drill symbol table in a format that I can use in AutoCAD.
Or I'm just something wrong?
Thank you
GaryGaryAtAMI,
Yes, sorry for the confusion on feature requests, please let me explain:
When a feature is requested by the staff, it is not a guarantee that it will get into the product. We have a lot of applications pending which do not get addressed in the product for various reasons and other factors. Some of the reasons include that other higher priority requests get scheduled before these features (due to the frequency or severity of other applications - or other strategic initiatives) and/or other technical capabilities that could be hard to do within a single. Some of them must be divided into several phases of the product then be implemented.
For this feature, although this has been asked several times, I can certainly tell you that right now, we have no immediate plans to include this - because of competing priorities within the R & D. We are starting to work on some of the underlying import / export capabilities Ultiboard, but right now I can't give you an exact date when this feature is applied.
As a community, please continue to comment on how you feel on the priority level of this feature as we continually reassess these requests.
OK, that being said, I have a possible work around. However, it is not ideal, here is a solution of possible manual workaround that I used on several other designs to include the table of symbols in DXF. Please let me know if this is feasible for you or not.
1. you generate a table of symbols automatically .gbr file. (File-> Export...-> select Gerber RS - 274 X-> properties)
1. navigate to the bottom of layers available and select "Drill symbol" and press the right arrow button (->) and press 'Ok '.
1. press the button 'Export' with the type of Gerber RS-274 X selected.
[At this point, you can use a third-party tool 3 to convert him Gerber to DXF format (last time I checked there are tools in the ~ $100 range)]
To generate DXF manually Ultiboard
2. open the .gbr just created... He will be in the format "ProjectName (FileName) - drill symbols-copper copper-Top Bottom.gbr.
3. copy the screen (depending on the size of PCB, you may need to copy multiple parts) in Microsoft Paint (I usually 2 copies of painting open)
4 invert the colors so that the background is black and Council information is white. Save this file with a black and white. BMP file (the background should now be black).
5. in Ultiboard, within the same project, open a new design (you can copy the layer outline of the Board of Directors of the old design to scale BMP import properly)
6. click on the mechanical layer (mechanics 1 or 2 mechanics) and choose the location-> chart-> photo... and choose the BMP black and white has created.
7 draw a rectangular box to import BMP in the mechanical layer (you need to resize according to scale).
[At this point, you can add some dimensional information for the Board of Directors]
8. now given that the table and the jury is out on a physical layer of Ultiboard, you can export the mechanical layer in DXF format (file-> export-> DXF [choose Properties - 1 mechanics and Export DXF])
OK, I didn't say it would be simple - and yes I do agree that an automated way would be better. I zipped BMP and JPG images sample to show the imaged steps...
Kind regards
Patrick Noonan
National Instruments
-
Windows 7 PC will not be updated.
Windows 7 PC my friend only keep looking for updates but not found in more than 45 days. If he tried to update manually, it will begin the search but then just keep checking. Normally, if there is no update, it would finally stop looking and say "Windows is up-to-date", but is not yet do. It keeps just to research and looking for as long as the computer is turned on.
It cannot be upgraded to Windows 10 because several major programs he uses are not compatible with 10. (He actually was updated about 6 months at 10 and could not get the programs to work when he came to 7. Everything worked well once he returns.)
I did a restore of the system for him at a time just before his latest updates successfully and now he always does the same thing, keeps constantly checking.
One last thing, on the Windows Update home page, until I start the updates manually, it says "Windows is up to date" and it shows the last time it was updated may 2016. It is now July. He gets no error message any.
We never seen it before?
We never seen it before?
This is the new default behavior in Windows update. Client update KB3138612 can not handle patch day KB3161664 June, to make a long story short. Client update to install KB3161647, available only in the framework of the cumulative June 2016, KB3161608.
https://support.Microsoft.com/en-us/KB/3161608
A research potentially being updated in the background should be stopped first. The value of the automatic updates to "never check for updates" and then restart.
Best regards, VZ
-
I need to be able to affect a Fund Manager, and the background should have the following properties:
1. rounded corners
2 gradient color - grey white
3. being able to have arbitrary height because I don't have a fixed number of items, I will show that the elements are generated after an http call.
The class BackgroundFactory offer for have a color degraded without rounded edges, or if it has rounded edges it must be with acute angles.
Check out this thread:
E.
-
Does anyone have any info/code/tutorial on how to shade text fields as in the attached picture?
I will probably also need help to make the text field prepared for corners too.
Thanks in advance!
Classes of border and background should do it for you. Looking for examples of this.
Also get the source for the sample to Dev17 and Dev18 of DevCon 2010. Search the Forum, I posted some links elsewhere.


Maybe you are looking for
-
Satellite A660 can I update i5 to i7?
Hello I have a Toshiba Satellite A660-1EM with Intel core i5 460M, and would like to know if I can switch to Intel core i7 720qm.
-
IX2 - dl not generate RAID1 Array
Hello I've been running an ix2 - dl (firmware: 4.0.4.14600) with a single 3 TB drive for about six months without any problem. I recently added a second identical disk for redundancy. When the ix2 - dl on the drive appears as expected in disk managem
-
An internal error has occurred in Windows Media Player
I write on behalf of a client who has a few problems with Windows Media Player in Windows XP. She said that she receives the error message "an internal application error has occurred" all the time. He will not play CD and does not even start. She won
-
Sansa 8Gig shows only 131 artists over 150
I have an extensive collection of CDs and Mp3 files which I converted to WMA 65kbs to put on my Sansa fuze 8gig. I also added an external 8gig micro SD card for it that I'm in serious need to organize all the music that I have so I could listen to wh
-
Vector of the types of image files supported by Captivate 9?
What are the types of files to vector images, supported by 9 Captivate?