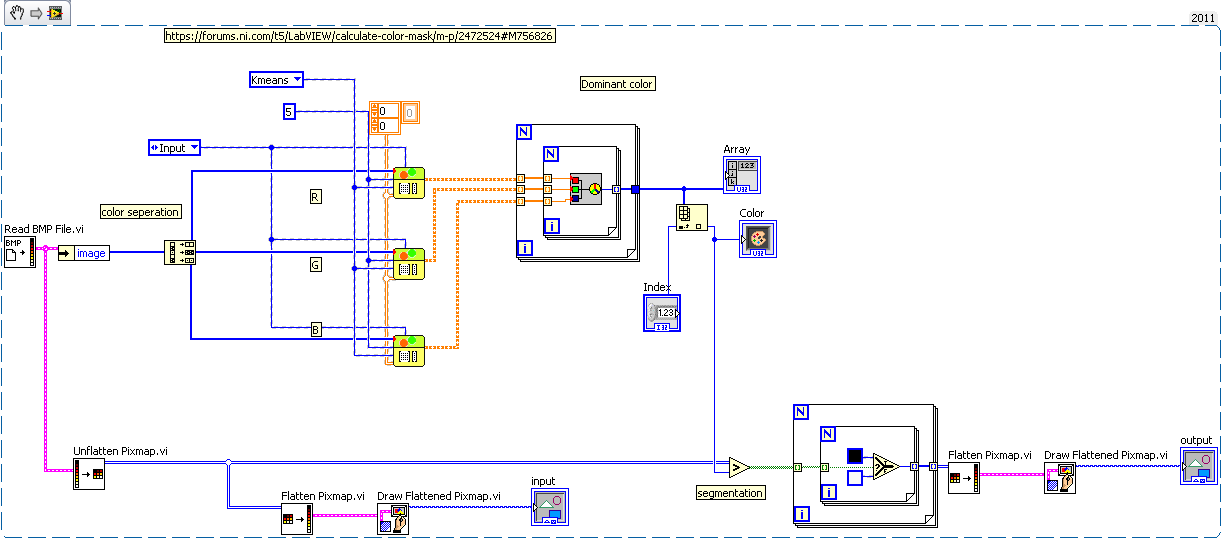
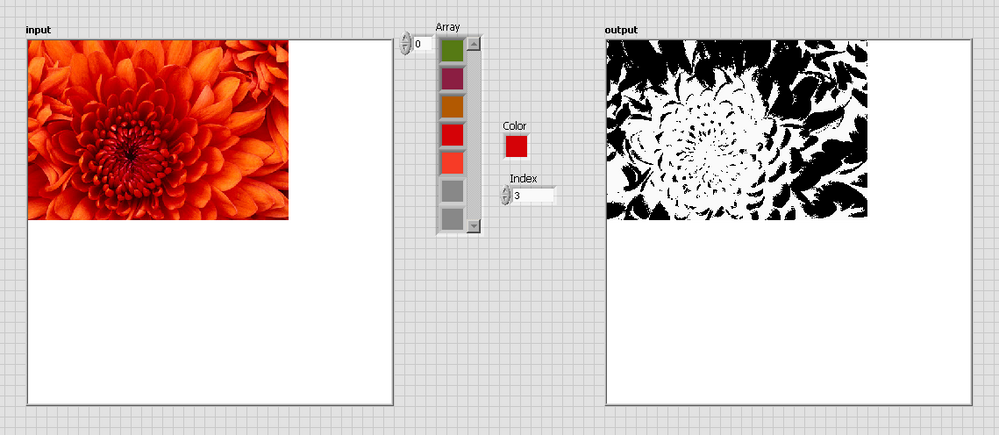
calculate the mask color
Hello
How to calculate the color mask image with the dominant color of the input image?
Thank you
So, you use the "dominant" colour as a threshold for segmentation.
Tags: NI Software
Similar Questions
-
How to calculate the mask with joker to ACL
Dear,
I know it may seem a question very bacis, but frankly I've searched the net, books & asked many friends and no one could help you.
I want to create one or two access list to hit the following ip prefix.
192.168.2.0
192.168.6.0
192.168.11.0
192.168.15.0
192.168.18.0
may well want to explain to me in binary computing.
concerning
I think your question is asking questions about the means to have a single line in the list ACL correspond to more than one address, so that with one or two lines of ACL you could match to these 5 addresses. The way to start is to understand what these addresses have in common. they all 192.168 in the first two bytes and 0 in the last byte. So the third byte is the place where there is no variation. We must therefore start with the value of the third byte in binary:
2 is 00000010
6 is 00000110
11 is 00001011
15 is 00001111
18 is 00010010
If you examine the binary and see what numbers have many BITS in common that we see that 2 and 6 have in common the 7 of the 8 bits and could be grouped. We see that the 11 and 15 have in common the 7 of the 8 bits and could be combined.
Then the Group 2 and six that we want a mask which says that bit positions 1, 2, 3, 4, 5, 7 and 8 must match and bit position 6 does not. The mask with 0 to 1, 2, 3, 4, 5, 7 and 8 is 00000100 (4 in decimal). The Group 11 and 15, we also have bits 1, 2, 3, 4, 5, 7 and 8 to match while we would use this mask still 00000100.
There is not a way to combine 18 very well with the other addresses. So an ACL have 3 statements to match these 5 addresses.
permit 192.168.2.0 0.0.4.0
permit 192.168.11.0 0.0.4.0
Allow 192.168.18.0 0.0.0.0
HTH
Rick
-
How to select a range of colors as in Photoshop or copy/move a layer in the mask of another layer?
Hello
I'm experimenting Photoshop Elements and wanting to use a layer of black and white (gray scale) I did as a mask of a another layer and do not know how to do in elements. In Photoshop, I could do it (there may be a better way to do it in PS, but I've not yet discovered)...
Click on the layer, I created that I intend to use as a mask
Select all
Copy
Select the layer that I want the mask to be applied to the
Click on the button Add a mask layer (bottom layer)
Click on the mask icon so it is highlighted (and is not the image)
switch to the channel display
highlith the layer mask in the R, G, B of the layers and make it visible
Dough
invisible again
Switch to layers.
This works and retains the full range of transparency for the semi transparent and soft contours of mask etc.
Otherwise, I can choose a range of colors, but this doesn't seem to be available in PS Elements.
So, how do I get the same result in PS Elements?
Thanks for your help
Jonno
After you have added your layer mask, Alt (Option) click on the thumbnail of the mask layer in the layers panel, and then edit > paste.
-
I often have people mask images to put them in an architectural setting. I so everything first open the image with a person, to convert the bottom of layer 0, add a layer mask and paint around the person with the black.
When I drag this layer to another then (enlargement), the mask around the person is black only as much as the original image size image of this person. around him he is white. When the scaling this image + mask, a thin frame appears sometimes, while the outer edge of pixel is interpolated and not completely black more. This must be retouched every time.
now, by chance, I did it 'right', in the sense that when you drag the image of the little person, the mask was completely black around the person. so there must be a way to make things right from the beginning. I tried to find what I have done in history, but the last 20 acts were brushing.
Anyone know how I can put the entire area of a layer beyond the borders of the image mask to black? I tried, but did not work:
activate the layer mask, select all, reverse, fill it with black (cmd + backspace when bg color is black).
I found a solution that works, but it's more complicated than the contours of the new layout of the image-editing.
Thank you.
Wim
I know exactly what you talk about and very glad you posted this.
What works is if you start with a new layer with no mask. Then draw a rough selection lasso around your object, then click adding a layer mask icon.
What also works is hold the option key before clicking on the Add layer mask button. Your mask is filled with black, then paint to keep the areas with a white brush.
What causes the problem is if you click on add a layer mask button and then start to use the brush to paint the areas.
It has to do with, if you helped photoshop know what color the mask is filled beyond your exisitng Web.
-
Masking color theme group when the color theme tool
How do hide you Palette of color theme?
You're talking about the Adobe color theme Panel (window > colors > Adobe color themes)? If this is the case, just close it.
Or do you mean the floating palette that appears when you use the color theme tool. If the latter, press ESC to remove and forget what it selected last.
-
Cannot make the fx color correction without getting the image of strobe
Cannot make the fx color correction or blur fx with masks without getting the image to strobe. Do not return in the sequence, or export without the video strobe effect. It is clearly a problem since at least 2011 because I saw some forum posts dating back that far. Don't know how or why it is always a question 5 years later. I have the correction color fx on an adjustment layer that makes very well. Leave color and blur fx on a couple of individual clips is whats creating the problem. Does anyone have a solution? It does not appear that I can wait for Adobe.
At this point, I would create a sequence for each clip (in the garbage, make a right click, create sequence and apply the FX it) then replace the clips in the mixture with the sequences. -Test this point by one before they go crazy.
OR, using the idea of sequence preceding above, return on a new clip with holiday color applied to replace as new originals in the mixture.
Third idea: replace the clips with linked AE comp and try the color of leave which are.
In short, do what you can to take the color of leave out of the final equation.
-
When using an adjustment layer to change the hue/sat (to make the fall colors), how to change hue/sat off the clothes clients and faces?
Choose the mask on the layers adjustment layer and paint in black in the areas that you don't want the adjustment layer to change
-
Add the dash of the masked image
Is it possible to add a feature to a masked image (formed irregular)?
MFJ
Can you be more specfic that you want to add the line to. The content of the Image or the mask. If the mask do you want white, gray or black line.
You can use the pen tool to create a path around the irregular shape. Then convert the path to a selection. Target the content of the layer or the layer mask. Then race the selection with the color of your choice to have time. If the race is the content of the layers. The layer mask can hide all or part of the race.
-
Photoshop actions: mask color claw Cup + 99 :/
I have a black image with a layer of just clipping mask above. I created a sample with a set of 99 colors that I use over and over again. I created an action that will be the color mask, prompt me to name them and save again the image layer mask active & ready for me to pick the next color in the swatch Panel.
Two questions:
(1) is it possible to automate this action to plow right through all the colors of 99 on my sample (the names of: Swatch1-99) without being invited by me?
(2) is it possible for the action name in order the image before the record within the action? I know I can do this in batch mode, but it is possible in the action itself?
Basically, I want the action to run 99 times on an image without interaction from me. Is this possible? Or I have to build 99 series of my action?
Thanks a lot for your help!
xoxox
omgsharon
Ok.. I slept on it and sometimes during the night, I woke up and found the solution.
CREATING THE ACTION
I had to create the action of the hard...
(1) open PSD with layer mask
(2) create a duplicate file and remove all the layers and add a blank layer 1
(3) set the focus to the original image.
(4), select the layer MASK
(5) SELECT ALL to select the entire image
(6) open the Actions tab, named my new action & hit record
(7) set to color chart color
(8) color the layer mask
(9) copy merged
(10) select double image
(11) block of
(12) set the focus to the original image
(13) repeat steps 7-12, 98 times (get cramp in the hand about half way, get coffee, answering the phone, lose my place 17 times, but keep plowing on...)
(14) to save the image with 99 layers PSD file
(15) to stop recording
(16) under action 99 COLORS
WITH THE HELP OF THE ACTION
(1) make sure you have correctly loaded custom color chart.
(2) open PSD with layer mask
(3) create a duplicate file and remove all the layers and add a blank layer 1
(4) set the focus to the original image.
(5), select the layer MASK
(6) SELECT ALL to select the entire image
(7) open the Actions tab, choose 99 COLORS & press PLAY
EXTRACTION OF 99 LAYERS INDIVIDUAL PNG FILES
I have an old version of Photoshop, CS3, so the ability to save PNG using a built-in script was not an option. I looked around the interwebs a bit and found a script to save each layer as a PNG. I'm new here and don't know the rules for the display of external links, so if someone wants information on the use of this script, send me a message.
(1) open the PSD file with 99 layers.
(2) choose FILE > SCRIPTS > BROWSE and load the SaveLayers.jsx script
(3) you are prompted with a message that makes me think to have a back-up, things can go wrong, the destruction of the Earth is possible but if you are connected to the Earth in your own folly, click OK.
(4) 60 seconds later, I have 99 different PNG files in my folder color.
(5) LIKE the world. Fill the coffee.
BY THE WAY
So after I found this clever script, I tested it on 6 different files with mask layers. Some were just 2 images of layer (layer image & original mask) and 2 images with 3 layers (image layer, layer, layer mask). The top layer is a layer of black of the entire image. This script worked on one of the 3 layers images but not the other. I kept getting an error during creation of layer 45 that there was nothing in the area of selection on the POPULATION of the original process. I do not know what has increased with this particular image, but he has worked a lot on the other image of the 3 layer and all the images of two layers with no problems.
-
How to remove the background color of a picture in artificial intelligence?
Hello
How can I remove the background color of a photo using Adobe Illustrator?
Thanks in advance!
This is something for the most in Photoshop due to his magic wand tool. But in Illustrator, you must create a clipping mask using the pen tool and make a Rectangle or a square and create a composite path with the top of the image.
-
Can not understand how the adjacent color elements
Hello, I am a new user of illustrator and it's been a frustrating experience.
I just want something simple... the linework, color using the fill color or a clipping mask. However I can't find how to do.
Whenever I tried to fill color or a clipping mask, he selects the wrong part of the object and does not follow the line. Please see the attached picture. Why is happening. Why Selection tool cut it like that?
(you see I tried to color eggplant, but the purple part is all wrong...)
I would be grateful if someone can help me.
Also, I find that it is incredibly difficult to choose the color that I want to leave this little rectangular box on the right side. How can someone find the color they want in this tiny color box?
Is there anyway I can have a color wheel, or is it more easy way to choose the color from the palette?

Use the closed paths (more intuitive) or paint (smoke and mirrors).
In this example, you must continue drawing the pink form (on the green form) with the pen until the path from the farm. Then go behind the Green shape by using the layers panel or cut and paste behind.
Or you can create a live painting of this group and colour it with the Live paint bucket.
I think you'll learn more by the way, with closed paths. Some people think of paint as cheating.
-
Product photo: how to make text stand out, w/o by stimulating the surrounding color?
Hi all!
I have a picture of a bottle containing a reddish cinnamon liquid. There is a line of text on the bottle which needs to stand out much better... Screenshot attached of the actual bottle of samples, close them up.
Can anyone suggest how to get the text to pop w/o touching the back at all? I played a lot with the levels, but it doesn't help; the background reflects the changes. And it is almost impossible to get a good selection on the text portion (unless I do this pixel by pixel).
Hoping that someone with much better PS smarts can give me an overview. If possible, I will probably need almost the instructions.
Thanks in advance!
Jerry


Top: Original
In the Middle: layer above the background layer
Bottom: Final
***********
I hope that you can start with a very focused image, then:
Select > range of colors... and choose white lettering
Lead the two sliders all the way to the right and click OK
Cmd + J to move the selection on its own layer. Lock the transparent part of the layer using the symbol at the top of the layers panel
Change the blending mode of the layer to screen
Hold down the Option key and click on the symbol of the mask. The mask will be black.
Paint with the brush 100% white. No need to be careful... only the type will be affected. The red background is not affected
-
How to add the mask into effect reference is Options for Composition with after effects CC 2014?
The main reason why I'm updating my After Effects with cc 2014 is "composition for each effect options, including the ability to limit the area affected by each of the effects with masks". This useful feature really simplify my work. But now I realize that I want to use the script function.
I get Composition Options the effect name and matchName.It looks like this:
Name Name Name Name propertyValueType Remove Composition options undefined ADBE effect built in Params Masks undefined Effect ADBE Mask Parade Reference mask 1 undefined ADBE effect mask Reference mask 1 MASK_INDEX Flow path ADBE effect Ref Opacity of the effect OneD ADBE mask opacity I try to use .canAddProperty ("ADBE effect mask") and .canAddProperty ("ADBE Path flow Ref effect"). However, it returns false.
I found that add or delete this property in the user interface are the buttons '+' and '-', so maybe I can use app.executeCommand (app.findMenuCommandId (theCommand)); However, I can't find that button name because it does not have a helpTips to remind me of the name.
So how do you add the mask with script reference? Or ESTK has no permissions to access this useful property so far? I have not found anything on the Internet.
Moreover, I have an another two quick questions:
1. If there is more than two masks in a layer, remove for each mask is the same ("ADBE Mask Parade") ("ADBE Mask Atom"). How can I use the Remove to get the second mask such as the name property? First I treat like a table, but ("ADBE Mask Parade") ("ADBE Mask Atom') [index] actually did not work, so that ("ADBE Mask Parade") (" ADBE Mask Atom'") (index) is referring to the child property altogether in the first mask. I have no idea about it.
2. when I use the method property() with script, property ('effect'), and property("effect") are all the two ok. The only difference in the method is the single quotes ' and the Quotation brands "." I just want to know if the "and" have any difference in the method property (), except that "this color is blue" and "this color is purple" in ESTK.
The advice and the answer would be appreciated.
Yes you can add masks to the effects by script.
If "fx" is a fx on a layer:
var fx.compositingOption = co; or fx.property ("ADBE effect Built In Params')
var fxMasks = co.mask; or co.property ("ADBE mask Parade"): INDEXED_GROUP j
fxMasks.canAddproperty ("ADBE effect mask"); true
var fxMask = fxMasks.addproperty ("" ADBE effect mask");
fxMask.maskReference.setValue (1); or fxMask.property ("ADBE effect way Brook Ref") .setValue (1);
If you can do short
fx.compositingOption.mask.addProperty("ADBE Effect Mask").maskReference.setValue(1);Xavier.
-
Count the boxes, color Format according to value
Searched for how to count the boxes in a PDF form. Found this link and have renamed my boxes so that they share the same initial letters. Added the script below in the section of a body of numbers custom calculation script. Nothing happens not even. What should I know to set up correctly? Also, I need to add a table more so it adds another section to the meter. These boxes begin with cbxSAP. Once the number of box is working, is there a way to tell if the sum is = or greater than 14 to the green color of the border/field and the default value would be red? Hope that makes sense, thank you.
// Custom calculate script

(function () {


    // Get an array of the PO checkbox fields

    var fa = getField("cbxPO").getArray();


    // Initialize counter

    var sum = 0;


    // Loop through the fields and update counter

    for (var i = 0; i < fa.length; i += 1) {

        sum += fa[i].value !== "Off" ? 1 : 0;

    }


    // Set this field's value to the sum

    event.value = sum;


})();
You have get an error and it's why the JavaScript console opens and displays the lines of information.
The first line indicates there is an eorror.
The code is a custom calculation script.
The code cannot locate the Group of fields named "cbxPO". Verify that the field whose name "cbxPO. ' # ' exist. The ' # ' is the name or number of subfield.
The code actually works if there are no errors.
For hierarchical fields, there must be "." separates levels. You field names must be:
cbxPO.Dest
cbxPO.Tax
cbxPO.Pay
cbxPO.Status
cbxPO.Freight
And it is not important what was once the value of exports.
-
Turned off accidentally remove the mask...
I'm working on a folder where I have a mask on a layer, and I work for selections, choose the layer, and then move the mask to remove the selection of black. It was working perfectly.
(On the layer) Select > Color range > (click on the eyedropper on the color I want to choose) > OK > (on the same layer mask) >(Click DELETE)
This used to work, but then I think I accidentally hit something on my keyboard, and the only way to remove the selection mask is now to activate the QuickMask. Even if its just 1 no more, I still want to know what I got to what I can simply delete the selection.
Thanks in advance
Your background color is set to white and black. Hitting Delete will fill the selection with white.


Maybe you are looking for
-
mail will not be forward by using a filter
I can send email normally but there are a few emails I send automatically to the e-mail account of my wife. I set up a filter to do this, but it won't work. What I lack?
-
Redisplay the screen if you want to download on screen or save on downlad "file."
If I ask for in a pllication a report, then firefox automatically download. I want to see the output on the screen first (before I had a pop up asking if I want to have on the screen or save it.
-
Satellite A60 and PS/2 keyboard
I had a keyboard PS/2 and a PS/2 to USB for connecting the keyboard on one of the USB ports. However, when I do this, windows just keeps telling me that a USB device has failed and the keyboard does not work. Is there a PS/2 driver I need to download
-
I got a message today saying my server has been hacked by TiGER_M@TE , but the computer says that there are no security threats. I ran the page off and part he says * address email is removed from the privacy *. That's what worry and I'd do anything.
-
Desk top icons disappear at startup
Have Vista Home Premium SP2 At the start of my desktop icons disappear. Watch "show desktop icons" and it is selected. If deselection and then reselect they return but disappear again when restart the laptop. Any suggestions why?