Change the picture in the mask
Hi people. New to AE. There is something that makes me a little crazy. I have a few images that I've hidden. I just want to either move or size the picture in the mask, but leave the masks position and dimensions only. Is this possible?
As in Photoshop, you can unlink a layer of the image with its layer mask. In Illustrator, you can use the white arrow and select the image and not his mask.
I'm sure its something easy, but I was not able to understand. Thank you very much!
Apply masks in a solid over your layer, then use the solid as a track matte for the layer below. With this configuration in place, you can manipulate the contents of the image way of nay you like without changing the windowing.
Mylenium
Tags: After Effects
Similar Questions
-
Plugin 'Hidden text': how to change the mask of interactively? (Apex 4.2)
Hello
I use the plugin 'Hidden text' large (of the Oracle Application Express Plug-Ins page) to enter formatted text.
Now, I'm trying to put in place a way so I can change the format interactively mask, but has failed so far.
The plugin has a custom attribute "The InputMask" and I created an element of the page 'P2_INPUTMASK '.
In th e page is displayed as 'Hidden text' the "The InputMask" attribute is defined on & P2_INPUTMASK.
I put in place a dynamic action (with a point of the box) that can change the value of P2_INPUTMASK, and then refresh the
Text maskes element, but the mask of text never changed.
Is it possible to change the value of the attribute mask interactively?
Kind regards
Roland
If you examine the code of the plugin, you will see that the mask is applied on the definition page loading, so your change does not affect things to run.
        apex_javascript.add_onload_code (
            p_code => 'apex.jQuery("#'||p_item.name||'").mask('||
                      apex_javascript.add_value(l_input_mask)||
                      '{'||apex_javascript.add_attribute('placeholder', l_placeholder, true, false)||'});' );
But you can change your dynamic action to call some javascript that would execute, something very similar to this one. Make sense?
to start:
$('#P2_INPUT').mask($v('P2_INPUTMASK'));Scott.
-
Change the mask of the executing (Oracle forms 6i) date field format
Hello
I use Oracle forms 6i. I have a domain where I use to store dates. I need to change the format mask of this date the runtime field.
Y at - it no set_item_property built in that I can use to achieve this?
Kind regards
Bet.
Published by: 1009523 on June 3, 2013 11:11Part 2, help information on the Format mask item property; you will need to make sure that you set the property correctly.
Sorry, I had to drill two answers but my first attempt surpassed the eligible characters in an answer ;-)
Format Mask property Description Specifies the display format and input accepted for data in text items. Applies to text item Set Form Builder, programmatically Refer to Built-in n GET_ITEM_PROPERTY n SET_ITEM_PROPERTY Required/Optional optional Usage Notes Valid format masks for character strings, numbers and dates are described in the following tables. Character Strings The following table describes valid format masks for character strings. Element Example Description FM FMXX99 Fill mode: accept string as typed, do not right justify. Allows end user input string to be shorter than the format mask. X XXXX Any alphabetic, numeric, or special character. End user input string must be exact length specified by format mask. 9 9999 Numeric characters only. End user input string must be exact length specified by format mask. A AAAA Alphabetic characters only. End user input string must be exact length specified by format mask. Character String Examples Format Mask Description XXAA Will accept: --ab, abcd, 11ab; will not accept: --11, ab11, or ab--(must use XX to accept hyphens and other special characters). XXXX Will accept any combination of alphabetic, numeric, or special characters: --ab, abcd, 11ab, --11, ab11, or ab--. Will accept 1234 or abcd; will not accept 123 or abc. (To accept input string shorter than mask, use FMXXXX.) FMXX99 Will accept ab12, ab1, ab followed by two spaces; will not accept 12ab or abcd. (To produce the Form Builder Version 3.0 Alpha datatype, use FMAAAAAA.) n To embed additional characters such as a hyphen (-) or a comma (,), surround the character with double-quotes ("). n Embedded characters are separate from text item values and are not collated along with text item values, even when the end user enters them. NUMBERS The following table describes valid format masks for numbers. Element Example Description 9 9999 Number of nines determines display width. Any leading zeros will be displayed as blanks. 0 0999 Display leading zeros. 0 9990 Display zero value as zero, not blank. $ $9999 Prefix value with dollar sign. B B9999 Display zero value as blank, not "0". MI 9999MI Display "-" after a negative value. PR 9999PR Display a negative value in. comma 9,999 Display a comma in this position. For correct behavior in multilingual applications, substitute G to return the appropriate group (thousands) separator. period 99.99 Display a decimal point in this position. For correct behavior in multilingual applications, substitute D to return the appropriate decimal separator. E 9.999EEEE Display in scientific notation (format must contain exactly four "E"s). FM FM999 Fill mode: accept string as typed, do not right justify. n When you mask a number with nines (9), Form Builder adds a space in front of the number to accommodate the plus (+) or minus (-) sign. However, since the plus sign is not displayed, it appears as if Form Builder adds a space in front of the number. (The minus sign is displayed.) n To embed additional characters such as a hyphen (-) or a comma (,), surround the character with double-quotes ("). n Embedded characters are separate from text item values and are not collated along with text item values, even when the end user enters them. NUMBER Examples Format Mask Description FM099"-"99"-"9999 Displays the social security number as formatted, including hyphens, even if end user enters only nine digits.To create a Social Security column, create an 11-character column, set to fixed length, with a format mask of 099"-"99"-"9999. This mask will accommodate Social Security numbers that begin with zero, accepting 012-34-5678 or 012345678 (both stored as 012345678). 99999PR Accepts -123; reformats as <123>. 999MI Accepts -678; reformats as 678-. 9.999EEEE Displays as 1.00E+20. How Forms handles length mismatches If a runtime user enters a numeric string that exceeds the format mask specification, the value will be rejected. For example: Format Mask User enters Result 99.9 321.0 Invalid 99.9 21.01 Invalid 99.9 21.1 21.1 99.9 01.1 1.1 In contrast, if a numeric value fetched from the database exceeds the format mask specification for its display field, the value is displayed, but truncated, with rounding, to fit the mask. (The item itself within the Forms application retains its full value.) For example, if the database held the value 2.0666, and the format mask was 99.9, the value displayed to the user would be 2.1. However, the value of the item within the form would be the full 2.0666. Dates The following table describes valid format masks for dates. Element Description YYYY or SYYYY 4-digit year; "S" prefixes "BC" date with "-". YYY or YY or Y Last 3, 2, or 1 digits of year. Y,YYY Year with comma in this position. BC or AD BC/AD indicator. B.C. or A.D. BD/AD indicator with periods. RR Defaults to correct century. Deduces the century from a date entered by comparing the 2 digit year entered with the year and century to which the computer's internal clock is set. Years 00-49 will be given the 21st century (the year 2000), and years from 50-99 will be given the 20th century (the year 1900). MM Month (01-12; JAN = 01). MONTH Name of month, padded with blanks to length of 9 characters. MON Name of month, 3-letter abbreviation. DDD Day of year (1-366). DD Day of month (1-31). D Day of week (1-7; Sunday=1). DAY Name of day, padded with blanks to length of 9 characters. DY Name of day, 3-letter abbreviation. J Julian day; the number of days since January 1, 4712 BC. AM or PM Meridian indicator. A.M. or P.M. Meridian indicator with periods. HH or HH12 Hour of day (1-12). HH24 Hour of day (0-23). MI Minute (0-59). SS Second (0-59). SSSSS Seconds past midnight (0-86399). /. , . Punctuation is reproduced in the result. "..." Quoted string is reproduced in the result. FM Fill mode: assumes implied characters such as O or space; displays significant characters left justified. Allows end user input to be shorter than the format mask. (Use in conjunction with FX to require specific delimiters.) FX All date literals must match the format mask exactly, including delimiters. n When you prefix a date mask with FX, the end user must enter the date exactly as you define the mask, including the specified delimiters: Date Examples Format Mask Description FXDD-MON-YY Will accept 12-JAN-94, but will not accept 12.JAN.94 or 12/JAN/94 because the delimiters do not match the mask. Will not accept 12JAN94 because there are no delimiters. Will accept 01-JAN-94 but will not accept 1-JAN-94. FMDD-MON-YY Will accept 01-JAN-94. Will also accept the entry of other delimiters, for example 01/JAN/94 and 01 JAN 94. However, will not accept 01JAN94. Will accept 1-JAN-94, converting it to 01-JAN-94. DD-MON-YY Will accept 12.JAN.94, 12/JAN/94 or 12-JAN-94. Note: Any delimiter characters will be accepted, but if delimiters are omitted by the end user, this mask will interpret date characters as a delimiters. Will accept 12-JAN94, (but will erroneously interpret as 12-JAN-04); but will not accept 12JAN94, because "AN" is not a valid month name. n Use of a format mask only affects how the data looks. Form Builder stores full precision, regardless of how the data is presented. n Embedded characters are separate from text item values and are not collated along with text item values, even when the end user enters them. n To embed additional characters such as a hyphen (-) or a comma (,), surround the character with double-quotes ("). Note, however, that double-quotes themselves cannot be used as a character. In other words, trying to achieve output of DD"MM by specifying a mask of DD"""MM would not work. Format Mask Description FMMONTH" "DD", "YYYY Displays the text item data in the specified date format: JANUARY 12, 1994, including the appropriate blank spaces and comma. FMDD-MONTH-YYYY Displays as 12-JANUARY-1994. DY-DDD-YYYY Displays as WED-012-1994. Note: for input validation including day of the week, a mask that allows specific determination of the day is required, such as this example or DY-DD-MM-YY. n When you use day of the week formats, be sure that the data includes day of the week information. To avoid illogical masks, display also either the day of the year (1-366) or the month in some format. Format Mask Description DD-MONTH-YYYY Displays as 12-JANUARY-1994. DY-DDD-YYYY Displays as WED-012-1994. DY-DD-MON-YY Displays as WED-12-JAN-94. Be sure to include month. Avoid masks such as DY-DD-YY, which could generate an error. NLS Format Masks The following table describes valid National Language Support (NLS) format masks. Element Example Description C C999 Returns the international currency symbol. L L9999 Returns the local currency symbol. D 99D99 Returns the decimal separator. G 9G999 Returns the group (thousands) separator. comma 9,999 Displays a comma in this position. period 9.999 Displays a decimal point in this position. Displays a decimal point in this position. NLS Format Mask Examples Format Mask Description L99G999D99 Displays the local currency symbol, group, and decimal separators: if NLS_LANG=American, this item displays as $1,600.00; if NLS_LANG=Norwegian, this item displays as Kr.1.600,00. C99G999D99 Displays the appropriate international currency symbol: if NLS_LANG=American, this item displays as USD1,600.00; if NLS_LANG=French, this item displays as FRF1.600,00. Craig...
-
Then... Photoshop won't let you change the form inside a mask unrelated now?
Anyone else having the problem of scaling a form inside a mask not linked?
Before the update I could do without the mask. After the last update, it evolves the mask even without him being related.
You can always push the autour images without changing the mask... but scaling scales the mask.
Not that I can't get around that problem, but WTF.
"FOR THE LOVE...". OF... GOD, LET JUST WIDE BOY SHAPE PRETTY ON THE INSIDE OF THE MASK! »
-Chris Farley
I can't repro this, but there are conditions. Steps to follow:
- Create a document of any type.
- Create a shape of any type by using the shape tools. Add a layer mask and he break the link.
- Here is the conditional part: select one of the other tools (like the move tool). Target tile form. Try to turn the form using Ctrl/Cmd + T. The shape and the mask of her resize. This does not happen with other types of layer (as of rasterized images).
The only way I could not repro is to date if I have a selected shape tool; so I'm able to transform as usual.
-
Change the color of the quick mask
Is there a way to change the color of the quick mask in CS6? Sometimes, the Red is not a good color to use.
Thank you
Many people also prefer to change the mask default value and set it to color indicates: Selected Areas

-
Change the layer mask: Alt + Shift + click does not work?
I have PES 9 w/Mac OS X. According to Adobe using for layer masks, "to display the mask in a mask color red, hold down the Alt + Shift and click on the thumbnail of the layer mask". It is also stated by Missing Manual for elements. I can't get this to work and can display the mask only in itself (in black and white). I have uninstalled/reinstalled without success. In other words, when I change the mask, I don't see where I'm editing. Can someone help me?
Exit the editor, then go in your username > library > Preferences and delete:
com.adobe.PhotoshopElements.plist
Adobe Photoshop Elements 9 paths
Adobe Photoshop Elements 9 parameters
Repair permissions, and then try again.
-
Seting keyframes to move a mask, what are the Red handles, and why can't I move the mask.
So, I have a mask I want to track manually. I put a keyframe, and then as soon as I move down the clip in time, the handles on the mask all the Red Tower, I can't move anything. What is c.
I must be in Auto key. If is not very intuitive to manually follow a mask. Can someone explain what I got. When I put a keyframe, it also always affects a red keyframe at the beginning of a clip.
OK, so if I put on auto and then change the mask a little to set the first keyframe and make a few adjustments it works fine. TEEN Style!
I guess that's the best solution. Use Auto and adjust as required.
But for reference, what are the Red handles that is supposed to mean. And is there a tutorial for manual monitoring mask.
Also how do a mask drawing good hand, when I click on the + curve and make points, then the expanded mask gets all hexagonal... What is happening with that. you have to start with a round mask and add points and tweak from there to make a mask customized with adjustable smooth edges?
Seems to be the only way I can hack through for now. Again, please to a good tutorial on the masks and the points, I have an account of Linda, if that helps.
-
Problem with the scale/resize the masks
Win 7 64 bit, CS5.1
This question relates to the updated scale/resize the layers with masks. I have a layer with a mask that only shows part of the image, so the majority of the mask is black. However, when I resize the layer (with linked mask), Photoshop changes the mask so that areas once black become white, except for the area around the part that has been hidden behind.
Below are screenshots of the before - after a sample mask.
Before:

After:

This example shows what happens to the mask using the Image > Image size of dialogue, which I would have assumed would fully respect the layout of the mask, but does not work. I also have the same problem when you use the transform tools. I also tried to change the permission of foreground/background colors to resize, just to see if it has auto-fill of the mask with white, but I saw no effect by changing or reversing the values.
I am hoping there is a single place or a preference to prevent this behavior and respect for implementing page-fill masks when resizing. I appreciate any assistance.
This is probably the reason why your seeing this behavior.
If you add a layer mask > hide all, or invert the layer mask if you are using a layer mask > show all (even just by clicking on the button layer mask), just use Ctrl > I (Image > adjustments > invert) to reverse the layer mask.
So you probably won't see this issue.
-
an effect in the form of ps or the mask path
Hello forumers.
Ive done a ps form using my pen too, ive imported the psd file into after fx,.
and im trying to hide the effect of lightning in this form, ca this is how pls?
Thank you.
It's things very 101...
Once you have your précomposé, you can copy and paste your PS on the precomposed layer mask. Chances are that if your PS document and your AE comp are exactly the same size, things don't line up perfectly, but you can then change the mask to adapt.
The best route is creating a matte off your mask, which means paste the mask to another layer, and then using the alpha information created by this mask for "matte" the precomp. But this requires some understanding of the logic of the AE. Do you know how to set a track matte?
-
Hello, I want to make an outline of the text that I created. I started with a blue background. Then, I created a text and changed the color of gold. I then put on an image and used the clipping mask to show the image by the text. Problem is it gets rid of color and shows that the peak through the text. I wanted a draft of the text with the picture. Is this possible?
Thank you
Peter
You're welcome, Peter.
-
Hey!
If I have
- Start a new file in Photoshop in RGB Mode
- Create a new layer and fill it with RGB = (8,8,8)
- Add a mask
- Copy the (8,8,8) color (strg + a, Ctrl + c), then paste it into the mask layer (alt + click, Ctrl + v)
What I get is not a - plain - color (8,8,8) in the mask, but a picture raster with (7,7,7) and (9,9,9).
Can someone explain this strange behavior for me? It's just a bug in my version (CS6 13.0.1)?
Bonus question:
- In view of this strange behavior: How can I turn a picture exactly in a mask layer?
This is how Photoshop. RGB to copy then paste into a single channel, for example, a mask or alpha channel will involve conversion of document RGB profile in grayscale, working space profile (as defined in Edit > color settings).
If a doc has sRGB profile and grayscale working space is sGray, or doc a profile Adobe RGB and grayscale working space is Gamma 2.2, gray values RGB will be then copy and paste into a mask without changing the value.
In any case, if you copy a single color channel, say R, then that can be pasted into a mask and values will not change.
-
What would be the best way to change the color of a part of this picture? (image attached)
I am on XP using PS CS4.
Please see the picture below. I would like to change the color of the shirt/deck of this lady, and I was wondering what the best way is to do it. I know that if I try to change the color, white bowls change color as well. In the past, I've isolated parts of images using paths, but I wanted to know if it was the most effective way. Maybe the masking is the answer. I just wanted to hear from the pros

Thank you.
I'm not pro, but you can isolate areas likely to be affected by the change of color. Try the quick selection tool (which detects the edges) with mask edge/refine refine to refine the selection.
-
Change the location of several pictures at the same time?
I see how to change the location of a photo at a time. Is it possible to change the location of several pictures at the same time?
Thank you
Phil
Select the photos and info - enter the location (or any other field of the info) and it is applied to all photos
This is described in using Photos - a good place to get help with Photos
View and add information about the photos
To view or change information for the photos, you select one or more photos, and then open the information window.
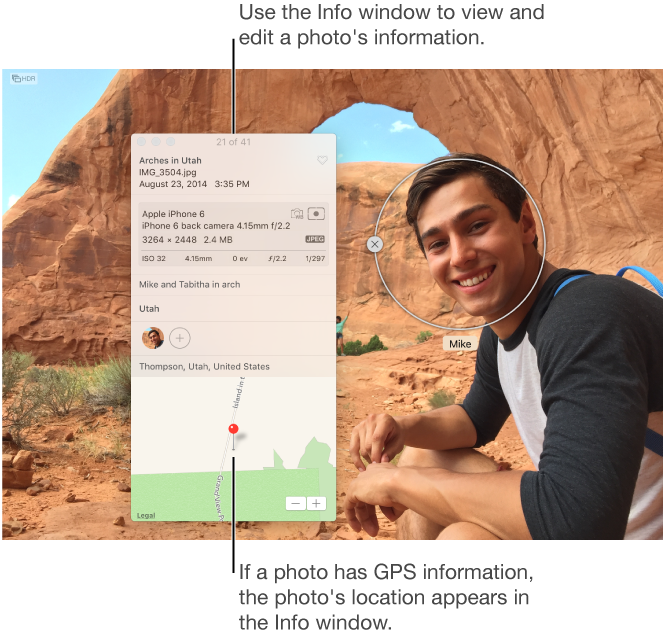
- Open the Info window: Double-click a photo to view it, and then click the Info button
 in the toolbar or press on command I.
- Add or change information: Change the following.
- Title: Enter a name in the title field.
- Description: In the Description field, type a caption.
- Favorite: Click the Favorites button
 to mark the photo as a favorite. Click the button again to deselect.
 - Keywords: Enter the keywords in the keywords field. When you type, Photos suggest keywords that you have used before. Press enter when you have finished a keyword. To remove a keyword, select it and press DELETE.
- Faces: Click on
 and type a name to identify a face. Click on several times, and then drag the identifier of the face different faces to identify many faces in a photo.
 - Location: Enter a location in the location field. When you type, Photos suggest places you can choose. To change a location, you can search a different location or change the location by dragging a PIN on the map. To remove location information, delete it or choose Image > location, then choose Remove location or back to the original location. You cannot assign a location if your computer is not connected to the Internet.
LN
- Open the Info window: Double-click a photo to view it, and then click the Info button
-
Can I change the Date on the pictures App?
So I imported a few pictures and the date are false. Can I change the dates of the Photos for Mac app?
Use the Image in pictures menu: Image > setting Date and time
If you select several photos at the same time, the date and time will be shifted as much for all the selected photos. This is useful, if the date and time of the camera was malfunctioning and all photos should be adjusted by the increment of time even
-
EPrint change the picture on ipad
I've just updated the i pad eprint and operating system. Now when I choose a picture to print, I can no longer make the image smaller and move it around on the page and choose where abouts on the page, I want the image to be printed. I know that I can crop the image, but this is not suitable for my needs, I need to make the picture smaller
Any help would be assessedHi Inorb,
I can understand the frustration you must be feeling when the functionality that you're used to using seems to have disappeared.
I did some research on this by using an iPad with the updated HP ePrint version and an iPod where the HP ePrint app had not yet updated. You are right the functionality you are looking for is no longer available in HP ePrint app upgrade.
This feature can be found in HP all-in - One Printer Remote app, formerly order of the HP printer app. I've included the instructions below:
(1) once the application is open, please press 'Photos' on the menu bar on the left hand side.
(2) select the photo that you want to print. He must now show in the app with "Print preview" shown at the top.
3) press the train of settings in the upper right corner
- Under the "paper size" option to choose the paper size you want to print on (majority of cases it's letter)
- Under the "Image size" option, choose "custom size."
- Now, with the help of your fingers you can pinch to change the size of the image and the location of the image on the sheet
4) press 'Print' in the lower right of the application
For more information on HP AiO app I've included the FAQ document for the application.
HP all-in-One Printer Remote App Mobile FAQ


Maybe you are looking for
-
It will work with an amd processor dual-core E1-2500 (1.4 GHz)
Will Firefox run on dual-core AMD E1-2500 (1.4 GHz) CPU
-
My workout app is frozen. As I was about to start my training on elliptical, that nothing would come up to set my market. Now, it is frozen and only watch elliptical and the arrow in the upper left corner.
-
Re: Satellite L300D - where to find the driver for Vista 64 bit
Hello is there a driver for this laptop running Windows Vista Business 64-bit?Only found a part for 32 bit. Thanks in advance
-
17 f151nm Pavilion: Pavilion 17 f151nm Fn keys driver
Hello I bought a Pavilion 17, had 8.1 Windows 64-bit installed on it, but I can't seem to get the fn keys to work, or find the drivers to this page. Any ideas on how to get them to work? Thanks in advance Ellen
-
I'm missing a component of Windows Vista SP2?
I formatted my computer and when she came back to the top I am still having problems to install software. I am running Win Vista home edition. I've updated to SP2. How can I check to see if I'm missing something. I did all the updates already. I can