cracked glass image with transparency (alpha) for overlay?
All knowledge of a file PNG image good glass cracked including transparency (alpha) is I could use? The idea is that it could be placed above other images so you could still see the pictures back, but it would be like they are behind the cracked glass. Otherwise, if not directly, there are images that match this requirement, so how would easily transform a picture of glass cracked an alpha/transparency?
1. Desaturate the layer of glass.
2. make two copies of the glass layer, desaturated. Disable all three eye visibility for these layers in the layers palette.
3. turn on the first glass desaturated layer by clicking on the eye in the layers palette. First glass desaturated layer place (an image directly above) in blend mode screen. 100% opacity. If the glass has a hole, use a layer mask or erase to drill a hole in the desaturated layer. The levels command to set up the glass so to taste... use push black cursor Grays to black and use the middle gray slider in the dialog control to transition between black and white. You can also set the white slider if you wish. Note: If you have added a layer mask, click the desaturated picture glass to ensure that you use the command levels on the image, not the mask. (Tip: shortcut on PC for levels is Ctrl + L on Mac Cmd + l.)
Note: If you need a hole in the picture, it is easier in Normal blending mode. 100% opacity. Use the Quick Selection tool if you have a version of items that includes this tool. If you have an older version of elements before the introduction of this tool, the wand should also do the trick.
Note: If you punched a hole in the glass, save this selection, so you can reuse it. Select
Just go to step #4 If you punched a hole in your glass.
4. go in the first copy of desaturated glass (one directly on the one you made to step #3... you should have one above it) and turn on his eyes the visibility in the layers palette. As previously, the value this screen blend mode layer: 100% opacity. Hide or delete so this layer effect will be limited at the edge of the hole and some of the glass around the edge. Use the levels command to adjust the contrast around the hole. You should concentrate on the white slider and the edges medium gray to make the hole look correct.
Note: To make it easy on myself, I have used Select
5. Optional: go to the latest copy of desaturated glass (this must be on top of your pile of palette layers.) and turn on the eye of this layer. Change the blending mode of this layer to soft light blending mode and adjust the opacity to your liking.

Above shows my layers using Photoshop. In the elements, layers will be the same, although your UI will be different. If you have PSE 9, you can use layer masks as I... see PSE9 layer mask video link I linked below.
http://www.Photoshopelementsuser.com/featured/elements-9-easy-layer-masks/
If you don't have a PES 9, you can either use the eraser to delete what you don't need or use a clipping mask or clipping group. (Same thing another name.) PSE 8 and 9 PES call it a clipping mask while all older versions of elements called it a clipping group.
See the tutorial below if you need a tutorial on clipping mask/clipping group.
Another method:
You can also use Photoshop brushes and little white paint. Search for brushes that are high resolution, pixel large size... like the smaller brush sizes will be blurred if you have their measure. These brushes can usually be found using broken, break, broken, broken or cracked in the search term. These two are beautiful high resolution sets:
http://archaii.deviantart.com/art/shatter-glass-brushes-82308115
and
http://archaii.deviantart.com/art/shatter-v2-new-101049266
Several other series are out there on the net at this site and others. This set has attracted my attention like beautiful brushes appearance and are big brushes. (Brushes of mind may not be more than 2500 px in height or width if you do brush of your own images. Brushes, which are small get blurred when the brush tip size increases then trying to make them bigger. This is why I suggest that you are looking for brushes large high resolution at first.
Tags: Photoshop
Similar Questions
-
How can I import an image with transparent background .png in the Vision Assistant?
Hello
I am using the Vision Assistant of NOR. Here, I want to overlay one existing image with another. Therefore, I use the overlay Installer where can I import a .png image. If I do, I don't get
the transparent background of the back of the image, even, I was saved with a transparent background. The image is displayed with an orange background.
If I import the same image to any front panel for example, I see the picture on the right path with a transparent background. What I've done wrong? I have attached the image I want to use.
Thank you
Hello! Don't know how to do this in the Vision Assistant. Try to use the overlay (bitmap) or convert your image into mask. Effect of transparency not supported in the Vision. What you can do in LabVIEW is something like this:
-
can images with transparency display edge art object - what I'm doing wrong, how it be fixed
Hello
With the help of MUSE CC 2014
I need to place images photoshop text (with transparency) on a full screen slide show but I'm artifacts edge around the inscription which looks like, well frankly, horrible. I do not remember previous versions of MUSE is quite as bad as this, I'm doing something wrong? Is there a trick to overcome these ugly artifacts?
PSD images are either imported SS
Thank you very much in advance for any help.
Hi Vikas
I was falling a pds on the scene file. No other layers as transparent image and bg. I was reducing the image down in the Muse that I discovered exaggerates the visibility of image edge objects. After a little reading, it appears that there is a known issue with Adobe Muse, something to do with the algorithms that muse use images nationwide. I also think that the color of the layer has contributed a bit to the effect also.
Problem solved when I gave up the way of the PSD and rather any SS as a PNG image.
-
Background image with scrolling not for the screen
Hi all.
I use the following code to make the background dropdown not image, and it works for all BlackBerry Storm2 (OS 5.0) except (I tried it on a simulator):
public class MyScreen extends MainScreen{

...

    public MyScreen() {
       super(NO_VERTICAL_SCROLL);
       bitmap=loadBG();       super.add(mContainer = new BGVerticalFieldManager(bitmap));
    }
    public void add(Field field){        mContainer.add(field);    }...

}
public class BGVerticalFieldManager extends VerticalFieldManager { Bitmap mBgBitmap = null; int mBgWidth = -1; int mBgHeight = -1; int mBgX = -1; int mBgY = -1; public BGVerticalFieldManager(Bitmap background) { super(USE_ALL_WIDTH | USE_ALL_HEIGHT | VERTICAL_SCROLL | VERTICAL_SCROLLBAR); mBgBitmap = background; mBgWidth = mBgBitmap.getWidth(); mBgHeight = mBgBitmap.getHeight(); mBgX = (Display.getWidth() - mBgWidth) >> 1; mBgY = (Display.getHeight() - mBgHeight) >> 1; } protected void paintBackground(Graphics graphics) { paintBackgroundBitmap(graphics); } protected void sublayout(int maxWidth, int maxHeight) { mBgX = (Display.getWidth() - mBgWidth) >> 1; mBgY = (Display.getHeight() - mBgHeight) >> 1; super.sublayout(maxWidth, maxHeight); } private void paintBackgroundBitmap(Graphics graphics) { if (null != mBgBitmap) { int x = mBgX + getHorizontalScroll(); int y = mBgY + getVerticalScroll(); graphics.drawBitmap(x, y, mBgWidth, mBgHeight, mBgBitmap, 0, 0); } } }The Storm2 scrolls the background image, looks that getVerticallScroll() does not work.
Can someone help me with this?
Thank you.
also have glance at this:
-
export the image with an alpha channel in cs3
on the video layer 1 I have a background image and video 2 I have a psd numbered video of maya (is the text animation) with an alpha channel (black is the alpha).
If I export the end frame (even with 1 off video (background)... I don't get a bmp or tiff with alpha channel image. I get the black background.
is it possible to export end frame and keep the alpha channel?
Thank you!
Search millions of colors +, this will give you channel alfa.
-
save images with transparent background
I cut an image in pscs6 and recorded on a transparent background and saved on my Finder in format giff. The image went to the ps, but opening my Finder it was slightly desaturated. I do not have the need to save transparent images that often so I'm not familiar with the technique. My client is looking for a 3 to 6 MB image for use in print. Cheers, bj
For printing, do not use the gif files. They are an obsolete format that supports a limited number of colors (255) + 1 color used for transparency.
PNG uses 256 colors red + 256 blue + green + 256 256 shades of gray for transparency.
As you can see png has many more colors and shades of transparency, which means a much smoother and softer image shadow brought to get an example of transparency.
Better yet is to save it as a tiff or psd, allowing a larger number of colors if necessary and support layers, layers alpha, transparency, the living text, paths, etc.
If it is set on a printer, then pdf may be the best solution.
In other words, you have many choices and the reasons not to use gif.
-
Trace an image with transparency - bug?
Try the following: import a PNG or PSD, which consists of WHITE color on a layer line drawings (background is transparent).
Now run autotrace (fact I just date myself?) Trace the image. Now develop. Look at your document in outline view (off preview mode). Everything you did was a solid white box. Try tracking with "ignore white" lit. Now you get nothing at all.
It's sort of lame. If I have a line on a transparent background drawings, what could be better for the follow-up?
Solution: in Photoshop, flatten the white work on a solid black background, reverse and then save it as a TIF with layers off the coast.
So, Adobe, it's a feature? A bug? It will look?
What you must have is to select the image in Illustrator and go to Edition > change color > invert the colors and then perform your trace or Trace of Image works like a charm
It's all white art on a transparent background in photoshop, I open the psd in photoshop converted to illustrator objects and then used the command reverse and did my picture tarce no problem


You can use the option ignore white and then delete everything in the Panel layer, except the compound path that describes art as such

You end up with this

then you can fill it out as you wish as such

-
Photoshop Image with transparent background - export gives me a white background?
Hello
OK, the hours of my life have already evolved in this one - I guess that's computers! I have a few images in Photoshop which already have transparent backgrounds, but when I try and drag the latter in a different program, they move across with a white box as their background. I tried to save as TIF, GIFF... - of all kinds, so clearly I'm missing a pretty basic step that I can't see.
Any help would be SO appreciated.
Thank you.
Doreen.
Save as a PSD or PNG, depending on whether you final output will be printed or web. Then use the Place rather than drag the image on.
-
How do I export my image with transparent bkground (CC)
Before I ask my question, I want to emphasize I currently exporting my image by clicking file > export >. PNG >(72PPI+Transparent)
The question running im's; for example when I export text, I'm also exports a certain amount of space around my image. How can I export the exact outline of my picture? I posted a screen shot of what im referring to.
When I tried to use my image of text for a website that I was building I noticed that I could not image at the Center. I opened the image in paint and noticed I have export the area around my image aswell and not just the image itself. I hope that screenshots can explain my scenario a little better...
I would like to export the outline of text only. As you can see in the paint I export a fixed area around my image.
ANY HELP IS GREATLY APPRECIATED! THANK YOU - JON-


A couple of things you could try: first, to present the text (Type > vectorize) before exporting. In the second place, especially if you want to keep the editable text, try effect > path > describe the object, then export. I think that those who will give you what you want.
Edit: One or the other, shouldn't it need both.
-
Using an image with transparency in the book module and keep the transparency?
Hello.
Let's see if I can explain my question, I'm not an experienced LR or PS user (and not in the English language)
I changed an image in PS and cut out a part of it and pasted into a new layer and then adjust the opacity of the background at 0%.
Then I saved the picture in PSD format and imported to LR to be used in ledger. When I then use the peak and attached to the photo book have a white background.
What I want is that only the cutting part appears in the book and the rest of the area of the image is in the same color as the color of the pages (in my case clear yellow).
Is it possible to do what I want to do and if it is, how?
Shovelc wrote:
What I want is that only the cutting part appears in the book and the rest of the area of the image is in the same color as the color of the pages (in my case clear yellow).
Is it possible to do what I want to do and if it is, how?
You should be able to do this by building the PSD file layer of the same color as background color LR ledger. The key to making this work correctly is by matching the two background colors. In the book LR module background panels 'Background color' color picker icon, right-click in the color selector box, click on select HSB. In the PS use fill and set the background color using the STL values inside the book LR module. Color space ProPhoto RGB native of LR in PS helps prevent the background color to move within LR.
Example for 59, 16, 93 HSB


-
Import an image with transparent background
I have a chart that has a transparent background in Photoshop. When I import into Indesign, it has a white background. Is there a way to keep the background transparent when importing?
If it's 16-bit record like 8. Also make sure the frame is not filled with white.
Bob
-
Hello
I created a card that contains a simple geometric shape and type, and the client would like to for it to print on different kinds of papers / different background colors.
I don't know what is the best way to export this .ai file to send to print. Your suggestions are appreciated, and my apologies if this question has arisen before.
Carmen
The white background is just the preview. The application of the observer must show a sort of background.
PNG is not specific to printing. If you export a PDF file that has the correct settings (depending on the printing process)
-
GIF Image with a transparent background, has a background color when exporting to PDF
Hi all
I'm having a problem when you try to export a Microsoft Word or PowerPoint document which has GIF or PNG image with transparent background. When I save the file as a PDF file with the PDF option "ISO 19005-1 compliant (PDF/A)," the transparent background will have a colorful background after having been exported. This occurs when you try to export from Microsoft Powerpoint and Word 2007. Here is a screenshot of what the Gif and PNG images looks like after export.

Does anyone have any ideas as to why what is happening?
Thanks in advance!
Mike
PDF/A-1 does not support transparency, so you can't have both.
-
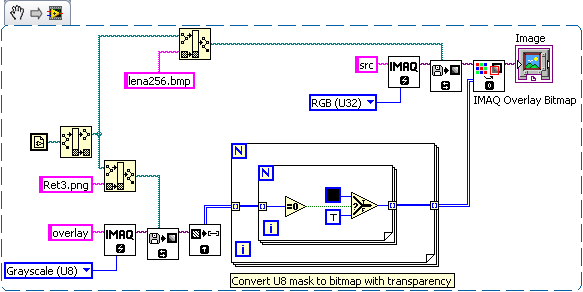
IMAQ image with alpha (partial transparency) blending overlay?
I'm using Labview 2014 on Win7. I found examples of image color with binary transparency overlay (A + B = OUT with each output pixel is 100% image A or B of the image), but have found no examples of mixture alpha (partial transparency). For example, a few pixels output are (20% to + 80% B). I can do it in LabView?
IMAQ ArrayToColorImage VI takes U64 pixels of the image and the clusters of 4 values unsigned 16 bit, interpreted as the red, green, blue, and Alpha planes. Is there any VI that makes use of the 4th (alpha) plan to make an alpha blending by combining two bitmaps?
IMAQ Overlay Bitmap VI comes with the note "Ce VI does not support alpha blending." Are there any other VI that supports alpha blend?
Hi jbeale1,
IMAQ does not display transparency. It maintains the alpha channel, but does nothing with him.
If you want to emulate transparency alpha blending manually here is a page on that are:
http://www.NI.com/example/26682/en/
I hope this clarifies some things.
Michael
-
Sequence of images with alpha to video with transparency
I have a sequence of png images that has an alpha channel. I care about her as a kind of video where if I import into PowerPoint, I can overlay on a background and have the visible bottom where the video alpha is out.
Is it possible to release a video with transparency?
TIA
Dean
When people ask me to do that I have shot greenscreen then match the background color of the powerpoint. It is the only solution.


Maybe you are looking for
-
Quest & #xae; Foglight & #x2122; for virtualization, Enterprise Edition 7.0 - upgrade
Hello I'm reviewing the documentation for FVE 7.0 (http://us-downloads.quest.com/Repository/support.quest.com/Foglight%20for%20Virtualization%20Enterprise%20Edition/7.0/Documentation/FoglightFor_VirtualizationEE70_StorageManagement30_ReleaseNotes.htm
-
Bluetooth receive files, but in the right folder
I recently bought a Bluetooth USB Medialink adapter and use it to send pictures from my phone to my PC. One of the configuration options when I installed the device was to specify the location of the Bluetooth Exchange folder, I did. My understandi
-
Need help - iTunes component missing 45075...Uninstall, then reinstall new version 11.1.1 and then repair does not help.
-
Hi, Im kenny, I have Windows 7 Enterprise 64-bit and my laptop is HP g4-1311AU pavvilionmy system is as followsSo, I have problem with my windows 7 not in windows 8. My brightness on WINDOWS 8, can change to 0,5,10,15,20,25,30,35,40,45,50,55,60,65,75
-
Error code 0 x 8004072 during the installation of Microsoft Flight Simulator
Original title: Dave I'm under Windows8. Previously, I had Microsoft Flight Simulator installed successfully. Following some automatic windows updates to Flight Simulator, stopped working. I uninstalled then reinstalled but received the error code 0