Trace an image with transparency - bug?
Try the following: import a PNG or PSD, which consists of WHITE color on a layer line drawings (background is transparent).
Now run autotrace (fact I just date myself?) Trace the image. Now develop. Look at your document in outline view (off preview mode). Everything you did was a solid white box. Try tracking with "ignore white" lit. Now you get nothing at all.
It's sort of lame. If I have a line on a transparent background drawings, what could be better for the follow-up?
Solution: in Photoshop, flatten the white work on a solid black background, reverse and then save it as a TIF with layers off the coast.
So, Adobe, it's a feature? A bug? It will look?
What you must have is to select the image in Illustrator and go to Edition > change color > invert the colors and then perform your trace or Trace of Image works like a charm
It's all white art on a transparent background in photoshop, I open the psd in photoshop converted to illustrator objects and then used the command reverse and did my picture tarce no problem


You can use the option ignore white and then delete everything in the Panel layer, except the compound path that describes art as such

You end up with this

then you can fill it out as you wish as such

Tags: Illustrator
Similar Questions
-
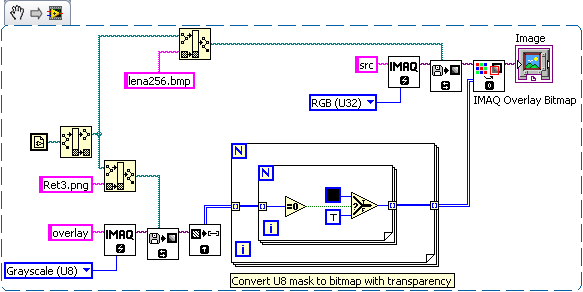
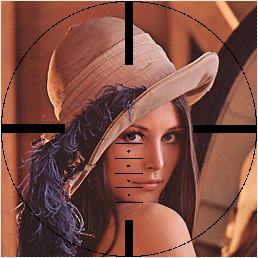
How can I import an image with transparent background .png in the Vision Assistant?
Hello
I am using the Vision Assistant of NOR. Here, I want to overlay one existing image with another. Therefore, I use the overlay Installer where can I import a .png image. If I do, I don't get
the transparent background of the back of the image, even, I was saved with a transparent background. The image is displayed with an orange background.
If I import the same image to any front panel for example, I see the picture on the right path with a transparent background. What I've done wrong? I have attached the image I want to use.
Thank you
Hello! Don't know how to do this in the Vision Assistant. Try to use the overlay (bitmap) or convert your image into mask. Effect of transparency not supported in the Vision. What you can do in LabVIEW is something like this:
-
can images with transparency display edge art object - what I'm doing wrong, how it be fixed
Hello
With the help of MUSE CC 2014
I need to place images photoshop text (with transparency) on a full screen slide show but I'm artifacts edge around the inscription which looks like, well frankly, horrible. I do not remember previous versions of MUSE is quite as bad as this, I'm doing something wrong? Is there a trick to overcome these ugly artifacts?
PSD images are either imported SS
Thank you very much in advance for any help.
Hi Vikas
I was falling a pds on the scene file. No other layers as transparent image and bg. I was reducing the image down in the Muse that I discovered exaggerates the visibility of image edge objects. After a little reading, it appears that there is a known issue with Adobe Muse, something to do with the algorithms that muse use images nationwide. I also think that the color of the layer has contributed a bit to the effect also.
Problem solved when I gave up the way of the PSD and rather any SS as a PNG image.
-
Photoshop Image with transparent background - export gives me a white background?
Hello
OK, the hours of my life have already evolved in this one - I guess that's computers! I have a few images in Photoshop which already have transparent backgrounds, but when I try and drag the latter in a different program, they move across with a white box as their background. I tried to save as TIF, GIFF... - of all kinds, so clearly I'm missing a pretty basic step that I can't see.
Any help would be SO appreciated.
Thank you.
Doreen.
Save as a PSD or PNG, depending on whether you final output will be printed or web. Then use the Place rather than drag the image on.
-
save images with transparent background
I cut an image in pscs6 and recorded on a transparent background and saved on my Finder in format giff. The image went to the ps, but opening my Finder it was slightly desaturated. I do not have the need to save transparent images that often so I'm not familiar with the technique. My client is looking for a 3 to 6 MB image for use in print. Cheers, bj
For printing, do not use the gif files. They are an obsolete format that supports a limited number of colors (255) + 1 color used for transparency.
PNG uses 256 colors red + 256 blue + green + 256 256 shades of gray for transparency.
As you can see png has many more colors and shades of transparency, which means a much smoother and softer image shadow brought to get an example of transparency.
Better yet is to save it as a tiff or psd, allowing a larger number of colors if necessary and support layers, layers alpha, transparency, the living text, paths, etc.
If it is set on a printer, then pdf may be the best solution.
In other words, you have many choices and the reasons not to use gif.
-
How do I export my image with transparent bkground (CC)
Before I ask my question, I want to emphasize I currently exporting my image by clicking file > export >. PNG >(72PPI+Transparent)
The question running im's; for example when I export text, I'm also exports a certain amount of space around my image. How can I export the exact outline of my picture? I posted a screen shot of what im referring to.
When I tried to use my image of text for a website that I was building I noticed that I could not image at the Center. I opened the image in paint and noticed I have export the area around my image aswell and not just the image itself. I hope that screenshots can explain my scenario a little better...
I would like to export the outline of text only. As you can see in the paint I export a fixed area around my image.
ANY HELP IS GREATLY APPRECIATED! THANK YOU - JON-


A couple of things you could try: first, to present the text (Type > vectorize) before exporting. In the second place, especially if you want to keep the editable text, try effect > path > describe the object, then export. I think that those who will give you what you want.
Edit: One or the other, shouldn't it need both.
-
cracked glass image with transparency (alpha) for overlay?
All knowledge of a file PNG image good glass cracked including transparency (alpha) is I could use?
The idea is that it could be placed above other images so you could still see the pictures back, but it would be like they are behind the cracked glass.
Otherwise, if not directly, there are images that match this requirement, so how would easily transform a picture of glass cracked an alpha/transparency?
1. Desaturate the layer of glass.
2. make two copies of the glass layer, desaturated. Disable all three eye visibility for these layers in the layers palette.
3. turn on the first glass desaturated layer by clicking on the eye in the layers palette. First glass desaturated layer place (an image directly above) in blend mode screen. 100% opacity. If the glass has a hole, use a layer mask or erase to drill a hole in the desaturated layer. The levels command to set up the glass so to taste... use push black cursor Grays to black and use the middle gray slider in the dialog control to transition between black and white. You can also set the white slider if you wish. Note: If you have added a layer mask, click the desaturated picture glass to ensure that you use the command levels on the image, not the mask. (Tip: shortcut on PC for levels is Ctrl + L on Mac Cmd + l.)
Note: If you need a hole in the picture, it is easier in Normal blending mode. 100% opacity. Use the Quick Selection tool if you have a version of items that includes this tool. If you have an older version of elements before the introduction of this tool, the wand should also do the trick.
Note: If you punched a hole in the glass, save this selection, so you can reuse it. Select
Just go to step #4 If you punched a hole in your glass.
4. go in the first copy of desaturated glass (one directly on the one you made to step #3... you should have one above it) and turn on his eyes the visibility in the layers palette. As previously, the value this screen blend mode layer: 100% opacity. Hide or delete so this layer effect will be limited at the edge of the hole and some of the glass around the edge. Use the levels command to adjust the contrast around the hole. You should concentrate on the white slider and the edges medium gray to make the hole look correct.
Note: To make it easy on myself, I have used Select
5. Optional: go to the latest copy of desaturated glass (this must be on top of your pile of palette layers.) and turn on the eye of this layer. Change the blending mode of this layer to soft light blending mode and adjust the opacity to your liking.

Above shows my layers using Photoshop. In the elements, layers will be the same, although your UI will be different. If you have PSE 9, you can use layer masks as I... see PSE9 layer mask video link I linked below.http://www.Photoshopelementsuser.com/featured/elements-9-easy-layer-masks/
If you don't have a PES 9, you can either use the eraser to delete what you don't need or use a clipping mask or clipping group. (Same thing another name.) PSE 8 and 9 PES call it a clipping mask while all older versions of elements called it a clipping group.
See the tutorial below if you need a tutorial on clipping mask/clipping group.
Another method:
You can also use Photoshop brushes and little white paint. Search for brushes that are high resolution, pixel large size... like the smaller brush sizes will be blurred if you have their measure. These brushes can usually be found using broken, break, broken, broken or cracked in the search term. These two are beautiful high resolution sets:
http://archaii.deviantart.com/art/shatter-glass-brushes-82308115
and
http://archaii.deviantart.com/art/shatter-v2-new-101049266
Several other series are out there on the net at this site and others. This set has attracted my attention like beautiful brushes appearance and are big brushes. (Brushes of mind may not be more than 2500 px in height or width if you do brush of your own images. Brushes, which are small get blurred when the brush tip size increases then trying to make them bigger. This is why I suggest that you are looking for brushes large high resolution at first.
-
Import an image with transparent background
I have a chart that has a transparent background in Photoshop. When I import into Indesign, it has a white background. Is there a way to keep the background transparent when importing?
If it's 16-bit record like 8. Also make sure the frame is not filled with white.
Bob
-
Using an image with transparency in the book module and keep the transparency?
Hello.
Let's see if I can explain my question, I'm not an experienced LR or PS user (and not in the English language)
I changed an image in PS and cut out a part of it and pasted into a new layer and then adjust the opacity of the background at 0%.
Then I saved the picture in PSD format and imported to LR to be used in ledger. When I then use the peak and attached to the photo book have a white background.
What I want is that only the cutting part appears in the book and the rest of the area of the image is in the same color as the color of the pages (in my case clear yellow).
Is it possible to do what I want to do and if it is, how?
Shovelc wrote:
What I want is that only the cutting part appears in the book and the rest of the area of the image is in the same color as the color of the pages (in my case clear yellow).
Is it possible to do what I want to do and if it is, how?
You should be able to do this by building the PSD file layer of the same color as background color LR ledger. The key to making this work correctly is by matching the two background colors. In the book LR module background panels 'Background color' color picker icon, right-click in the color selector box, click on select HSB. In the PS use fill and set the background color using the STL values inside the book LR module. Color space ProPhoto RGB native of LR in PS helps prevent the background color to move within LR.
Example for 59, 16, 93 HSB


-
GIF Image with a transparent background, has a background color when exporting to PDF
Hi all
I'm having a problem when you try to export a Microsoft Word or PowerPoint document which has GIF or PNG image with transparent background. When I save the file as a PDF file with the PDF option "ISO 19005-1 compliant (PDF/A)," the transparent background will have a colorful background after having been exported. This occurs when you try to export from Microsoft Powerpoint and Word 2007. Here is a screenshot of what the Gif and PNG images looks like after export.

Does anyone have any ideas as to why what is happening?
Thanks in advance!
Mike
PDF/A-1 does not support transparency, so you can't have both.
-
BlackBerry 5 - image with text and the background transparent resizing
Hey,.
My application consists of a series of images stacked on each other. Some are transparent, some are not. I use images high resolution and resize them based on the width of the screen of the blackberry that runs the application.
I'm having some trouble resizing of images with text on a transparent background. The resulting image is not of all anti-aliasing. This is the code I use to do:
function scaleBitmap(Bitmap bmp){

int rgb[] = new int[imageWidth * imageHeight];
bmp.getARGB(rgb, 0, imageWidth, 0, 0, imageWidth, imageHeight);
int rgb2[] = rescaleArray(rgb, imageWidth, imageHeight, width, height);
scaledBmp.setARGB(rgb2, 0, width, 0, 0, width, height);

return scaledBmp;
}
And here are the results from a group of images resized in photoshop:

Is it possible that I could improve my resize code to give better results?
Thanks in advance!
I found a solution and it is on these forums all the time!
-
How to trim a logo with transparent and degraded traces?
I use Illustrator CS2. I have a logo with transparent traces and a gradient. I would like to cut or trim so there is no space on the bottom of the logo as seen in the screenshot below. Thank you for your help.

Like2Create,
If you want to keep the B as direct Type, you can:
(1) tick Edit > preferences > General > use overview of limits;
(2) to select the Type (B) with the selection tool (normal) and the effect > path > outline object.
Which will reduce the Bounding Box to the real limits of the letters and keep the editable Type, so you can set the direct Type you like in function since its appearance.
But if you need not described the text as a PDF, you will need to remove the effect:
(3) with the selected direct Type, click reduce it to the basic appearance button in the appearance palette.
Who's going back to normal Type Escarole.
Obviously, you will need to uncheck the box use a snippet of the boundaries for other purposes, but you can just check that again when you need to edit (some of) the Type if necessary to keep in place. Maybe it's not necessary the changes will (for the most part and only if no letter is more than the vertical limits far) horizontally.
-
Try a background image with a PNG with transparency matte / partial transparency
Hello everyone.
Here's the scenario;
- I have a PNG sequence rendered in a 3d program. The sequence has a landscape that is partially transparent and has no background image or color. In the animation, which is not the landscape is 100% transparent, while the landscape is partially transparent.
- I have a background that I want to put behind the PNG sequence but I don't want the background visible through the part of the landscape of the sequence, only the portion that is 100% transparent.
I tried several different methods, but because the landscape is partially transparent, with a matte (alpha or alpha reverse) or blend (such as stencil alpha) mode does not give me the results I'm looking for.
I'm looking for is a way of mast (or mask) the background image with only the part of the PNG that is 100% transparent. In this way, the background image are not displayed in the semi transparent landscape, but will be visible in the part that is 100% transparent.
I would like to find a reasonable solution in After Effects, as opposed to the sequence of 3d objects rendered being invisible to the camera and the current background. The landscape scene itself took a considerable amount of time to make (120 hours) and I would like to avoid this kind of delay in my project.
Thank you all in advance for your consideration.
Maybe I said incorrectly: you cannot use the 3D app to generate a matte black and white simple - or mattes - to separate properly, then just composite in AE?
-
Use an image jpg as mask with transparency
Hello
I use photoshop CS6. I have two images like this:


I would like to use the second as a mask for the first. Also, I would need the final image to have transparent background:

From now on, I couldn't have the last image with white or black background, having the first two images in the form of layers and work with color inversion and layer blend modes, but I can't figure out how to set a transparent background.
Since there is a gradient there, not going to magic wand.
Is it possible to get? Thank you.
Copy & paste the mask directly in the channel mask after you have created an empty mask.
Mylenium
-
Masking of the image of the poster in sequence with transparency
Hi, people
Just a simple question. I have a sequence of images with a described sweater in png, transparent background format and the first image as an image of the poster, as told in the help.
When I place it on a white background, no difficulty. The image rotates when swipped and it stops after that.

The problem is that I want to put this sequence of images, partially on a flat color background and a few other square photo. The image sequence plays well, BUT the image of the poster there during rotation, spoil the effect. This does not happen when the n is color paper.
Any ideas what I'm doing wrong or how to avoid this? Maybe placing the sequence of images as a State second in an MSO?
Thank you very much
Gustavo (detachment of Madrid)
Andrew,
This trick works well. Thank you!
Your response, I paste here (as it was more detailed it) in order to have as well as a reference here:
A way around this is to make a MSO of the first State being the first image in your sequence PNG and the second State being the image sequence. You set the DSO to AutoPlay with a short interval (dry 0.125), tell him to play 1 time and stop at the last frame. If you want to change the settings for image sequence once you have back the ASM just select the State in the object States Panel and double click on the image sequence. Options in sequence of images such as "Drag to change the Image" should operate normally.


Maybe you are looking for
-
I have a direct connection to the internet and that you do not use a proxy server. Every few weeks, Firefox will automatically reset itself to be configured to use a proxy to the loopback address (127.0.0.1). Manually change to 'No proxy' works, but
-
W510 does not detect 16 GB of RAM
Hi, I bought Thinkpad W510 a month ago and then I updated memory up to 16 GB. My laptop detects only 8 GB of RAM. I tried to change the RAM, but it detects only the RAM into the slots on the keyboard. It does not detect the RAM which is at the back.
-
How to manage the data after the serial com port?
Hi all I'm new to labview and serial communication. I tried to receive data on external device labview (pic18f452). It's done, but I am getting data as strings. If microcontroller gives "11.25", in labview each letter is delivered to a different as s
-
The details are in the title
-
Windows vista 32 bit in a relationship 2541763
NAO estou access download an ATUALIZACAO 2541763 para o windows vista starter 32-bit. Alias na tela nao appears a versão 32-bit. Quando tento have other, appears uma mensagem dizendo than compativel com o tenho em meu computador e nao!