Create a sphere
I have a round image on a layer that I want to look like a field or baseball. I have PS CC.
Thanks for the help!
Leona
Hello
With this design, you can stretch it over the half of a sphere.
For this, remove external pixels as well as the circle is left then go to the 3D Panel and create an extrusion of your layer. This will make a cylinder with the ball on the flat end.
Reduce the depth of extrusion for zero and then go to properties and increase inflation at 90 angle and strength to 21%.
This will explode the ball as below:

However as it is already drawn 'spherical' you can be better off it shading.
Do add a color fill layer and a mask of the same size as the ball. Add a circular gradient to the mask. Adjust the opacity of the layer of filling in function.


Hope that helps
Dave
Tags: Photoshop
Similar Questions
-
I can isolate type was mapped to a sphere?
I created a sphere and mapped to a type around it. However, I can't understand how to knock out the sphere to 'clear' so I ONLY see the type and not the sphere (I'm placing the type on top of something else). I am sure that he has got to be simple, but I did some research online without success, so I thought I would ask the pros here.
Thanks in advance for your expertise!
Try clicking on the area of geometry Invisible

-
Trace of the end effector of a manipulator Robot in Simulator 3D display
Hi all
I am currently working on a project to control robot on LabVIEW Robotics Module 2013.
In project, I need to show 3D track of the Effector(or an arbitrary point of the last link) in the display of the Simulator.
So so we can easily see the error of monitoring (the diffrerance between the desired trajectory and actual path) on the façade of the Simulator.
I also added a picture of my primitive system to clarify what I needed.
Thank you.
Your photo, it seems that you already have a 3D scene called Simulator display. Is this VI an example that was provided to you? Or have you written this VI?
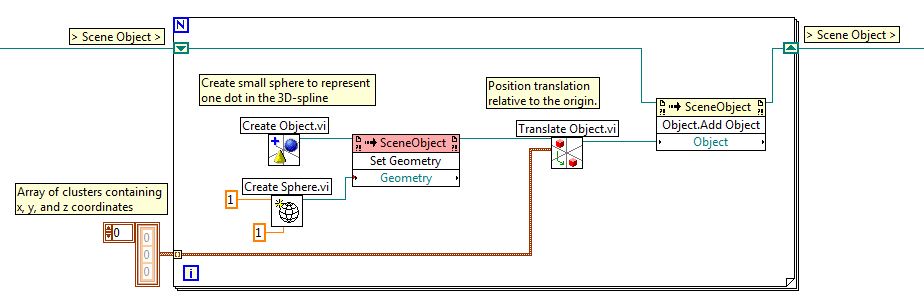
This isn't something I've done before, but assuming that the item titled display Simulator is a 3D scene or a 3D image, you could follow the path of the Effector keeping the Effector 3D locations in a wide range of groups, each with an x, y and z location. 3D scenes/images are used to represent physical objects in a virtual environment, so each location to which you want to trace would become an object. Below is an excerpt where I created a for loop that will create small spheres for each point that is stored in an array of clusters. These spheres are created, moved to the right and then added to the existing 3D scene location.
Your application may be different from what I proposed, but you should start by looking at the example of solar system set out below. This example shows how objects are created, added to scenes and interacts with.
Community: solar system with 3D picture control
-
Very familiar with creating a sphere of a semicircle. I know how to make a circular band. Can someone tell me how to cut this strip into a 3D segment? Grateful for any help.
SoC

Start with a rectangle.
3D-> Revolution
Then use the remote control and turn it only to 30 degrees or other
-
I am a newbie and hoping that this group can help me.
I want to learn how to take for example a flat item to think of a photo and then go flat and roll into a cylinder. The camera view would show it happens and then the camera view would be through the cylinder.
Here is where I get "confused" LOL
I know how to make a 3D cylinder in Photoshop Entended and display the 3D tools, but that and create the animation in AE is where I get confused. Again, I'm a newbie really want to learn and all imput appriciate! Can I create in AE, Photoshop... I'm good at first so I understand the timeline, keyframes, etc... which should help I hope
I pulled from that going from flat to a cylinder with the split on 6 oclock. OK show this newbie :-)
Thank you!!!

To do this, the easiest method is to a plug-in like Borris FX or Conoa which will give you the ability to roll and unroll a cylinder.
CS6 with ray tracing and a layer of bending would be a little pain and slow to render. Pain because the percentage of curvature is not linear and layers of do not curve around the anchor point. Make smoother and that actually look like a plain rolled upwards would be a tedious process.
If you don't want to use a plug-in 3rd party another option would be to use CC sphere and animate a solid moving in a demo to create the cylinder. Duplicate the pre-comp, time reverse layer and position it carefully, apply CC cylinder to the top of the page copy and add a light depending on the lighting on the sphere of the CC. Add to that a camera to get another view of the sphere, and you should be good to go. It took me about 5 minutes to set up. You can find the project here CS6 files.

If you want even more control everything for free and you have after effects CC you could create a sphere wrapped in a blender, export the obj file, load that into C4D Lite and who put in AE. I have not played with modeling a lot in C4D Lite, but you may be able to do it all in there.
-
How can I use axis layer against the axis of the world to animate?
Hi all
I'm open to other ways to address the issue.
I am trying to create a sphere using multiple images. Say, 200 images, arranged in 3d space, so they face outward and together form a large sphere. Pretty standard thing (like the sphere glowing apps blue droid in android ads, like this).
I used red giant PlaneSpace quickly take a sphere. I want to "explode" the sphere for all images to move away from the centre of spheres, but in a staggered and random way rather than all at once.
I thought it would be easier I see each orientation layers changed each axis of layers. So the layers of the z-axis of the Center points.
Example:

I tried to use a simple linear expression to update the Z axis over a period of 20 seconds to its current position minus 2000, like this:
AMT = linear (time, index, index + 20, position [2], [2] position - 2000);
Transform.position = [position [0], [1] position, amt];This updates the position of the z axis, but it is based on the world axis (or axis of the model), not the axis of layers. The axis of layer, I want to talk about is the widget of the axis that appears when you select a 3d layer and the axis 3 widget to see red/green/blue appears.
How can I get the expression to use the axis layers rather than the world?
Is there another approach to this? I'm certainly not up-to-date on 3d trig enough to write a formula to chart a course far from a specific 3d point. If all goes well, there is a simple way to do this that I forgot.
I will add that I have attach all 200 pictures to a null value, scaled to null, and it grows not all photos now. I also added a reverse scale expression to keep them the same size they were initially instead of scaling upwards with a null value. However, I really want to blow way random and not "both" and I need to get out of the null concept for this scaling access to each photo.
Thank you!
Unplug the layers of the null value and try this:
AMT = linear (time, index, index + 20, 0, -2000);
toWorldVec ([0,0,1]) + value * amtDan
-
Brilliant video on top, being carried out by camera line?
Im trying to do an effect similar to an animated map to display travel.
I have a sphere that turns, as well as a camera that zooms from destination to destination, but I'm stuck to animate a bright line as well as its on the layer of the Earth 3d, performed by the camera. The problem I have is that the world revolves and points of start / end are being made there. How do I cement the starting and ending positions of the line and also have the line made by the camera?
Any advice on what it would be greatly apreciated!
I hope that it is quite simple to understand.
-After Effects CS4You create the sphere within EI? If so, you need to precompose the sphere texture and animate the line on the map before it is transformed into a sphere.
-
I'm having a problem trying to get and use the position X to a Movieclip.
I have a main movie clip (main_mc), which will contain the other video clips inside.
In one of these clips (view_mc), I have a script that creates a sphere that can turn.
(it creates inside the clamp so that I can move it)
I tried passing the x value of view_mc (view_mc.x) in the script to rotate the sphere based on this x position
but the script does not include the reference to movieclip.
What I need to do reference to another clip as well //this (main_mc.view_mc.x) gave me an error as well.
Any help/direction would be appreciated
If you write the code on the timeline of the sphere, and view_mc is the parent of sphere, parent.x is the correct reference for view_mc.
If the code is on the chronology of view_mc, the correct reference is this.x
-
I can create 3D shapes (cubes, sphere, etc.) in Visual basic 6.0
is it possible to create a #D form in VB 6
enyone can help me.
Thank you & best regards
Sisi
The question in the VB forums:
http://social.msdn.Microsoft.com/forums/en-us/vbgeneral/threads -
Create a 3D in artificial intelligence sphere
Hi all
I'm pretty new to Illustrator, and I'll have a challenge with creating the look that I want to use the 3D revolution. The field belongs to a logo and should match the color of a part of the logo essentially, but I also want her to have a smooth 3D quality. Hard to explain in writing.
To start, here's the color I want to be predominant in the field:

Here's what I come up with so far:

That's as close as I've been able to get the original color, but there is no gradation between shades. Here are the 3D revolution settings:
Area: Plastic shading
Light intensity: 50%
Ambient light: 70%
Highlight intensity: 95%
Point highest Dimensions: 95%
Mix the steps: 256
Shading of color: black
And here's another experience:

It's the mixture of dark to light that I'm looking for, but the base color has become much more purple and does not really match the original. Here are the settings for this version:
Area: Plastic shading
Light intensity: 40%
Ambient light: 0%
Highlight intensity: 100%
Highlight size: 100%
Mix the steps: 50
Shadow color: no
I played a bit with a diffuse shading, but have not yet come as close as these two samples. So basically, what I'm looking for is the basic color of the first sample (perhaps a bit lighter), with the mixture of the darkness in the light of the second.
We appreciate any comments or suggestions, and I'll be happy to provide more information if necessary.
Sam
Icon,
To get an appearance similar to that of the second picture with good color (transition), you can:
(1) create the filling/nostroke circle,
(2) create a horizontal line from the Center to the right edge and a vertical line half the way (or it where your final appearance, perhaps a third of the way) on the top of the circle.
(3) select the circle and drag horizontally with the tool degraded the crossing to the edge and the switch of a Radial gradient,
(4) apply to white at the centre and #0000CC edge (left and right) and keep the cursor on the gradient to 50%.
(5) hide the lines and turn the circle by 45 dregrees (or whatever that either rotation corresponds to the goal).
You can cancel and set 2), 3) and 5), until you are satisfied and perhaps remove the lines when completed.
To try faster with less control, you can jump 2) and 5) and just drag it from somewhere on the Board (or somewhere else) 3).
You can also set the color as RGB 0/0/204.
Edit: Hi Monika.
-
How to create with PlotHelper.VI surface.VI 3d multiplot
I chose PlotHelper.vi and surface.vi 3D because I could (according to the help info) don't "successive calls of this VI with the 3D same plot entries with different values of ID of the plot will create several plots" I have attached my test VI. The radius of each sphere will provide by other VI, for now there are 8 difficulty and I want to draw 2 spheres with different X, Y and Z coordinates. I generate a first set of coordinates and go to a second round. It seems that the plot only show the last generated plot. The loop While produce successive calls to the VI Helper Plot and the ID is changed accordingly.
What could I do to keep each parcel on the drawing? How the draw 3D scale will include the two spheres?
Thank you for your help.
fmethot,
Hello! This document talks about How to improve or restore a VI to an another Version of LabVIEW.
I took a look at your code and played with it a little bit. I could get to graph various plots at the same time. Take a peek inside.
-
How to create a spherize effect?
I need to create a spherize effect in Illustrator. I tried the Funes Inflate and Fisheye. They give no details. The effect is not limited to a domain specific, even using a mask of clip I see many examples of Stock houses, so there may be a plugin out there that could help.
I use Illustrator CC 2014.1.1
Thanks for any help.
You can try using 3D revolve: simple tutorial here: http://vectorguru.com/tutorials/004_3d-sphere-pattern-in-illustrator.html
No need to plugin... ?
-
HelloDoes anyone know a model to a 3D Image sphere (see attached Image)?

Create a model which is 3.141 times larger because it is high. Organize your images inside this model in the checkerboard pattern. This model in your main come from nesting and apply cc sphere.
-
v-sphere partitioning recommendations
We are poised to deploy v-sphere and looking at partitioning recommendations. What we think, this is:
/ 5120MB
1600MB swap
/ Var 4096MB
/ Home 2048MB
/ Opt 2048MB
/ Tmp 2048MB
/vmimages 512 MB
My understanding is that the following partitions are created automatically.
/ Boot 260MO
Vmkcore 100MB
It will be a scripted installation. I read that/opt may no longer be necessary. What third-party partitioning schemes use?
Thank you
Mike
Hello.
I used to use exactly the same as the one you listed above, but I leave out /vmimages.
The VMFS/Boot partitions and vmkcore are automatically created, but with installs by script, you can set the size.
Good luck!
-
Trying to create a 3D wire frame object
Hi folks, I'm trying to create two objects: what is called a gravity well and a framed wire in Photoshop CS6 3D globe. Examples are here: http://www.carreonphotography.com/3D/ torque of the bolts 1/5 and 5/5. I tried to use a gradient map to create a depth map, but the form is not editable if I understand well PS 3D. Only the scale, light, texture and perspective.
The surace of gravity must be a grid on black with white wire. The world is basically the same. This is possible on Photoshop CS6 3D or do I have to this farm to a guy in 3D.
I've included some samples of my goals: #1 and 5 shots more screen that I'm done with, whose form is unmodifiable based on what I understand. Also, I don't know how I would create the frame of wire once I have the form.
I have I would ideally use the final images in png on a 2D surface that I would wrap later on a 3D surface.
No matter what thoughs please!
Thanks in advance people:
Ed Carlson
www.carreonphotography.com
Leaving aside the 'scientists' Mylenium mentioned, you can use a map of opacity to create grids.
I used the mesh of sphere of Photoshop, but it's a mesh extremely low resolution and returned with obvious facets and a bad fan - as the model is seen at the level of the poles. Photoshop offers no way to put a different material on the front and the back of the surface, then the Interior of the sphere is too different for a good illustration.
The well is a revolution extrusion of a path with the same opacity as front Grill card. I put 'delete the hidden backfaces' case, it was a confused mess of grids through Photoshop, unable to extrude an open path (that I know). That makes the bottom of the invisible funnel to one side, though. An edited map opacity may have solved that.
With the best models and some postrendu work, you could create good results better than my effort to show that it is indeed possible to make your 3D with Extended CS6 grids.


Maybe you are looking for
-
Toshiba 47L7463DG - combines HDMI-Image + Cinch - Sound
Hello! I got a new Toshiba 47L7463DG und now a problem.I use my MacBook Pro (late 2008) as Mediacomputer -.the Mac is connected via a MiniDisplayport to HDMI to TV adapterBut this old Mac simply transfers the Image via HDMI (no noise).for sound, I co
-
Black screen after update of Microsoft Windows 7
After you install automatic updates on 04/16/10, Windows 7 is no longer load. After the manufacturer splash screen (Dell), the screen goes black with the cursor at the top left. Cannot start in safe mode. Used the recovery disc for restore to the
-
How can I get the name of owners on a Power Shot S5 IS camera?
Hello I recently bought a Power Shot S5 IS camera. I would like to know how to enter my name into the camera while it lists my name EXIF information as the 'owner '. At present, this information is empty. Any help that can be provided will be appreci
-
700 - 210xt envy: adds browser
Suddenly my browsers have adds adds. Anyone know what is happening & how to correct? TIA
-
HP pavilion: failure OUO2JM-6J37SW-RXG31A-60VR03
Continue to receive this error on laptop. Same error with three drives. Don't know if is triggered by the controller or something, I changed in the bios. I Get error Code) xc00000e9 when booting with options to retry or f8 for startup parameters.