Draw the line width problem
Hello
1. work on the version of BB storm (9500/9530 Simulator) is v4.7.0.75
2 opportunity BB JDE 4.7
3. the request is:
I want to draw a line with my own thickness as in 'C' we have a setPenStyle method. is there a method that will do the operation similar to the blackberry.
Thank you
Sendhil Kumar V
Try this forum,
See if it helps,
Try drawFilledPath(),
Tags: BlackBerry Developers
Similar Questions
-
Draw the line below each item ListField
Hi all
I want to make a ListField similair to the contacts application. Under each ListField article a horizontal line is drawn as a separator. Somehow, I can't draw a line under each article. It works if I put the line above each item, but this means that the last element does not.
That's what I'm doing now:
public void drawListRow(ListField listField, Graphics graphics, int index, int y, int width) { // Draw a line separator above each field except the first one if (index != 0) { graphics.setColor(Color.LIGHTGREY); graphics.drawLine(0, y, width, y); }}Thanks in advance
When you draw the line, you need to add the () listField.getRowHeight for the parameter y and subtract 1, IE
graphics.setColor(Color.LIGHTGREY);
int yPos = y + listField.getRowHeight() - 1;
graphics.drawLine(0, yPos, width, yPos);
-
How to change the line width of underline and color (on my MacBook or iPad)
When you use my MacBook or iPad, how can I change the line width and color when you use the underline tool or the pencil tool?
Hi Backpacker48,
.. using the underline tool or the pencil tool
I'm fairly certain that you may have about the comment tools.
To highlight the tool, there is no option to change the line width (thickness). But you can change the color and opacity. In addition, you can change the style in the desktop application.
For the Pencil tools or drawing freehand, you pouvez change the width of the line (thickness) in addition to the color and opacity.
The key here is to change the properties of an existing comment, once it is added to a page.
Acrobat Reader DC (desktop application) on your MacBook
- Right click on the brand of underscore or existing pencil.
- Select properties from the context menu.
- Select appearance (if not already displayed).
- Specify the value of a property (color, opacity, Style or thickness).


Acrobat Reader for iOS (mobile application) on your iPad
- Tap the existing underlining or drawing freehand.
- Select a property (color, opacity, thickness) in the menu that appears.
- Specify the value of the property.


Once you change a property (for example, thickness, color, opacity), the mobile app will remember the new value of type specific comment for next time.
Please let us know if you have any additional questions.
-
How to draw the lines automatically
In LabVIEW I must draw a line automatically (both vertically and horizontally) the user will define the vertical and horizontal number lines.
Is this possible with LabVIEW
 Thanks in advance
You move to the point of departure of the line using "move the pen", and then draw the line using "draw the line".
Repeat for each line. (using for example a for loop and autoindexing on positions).
-
How to create an oval and thicken the line width?
I need to create the half oval, but I can't seem to make the width of the line thicker? As you can see on the properties box on the right, where it says details of form, I can't click the color or type to change the line width. Why is this?
Thank you.

Using the tool to create a path in place using change drop down menu shape mode for fill and stroke, the color of your choice and the desired thickness.


-
How to draw the line under STROKE and fill of an object in illustrator cc? Ideas: D...
How to draw the line under STROKE and fill of an object in illustrator cc? Any ideas ...
Aleksandar,
If I (put) understand it, you will need to divide the object. You can:
(1) select the object and Ctrl / Cmd + C + F, and then remove the filling of the copy and the blow of the original;
Draw 2) and drag the new piece down between Division 1 objects) in the layers palette, or select 1 copy) and Ctrl / Cmd + C + F + X + F or similar.
-
Illustrator CC 2015, need to draw the line after line with arrowhead already attached.
CorelDesigner has an option where you just draw your line / lines and arrow is already added at the end of the line. Not only that your arrow lines can have a color outside the line (which surround it). So if you make a technical with arrows pattern when placed on top the drawing there is white or what ever color you want outside the black line (what thickness you choose so) so it's easier to read the technical drawing. So, basically, it's not line against line. That's why you would put a little white around the line. He gives him the space to breathe and easier to read the technical drawing. In Illustrator, I find that I draw my line. Then hover over the line options palette, and then scroll down arrow heads and choose my arrow head. Then calculate the rest, make outside the line have a white that surrounds it. Thus, it can be placed on technical drawings. I find there are many steps I have to do when Corel has this feature built-in and you leave. I currently have a trial version of Corel. But... I already have Adobe Suite. I don't want to have to buy another program. But I also see that CorelDesigner is somehow more user-friendly for people who need to work with drawings technical line (writing). I understand that not every program offers the same tools. But I really need the speed of it because I work with a lot of technical CAD which are handed to me. If there is a way in Illustrator to draw my lines one after the other with the arrow head already attached? Then of course I need little white around it if its duplication on other technical lines. It just seems like a lot of steps in Illustrator. I also understand I could draw a line w/arrow attached installer as I want. Then draw another line... use the eyedropper tool and click on the correct line and my other line with change. Once more... what a pain. I feel that I have to jump through hoops to get my final result. I hope so that there's something built in Illustrator, I did not know was there and just unnoticed.
Yes, I was able to do, but this is delicate (buggy) to get there.
Make sure that the two traits have identical points of arrows and line widths.
After you have created your effect of offset on long-distance running, move the effect of shifting way somewhere else in the stack, and then put back where it was. This seems to be the only way to make it work. Weird.
-
Arrows appear when you try to draw the line in Photoshop
Sorry for the noob question, but when I try to draw a line in Photoshop, I get only an arrow. Can someone tell me how to solve this problem? Thank you!
If you use the online tool, make sure that you do not have the arrow heads selected by clicking the gear icon.

-
draw the line between black pixel: coordinates of the selected pixels?
Hello
I want to build a script that can check a Photoshop file and:
-find the black pixel
-for each black pixel, looking for an another black pixel at a maximum distance of 5 pixels
-then draw a line between the two black pixels.
I wrote this script below (my first script...), but it's VERY slow (and my final image is VERY large), I think because I test the color for each pixel in the image.
So an alternative would be to select a black pixel with the wand, then the script record all the details of the selected pixels, then my script wil test only the pixels (less than 1% of the pixels are black in my image).
Is this possible with JavaScript?
Thank you for your answer!
Marc
function main(){
 var startRulerUnits = app.preferences.rulerUnits;
 app.preferences.rulerUnits = Units.PIXELS;


 var myHeight = app.activeDocument.height;
 var myWidth = app.activeDocument.width;


// Find black pixel
 for(var i=5; i<myWidth; i++) {
  for(var j=5; j<myHeight; j++) {
   activeDocument.colorSamplers.removeAll()
   var sampler = activeDocument.colorSamplers.add([new UnitValue (i, 'px'), new UnitValue (j, 'px')]);
   if (sampler.color.rgb.hexValue === "000000") {


// For each black pixel, search another black pixel below left up to 5 pixels
    for (var m=i-5; m<i; m++) {
     for (var n=j+1; n<j+5; n++) {
      activeDocument.colorSamplers.removeAll()
      var test = activeDocument.colorSamplers.add([new UnitValue (m, 'px'), new UnitValue (n, 'px')]);
      if (test.color.rgb.hexValue === "000000") {


// Then draw a black line between the two black pixels
       var FillColour = new SolidColor;
       FillColour.rgb.hexValue = '000000';
       var ad=activeDocument;
       ad.selection.select([[m,n],[i,j],[m,n+1],[i,j+1]], SelectionType.REPLACE, 0, true);
       ad.selection.fill(FillColour);
       ad.selection.deselect()
      }
     }


// For each black pixel, search another black pixel below right up to 5 pixels
     for (var m=i+1; m<i+5; m++) {
      for (var n=j; n<j+5; n++) {
       activeDocument.colorSamplers.removeAll()
       var test = activeDocument.colorSamplers.add([new UnitValue (m, 'px'), new UnitValue (n, 'px')]);
       if (test.color.rgb.hexValue === "000000") {


// Then draw a black line between the two black pixels
        var FillColour = new SolidColor;
        FillColour.rgb.hexValue = '000000';
        var ad=activeDocument;
        ad.selection.select([[i,j],[m,n],[m,n+1],[i,j+1]], SelectionType.REPLACE, 0, true);
        ad.selection.fill(FillColour);
        ad.selection.deselect()
       }
      }
     }
    }
   }
  }
 }
}
main();
If someone wants to do the same thing, the ImageJ software works very well on very large images (1 billion pixels) by the process according to > binary > close
-
draw the line in graph (picture) xy
Hi all
I place an image in xy graph that I allow to annotate some of the indicators.
After I put the flag in a place in xy graph (picture) I want to draw lines between indicators.
can someone help me with this? I'm using LABVIEW 8.2.1
Sorry for my English.
Take a look at my example of the past.
Here; rapid s and diry draft amendment to your VI, see if it works for you. (the lines are drawn between annotations when you press OK).
-
I need to create something like this:
The line should vary according to consumption, the rest already calculated just need to know how can draw.
Can you help me?
concerning
BlackBerry have simply copied the documentation QT everywhere so proceed with caution.
I haven't used QLine, but this is a class to represent a line (vector) and therefore does not draw anything this either himself comes to classes of Q What to do.
-
Need to draw the line & bargraph on Blackberry using JDE 4.7
Hello
I need to draw a line and a graphic barcode using JDE 4.7.
can someone help me find the starting point.
Thanks in advance.
The forum search will often provide an answer.
-
Draw the line or a race on layer
Hello members,
First of all, thanks to the Adobe forums for the exceptional level
information and assistance in the forums I frequent!
I searched around, but could never quite figure out how to
this: a "ball" or a circle moves on a map from City A to city B to C.
etc. As my small ball moving a nice 'on-line' traces on the map
(a brush stroke?).
I've seen tutorials on writing a signature, but those who come
reveal what is already under (Ahron Stern, signature on the one hand,
and another of Layers Magazine). What is a good way to draw a line
following just the ball as it moves on the map?
I currently have four layers. In the lower part is the card, then a
solid black, with an opacity to about 45 or 50 percent.
the layer on top of the solid is a bunch of points and names of cities (no here, just change opacity animation),
points and the text are more corresponding to the names of cities on the map.
The top most layer is the object (a small circle) I want
move from town to town, with a line tracing the trajectory of the ball.
I want that ball to move from one point to the other, following a path based on the routes on the map.
As the ball moves, a line is drawn on the path along the road.
I have checked around on it, but have yet to find a way to achieve this.
Thank you
ewholz
Add another solid. Add a mask path that matches the path of your bouncing ball. You can do this just by selecting all the keys to position your ball layer, copy images, and then start a new mask at least 1 vertex on the new solid and paste.
Now apply stroke on transparent and animate the end point or start point of the race. EZ as pie and a search on Google for "lively route tutorial evokes this video covers the basics." I took about 10 seconds for the scanner and it will show you how to draw a mask and animate a stroke.
-
How to increase the line width
I used PSE 7 for a couple of monthe, mainly for basic photo editing. I am
try learning how to make graphic art a little for my business. The project, I am working is to brand cattle of the client, which is a simpleton with a X connected by one leg to the bottom of the T. Y there a way to increase the thickness of the lines without changing the proportions of all?

One way is to choose the logo, then > modify > Expand and fill the selection with the color of the logo.
In your example, I used the magic wand to select the logo, then expanded 10 px. Note however that the edges are now rounded, which may or may not be appropriate. You can work this around by then drawing a straight line on the curves using the background color (white in this case) and a brush. This will of course change a little the original proportions, but again, this could be acceptable.
I have PSE2 and maybe later versions have a better way.

-
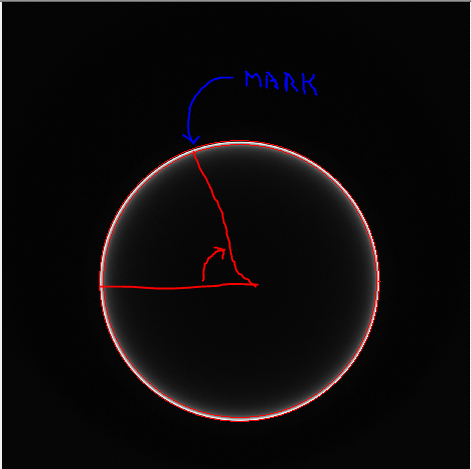
Draw the line at the location of the specific angular Tower
People-
I have a bmp as shown on the seal and a known angle image. I need to place a mark / arrow on the circumference of the circle to the specific known angle.
Is there an automated way to mark the angular location along the circumference knowing the angle with the screw of the Vision?
(The measure in Vision Assistant tool offers a way to really measure an angle between two lines (I think it's what he does to my playing with it).) Is there some emanation of which can be used to help here?)
Thank you
Don
Folks - this is proving to be a very reasonable problem to solve and I had the time today to spend on it.
Here are the basic steps:
(1) (use IMAQ find circular 2 edge to get describtion of circle with RADIUS and Center (use ID or OD - your preference edge until edge strength is pretty good in both directions)
(2) calculate the coordinates of the point circumference associated with angle of interest using VI attached (I had adjust the direction which is the reason why I add 180 degrees from the angle of entry)
(3) use IMAQ Overlay line with coordinates the circumference point and coordinates of the Center
(4) output power line IMAQ superimpose your vision Image


Maybe you are looking for
-
AirPort Express added to "AirTunes" music to the network
Hi guys, just a quick bit of advice of you would be good - I want to add an AirPort express to my set up as a dedicated "iTunes Speaker." So far, I have used a 1st generation Apple TV as my extension of iTunes, but this has made me now, and I don't n
-
Firefox has not loaded correctly, is not a problem of (IMO) graphics card
I have a problem when playing "pets" on tagged.com. I'm using Firefox 33.0.2 on Windows 8 http://www.uploadhouse.com/ViewFile.php?id=20142918 http://www.uploadhouse.com/ViewFile.php?id=20142917
-
My new 6 iPhone gives me beep whenever I receive by e-mail even if the preference of sounds in Control Panel is set to 'None' for email. Anyone know of a way to make it work correctly? Thank you!
-
SP3 will not install 0x8007F0CC
Installation of the SP3
-
Trying to open a PDF file, I get the following 'FGlobalHookDataMMFHandle OpenFileMapping' and then it freezes without opening the file.