Drawing vectorization technique
I'm new to Illustrator - so apologies for what is probably a basic question! I'm scanning of simple components on a technical drawing. Here's the line drawings - closed contours (for example, the outline of the cross section of an airplane wing). I try to use Illustrator to convert the vector jpg scan form - save the result as a .dwg file. I am so that import into SolidWorks where I'm trying to extrude the shape of the part before 3D printing.
In Illustrator, I use vectorization to create the vector representation. However I find that the vector representation seems to take the form of a number of vector representations. segmented. So, in SolidWorks I can obviously not extrude the component.
Are there additional steps in Illustrator should I use to clean up/unify the vector representation? Your help would be greatly appreciated...
Vectorization is usually a REALLY difficult interpretation of the object. Best practice would be to trace it with the pen tool. I understand that that's intimidating if you are new to the program.
Tags: Illustrator
Similar Questions
-
Techniques of natural drawing and Illustator
Hey everybody,
I'm relatively new to Illustrator, although competent in PS and painter and 'analog' drawing/painting. I work on storyboard tables that should be passed to a host and which would otherwise the line drawings simple need to have some layers filled. My problem is that when the drawing objects, there are always a few lines that don't "close" the form even when they look like they are. For example, when you draw a head, I could use 4 or 5 lines to build the basic scheme, but when I go to fill, it's a mess, because some of the paths does not connect. It's the problem of huge workflow on more complex drawings. Is there a simple way to get around this? And while we're at it, is there a way to attract more naturally, IE. without closure of all forms and get a result to fill? Thank you.
If I'm doing this I usually use a separate below layer outline to make the fillings,
This means that you can keep looking nice contours and not always be completely joined etc, then the fill behind past before gaps etc as it would if you were made of paper and pens
You can use a copy of the outline layer then join all the rooms where you want color to fill,
or you may be able to use form generator tool if you double-click it for detection of space set to large or custom length.
Otherwise, just use the pencil tool to draw in rough of the fill area approximations, which will again be disguised under the layer of contours/s if you are using a line thicker at the edges.
-
Vectorize an image using Labview
Hello world!
So, I work with a 3D cutting machine (Roland MDX - 15) and I'm supposed to design a program that can load images and burn them on a piece of wood using Roland MDX - 15.
What I've done, is to create a program where you can draw a picture using the tools of sketch of Labview and the machine will sculpt.
The machine is capable of carving the image using vectors (she follows lines point by point).
Now, I have to do the same thing, but an image that I have load in Labview. Therefore, I need to vectorize the image so that the machine gets a set of lines to draw. A program that is already it is Dr.Engrave (see youtube if you need to understand what I need).
So, anybody know a 'simple' way to transform an image into a set of vectors?
Thanks in advance!
Valentine
Hello VGans,
I assumed that when you talk of tracing any edge detection method would be allowed to help you get started.
If it is a false assumption, then let me know.
Keeping this in mind:
Already taken a peek at the "IMAQ CannyEdgeDetection' VI?
This could be a good starting point for tracing purposes.
Can you let me know if that's what you're looking for?
-
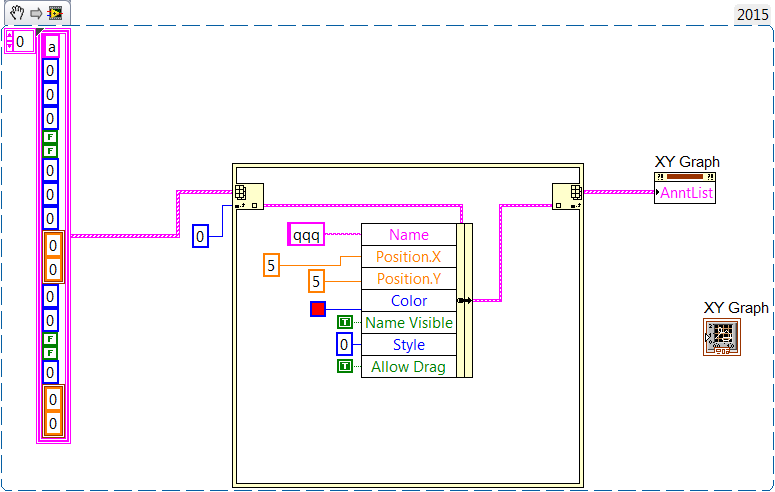
Hello
There is a technique to draw a text note on graph XY.
For example the text "AAAAAA" put near the upper left of the XY graph.
Thank you.
Previous version is wrong: this only works if an annotation already exists on the chart.
If no annotation it does not work.
Here is the solution for the empty graph:
-
Basic assistance a series of drawing curves
I want to draw a series of curves/waves by using a simple template. I am able to follow the curve of the first, even if I am unable to match the others. Can someone give me advice on what I'm doing wrong?

Hey Stan! I recognize that the exercise in the notebooks of the IPC.
Your first curve much coming in the second anchor, but he'll be back on this anchor point that is not quite right. I use the technique of the old school here (both are taught in the book), then try this:
Draw the first curve that you did:
- Press on and drag to the top anchor 1 point, release the mouse button
- Press on and drag down the anchor 2, release the mouse button
- Return to the point 2 anchor, press Alt/Opt and press on and drag upward on the 2nd anchor point, release the mouse button
- Press on and drag down the anchor 3, release the mouse button
- Return to the point 2 anchor, press Alt/Opt and press on and drag right right up on the 2nd anchor point, release the mouse button
- Press on and drag down the anchor 4, release the mouse button
- Return to point 4 of the anchor, press Alt/Opt and press on and drag upward on the 2nd anchor point, release the mouse button
Look at it this way: you drag as you want the curve to go, so 1 anchor is in place and 2 anchor is down. But 2 turns on itself, that is why go back you to 2, press the Alt/Option key and drag upward.

-
Thickness and Type of racing > vectorize
OK, so I'll try punching text from an object of single-color to a simple t-shirt design. Basically, the object is a white circle, and the text is CHRIS. The word CHRIS needs to be cut out / transparent so that the t-shirt shows thru. (Red = shirt white circle + red letters, = black shirt white circle + black letters, etc.)
Pretty simple to start. (1) draw the white circle. (2) type of text. (3) adjust the line width of font to text Select PT 5 very thick (4). (5) choose the text command > vectorize.
However, the blue outlines are for the basic text (0 pt) race blue contours do not include the additional line weight (5 pt).
Then... How can I get the blue outline to include additional line weight. (In other words, how can I move the blue outlines features outside?)
Thank you in advance.
Kind regards
Chris
Thank you very much for the quick responses, everyone.
I finally found a way to do...
(1) draw the white circle. (2) type of text. (3) adjust the line width of font to text Select PT 5 very thick (4). (5) type > vectorize. (6) object > path > Outline Stroke Pathfinder Panel (7) > unit (maintains the outside contour).
Thank you once again.
Kind regards
Chris
-
Compositional technique to remove backgrounds in a mobile shot
Hello people; I hope you do well!
I would like to talk about a compositional technique used to remove a background so that new objects, e.g. masts paints etc to put in the background.
As you can see in the image below, the background was removed in the first image and replaced with a new sky, dirt field and houses etc in the second photo.
This photo came from a mobile shot where the camera was panning (moving) from left to right, so that it was a mobile shot.
I note that the first photo also has a small green screen. I think that for the preparation of the budget and practical reasons, the background everything could not have green screens erected to cover the entire background of the junk in the shot. So, by using a smaller screen in a part of the area, I believe that some technique is used to remove the background for it together. I saw VFX breakdowns where the same technique has been used - that is, a little green screen is placed somewhere in the background when the intention is to remove the entire background.
Let's say that the shot was a slow, steady camera pan move for 10 seconds. Then at 24 frames per second, we seek to 240 images. I know at one point rotoscoping will be used, but find it me hard to believe that each of the 240 images will be rotoscoped individually to remove the background. If that was the situation where each image had to be rotoscoped, so I don't see the need for this green screen to have been erected in the first place.
Therefore, I think that there is something that I'm missing here in what concerns a missing link in the process. Is there some recognized effective/technical effective time that allows to remove a background from a mobile call such as the following, where only a small green screen is erected part of the background instead of the background?
A tutorial? You can tell me which helps with the technical/process in this case?
Link to the example here:
http://postimg.org/image/465jdt6of/
First person rotoscopes a frame at a time. Second, with something like a shooting panoramic you'd Motion stabilize first. Stabilize the Motion isn't stabilizing the Warp. The camera movements you stop monitoring something in shooting you want to hold still. The next step with a shot like the one you describe is to expand the size of the publication so that you can see the shot together as it moves. There are small buttons in the composition settings so you can do it more effectively.
Then you add a new layer to the comp and use a blend mode, so you can see through the shot and you begin to frame 1 and draw a mask to separate remove background. Then you go at the end of the shooting and make changes, you need to do the mask. Then split you the difference and make other adjustments to the mask. If it's a pan smooth then it just usually takes a few keyframes to get the matte to follow perfectly.
Now define mate as layer hiding approach for images and add your new background. If the matte line is far enough away from the camera so you don't have to worry about Parallax as the ball moves you did pretty much with the composite.
The last step is to remove the Motion to stabilize the original shot and animate stability the root layer and the bottom plate. The best way to do this if you have not added, scale and rotation, the motion to stabilize should simply add a null value to the model. Then reveal property of anchor point of the stabilized layer which will be a lot of keyframes. ALT/option, click on the position of the null value property and use the pickwhip to connect the nulls position at anchor of the stabilized sequence. Now move the CTI to the first image and the parent then the matte layer, the background layer and image stabilized to null. This will be online back up everything. Resize the model or the NEST just in a new comp that matches the size and pace of the origin of the film and you are finished.
That's all. Manual rotoscoping base and exactly what one would do with the example that you have demonstrated.
If the replacement of background area is closest to the camera, then you would track camera so, define a plan of origin and the Earth, and then add a camera a solid to the shooting. You would do the same technique of roto using 3D solid and your bottom plate would also be a 3D layer. Pretty simple.
Two examples of rapids. The first demonstrates the base roto but does not use the null thing to add to the query. The second demonstrates how to use the Camera Tracking to add a cache for a layer. You'll get the idea.
Sorry, no audio on the second example.
-
What are the after-effects of the techniques used to create "Weaving Seagram" Elena Manferdini?
I am currently working on a short clip and I'd like to get a similar effect as video "Weaving Seagram" Elena Manferdini. Weaving mies: Seagram_close up on Vimeo 01
I know a few basics and I'm guessing that the video use the scan of the crack or the effect of travel time in sequels. I would appreciate if someone can tell me what other techniques are used to create the effect of smooth transition that transform a photo into a dynamic animation.
Thank you!
This kind of effect can be achieved by masking and radical scaling to 'y '.

Place the anchor point where you want the scaling to be centered, duplicate the layer, draw the mask by the anchor point (alignment assistance) and then are resized in there until you get the desired effect.

It seems that you could do the whole project by simply adding a group of layers and masks.

-
I am a digital artist, and I don't know which product is the best for me.
I'm basically a beginner, although I learned a few basics in GIMP.
I use a Wacom Intuos Pen & Touch tablet.
I am inspired by these artists:
Hootenanny gigi d.g. doodle: Archives
http://cryptid-creations.deviantart.com/gallery/
http://sambees.deviantart.com/gallery/3126978/illustrations-and-paintings
Nakanoart's DeviantArt Gallery
AbigailLarson's DeviantArt Gallery
HasaBattle's DeviantArt Gallery
Among others.
Do you think I could make similar art in Photoshop CC? Or if I have to buy Adobe Illustrator and finishes in the PS, a technique that I've heard.
I could also put in place for the purchase of the stand-alone version of Photoshop CS6, because I heard some people say they've had the PS since before he started to sell on a subscription basis, and they have never felt the need to update.
Help to all opinions. Thank you!
Many artists who listed you use traditional media (pencil sketches, inking) to start a drawing/illustration, after which they then scan in their work and finish the digitally (colouring, for example).
First and foremost: Learn how to draw. Learn the anatomy. Sketch on paper - nothing beats a few soft and hard pencils and sketching on a Notepad. Take it with you anywhere you go.
With regard to the software: I find ClipStudio (Manga Studio) to have the best feeling/sketch in pencil of all the software that I have used so far, and I'm not the only one. I stopped using Photoshop for digital painting a couple of years, in favour of Clip Studio both Krita.
Krita is free and beats the pants off of Photoshop for digital painting. It does really - no comparison. I'm not saying that Photoshop is bad (it is not), just not nearly as good that Krita is now, or Clip Studio for drawing. Combine Krita with ClipStudio and you are set.
-
Name of the technique of "boiling down sketches" + resources?
I'm looking for: 1) namefor a certain art/design techniqueand 2 /terminology) resources to help develop the technique.
I want to be able to create graphic images by: a) Google search for photographs of objects such as animals, structures, trinkets, tools, etc., b) mentally boiling down the concept of the object to its Visual essence, c) drawing on paper than the representation of the object, d) convert this sketch to a vector to be digitally refined and finalized object (, simplified and ending e) with a final result that resembles the 'simple' graphs as described, shapes, silhouettes, icons - type chart located in the logos, album covers, etc. (maybe in a few years, I'll shoot for the more ambitious designs, but not today.) )
The technique that I write especially is the combination of b) + c) above, which I shall call a technical 'sketch of boiling down'. I am confident in my ability to manage a) + d).
I think it has an official name in the world of the art/design for this technique of "boiling down sketches", but I have been unable to identify it with the research. Also, I saw a number of Lynda.com courses on drawing and illustration, and as big as they are, none of them seem to specifically cover the How-to of this technique of "boiling down sketches".
1) which is the term for this technique of, so that I can find some practical information about this? Any other relevant search keywords would be appreciated also.
2) what how-to resources for the development of this technique that you would recommend? (Videos, if possible, that my brain seems to process statement better art actually look at how it's done in real time).
I have to emphasize two points:
(1) I spent half a day to myself education on copyright law which concerns photographs. I am aware that convert a photo vector or tracing it or "melting" otherwise a derivative work off the coast of photography is a violation of the copyright of the creator. I have no intend to do any of those things. I am also aware that I can go online and license images that might meet my criteria. However, my intention is to avoid the right to author and licensing complications while creating the images myself and own copyright outright.
(2) I am brand new in the world of art and graphic design. My personal development of this skill will be used for my own personal projects. Then, if it is inappropriate to post a question like this in this forum Illustrator, please kindly direct me to a more appropriate place. I started here because it seemed the location with the highest probability to give rise to a professional answer.
Thank you.
This page has many different styles of illustration. The more I see are silhouettes, as well as comic strips and cartoons, and there everything pop, retro pictogram. There are many courses in the illustration, that you will find at the Art Institutes or any college with a degree in design.
-
When you draw paths, what percentage of level best to see the image?
Hello
When drawing paths in the PS, which is the best level increase percentage to display the image? I find that 200 to 400% is sometimes useful, but sometimes 300% is too big and the edges of my selection become indistinguishable from the background. What are the techniques of zoom percentage that others use all pulling the railways?
Thank you.
Patrick
Patrick, the answer is that it all depends on what you're trying to isolate, how you plan to use and how fast you need to do. I will describe a couple of scenarios.
If you are knocking out 25 pictures of products, you need to go fast. Some studios will order their retouchers remain with zoom at 50% only. For general color/brightness, no drama, describing changes a form on this scale will be fine. The resulting mask will not be perfect, but it will go faster than the zoom to 100% because you will be with less detail.
If you need a little more precision, zoom and more. So the question is: where to place the path on the edge of the element you want to isolate.
If you plan to break the clip from the bottom, then place the path inside the border of the element. As long as you're fairly accurate, the fact that you can cut the edge pixels will be not easy for the Viewer to the end. It's better, because you can trim off the coast, say, clothing fabric in excess and idealize shape more. When hit against a new background, the shape will be better and no one will notice that you have trimmed it anyway.
If you plan to keep this element in their existing background environment, you have to be more specific. As you say, you could perform a current zoom 100%. I'll generally not much past plu 150% because we always need to take a view of the overall shape, the forest from the trees so to speak. In this case, you'll want to put the path in the pixel areas liminal along the edge - right between where you see the transition of the element edge pixels and the background. If you make dramatic changes hue/lightness, you will need to massage the mask edge later to reduce the edges that appear.
And don't forget to put a small feather on the resulting mask is always the key.
Hope that helps, check out my blog if you are interested to learn more about the techniques of cutting, I'll post some in the future.
-
Try to draw a diamond of a form - please help!
Hello
I'm drawing a diamond of a library of custom shapes shape, but have a hard time to make him precisely the form, the form that I'm drawing should look like this:

If someone can teach me some techniques in photoshop how to get thoroughly remodelled with precision using the tools of photoshop that will be great or if you can do it in my project file that will also help, the psd of the project file can be downloaded here: http://tonyalepski.heliohost.org/Diamond.psd
Your help would be really appreciated.
Thank you very much!!
Tonya.
Your diamond looked as if it was square to me. So I have centered your diamond on your canvas add a vertical guide to 50%. Don't measure your square at 190 PX dragged on a square of 190 PX No 1 red px border background. Changing the form turning 45 degrees and moved upward to align with your diamond. Drag on a horizontal guide to match your diamond cut. Use the pen tool to add two control points of the square shape. then use the pen to remove the checkpoint at the top can convert control point tool to convert two checkpoints added.
http://www.mouseprints.NET/old/DPR/diamond.PSD


-
optimization techniques: cacheAsBitmap
I read that cacheAsBitmap is beneficial when used on display objects. I have a btimap not a vector in my game that I convert it to a clip - a ship of hero for example. Can I use cacheAsBitmap on it too even if it's already a bitmap (png though)? I have also read that the scale and rotation using cacheAsBitmap is OK.
Edit:
http://forums.Adobe.com/thread/758774
Just read this post. The information I gleaned was:
a. cacheAsBitmapMatrix -is necessary or preferred if you want to rotate and fit the mcs
b. you DO use cacheAsBitmapMatrix even if the mc is a bitmap (png)
c. even static images of circles should be cached
However at the end ot the post, it is said that if you use a big bottom, then add just for the library as a bitmap
var myLibraryBitmap:Bitmap = new Bitmap (new LibraryBitmapSymbol());
Nothing to cache as Bitmap, also there is no overload of the memory of your movieclip
This is incredibly useful if an expert could confirm the foregoing that all games should be optimized properly.
Post edited by: codeBeastAdobe
All this says is true, but I would like to add a few notes.
cacheAsBitmapMatrix is good when you're not literally rotation/scaling/etc. being constantly. It is for an object that adapts simply x / y properties most of the time but can sometimes rotate or scale. If it is a ship any who is constantly moving because it's just going to re - draw the music constantly in any case I don't even bother with cacheAsBitmapMatrix.
Static backgrounds / bitmaps (buttons, graphics, etc.) must always be cached to reduce the refresh.
Immense horizons should use a technique of blitting to maintain the simplified view list. Images bitmap for the background will remove indeed some additional processing. Equally important, backgrounds and all other non-interactive objects should also be
mouseChildren = false set so events don't phase through them. Every single object that has no interactive purpose must assign to drastically reduce the events.
Finally, keep in mind that cacheAsBitmap is a toggle and works best when you have multiple objects in a single element. Caching of a single object within a clip isn't really a big advantage unless it is a vector. But as you've driven it, if you know that a complex object will not change for a period of time you can activate cacheAsBitmap. Then, when the object will turn, simply turn off until you are finished and then reselect as a toggle.
-
How to turn a photograph of this kind of painting/drawing. (examples of joint)
Hello
I would like to transform a specific type of paint/draw from photographs.
I understand that theres allot of filters already available and I also downloaded some actions that I found, that none gave me the result I want below theres an example of a picture that I want to turn (left) and an example of the kind of end result, I'm looking (right).
If someone outthere can give me an anser I would be very grateful.


Hello
See if these links help.
Russell Brown has a tutorial for watercolor, but she uses Photoshop Touch:
For the deeper instructions on painting watercolor with Photoshop techniques, Tim Shelbourne has a great resource here:
http://www.theartistsquarter.com/
Kind regards
Steve
-
Drawing from scratch. Any help?
I want to create my own designs or really anything using an online tool or the pen tool. I want to use the curves and straight lines. Someone at - it a good tutorial that is slow and painstaking for a beginner? I use Photoshop CS5 btw. Thank you!
Response from Michael suppliment, here are some other resources you might find useful:
1. an introduction to the tool pen:
2. with the help of the tool pen to create shapes:
3. create lines with the pen tool:
4. here is an excellent tutorial on the use of the tool pen to create a line drawing. A little tip: combine the techniques of the video above features with the tips in this tutorial to add the line thickness to your art. For more information on this, you can read this tutorial about adding line weight of your works of art: http://acaraluv.deviantart.com/art/lineart-with-the-pen-tool-21814747
My best advice for learning the pen tool is to just start experimenting with it! It is a tool that can do a ton of things, to make a selection to create a complex illustrations. Once you get the hang of it, you'll find yourself using it all the time
Good luck!


Maybe you are looking for
-
What will happen if I plug the iphone 5 in super usb support?
IPhone is not overfeed compatable, and I wonder if it would be case of damage to the hardware of the iPhone, or need protection?
-
El Capitan facility destroys the functionality of my Adobe Photoshop Elements 10
Re: Be required to spend $100 for Adobe Photoshop elements 14 when version 10 has been very well - only because I installed Apple IOS El Capitan, without realizing the income implications. I was very pleased with Adobe Photoshop Elements v. 10 and us
-
Acer Aspire not start after cleaning the fan and re - paste.
I need help, I cleaned up my Aspire 5750 was dust accumulated during the last 3 years, I dismounted, clean the fan, re-glued the CPU and put everything back carefully, when I turned on it, the rotations of the fan for a while, then turns off, gets ba
-
the windows update icon is constantly on and I don't know why... If I put the updates automatically update... help
-
Keyboard for Indian Format options does not not under Vista
Using the keyboard for special characters Options does not not according to Indian Format for Windows Vista. I'm using windows vista but cannot use the arobas option above digital key2?