Frame by frame .tiff render - film?
CS6 AE 11.0.4.2
I accidentally made a nice animation of Cinema 4 d as 228 .tiff images. (Accidentally left on a previous project settings)
Y at - it an easy way to:
(1) to each image of the same length. (If you can recommend a good length for each image to get this fluidity of the animation, please notify).
(2) that each image should follow the last in order, from 1 to 228?
I have them all loaded into After Effects, and this looks like a long nightmare. Please help - any advice would be great appreciated.
With all your images in the same folder, select file > import, select any singld image and check the box that says import as a sequence. you will get a movie. You can set the frame rate in the interpretation of the file. The default 30 frames per second frame rate is defined in your preferences.
Tags: After Effects
Similar Questions
-
When I select a sequence of five frame to render HDR in Lightroom it merges files in a preview very well. But when I click on the Merge option, the progress bar is obstruction of about 42% complete. I suspect a memory problem, so I spent a few hours uninstalling a bunch of useless software on my laptop and still photography will not merge the HDR sequence. It worked once before, but now it does not work. Help!
I just 8 GB of RAM and have been able to put together five separate images HDR images. I compared these files 5-image HDR with files - 2 and 3-image and see improvement very few (if any) using all five. Your results may vary, but you can try to reduce the number of images until you get your new laptop.
-
Need a help. Please, I beg you. the project long render times.
Hi there everyone!
If im new in the world of Adobe AE. I need help. Watched a 100 videos and searched, but... I did an audio visualization for my youtube channel and want to restore the mix of 50 min. My PC config is 8 GB ddr4, skylake quad intel. GTX 960 m. Then, when I try to make it take so long! 24 seconds to display a preview is about 5-7 min. and for 50 minutes, it would be around 7hours! my laptop from heating even after 7 min of render. How can I speed up the rendering, and I have to do with the size of the video? I made in adobe encode. h.264 - 8 mb full HD - advice read on youtube too for the best settings. People please help
Have a great day and tons of positive emotions!
Unless your 50-minute video is one-shot with effects applied to the same shooting and there is no cuts nuts is to try to do this in a single computer in AE. According to effects applied to only one made of several minutes, that a framework can be normal and expected. The usual workflow for a project of 50 minutes would be to break into small pieces, if the effects on each segment are complex or very slow return, then you make each room when this is done. If the effects are simple and fast make you can consider using Dynamic Link to each piece in Premiere Pro for final assembly. More than 90% of my comps AE are less than 10 seconds, because most of the shots in the films that I produce are less than 10 seconds. Several times my compositions contain dozens of layers and can take up to four or five minutes a frame to render. Most comps are effectively created composite or motion graphics restitueront at the rate of 3 or 4 frames per second. Nowadays about half of my work is 4K, and I produce masters 4 K that are made to the HD for final delivery using Adobe Media Encoder to create an h.264 MP4.
I'm just guessing that you have very long shots in your comp with a sort of music visualizations. If this is the case, every time that the music changes or there is a break, you break the project down into a separate model and then make this model in a lossless format visually. Because your system is currently taxed I would use the Cue Render to render these masters of the production. When you have all the parts made I would bring them together in the final project in Premiere Pro, which is the only way you'll be able to get an overview of real-time editing. Then use Premiere Pro to make the file available. This will save you time in the long run because rendering Cue and the output module will make faster than Adobe Media Encoder because TEA running AE in the background to do the rendering, it is less effective. The probability that a rendering of 50 minutes will fail repeatedly during rendering is very high, if all this makes your system resources. This will also give you time to check each section to see if you like it before moving on to the next section.
I hope this helps. I would never and have never tried to edit one to animate a sequence in AE who was only a few minutes longer because it is simply too inefficient. I put a whole feature in AE to make color correction, but he is already gone and it is a layer that already went to a master of production. Therefore, unless all your effects are applied to a single video track for 50 minutes together, break the project and make it into pieces.
-
Difficulty to import an image correctly TIFF format (I think)
Hello
I have difficulties to import a TIFF Fluxsol image that is a screenshot of my film to screen. It seems to be a problem with resizing of some sort.
The TIFF image is a grab right frame of my film, which is 1920 x 1080 in size.
Here's the question:

The screen of the movie has the face image overlay of Buddha on 'walk in the forest' lying, perfectly centered in the context of the film, but when I import this screen shot of the film, the mouth of the Buddha and Chin is cut on the left side.
Any thoughts?
Is it because I'm doing it in a smaller DVD template in Standard definition?
It will make this cut out of the picture for my film as well?
Matt
Matt,
You also have Photoshop?
If so, I find much easier to work in PS, for Menus, and you have much more control, you can do all sorts of Image editing just there. Everything is in perfect condition, before he can really use the asset. She does not do video editing, Audio editing, and Image editing. I always try to import in final form material, specifications. This reminder can work better with. This is true for my video, Audio and Images, be it for a slideshow or a menu. On the single 'edition' I do in still is on color schemes for the subpicture highlights (which is done at the stage of DVD in PS and yet does not even recognize the games of color). Otherwise, I will be author ONLY in still.
Good luck
Hunt
-
From film AFTER reading Animation?
Hello
I have a demo/spec file I am working right now (download the .fla here): http://www.jasonfraziercreativedesign.com/Outbox/MeanGirlsAd.fla
I wish I had a clip START PLAYING * AFTER * broadcast the this animated series (marked '1st anim').
I know that once I bring in the clip, I'll need to give it an instance name and reference it in AS, but I'm not quite sure how to in this regard...
Any help would be appreciated!
Thank you
Jason
Ask the movieclip in the timeline panel and when it reaches the frame where the film is supposed to be/reading...
Stop();
mcName.play ();
where mcName is any instance name you end up giving the movieclip
-
Export of iMovie 10.1 (OS 10.10.5) problem mp4
I export my videos (iMovie 10.1, OS 10.10.5) to mp4 files and my Samsung TV showed them without problems. There are fine without change in the surprises of the TV versions saying that 59 frequency is not supported. The TV shows earlier mp4 files exported from iMovie. Recently, the TV refuses to show you ask, exported mp4 files this 59 frequency is not reported. In the meantime, no change of versions, there not in my Mac and not the TV. Can anyone help?
Looks like you now export movies at 60 fps (frames per second) that does not support your TV, while previous projects may have been at 30 frames per second. To check this open the movie on our computer with Quicktime Player and under the window, select menu ' show movie Inspector. This will show the frame rate of film against "FPS".
The pace of the film projects is determined by the first clip that is placed in the timeline. See: http://help.apple.com/imovie/mac/10.1/#/move6ccb3330
To generate an SPF 30 film create a new project and put any 30 fps clip in the timeline. Then, open the project 60 fps and all select, copy. Open the new project and paste it in the timeline. The clip of 30 images/s can now be deleted. Share and you should get a 30 fps movie.
Geoff.
-
Thanks for reading this.
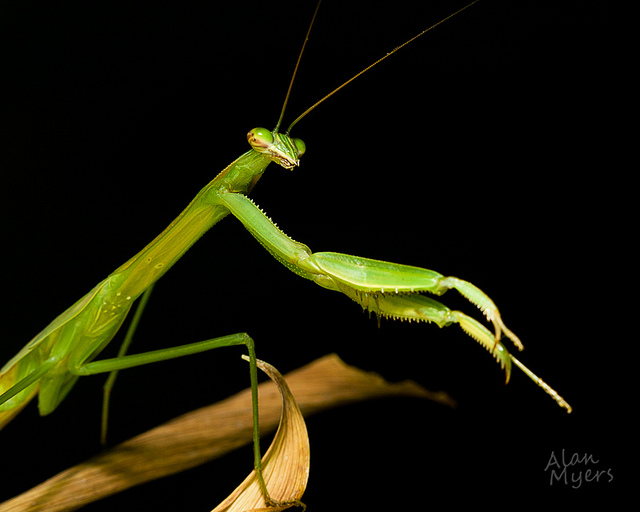
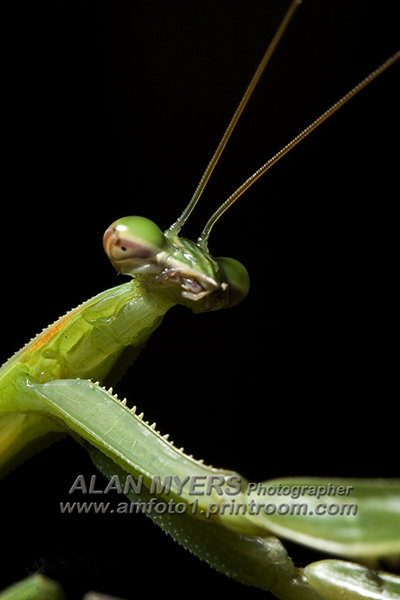
I like to take pictures of things like insects and small lizards. I found a really cool Mantis yesterday in the garden and took some pictures of it. I used my 70-200 with the 1.4 tc which was pretty good, but I could of course not very close because the limits of depth of focus. I am considering getting the barrel extension tubes: EF 12 II and EF 25 II. What is a good way to go? Here's something that you would use as well as a tc on a 70-200? Or is the wrong type of lens for this kind of work? I also had an initial investigation of the flash macro circular rings. But I am assuming that they would work with my 70-200 cause of large diameter of the front element. He seems to have a lot of options for macro set ups. What kind if the installer should be to make the pretty decent macro shots? I was a big fan of Igor Siwanowicz' work for a very long time.See you soon,.
CG.Hello
As ebiggs says, there are several ways to make macro shots.
Personally, I use a number of extension tubes (a set of Kenko of 3-36, 20 & 12 mm - more a 25mm cannon and two Canon 12 mm). These are always useful to have, and I wouldn't be without a few in my camera bag, all the time. They are inexpensive and can allow you to get this macro or close-up when you do not have a lens macro with you, or can be used to increase the capabilities of a true macro lens beyond magnification is 1:1 (general) potential, or simply used to get the nearest minimum focus distance with a telephoto lens.
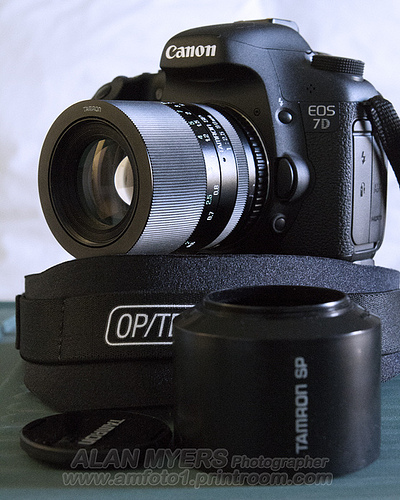
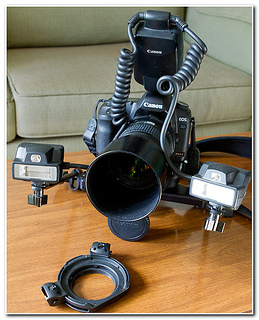
For example, this was shot with EF 70-200/2.8 IS, Canon 25 mm extension tube and 550EX flash (filling)...
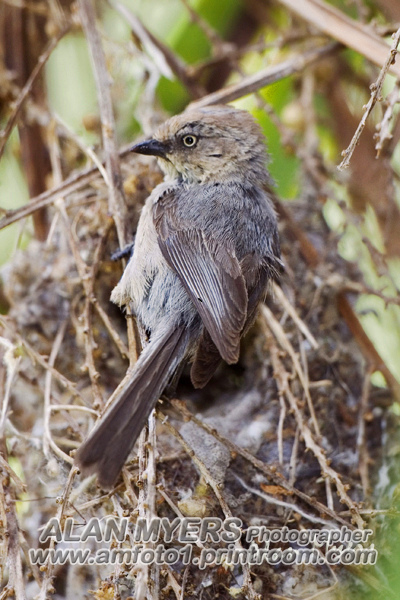
I have been hunting of birds and did not have a macro with my lens.
For sub image to frame the small Bush * i * (replace the astericks with "t"... the cyber censorship allow me to use the actual name of this bird) as tight as I wanted, I needed to add a 36mm extension tube to an EF 500/4 IS lens, so that the lens to focus more closely...
While they are not necessarily designed for the macro or almost macro work teleconverters (Canon calls Extenders) change the effective focal length of a lens, but leave its closest distance focal length quantity... so will increase the potential of magnification. In order to get the slot kick a little fence lizard, I have had to use time - Canon EF 1. 4 X II and an extension of 25 mm - 300/2.8 IS lens...
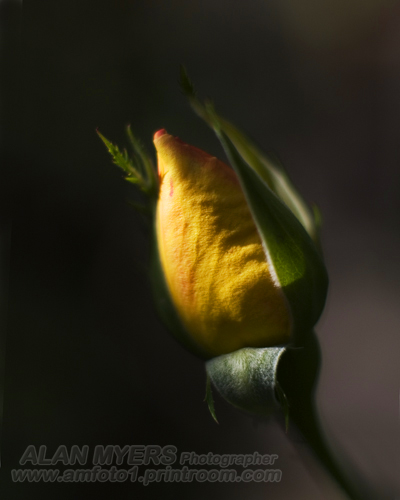
More the focal length of your lens, the effect less any given amount of expansion will give. An extension of 25mm changes slightly the magnification and the closest focusing distance of a 300mm lens... But the same amount of extension on a 50mm lens would have dramatic effect. Next image was shot with 12mm on the EF 50/1.4 lens extension...
Even more extreme, the following was shot with 12mm on an EF 20/2.8 lens extension (I wanted an extra depth of field to keep more detailed background)...
During the filming of the foregoing, the petals of flowers were actually touch the front element of the lens! Can't get much closer than that!
The macro above or near macro shots were made using lenses "non-macro" that have been made to concentrate more than normally possible, using extension tubes. Those who can work, but there are some advantages to true macro lenses, too. I personally use four in my Canon Kit: Tamron SP AF 60mm f2.0, Canon MP-E 65mm f2.8, Canon 100/2.8 USM (not the L / IS) and Canon 180 / 3.5 L. I also use a Canon TS - E 45/2.8 for big jobs and occasionally a target macro Tamron SP 90/2.5 1:2 vintage, adapted.
When you force non-macro lens to focus closer than expected, there may be side effects. For example, the shot of the rose bud above has a pretty strong vignetting and softer edges. It's characterisic of the EF 50/1.4 lens when it is done to focus very narrow and more openness is used... It is not necessarily a bad thing. I used the lens with extension deliberately for this one, because I wanted so much vignetting and soften the effects.
One thing, you don't need to worry with 'real' macro lenses is image quality. In general, they are all very able to make beautiful pictures. It is lower for other features of macro lenses that set apart them from each other.
Focal length is probably the main consideration. Too short a macro lens can get awfully close to your subjects, which could scare the living creatures, or do you throw an unwanted shadow on the subject or not even you bit or stung! A longer lens gives you more space to work, but a long lens is hard to get a stable shot and makes very very shallow depth of field.
If I could have only one, I would choose my USM Canon EF 100/2.8 macro lens. It's the best all around for my purposes, on both devices of cultures (like yours, although I use 7Ds) and full frame (5 d MkII). 90 to 105mm gives the reasonable working distance, but it is quite easily portable for quick shots. DOF is still shallow, but manageable enough without resorting to ridiculously small openings where lighting is a problem and optical diffraction robs fine detal of images.
Here's an example shot with my 180 / 3.5 L, which demonstrates how depth of field thin razor can get with such a long focal length...
Even if it's a fairly large bee, the plan of sharpness is only of a few mm of depth. This was shot near 1:1 on full frame (with a film camera, actually). The lens and the camera are resting on the ground to help keep their constant. Something close to 100mm is much more easily portable, not too big and makes a bit more depth of field.
There are other features of the Canon EF 100/2.8 USM which make a great macro lens, IMO.
It's 'internal focus' (IF), which means that it does not grow in length when you focus it close, so don't cut your work remotely (note: 100L, Tamron 60/2 and 180 / 3.5 L are also IF lenses). However, there is no such thing as a free lunch, with optics. In order for the 100/2.8 if it starts raining that some other lenses of similar focal length. And the focus distance actually changes somewhat because it brought closer. I heard max with 1:1 magnification, it is closer to the 70mm lens... but it is not particularly notable in the field of work with the goal.
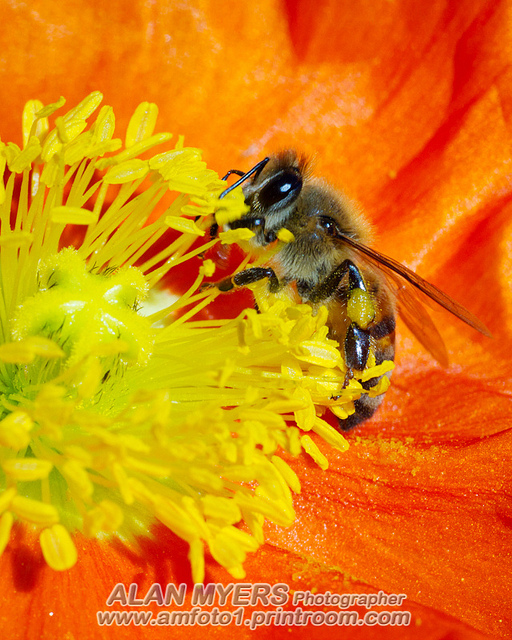
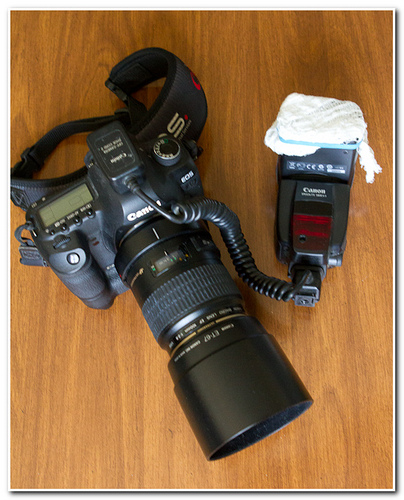
100/2.8 USM macro lens on a crop sensor camera, with 550EX flash, pocket...
Version 100/2.8 that I use has player development USM, which gives it an autofocus fast enough for a macro lens. Macro lenses tend to be slower to focus for a few reasons. One is that they must move their items focusing a long, long way to go all the way from infinity to 1:1 magnification. Another is that most precision signals more speed, so use what is called a mechanism of the development of "throw long". In the old days of manual focus, you have to turn the focus ring a lot more away with a target at long range. Short-range lenses were built for speed and could be used for sports photography. By car from the 100mm USM (who are also the EF - S 60 / 2.8, 100 and 180 / 3.5 L) makes more than one lens dual use, more usable for purposes of non-macro. Despite USM, the 180/3.5 L is significantly more slow development and not as useful for the non-macro works.
I make the distinction between macro and non-macro focus because often the macro shooting focuses more easily manually. I use AF sometimes, but just as often or more often use the development manual method or the other. But if you want to use as a non-macro, also, moderate telephoto lens it can be enjoyable if it is reasonably fast to the point. Another advantage of USM, it's that you haven't disable AF before substitution manually. (Note: there was a version prior to EF 100/2.8, abandoned years ago, that has no USM).
For me, one of the most important features of the Canon 100 mm macro lenses is that they may fit with a Ruff of the tripod mounting. The 100/2.8 USM uses tripod ring B (b) and 100L tripod D ring. I'm not aware of any other macro lenses less than 150mm than a being mounted with a ring of tripod and for me, this is a very important feature. A lot of macro photography is made of a tripod or monopod. That is one of the reasons I really don't think that he had to upgrade to the new version IS..., the more it costs much more. In addition, the stabilization is of limited effectiveness when shooting macro... If this can be nice when you use the goal for non-macro purposes (except that I have several other lenses, so do not rely on the macro for dual use that much). The 180 / 3.5 L and most other 150 mm and more macro lenses equipped with a tripod ring.
Speaking of stabilization, the Canon 100 L uses a hybrid form developed especially for macro, which obviously is one of the most effective. However, the 1:1 mag, it could only be good for one or two stops of assistance. For non-macro photos, the IS could give three or four stops assistance.
I had the Tamron SP 60/2.0 recently because it is quite small and light, easy to store in my camera bag, when I don't know if I'll take any macro shots or not, have other gear to carry around. The same is true for the Canon EF - S 60/2.8 USM, it is just as compact. I opted for the Tamron for its opening of f2, mainly in order to use the lens for portraits, as well. Both the Canon and the Tamron 60 mm lenses are "cultures only" (all other macros mentioned are capable of FF). I don't have the images uploaded of him online yet, but have found the quality to be good enough. It is a bit slow focusing... no problem for the macro or portraits, but not a goal I would use for sport and shooting action. I imagine that the Canon with its USM is developed faster.
I used to use the vintage (25-30 years) Tamron 90 mm as my macro "compact" (shown on one of my 7Ds, above)... and he is used to this end but was less useful for portraits. Yet, for a goal which cost me about 60 US $. It's $20 for the lens - like new with hood, 1:1 adapter, caps and a Nikon Adaptall mount - plus $40 for a China Adaptall-EOS mount. It is slower to work with. Set to manual focus, as well as manual control of the opening, but did a good job (here with the extension tube of 36mm to increase the magnification).
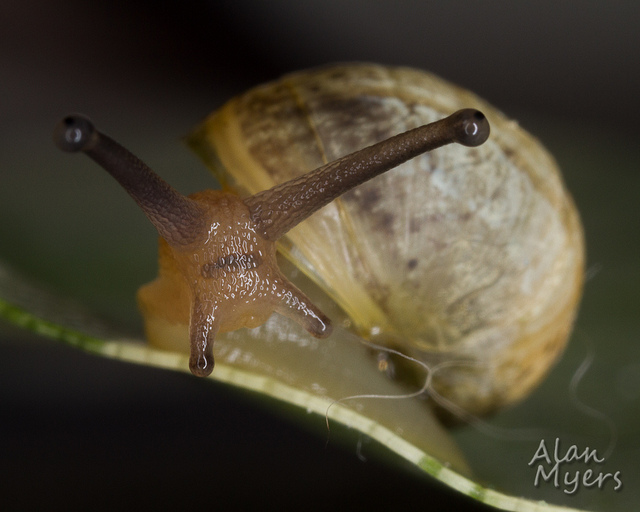
The other lenses I mentioned use are more specialized. The Canon MP-E 65mm macro is a very high magnification, the manual focus lens. The magnification less he can give is 1:1, where most other macro lenses are at their maximum (unless you add extension for them tubes). It goes back to 5 / 1 or 5 X life size, so, essentially, can fill the frame on one of my 7Ds with a grain of rice. Image made with the MP - E 65mm here is a tiny snail, newly hatched which was smaller than the nail on my pinky, at 2 X magnification...
I must say, I would not recommend the MP-E 65mm as a first macro lens. It will especially be a lens only tripod. Depth of field is incredibly deep. Due to the extension of the objective, it's more small aperture of f16 becomes something like an effective f96 at higher magnification. I'll have to work on the development of techniques of stacking with this lens (and will need something much slower moving than a snail, shoot those!).
I use the lens 'Tilt Shift' TS - E 45mm especially for close-ups of small product... Shoots of studio on table, like this that was one of hundreds of fact for the customer's Web site...
Magnification with the 45mm alone isn't really the territory of the macro, but it allows a single control in terms of development with the tilt movements, as well as ways to dodge the reflections with the movements of travel. It is the manual focus lens, too. For higher magnfication work, the TS-E 90mm might be a better choice and magnification of two lenses can be increased by using extension tubes.
As for flash, there are choices with those, too. There are specialized macro flashes or ways to use standard flashes for macro photos.
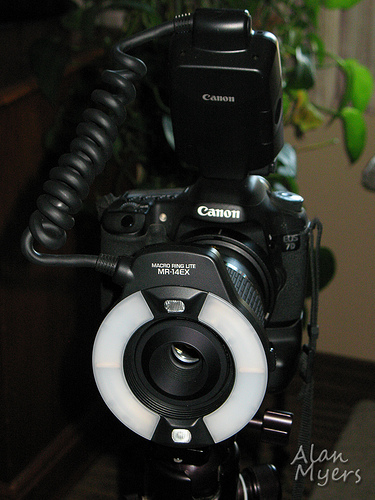
I used a Canon MR - 14EX Ringlite for turned snail, above. I mainly only use a ring light with very high magnificatioin shots... to the low mags just light seems flat and 'clinical' for me. As far as I know, the MR-14EX is pretty much dedicated to Canon lenses, since it clips directly on the lens, locking silver that is on the Canon lenses.
MR-14EX on MP-E 65mm, on 7 d...
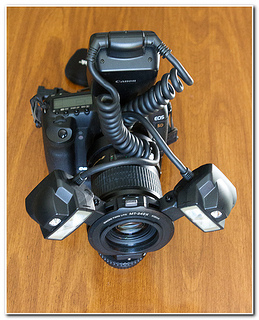
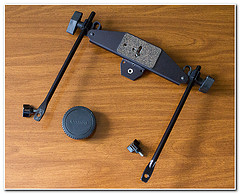
More often, especially for 1:1 magnification and more low blows, I use Canon MT - 24EX Twin Lite or a unique and standard flash with some minor changes. The Twin Lite is great, but a package large enough and not very useful for non macro. Also, it is designed to attach on the front of the Canon lenses, but is more flexible because it can be used with a more generic double flash support, too.
Image of LH: MT-24EX normally mounted. Center: Double Lepp/Stroboframe flash support. Image of HR: MT-24EX on support Lepp.
But do not use a dedicated, macro flash either. Often I will just use a flash unique and standard cord shoes off camera so that I can stand to the side of or above the object...
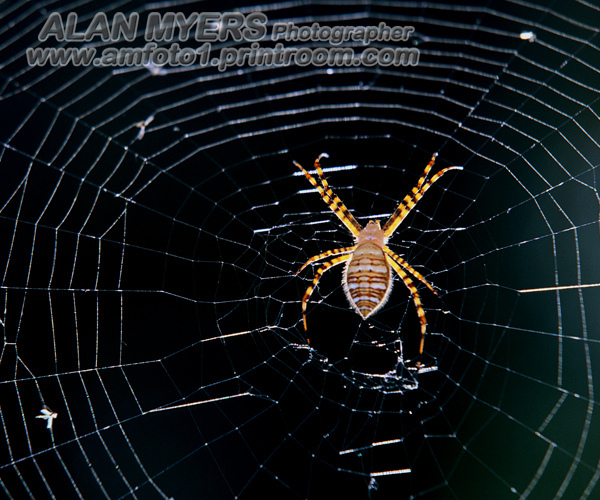
Note that I put two coats of white qauze bandage on the flash head, maintained by a rubber band. This reduces and diffuse the power of the flash so that it can be used near a small subject. A single flash works surprisingly well, because compared to a small topic, it's like a giant light box in the sky. This Mantis was shot using something similar to the above setup (and EF 100/2.8 USM macro lens)...
Enjoy you shopping!
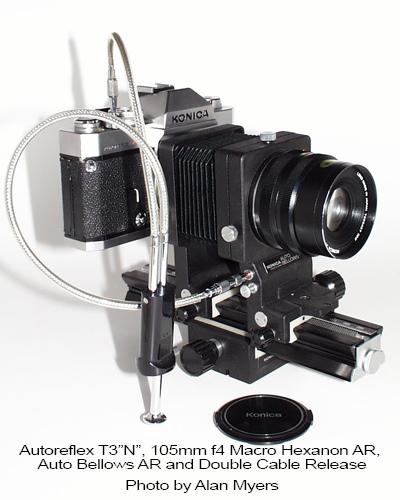
Macro is lots of fun... and a lot easier today than it was back in the good/bad old days of film! One of my old rigging...
***********
Alan MyersSan Jose, California, USA.
«Market softly and carry a great lens.»
MATERIAL: 5DII, 7D(x2), 50D(x3), some other cameras, various lenses & accessories
FLICKR & REPROGRAPHY -
Unable to save the movie in Live Moviemaker - many error codes
I have tried repeatedly to record a movie in Live Moviemaker. Last night I tried to save the movie using "recommend the parameter" error 0 x 87160129 appeared. The location of the source has not been moved or renamed. When I checked through the 23 images were affected, with different error codes - 0xC946001E, 0 x 80070057, 80004003 0 x, 0 x 87160129. When I tried to save this morning using "burn dvd" setting, error 0 x 80070057 appeared, only 12 frames of the film have been affected and only image was the same as the previous night, but with a different error than before. When I previews savings B4 film everything seems ok, I tried to save at least 5 times, but noted only error codes / affected executives in the last 2 times. But it seems that concerned executives continue to change. Would appreciate any help. Thank you very much
I have tried repeatedly to record a movie in Live Moviemaker. Last night I tried to save the movie using "recommend the parameter" error 0 x 87160129 appeared. The location of the source has not been moved or renamed. When I checked through the 23 images were affected, with different error codes - 0xC946001E, 0 x 80070057, 80004003 0 x, 0 x 87160129. When I tried to save this morning using "burn dvd" setting, error 0 x 80070057 appeared, only 12 frames of the film have been affected and only image was the same as the previous night, but with a different error than before. When I previews savings B4 film everything seems ok, I tried to save at least 5 times, but noted only error codes / affected executives in the last 2 times. But it seems that concerned executives continue to change. Would appreciate any help. Thank you very much
=============================================
I'm guessing that you are running Movie Maker 2.1 on Windows XP?There is a good possibility that some of your source files (photos.
video clips, audio clips) are incompatible or corrupted.Even if the project plays well in Movie Maker... which is not guaranteed
It can encode the project in a video file.First... try the following...
When ready to save it as a movie... go to...
Tools / Options / Compatibility tab and uncheck the box 'all' filters.Following... record in DV - AVI format as follows:
XP Windows Movie Maker 2.1...
To save a DV - AVI movie file...
(and other options)
Type of... CTRL + P (or go to...) File / save movie file)
to open the wizard movie recording.
Choose... My computer.
Next /.
Enter a name and a location.
Next /.
Show more choices.
Other parameters.
Open the window of the droplet and choose... DV - AVI.
Next /.
Wait while the movie is saved.
Finishing...If the steps above fail, the next task would be to convert
video clips on the. Before you import into movie WMV format
Audio Maker and convert to the. WMA format before
import into Movie Maker.There are many converters available on the net... the
the following link is an example:(FWIW... it's always a good idea to create a system)
Restore point before installing software or updates)Format Factory (freeware)
http://www.videohelp.com/tools/Format_Factory
(the 'direct link' is faster)
(the file you want to download is: > FFSetup296.zip<>
(FWIW... installation..., you can uncheck
('all' boxes on the last screen)
(Windows XP / Vista / 7)First... after the download and installation of Format
Factory... you can open the program and
left click on the toolbar, the "Option" button and
"Select an output folder to" / apply / OK.
(this is where you find your files after they)
are converted)Drag and drop your music files on the main screen...
Select "while"WMA"/ OK...
Drag and drop your video files on the main screen...
Select "all to WMV" / OK...
Now try to recreate the project with the converted files.
If you decide to try these suggestions... Let us know the result.
-
Hi, I'm back to work Flash after a few years away from him and I wonder if TI a feature has been implemented in the latest versions of a few.
My apologies in advance for what is inarticulate - I don't know exactly how to ask him.
I would like to see an overview of what is happening to export on the timeline. For example, if I have a clip on the frame that has 20 images it contains, I currently only see the first frame of this film clip showing the scene when I scrub the playhead.
Is it possible to see all executives who will show export, in this case the main timeline now?
See you soon
No, this has not changed. You can use test movie in the menu to preview your embedded movieClips.
-
Single-line print multi-line TextField
Hi all
I have 2 TextFields on a frame in my film. What happens is, if my connection to losses of film to a server, it starts to run a timer to continue to retry the connection every 10 seconds. And what I'm trying to do is to write in one of current advance TextFields and what 'Retry' count on what we... But for some reason, I'll try to have 2 htmlText lines appear on the same line, except the second method htmlText adds new text to a line break.
I already put the TextField on the stage to be single line and no. WordWrap, and set the text of TLF. So how could it possible to appear on separate lines 2. ? What confuses me the most, is that I updated the TextField on the stage and in the following single line (* just to see if it helped, and there no), then why he would print to a second line is spooky in my mind.
Here is my code:
/ * There are 2 TextFields:
* #1. Title/header field, this text will not change.
* #2. Message/info field, this is the text I want to change to each loop timer
*/
function retry_connectSocket(event:TimerEvent)
{
trace ("FUNCTION IN: retry_connectSocket():");
WBDMovie.errorMsg_textField.multiline = false;
WBDMovie.errorMsg_textField.wordWrap = false;
Add text to the textfield 'errorMsg_textField ':
err_string = ' # ' + myTimer.currentCount + '. '. Retrying connection... "
WBDMovie.errorMsg_textField.htmlText = "< font color ="#FFFFFF"size = '25' > < b > ' + err_string + ' < /b > < / police > ';
Call function 'connectSocket()' to try to reconnect to the server:
connectSocket();
If socket.connected returns TRUE, then the connection has succeeded
If (socket.connected)
{
Print the Message that the connection is successful:
WBDMovie.errorMsg_textField.htmlText += ' < font color = "#00FF00" size = '25' > connection successful! " "< / police > ';
} else {}
Print the Message saying that the connection has failed:
WBDMovie.errorMsg_textField.htmlText += ' < font color = "#FF0000" size = '25' > Connection Failed! "< / police > < br / > ';
}
}
No idea why it is printing several lines? In addition, any ideas for why the "BOLD" < /b > < b > tags do nothing no more?
Any ideas or suggestions would be greatly appreciated!
Thanks in advance,
Matt
Have you tried to use a regular dynamic TextField instead of a TLFTextField?
-
Sorry if this question makes no sense. Im confused so I don't even know what day of the week it is
So ive had some problems with bars at the sides of my video, I read the forums and directed project/video/output needed to match settings. So I have a few raw images that is 1920 x 1080 25 fps and I went to register as an AVI and made sure I changed the preset then its save as 192 - x 1080 25 images per second, changed to square pixels and video just came out and I have no bar. Result!
Problem is now video scared in places and offsets. If I do exactly the same thing and save it as a WMV video is perfect but just slightly less quality. For some reason any that just like an AVI file doesn't seem to work. Can anyone help, Im starting to see bars appearing on other people when they talk now!
BoShealecta
Thanks for the reply. If you have 1920 x 1080 at 25 frames per second film source of the layer, and then set your preset for project
If the 25 progressive frames per second...
PAL
DIGITAL SLR
1080 p
DSLR 1080p25
If 25 interlaced images per second
PAL
AVCHD
1080i25 Full HD
You can find out if source is interlaced or rate of progressive images using video and audio properties reading programs
like MediaInfo. MediaInfo | Free software on SourceForge.net downloads
Just pay attention to your download and install choices so that you don't receive any unwanted alongs carry with MediaInfo program.
Now for exports...
Publish + share
Computer
Windows Media
define Presets = 720 x 576 16 9 25 x
Then, on the Advanced Settings button and video tab, customize your export settings to resemble those in the screenshot below.

If the screenshot is not sufficiently clear, click it to bring up the clearer version.
There is a box to the right of the width of the frame and the frame height. It is empty in the
screenshot. If you see this box with a link in the chain inside, click on this link in the chain to remove
It's in the box. That will allow you to type in the Frame Width and Frame Height without
problems.
Should you produce your content in Timeline .avi file? Are other formats
Acceptable? I think in terms of AVCHD.mp4.
If you need to consider an export .avi, you might look
Publish + share
Computer
AVI
and set the presets = DV PAL widescreen
Then, under the Advanced button/video settings tab, customize the export settings that should appear as in the
following screenshot

For this export AVI, I downloaded and installed the Lagarith codec and used
which.
Please read the above, and then we can decide what then. For any question or need clarification, please
do not hesitate to ask.
Thank you.
RTA
-
Why my project restores constantly?
I put the points IN and OUT on my calendar and select 'Go In at Out' the rendering window appears as normal. As the progress bar fills everything seems fine. Filled about 75% the number of this video preview pops up and the number of frames to render jumps as well. I have let it run once for 30 minutes with the number of up to approximately 150 video preview and executives approximately 50,000; certainly not what my project was. I did not have to happen to any other project, and I have not changed my workflow in how to create a project. Why is that happening and how can I prevent it from happening for future projects?
Thank you!
Hi JBergstrom,
In sequence settings, change the video codec Previews Microsoft AVI (Win) or QuickTime ProRes 422 (Mac OS). See if it works for you.
Thank you
Kevin
-
Hello. This is my first time, ask a question here on the forums. Usually, you are covering all the questions that I would never, but thought I'd ask since I have a specific question to my features of the machine. I have a general question about the performance of EI. At work, I just got a new machine that is very fast, yet struggles AE preview a frame unique resolution quarter.
Here are the specs of the system:
- Windows 7 Pro 64 bit on a SSD
- 32 GB of Ram
- NVIDIA GeForce GTX 650 with 4 GB ram top
- Drive hard terabyte WD separated for disk cache
- Intel Core i7 3.4 GHz
I loaded AE CC and it starts within 2 seconds. I load my file local ASP, and it takes a few seconds. However, takes Ram preview forever, about 20 seconds per frame. The film is less than 100 MB, so I am stunned. The only effect that I use is a luma map created by a fractal. I tried to reset the preferences now Ctrl + Alt + Shift keys, but AE load too fast, I can not get the dialog box. (No way to reset it without using this method?)
Any suggestions for preferences that build on the ram and the system of power of this machine?
Thank you.
Update. So, I found the cause of my concern. I had imported the PSD as "keep the size of the layer" and there were a few layers in the PSD who were not cropped to the size of the document 1920 X 1080. Re-import in the form of normal composition seems to mitigate the struggle of ram preview.
Thank you both for your help.
-
I recently shot the video using my camcorder Panasonic HDC-HS900 using the 1080 p 60 format. I use Adobe first Elements 9. I set up a new project, but haven't seen a pre-defined corresponding to 1080 p 60. I took AVCHD Lite 720 p 60 and one (file MTS) video files added to the project. When I saw the video, it went well for a few seconds, but then become unstable and very bad. My computer is about 4 years old. It has an Intel dual core 2.4 GHz and 4 GB of RAM.
Any suggestions here? That I should
(1) change to another preset?
(2) convert my MTS file to a different format? If so, what tool would I use for this?
(3) make another option? I hope that my computer is powerful enough to do this, because I don't want to have to buy a new.
Any help would be appreciated.
I use PE10 for months edititing 1080 p 60 files from a camcorder near twins (HDC-SDT750) and a Sony HX9V. I use a laptop which is two years old and has a lot of memory. I had no idea that 1080 p 60 was 'not supported '. In fact, with the exception of this forum, I can't find documentation that says it is not supported.
Bill T74 has written, "I... one of the video files (file MTS) added to the project. When I saw the video, it went well for a few seconds, but then become unstable and very bad. »
Don't worry about this. The preset of the project is for viewing in real time of your project. Rendering by pressing
reads the original files and makes a temporary file used during editing. It works pretty hard computer because he's trying to make it look like the final product. The preset that counts is the tab share. The preset on part is where she is rendered using all markers that you set in the project, to make a usable and optimized video for YouTube or your TV 55 ". And it may take some time. In other words, the computer takes all the time is needed to read from your frame of a film made and original at the same time a completely new video file that will play smoothly if played on the device, as it was intended. Bill T74 have also asked, "I took AVCHD Lite 720 p 60"
That one works for me PE10. Rendering line red does not appear in my time line when you use 1080 p 60. It might be because the pace is matched. Defining the project preset to AVCHD1080i create make it red me line.
Then Bill T74 asked, ' do another option? I hope that my computer is powerful enough to do this, because I don't want to have to buy a new. "On another forum, I followed one year it seems common for owners of the Panasonic 700/750/800/900 camcorders are unaware the software that comes with it is called HD Writer. My version is 2.6 and probably yours is 3.0. His goal is to make all the the Pansonic has usable, including 1080 p 60. The manual included on the disc is more than 130 pages. You must read, or at least the scanner, to understand what he can do. Included is the ability to trim clips, split clips, join the clips, add titles, add transitions and making movies. She did this while preserving the quality of the original video. It will put the final vidoe on a Blu - Ray disc, a disc playable AVCHD to BD (30-minute), a DVD, uploading to YouTube or nothing, that you might want. It doesn't have the wonderful selection of color controls, effects, and audio tools that has PE.
HD Writer is a major imperative. It should be used to transfer files from your camera to your computer. The reason is that each camera .m2ts file makes, three smaller files are made with that understanding for HD Writer. If you have already copied your files on your computer, HD Writer will be useless for you.
If you don't first elements to work on your 1080 p 60 files, HD Writer will convert it to the 1.0 AVCHD format that works better. In other words, a file 1920x1080p60 can covert 1920x1080i30 file. (In version 2.6 Select tool > film > Conversion of Format.)
Bill
-
Ok
In my main script, I have a few buttons. When you click on a button you are diverted to the an image tag in the main timeline.
When the timeline stops to say frame 2 that a flv is loaded into a clip of blank film on the main stage. If you click on the button 2, same thing. In total I have so about four FLV this room when a button is pressed. If I go to by clicking my buttons to test the sweetness of my flv, after that about three clicks of navigation between my flvs frames/load my film main set becomes slower.
Each FLV is about 5 MB.
The following code gets start when I click on my button and taking me to this image. My question is, if I jump between FLV with each click of a button is the FLV file that always plays first play and causing the main movie together to slow down? Is there a better way to handle this? What I need to unload the film play when I click? I'm trying to see if there is a better way to have a smooth streaming of my flv. The flv file which becomes able to simply start looping when it's done and servers background 'mobile '.
is there something else can I implement in my code that will keep my smooth game flv load? Thank you
This is the code in the main timeline, which is responsible for my external swf that will load the FLV file
var myLoader:Loader = new Loader();
addChild (myLoader);
var url: URLRequest = new URLRequest ("theexternal.swf");
myLoader.load (url);This is the code that is in the external SWF file that will launch the FLV file.
Fl.video import. *;
function onFLVComplete(event:VideoEvent):void {}
Event.Target.Play ();
}swl.addEventListener (VideoEvent.COMPLETE, onFLVComplete);
After some trial and error, I have the winning code and the solution. My action script resided inside the physical video I created that was charge my external swf. I decided to try to work around it and put the code on the main timeline of the main SWF and it worked! Thank you for assiting me everyone.
var myrequest2:URLRequest = new URLRequest ("external.swf")
var myloader2:Loader = new Loader();
myloader2. Load (myrequest2);
stage.addChild (myloader2);
myloader.unloadAndStop ();


Maybe you are looking for
-
Skype crashes on my LG G2; no sign of an update
That's more than three weeks since my application Skype for android has an update and since the update whenever I try to make all calls be it WiFi or mobile data, the application block every time. Now, it is virtually unusable. I had left a very low
-
ProBook G2 430: Compatible battery for HP Probook G2 430
Hello I have the G2 430 HP probook with battery 4 cells. The battery life is little more than 2 hours. I am looking for a compatible with battery backup battery more (9 or 12 cells cell). What HP battery with higher backup is compatible with this mod
-
VI to the serial port to hyperterminal
Hi guys. I use 2 RS232 cables to connect the 2 ports. I use 1 ports for hyperterminal. When I start my VI I want to see what is displayed in the hyperterminal. However, all I get is gibberish. Can I know what is the problem? Please advice. Thank you
-
Updates Windows 7 - error code 80070005. Impossible to update.
This message appears when I try to update manually. Please notify.
-
The folder location of the root of the Documents folder locations
Original title: windows Explorer Why are also copied the files listed under Documents to the users folder?