How to change the position of the total line correctly?
Hello everyone.
Now, I am working with obiee 10.1.3.4.2.A question took place a few days ago. Our user has requested that all of the data must not be in the second line of the table under the heading of the table, the last row of the table. Y at - it an idea?
Thank you...
Click rotate the view, click on the symbol "sigma" in addition to the lines and click on 'before '...
Please mark the correct answer and close the topic
Tags: Business Intelligence
Similar Questions
-
How to change the Total report with a different name
Hello
I have a report and the last line display total report (using default apex - check check sum).
My last appear as follows: full report | 10. 20. 30. 2 ¾ 100
What I want to do is to change the name of 'total report' "Grand Total" or something else of my taste. Is - it there anyway that I can can be achieved. Any help would be appreciated.
Thank you
MattOn the report attributes tab, find the section break, formatting is a text box labeled: view this text when you print the report amounts, you can enter your text to replace the total report...
Thank you
Tony Miller
Webster, TX -
How to change the .h to correctly practice the .dll
Hello world
I have a problem with a .h file to control my cnc-planet engine.
I don't know how to edit.
For example, I have the following function not recognized by Labview:
extern "C" CNC_ERROR CALLCONV Connect();
I tried with: int Connect(); Int32 Connect(); int CNC_ERROR Connect() and int32 CNC_ERROR Connect() with no result.
Perhaps, it's the statement variable...
It is written as follows:
enum CNC_ERROR: int
{
CNC_SUCCESS = 0 X 00000000.
CNC_ERROR_FAIL = 0 X 00000001,
CNC_ERROR_NOT_IMPLEMENTED = 0 X 00000002,
CNC_ERROR_NOT_INITIALIZED = 0 X 00000003,
CNC_ERROR_DEVICE_NOT_FOUND = 0 X 00000004,
CNC_ERROR_DEVICE_NOT_READY = 0 X 00000005,
CNC_ERROR_DEVICE_NOT_CONNECTED = 0 X 00000006,
CNC_ERROR_SEND_FAILED = 0 X 00000007,
CNC_ERROR_LICENSE = 0 X 00000008,
CNC_ERROR_RAWDATA = 0 X 00000009,
CNC_ERROR_DEVICE_PARAMS = 0X0000000A,
};I don't know how to change in a way that undrestand Labview...
Any help?
Thank you very much.
PS: The integral .h file
#pragma once
#ifndef __AFXWIN_H__
#error include 'stdafx.h' before including this file for PCH
#endifenum CNC_ERROR: int
{
CNC_SUCCESS = 0 X 00000000.
CNC_ERROR_FAIL = 0 X 00000001,
CNC_ERROR_NOT_IMPLEMENTED = 0 X 00000002,
CNC_ERROR_NOT_INITIALIZED = 0 X 00000003,
CNC_ERROR_DEVICE_NOT_FOUND = 0 X 00000004,
CNC_ERROR_DEVICE_NOT_READY = 0 X 00000005,
CNC_ERROR_DEVICE_NOT_CONNECTED = 0 X 00000006,
CNC_ERROR_SEND_FAILED = 0 X 00000007,
CNC_ERROR_LICENSE = 0 X 00000008,
CNC_ERROR_RAWDATA = 0 X 00000009,
CNC_ERROR_DEVICE_PARAMS = 0X0000000A,
};enum CNC_STATUS: int
{
CNC_STATUS_NONE = 0 X 00010000,
CNC_STATUS_CONNECTED = 0 X 00010001,
CNC_STATUS_DISCONNECTED = 0 X 00010002,
CNC_STATUS_UNPLUGED = 0 X 00010003,
CNC_STATUS_DATAERROR = 0 X 00010004,
};enum CNC_CODE: unsigned char
{
CNC_CODE_Unknown = 0,
CNC_CODE_OK = 1,
CNC_CODE_Pos = 2,
CNC_CODE_Stop = 3,
CNC_CODE_Error = 8,
};enum CNC_PLANE: unsigned char
{
CNC_PLANE_Unknown = 0,
CNC_PLANE_XY = 1,
CNC_PLANE_YZ = 2,
CNC_PLANE_ZX = 3,
CNC_PLANE_UV = 4,
CNC_PLANE_VW = 5,
CNC_PLANE_UW = 6,
};enum CNC_SPINDLE: unsigned char
{
CNC_SPINDLE_Unknown = 0,
CNC_SPINDLE_Stopped = 1,
CNC_SPINDLE_CW = 2,
CNC_SPINDLE_CCW = 3,
};enum CNC_COOLANT: unsigned char
{
CNC_COOLANT_Unknown = 0,
CNC_COOLANT_Off = 1,
CNC_COOLANT_On = 2,
};enum CNC_VERSION: unsigned char
{
CNC_VERSION_Unknown = 0,
CNC_VERSION_MK1 = 1,
CNC_VERSION_MK2 = 2,
};#define CALLCONV __stdcall
Reminder for the UBS state changes
empty typedef (__stdcall TStatusCallback) (State CNC_STATUS);Reminder of the changes in the status of the drive
(typedef) empty (__stdcall TDataCallback)
Code CNC_CODE, //status
unsigned char bufferFree //amount of free buffers - don't start a new order if it is less than 4
int numExecuting, number of running command
keysLimit unsigned char, unsigned char keysJog, //state of the limit and jog buttons
Put int, int posC, int POSD, int posB //position of the four axes in steps
unsigned char output); Exit status of the controller (flood, mist, axis)extern "C" CNC_ERROR CALLCONV (BSTR * result);
HID
extern "C" CNC_ERROR CALLCONV HidInitialize();
extern "C" CNC_ERROR CALLCONV HidFinalize();
extern "C" BOOL CheckHidInitialized() CALLCONV;
extern "C" CNC_ERROR CALLCONV GetHidDeviceList(BSTR* deviceList);
extern "C" CNC_ERROR CALLCONV GetHidDeviceInfo(int vid, int pid, BSTR* vendorName, BSTR* productName, BSTR* serialNumber);
extern "C" CNC_ERROR CALLCONV GetHidDeviceInfoByName(BSTR device, BSTR* vendorName, BSTR* productName, BSTR* serialNumber);Controller of
extern "C" CNC_ERROR CALLCONV Connect();
extern "C" CNC_ERROR CALLCONV Disconnect();
extern "C" BOOL CALLCONV IsConnected();
extern "C" CNC_ERROR CALLCONV GetDeviceInfoEx(BSTR* vendorName, BSTR* productName,)
BOOL * crafts, int * serialNumber.
unsigned char * ver_year, unsigned char * ver_month, unsigned char * ver_day);
extern "C" CNC_ERROR CALLCONV GetDeviceInfo(BSTR* vendorName, BSTR* productName, BOOL* diy);
extern "C" CNC_ERROR CALLCONV RegisterStatusCallback(TStatusCallback *statusCallback);
extern "C" CNC_ERROR CALLCONV RegisterDataCallback(TDataCallback *dataCallback);extern "C" CNC_ERROR CALLCONV GetState)
CNC_CODE * code,.
char * bufferFree,.
int * numExecuting,.
char * keysLimit, char * keysJog,
int * posA, int * posB, int * posC, int * POSD.
char * output);
extern "C" CNC_ERROR CALLCONV SetDeviceParams)
int axis1StepsPerMM, int axis2StepsPerMM, int axis3StepsPerMM, int axis4StepsPerMM,
unsigned char axisLimitSwitch,
Double axis1Backlash, double axis2Backlash, double axis3Backlash, double axis4Backlash.
Double axis1Accel, double axis2Accel, double axis3Accel, double axis4Accel.
(double axis1InitSpeed, double axis2InitSpeed, double axis3InitSpeed, double axis4InitSpeed);extern "C" CNC_ERROR CALLCONV CmdInfo(int* num);
extern "C" CNC_ERROR CALLCONV CmdWrite(int* num);
extern "C" CNC_ERROR CALLCONV CmdMoveAxes(int* num, double posA, double posB, double posC, double posD, double speed, BOOL startAccel, BOOL endAccel);
extern "C" CNC_ERROR CALLCONV CmdMoveAxesDelta(int* num, double posDeltaA, double posDeltaB, double posDeltaC, double posDeltaD, double speed, BOOL startAccel, BOOL endAccel);
extern "C" CNC_ERROR CALLCONV CmdPos(int* num, double posA, double posB, double posC, double posD);
extern "C" CNC_ERROR CALLCONV CmdDwell(int* num, double seconds);
extern "C" CNC_ERROR CALLCONV CmdEStop(int* num);
extern "C" CNC_ERROR CALLCONV CmdStop(int* num);
extern "C" CNC_ERROR CALLCONV CmdPause(int* num);
extern "C" CNC_ERROR CALLCONV CmdPauseNow(int* num);
extern "C" CNC_ERROR CALLCONV CmdResume(int* num);
extern "C" CNC_ERROR CALLCONV CmdResumeNow(int* num);
extern "C" CNC_ERROR CALLCONV CmdOut(int* num, unsigned char output);
extern "C" CNC_ERROR CALLCONV CmdOutNow(int* num, unsigned char output);
extern "C" CNC_ERROR CALLCONV CmdSpindle(int* num, CNC_SPINDLE direction, double speed);
extern "C" CNC_ERROR CALLCONV CmdSpindleNow(int* num, CNC_SPINDLE direction, double speed);
extern "C" CNC_ERROR CALLCONV CmdCoolant(int* num, CNC_COOLANT flood, CNC_COOLANT mist);
extern "C" CNC_ERROR CALLCONV CmdCoolantNow(int* num, CNC_COOLANT flood, CNC_COOLANT mist);
extern "C" CNC_ERROR CALLCONV CmdNothing(int* num);Hello
Rather than edit the .h file, it is easier to use the dll call function to define exactly what are the arguments, and return the function.
Thanks for your replies.
M.
-
How to get the total line count COUNT (*) SELECT and put on a page?
Hello
I use JDeveloper 10.1.3.4. I need get the total number of rows in a table and display it on a page and the problem in doing so. At the sqlplus prompt the row count simply would be, for example:
I wonder if having this simple number must be so complicated and if there is more simple, better ways. Here's how I do it and the problem encountered.select count(*) from BILL;
1. the name of the page to display the number is summary.jspx. It has a grain of support that "summed" as the managed bean name in faces - config.xml, and the name of the bean class is "summary." The component output on the page is:
2. in summary the bean code is:<h:outputText value="#{summary.totalStudentsCount}" binding="#{summary.outputText5}" id="outputText5"/>
The idea of calling a stored function usnig as a "helper" method is 25.5.3 in the Developer's guide, which is closest to you in my need. It's for the functions with the one IN argument; but in my case, the function is not any argument IN. That's why, when you call the helper method CallStoredFunction(), I gave an empty as the last argument and amazing array that caused the problem:private Number totalStudentsCount; public static int NUMBER = Types.NUMERIC; public void setTotalStudentsCount(Number totalStudentsCount) { this.totalStudentsCount = totalStudentsCount; } public Number getTotalStudentsCount() { ZBLCModuleImpl zblcam = getZBLCModuleImpl(); LoggedInStudentImpl studentTable = (LoggedInStudentImpl)zblcam.getLoggedInStudent(); String sql = "select count(lsap_uid) from BILL"; studentTable.setQuery(sql); return (Number)CallStoredFunction(NUMBER, "get_total_students(?)", new Object[] {}); } private ZBLCModuleImpl getZBLCModuleImpl() { FacesContext fc = FacesContext.getCurrentInstance(); ValueBinding vb = fc.getApplication().createValueBinding("#{data}"); BindingContext bc = (BindingContext)vb.getValue(fc); DCDataControl dc = bc.findDataControl("ZBLCModuleDataControl"); ApplicationModule am = (ApplicationModule)dc.getDataProvider(); return (ZBLCModuleImpl)am; } protected Object CallStoredFunction(int sqlReturnType, String stmt, Object[] bindVars) { CallableStatement st = null; ZBLCModuleImpl zblcam = getZBLCModuleImpl(); try { st = zblcam.getDBTransaction().createCallableStatement("begin ? := " + stmt + "; end", 0); st.registerOutParameter(1, sqlReturnType); if (bindVars != null) { for (int z = 0; z < bindVars.length; z++) { st.setObject(z + 2, bindVars[z]); } } st.executeUpdate(); return st.getObject(1); } catch (SQLException e) { throw new JboException(e); } finally { if (st != null) { try { st.close(); } catch (SQLException e) { throw new JboException(e); } } } }
3. the registered function has been tested and works fine at the sqlplus prompt:return (Number)CallStoredFunction(NUMBER, "get_total_students(?)", new Object[] {});
4. when the summary.jspx page is run, the browser is full of error messages, the first long line is here (I have split several online for ease of reading):create or replace function get_total_students return NUMBER AS v_student_count NUMBER; BEGIN select count(ldap_uid) into v_student_count from bill; return v_student_count; END;
Thus,.javax.faces.el.EvaluationException: javax.faces.el.EvaluationException: Error getting property 'totalStudentsCount' from bean of type zblc.viewcontroller.backing.staff.Summary: oracle.jbo.JboException: JBO-29000: Unexpected exception caught: java.sql.SQLException, msg=Missing IN or OUT parameter at index:: 2
(1) what is the problem? What is this parameter IN or OUT of {color: red} index: 2 {color} consult? It has to do with the empty array as the last argument in the call to the helper method?
(2) this approach is an overdose, and are there more simple and better ways?
Thank you very much for help!
NewmanHello
Is there a specific reason why you don't simply create read only object to display with some count (*) as OFCASES from MYTABLE and then just drag and drop the attribute ofcases in page?
Kind regards
Branislav
-
How to change the low linit for' bit support?
I just bought this product ENVY-DV6 7206 .
I read on "cancel free bit" when the battery is between 94% and 100%.
I want to change this lower limit to 75 or 80%.
Is there a recommended or safe lower limit for this?
Also inform me if there is one way different or better to stop charging the battery while the charger is plugged as DELL BATTERY GAUGE where we can manually stop charging the battery.
Thank youchiragbaldha,
They might be able to change the setting to some of the books business model, but he mentions that he is not able to find the setting to change in the user manual.
As far as I know, you are not able to change the settings on the consumption patterns.
-
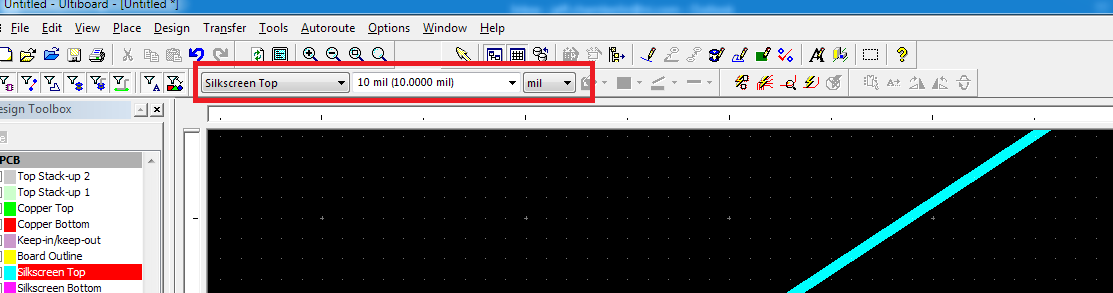
How to change the default line width in Ultiboard?
Hello
I was recently working on my Board and somehow (for screen printing lines) default line width has been set to 0.00004 mils.
How can I change this default width?
Thank you
Nick
Hi Nick,
You should be able to set the width of the default drawing for the layers of the toolbar settings to draw that is above the Board default workspace. Select the top layer of the screen and enter a value, it shouldn't forget for the subsequent designs.
See you soon,.
Jeff
-
How to change the default line width
Hi all! I wish that my lines by default to thickness pt.5, instead of 1 pt. How can I do this? I looked online and read all about the object styles. But this isn't what I want. I want just by defaut.5. I don't see in the preferences to do this. I'm sure it's possible, but I can't find the place where. Thank you!
Julie
for change in the existing files do change with nothing selected.
-
How to change the position of the BB Menu?
Hi all
I would like to know how to change the position of the BB Menu. We made a personalized menu of BB and it appears in the upper right of the screen. I would like to know if it is possible to display the menu in the lower left side. We have checked RIM API, but did not find anything for this. Is there a way to do this? We could use other libraries or specific solution as it is very important for our project.Thank you
Pedro
It is not possible with the menus built-in mechanism.
You can provide your own menu, using popupscreen and objectlistfield, for example. You can place this popup where you want.
-
How to change the position of 'you passed the test?
Hello
I need help on how to change the position of the message "congratulations, you passed the test. Perhaps the failure message.
It should be in the Middle, but now to the left, it sinks in the background.
I Don t see where to change it. All of the index are adjustable but it escapes me...
Thank you very much!I think you are talking about the area of control on the slide to score? Move this area result or score slide himself slide.
-
How to change the font, color line, column and Grand Total labels in PivotTable
Hello Guru
Can you get it some one please let me know how to change the look and feel of the reports in Pivot table using css files. I want to have the dimension and the measure to be of different color columns and grand total different color. I want to achieve for all pivot table reports instead of manually change each report so I want to do in css files.under s_SRIKI\b_mozilla_4\views.css I've seen a lot of options but nothing has worked. So can you please exactly tell what class we need to change to make changes. Thank you!!!
Thank you
SR
For values
. OORT {}
text-align: right;
vertical-align: top;
color: Red;
}
For the product if you got hyper link
Code OOB is
. PTL {}
color: #039;
text-decoration: none;
cursor: pointer;
}
If brand aid
-
How to change the position of a window created in the script?
Hi all
A window called from another window are the same size. How to change the position of the window from the window of the appellant's appeal?
You can also use the property frameLocation of the window to get a set the locations of the windows.
-
Portege S100: How to change the RAID in the BIOS
Change the BIOS setting for Portege S100 of JBOD to RAID0, I hit space on Exectute creation and enter the key of type string in the manual, and press "enter".
Settings and then return to existing arrangements and not the new RAID0 configuration setting that I selected.I stayed in this part of the day / night looking at different positions, but I don't see anything wrong with the data entered.
This is the same as that recorded in this link: -.
[How to change the RAID configuration | http://aps2.toshiba-tro.de/kb0/TSB6901K60006R01.htm]I'm now at the end of my home, I just wanted to install new HDD WD and new installation of XP Pro, is - it too much to ask?
Maybe it s a silly question but; have you installed the second HDD to the Ultra Slim Bay?
The RAID did feature is available when a second HDDD is installed in Ultra Slim Bay.If the second HDD was inserted and then change the RAID in the Windows operating system.
There should be a Toshiba RAID Console.
You can use this console to create or manage a RAID array.To start the utility, click Start, point to all programs, point to Toshiba, RIAD-tap and click RAID console.
It of possible to change the RAID1 (mirroring) of a configuration non-RAID (default).But note; When RAID1 is set, you cannot change your settings unless you completely restore your preinstalled software.
-
Animate dashboard. How to change the cursor of the animated symbol (no picture)?
Hi, could you tell me please how to change the cursor in internship at the animation symbol and label goto inside when click on and release.
For example, I want to create hammer striking the rock, my cursor should change when I'm on the stage and the hit, when I am pressing the button of the mouse and goto the first position when released.
Thanks for the help =)
Hello
This demo file can help you: can I use a symbol animated acting as a mouse cursor?
-
How to change the Spry CSS tab
I like to use these old screens provided with the former DW Spry tab. I just looked in DW CC and it looks like they aren't there and more. But anyway, I made one for my client. Now, they want to get one of the tabs on the far right of the margin. See the image below:

I don't know yet if it's possible to do and if someone has done this before, can you tell me what code I need to change in the CSS? I would have joined the CSS file, but it seems that you cannot attach files in this forum, so I've copied below.
Please offer any means to change the color of the tabs, etc. - I just need to know how - or at all - this tab can be moved to the right.
Thanks, Guy deaf
PS I'm sorry that the CSS code does not correctly appear in this forum. When I type this message, looks like it will display line-by-line, but it's not. I'm sorry.
---------------------------------------------
@charset "UTF-8"; /* SpryTabbedPanels.css - version 0.6 - Spry Pre-Release 1.6.1 */ /* Copyright (c) 2006. Adobe Systems Incorporated. All rights reserved. */ /* Horizontal Tabbed Panels * * The default style for a TabbedPanels widget places all tab buttons * (left aligned) above the content panel. */ /* This is the selector for the main TabbedPanels container. For our * default style, this container does not contribute anything visually, * but it is floated left to make sure that any floating or clearing done * with any of its child elements are contained completely within the * TabbedPanels container, to minimize any impact or undesireable * interaction with other floated elements on the page that may be used * for layout. * * If you want to constrain the width of the TabbedPanels widget, set a * width on the TabbedPanels container. By default, the TabbedPanels widget * expands horizontally to fill up available space. * * The name of the class ("TabbedPanels") used in this selector is not * necessary to make the widget function. You can use any class name you * want to style the TabbedPanels container. */ .TabbedPanels { overflow: hidden; margin: 0px; padding: 0px; clear: none; width: 100%; /* IE Hack to force proper layout when preceded by a paragraph. (hasLayout Bug)*/ } /* This is the selector for the TabGroup. The TabGroup container houses * all of the tab buttons for each tabbed panel in the widget. This container * does not contribute anything visually to the look of the widget for our * default style. * * The name of the class ("TabbedPanelsTabGroup") used in this selector is not * necessary to make the widget function. You can use any class name you * want to style the TabGroup container. */ .TabbedPanelsTabGroup { margin: 0px; padding: 0px; } /* This is the selector for the TabbedPanelsTab. This container houses * the title for the panel. This is also the tab "button" that the user clicks * on to activate the corresponding content panel so that it appears on top * of the other tabbed panels contained in the widget. * * For our default style, each tab is positioned relatively 1 pixel down from * where it wold normally render. This allows each tab to overlap the content * panel that renders below it. Each tab is rendered with a 1 pixel bottom * border that has a color that matches the top border of the current content * panel. This gives the appearance that the tab is being drawn behind the * content panel. * * The name of the class ("TabbedPanelsTab") used in this selector is not * necessary to make the widget function. You can use any class name you want * to style this tab container. */ .TabbedPanelsTab { position: relative; top: 1px; float: left; padding: 5px 20px; margin: 0px 1px 0px 0px; font: bold 12px sans-serif; background-color: #f1c185; list-style: none; border-left: solid 1px #CCC; border-bottom: solid 1px #999; border-top: solid 1px #999; border-right: solid 1px #999; border-radius: 5px 5px 0px 0px; -moz-user-select: none; -khtml-user-select: none; cursor: pointer; } /* This selector is an example of how to change the appearnce of a tab button * container as the mouse enters it. The class "TabbedPanelsTabHover" is * programatically added and removed from the tab element as the mouse enters * and exits the container. */ .TabbedPanelsTabHover { background-color: #ffd197; } /* This selector is an example of how to change the appearance of a tab button * container after the user has clicked on it to activate a content panel. * The class "TabbedPanelsTabSelected" is programatically added and removed * from the tab element as the user clicks on the tab button containers in * the widget. * * As mentioned above, for our default style, tab buttons are positioned * 1 pixel down from where it would normally render. When the tab button is * selected, we change its bottom border to match the background color of the * content panel so that it looks like the tab is part of the content panel. */ .TabbedPanelsTabSelected { background-color: #ffe9cd; border-bottom: 1px solid #EEE; } /* This selector is an example of how to make a link inside of a tab button * look like normal text. Users may want to use links inside of a tab button * so that when it gets focus, the text *inside* the tab button gets a focus * ring around it, instead of the focus ring around the entire tab. */ .TabbedPanelsTab a { color: black; text-decoration: none; } /* This is the selector for the ContentGroup. The ContentGroup container houses * all of the content panels for each tabbed panel in the widget. For our * default style, this container provides the background color and borders that * surround the content. * * The name of the class ("TabbedPanelsContentGroup") used in this selector is * not necessary to make the widget function. You can use any class name you * want to style the ContentGroup container. */ .TabbedPanelsContentGroup { clear: both; border-top: solid 1px #999; background-color: #FFF; } /* This is the selector for the Content panel. The Content panel holds the * content for a single tabbed panel. For our default style, this container * provides some padding, so that the content is not pushed up against the * widget borders. * * The name of the class ("TabbedPanelsContent") used in this selector is * not necessary to make the widget function. You can use any class name you * want to style the Content container. */ .TabbedPanelsContent { overflow: hidden; padding: 4px; } /* This selector is an example of how to change the appearnce of the currently * active container panel. The class "TabbedPanelsContentVisible" is * programatically added and removed from the content element as the panel * is activated/deactivated. */ .TabbedPanelsContentVisible { } /* Vertical Tabbed Panels * * The following rules override some of the default rules above so that the * TabbedPanels widget renders with its tab buttons along the left side of * the currently active content panel. * * With the rules defined below, the only change that will have to be made * to switch a horizontal tabbed panels widget to a vertical tabbed panels * widget, is to use the "VTabbedPanels" class on the top-level widget * container element, instead of "TabbedPanels". */ .VTabbedPanels { overflow: hidden; zoom: 1; } /* This selector floats the TabGroup so that the tab buttons it contains * render to the left of the active content panel. A border is drawn around * the group container to make it look like a list container. */ .VTabbedPanels .TabbedPanelsTabGroup { float: left; width: 10em; height: 20em; background-color: #EEE; position: relative; border-top: solid 1px #999; border-right: solid 1px #999; border-left: solid 1px #CCC; border-bottom: solid 1px #CCC; } /* This selector disables the float property that is placed on each tab button * by the default TabbedPanelsTab selector rule above. It also draws a bottom * border for the tab. The tab button will get its left and right border from * the TabGroup, and its top border from the TabGroup or tab button above it. */ .VTabbedPanels .TabbedPanelsTab { float: none; margin: 0px; border-top: none; border-left: none; border-right: none; } /* This selector disables the float property that is placed on each tab button * by the default TabbedPanelsTab selector rule above. It also draws a bottom * border for the tab. The tab button will get its left and right border from * the TabGroup, and its top border from the TabGroup or tab button above it. */ .VTabbedPanels .TabbedPanelsTabSelected { background-color: #EEE; border-bottom: solid 1px #999; } /* This selector floats the content panels for the widget so that they * render to the right of the tabbed buttons. */ .VTabbedPanels .TabbedPanelsContentGroup { clear: none; float: left; padding: 0px; width: 30em; height: 20em; } /* Styles for Printing */ @media print { .TabbedPanels { overflow: visible !important; } .TabbedPanelsContentGroup { display: block !important; overflow: visible !important; height: auto !important; } .TabbedPanelsContent { overflow: visible !important; display: block !important; clear:both !important; } .TabbedPanelsTab { overflow: visible !important; display: block !important; clear:both !important; } }!-[CodeBlockStart:dffe5525-a787-4a98-a87f-f24554b12141]-->@charset 'UTF-8'; / * SpryTabbedPanels.css - 0.6 - pre-release Spry 1.6.1 version * / / * Copyright (c) 2006] Adobe Systems Incorporated. All rights reserved. * / / * Horizontal tabbed panels * the default style for a TabbedPanels widget puts all the tab buttons * (stalled left) above the content panel. * / / * This is the selector for the main container of TabbedPanels. For our * style by default, this container does not contribute anything visually, * but it is floated to the left to ensure that all floating or compensation done * with any which of her children the elements lie entirely within the limits the * TabbedPanels container, in order to minimize any impact or unwanted * interaction with other floating elements on the page which may be used * for page layout. * If you want to limit the width of the widget TabbedPanels, define a * width of the container TabbedPanels. By default, the widget TabbedPanels * extends horizontally to fill the available space. * The name of the class ("TabbedPanels") used in this selector is not * necessary to make the widget service. You can use a class name, you * want to style the TabbedPanels container. */ . TabbedPanels {overflow: hidden;} margin: 0px; padding: 0px; Clear: none; Width: 100%; / * Hack IE to force the layout correct when preceded by a paragraph. (hasLayout bug) * /} / * this is the selector for the TabGroup. The container of TabGroup houses * all buttons on the tab for each tabs in the widget panel. This container * does not contribute to what both visually in the appearance of the widget for our * default style. * The name of the class ("TabbedPanelsTabGroup") used in this selector is not * necessary to make the widget service. You can use a class name, you * want to style the TabGroup container. */ . TabbedPanelsTabGroup {margin: 0px;} padding: 0px; } / * This is the selector for the TabbedPanelsTab. This container houses * the title of the Panel. It is also tab 'button' that the user clicks on * to activate the corresponding content panel so that it appears on top * of the other tabs in the widget panels. * For our style by default, each tab is positioned relatively 1 pixel down from * where it would normally. This allows each tab overlap content * panel that renders underneath. Each tab is rendered with a background of 1 pixel * border which has a color that corresponds to the upper edge of the current content * panel. This gives the appearance that the tab is drawn behind the * content panel. * The name of the class ("TabbedPanelsTab") used in this selector is not * necessary to make the widget service. You can use any class name you want * to style the tab container. */ . TabbedPanelsTab {position: relative;} Top: 1px; float: left; padding: 5px 20px; margin: 0px 1px 0px 0px; Police: bold 12px without serif. background-color: #f1c185; list-style: none; border-left: 1px solid #CCC; border-bottom: 1px solid #999; border-top: 1px solid #999; border-right: 1px solid #999; border-radius: 5px 0px 5px 0px; -moz-user-select: none; -khtml-user-select: none; cursor: pointer; } / * This selector is an example how to change the appearance of a button in the tab * container as the mouse enters in the it. The class is "TabbedPanelsTabHover" * programatically add and remove the element tab as the mouse between in * in and out of the container. */ . TabbedPanelsTabHover {background-color: #ffd197 ;} / * this selector is an example how to do to change the appearance of a button in the tab * container after the user has clicked on it to activate a content panel.} * The 'TabbedPanelsTabSelected' class is programmatically added and removed * the tab element as long as the user clicks button tab containers in * the widget. * As mentioned above, for our style by default, the tab buttons are positioned * 1 pixel down where he would normally. What is the tab key * selected, we change its bottom border to match the background color of the * content panel so that it looks like the tab is the content panel. */ . TabbedPanelsTabSelected {background-color: #ffe9cd;} border-bottom: 1px solid #EEE; } / * This selector is an example of how to make a link inside a tab button * look like normal text. Users may want to use the links within a tab button * so that when it gets the focus, the text * inside * the tab button gets a focus * ring around it, instead of the ring around the whole tab. * /. TabbedPanelsTab a {color: black;} text-decoration: none; } / * This is the selector for the ContentGroup. The ContentGroup container houses * all panels of content for each tabs in the widget panel. For our * style by default, this container provides the background color and borders that * surround content. * The name of the class ("TabbedPanelsContentGroup") used in this selector is * not necessary to make the widget function. You can use a class name, you * want to style the ContentGroup container. */ . TabbedPanelsContentGroup {clear: both;} border-top: 1px solid #999; background-color: #FFF; } / * This is the selector for the content panel. The content panel contains the * content for a single panel tabs. For our default style, this container * provides some padding, so that content is not pushed upward against the * widget borders. * The name of the class ("TabbedPanelsContent") used in this selector is * not necessary to make the widget function. You can use a class name, you * want to style the content container. */ . TabbedPanelsContent {overflow: hidden;} padding: 4px; } / * This selector is an example of how to change the appearance of the currently * active panel container. The class is "TabbedPanelsContentVisible" * programatically added and removed from the content as the Panel item * is enabled/disabled. */ . TabbedPanelsContentVisible {} / * vertical tabbed panels * following rules override some of the default rules above so that the * TabbedPanels widget is rendered with its buttons on the tab on the left of * the active content panel. * With the rules defined below, the only change that will be made * to move a widget panels to horizontal tabs to vertical tabbed panels * widget, is to use the 'VTabbedPanels' class on the top-level widget * element container, instead of "TabbedPanels. */ . VTabbedPanels {overflow: hidden;} Zoom: 1; } / * This selector floats the TabGroup so that the tab buttons it contains * make left of active content panel. A border is drawn around * the group container to make it look like a container from the list. */ . VTabbedPanels. TabbedPanelsTabGroup {float: left;} Width: 10em; height: 20em; background-color: #EEE; position: relative; border-top: 1px solid #999; border-right: 1px solid #999; border-left: 1px solid #CCC; border-bottom: 1px solid #CCC; } / * This selector disables the float property that is placed on each button of the tab * by the rule above TabbedPanelsTab default selector. He also draws a background * border for the tab. The tab button will get his left and right border of * the TabGroup and its superior border of the tab above it or button TabGroup. */ . VTabbedPanels. TabbedPanelsTab {float: none;} margin: 0px; border-top: none; border-left: none; border-right: none; } / * This selector disables the float property that is placed on each button of the tab * by the rule above TabbedPanelsTab default selector. He also draws a background * border for the tab. The tab button will get his left and right border of * the TabGroup and its superior border of the tab above it or button TabGroup. */ . VTabbedPanels. TabbedPanelsTabSelected {background-color: #EEE;} border-bottom: 1px solid #999; } / * This selector fleet contained signs of the widget while they * make it to the right of the tabs buttons. */ . VTabbedPanels. TabbedPanelsContentGroup {clear: none;} float: left; padding: 0px; Width: 30em; height: 20em; } / * Printing styles * / @media print {.} TabbedPanels {overflow: visible! important;}. TabbedPanelsContentGroup {display: block! important;} overflow: visible! important; height: auto! important; } . TabbedPanelsContent {overflow: visible! important;} display: block! important; clear: both! important; } . TabbedPanelsTab {overflow: visible! important;} display: block! important; clear: both! important; } }
Add the class like below:
- Open Ocean
-
How do I reselect the type to change. I have a text template that I want to, but when I try to select it with the text tool always creates a new text layer. How to change the type of the layer in my registered design?
OK, Bob. This give a try.
First, open a new file and make sure the background is white, not on Transparent that I suspect you have currently defined.

Then, type your copy. Your layers panel will then look like the top of this picture...:

and when you drag the text on the image layer, it will look like the lower part of the sample above.
You can then position the text layer with the tool move

Delete the following in your css spry as file its in the ' query print media "and has no effect on the screen - have added you it to the wrong place."
{.alignRight}
position: relative;
Top: 1px;
float: right! important;
padding: 5px 20px;
margin: 0px 1px 0px 0px;
Police: bold 12px without serif.
background-color: #f1c185;
list-style: none;
border-left: 1px solid #CCC;
border-bottom: 1px solid #999;
border-top: 1px solid #999;
border-right: 1px solid #999;
border-radius: 5px 0px 5px 0px;
-moz-user-select: none;
-khtml-user-select: none;
cursor: pointer;
}
Add the below css just above the press query written:
{.alignRight}
float: right! important;
}
/ * Print styles * /.
@media print {}


Maybe you are looking for
-
Satellite L450D-113 vs Sat Pro L450D-13 x - touchpad issue
Good day for a novice. I bought a Satellite L450D and the touchpad's door as well as the left button is tired.I want to replace the entire palmrest with buffer and ebay buttons but cannot see examples of Satellite L450D Pro offer. Are they interchang
-
Equium A200 BIOS update start with an error
I am trying to update Bios on my Equium A200, once downloaded and started to install the error say rom of good size file box. Can anyone help? I'm using Vista Home premium.
-
HP Mini 311-1037NR: BIOS password
I'm trying to access the BIOS on a HP Mini 311-1037NR. I don't know the BIOS password. After 3 attempts I get a "system disabled" pop-up with the code: 50892939. Any help would be greatly appreciated! Thank you Katey
-
Some of my missing Office files and are NOT in the trash. Where should I look?
I read a warning that removes this photo or file it would remove everywhere. I deleted. He made my office files disappear as well. They are not in the trash. If not where should I look?
-
Need to clean and restore dell to form factor computer
I need clean and restore my computer laptop studio xps from dell to factory settings and do not know how. It came with windows vista but I don't know if my kids has changed, I am a computer dummy. I was hoping that I could go to dell online and pre