How to change the width of the table of results LOV
HelloI have several lov defined on the attributes of display objects. The LOV renders correctly, but if add more columns to the list of attributes resulting display of table always displays bars scroll if they don't fit within the default width of the table of results. How can I increase the width of the table of results so I can show all display both attributes?
Kind regards
André Jochems
Hello
guess it needs a new skin picker because there is no option to do this. I played with skinning and finally with
AF | table {width: 500px}
#departmentId_afrLovInternalTableId::scroller {width: 500px}
The ID selector is what I disovered debugging page. I guess that ID always starts with the name of the field to be updated, "departmentId" in my case
I'll drop and ER, what kind of count is fragile
Frank
Tags: Java
Similar Questions
-
How to change the table of contents page text color
Hello
Can someone suggest me please how do I change the color of the text in Captivate6 table.
Please see below image, color of the highlighted text should be changed.
Future prospects for assistance.Thank you
Srikanth

The background color of the text is controlled by the selection of "Title" in the color.

title text font, size and color are controlled by accessing the "Info" button and selecting "Title" in the theme area and by changing your selections there.

Hope this helps - sorry for the delay - took in a drama date limit!
-
How to change the table of contents
Awhile back, I created a table in my document and it works very well. Now I need to add a section and I completely forgot how do. If anyone can help?
Your table of contents is pulling one or more Styles (probably the stars) paragraph of the document. Add the new article he style identical to existing sections (same paragraph Styles), then update the table of contents (right click anywhere in it and choose to update Table of contents). Unless you have a few other wrinkles, that should come at the end.
-
How to change the table of facts in the backend application
Hello
I have a test where f1 is the fact coming in the backend query table, how can I change/modify so that if I select the same test he should come in fact different table f2.
Please suggest.Since you have a degree you're your report column implied is ignored.
Your measurement is mapped to 2 facts and obiee is to select one of the sources is. (not sure what criteria).
If you want your report to get data F1 pull your implicit done column (internal line number) in the report and hide it.
I hope this helps.
Published by: Ménard Hussain on November 16, 2012 06:08
-
How to change the table definition after upgrade from 9 to 10?
after update from 9 to 10, DOF tables still as 9i:
................. PCTFREE, PCTUSED, INITRANS 40 10 1 MAXTRANS 255...
... inndex PCTFREE 10 INITRANS 2 MAXTRANS 255 COMPUTE STATISTICS...
Is there a method to convert all tables to new style 10g without re-creating thousands of tables and emp/imp one then?
Thank youYou can use the package dbms_redefiinition to Redefine tables.
You can find more information in this regard on the following linksSyntax
http://download.Oracle.com/docs/CD/B19306_01/AppDev.102/b14258/d_redefi.htm#CBBFDJBCAll tasks
http://www.Oracle.com/pls/db102/search?word=DBMS_REDEFINITION&PartNo= -
How to change the runtime of height and width of the front panel
How to change the front height and width during execution. Basically, I want to decide height or width according to some parameters that I'm in the moment of execution.
Ed johnsold was first

-
How to change the PCTFREE parameter for an existing table
How to change the PCTFREE parameter for an existing table?
Guys can you help me pleaseHello
Of course it is possible.
In this case you would export the table from the database (using old style exp)
Start the import with the index_file option to generate the table/index instructions
Modify the file created and updated the PCTFREE and remove any that need to be performed (default, if I remember correctly, he comments on the statements of the Index)
Run the file for the table and the index created
After that start the import with the option "ignore = yes".Make sure that you export only this particular table using "tables =
Also in importing the "ignore = yes" will also be important data that still exists.In my view, however, this is not what you want to do. It's more complex, sensitive failure and the table should be deleted, so users are affected unnecessarily long.
Success!
FJFranken -
How to change the default color for tables/pivot tables
Can someone share how to change the default font color or background for tables and PivotTables? In my view, there is a CSS or XML setting I need to change.
It is difficult to read the text when negative numbers are RED and the overall totals have a default NAVY background fill. I'm trying to find out how to change the color of these without doing it manually to each report.
Thank you.Jin
For pivot Table
Go to OracleBI\oc4j_bi\j2ee\home\applications\analytics\analytics\res\s_oracle10\b_mozilla_4\views.css
Change the PivotTable section code
For table veiw
Go to OracleBI\oc4j_bi\j2ee\home\applications\analytics\analytics\res\s_oracle10\b_mozilla_4\views.css
Change the section of the Table
PS:take backup your original file before you edit any css file. Don't forget to give the points/close the thread
Thank you
saichand.v -
How to change the tag page layouts
I'm trying to change my great model produced. When adding the tag related products he puts them with horrible HTML full of Tables etc. I can't seam to figure out how to change the layout for the tags. What Miss me?
{module_facebookcomments, url ="http://www.impactnations.org/{tag_itemurl_nolink}", moduleTemplateGroup = "Default", local = 'en_US', message = '2', width is '500', olorScheme = 'light' c}{tag_name}
{tag_poplets}- Price:
{tag_saleprice}
- {tag_attributes}
- {tag_grouping}
- Quantity: {tag_addtocartinputfield}
- {tag_buynow}
Description
{tag_description}Related products
{tag_relatedproducts}You have a few options with the configuration of the tag:
But what makes a tag on is what you have to work with.
- Price:
-
How to change the tab order of an array of clusters?
How to change the tab order of an array of clusters? I have the cluster arranged into a table in the front panel. The element of the cluster passes horizontal and array element passes vertically. When I press the tab key, the cursor will move to the item next to the table instead of the next item in the cluster (down to the place overall).
so you have an array of clusters or cluster and the separate table?
-
How to change the style of picture frame
I would like to know how to change the style of table on the front. For the example below, I would like to remove the covered framework of gray color.
I could not find the table style editor.
First option: use the table on the classic controls palette, which has no border.
Second option-
- Select the painting tool.
- Right click on the border.
- With open color dialog box, click the space bar. This toggles the color picker to work on color FG, the background color, or both. It is also described at the bottom of the color picker.
- When the two have been selected, you can make the frame completely transparent by selecting the color of T.
-
How to change the input descriptor of return on investment?
I am a beginner of Labview Vision users. I need to convert a RGB image into binary image and superimpose a few lines on the binary image at random and then measure the length of the ordinate at the origin of the image. I came across the problem of changing of return on investment by incorporating a few random coordinates (by this contact information, I can generate random lines.). But I could not find how to change the coordinates or import data from an excel file coordination.
Any help is appreciated.
Jian
If you have the package of Vision, you can use the line to convert to the KING function and the power cable in the KING of the image property. If you do not, you will need to build your own KING. Given the coordinates of line (X 1, Y1) and (X 2, Y2) the entries in the return on investment are the following.
Global rectangle - table of 4 elements with values [X 1, Y1, X 2 + 1, Y2 + 1]
Countours - single element (table 4 external elements, line [X 1, Y1, X 2, Y2])
-
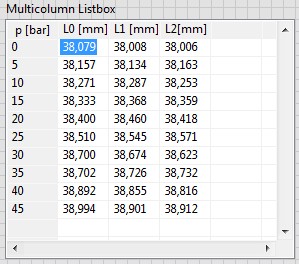
How to change the upper-left corner of the multicolumn listbox?
Can I change the properties of the cell (-1, -1), but I don't know how to change the text.
Is it too simple or impossible?
Kind regards
Ljubo.
In Excel, you cannot change the headers of columns (A, B, c...) and headers of lines (1, 2, 3,...).
I have a 2D data table Y a 1 d of data table X. data of X are the same for all the columns of Y. The first idea was to use X values as row headings to give him special attention. There should be a header above the data of X (name, quantity, unit,...). See the example below.
The solution is very simple: I created a label and put it on the upper left corner of the listbox.
Good day
Ljubo.
-
Hello
Happy New Year to ALL
On the Login area:
I would like to know how to change the size of the region of Login and its place.
For example: Login area should have a = 600 height and width = 100 and should be on the right side, not in the center of the screen.
This problem concerns oracle12, apex 4.2 and html5 theme.
Ziut
Ziut wrote:
Hello
for example: apex.oracle.com
workspace: tb2, tb2/tb2
App = 23705
My comp (for example):

style = "height: 600px;" Width: 100px; »
This is only an example. Theme 26.
Ziut
Ziut,
This is the closest I could come to your comp. The simplest implementation, I found was:
- A region has added to the Information
- Place the Login area in a Sidebar area model
- Kept the two regions in the same Point on the screen and the same grid.

I have attempted to substitute the CSS for the Login region but made very little progress and make a slurry in a perspective of support. You should always keep in mind that another person will have to support your claim, a day, and play the more you with him, it may be more difficult to maintain if it is not well documented.
Here's my demo:
Username and password are all two - demo
https://Apex.Oracle.com/pls/Apex/f?p=11956:101
Jeff
-
How to change the Spry CSS tab
I like to use these old screens provided with the former DW Spry tab. I just looked in DW CC and it looks like they aren't there and more. But anyway, I made one for my client. Now, they want to get one of the tabs on the far right of the margin. See the image below:

I don't know yet if it's possible to do and if someone has done this before, can you tell me what code I need to change in the CSS? I would have joined the CSS file, but it seems that you cannot attach files in this forum, so I've copied below.
Please offer any means to change the color of the tabs, etc. - I just need to know how - or at all - this tab can be moved to the right.
Thanks, Guy deaf
PS I'm sorry that the CSS code does not correctly appear in this forum. When I type this message, looks like it will display line-by-line, but it's not. I'm sorry.
---------------------------------------------
@charset "UTF-8"; /* SpryTabbedPanels.css - version 0.6 - Spry Pre-Release 1.6.1 */ /* Copyright (c) 2006. Adobe Systems Incorporated. All rights reserved. */ /* Horizontal Tabbed Panels * * The default style for a TabbedPanels widget places all tab buttons * (left aligned) above the content panel. */ /* This is the selector for the main TabbedPanels container. For our * default style, this container does not contribute anything visually, * but it is floated left to make sure that any floating or clearing done * with any of its child elements are contained completely within the * TabbedPanels container, to minimize any impact or undesireable * interaction with other floated elements on the page that may be used * for layout. * * If you want to constrain the width of the TabbedPanels widget, set a * width on the TabbedPanels container. By default, the TabbedPanels widget * expands horizontally to fill up available space. * * The name of the class ("TabbedPanels") used in this selector is not * necessary to make the widget function. You can use any class name you * want to style the TabbedPanels container. */ .TabbedPanels { overflow: hidden; margin: 0px; padding: 0px; clear: none; width: 100%; /* IE Hack to force proper layout when preceded by a paragraph. (hasLayout Bug)*/ } /* This is the selector for the TabGroup. The TabGroup container houses * all of the tab buttons for each tabbed panel in the widget. This container * does not contribute anything visually to the look of the widget for our * default style. * * The name of the class ("TabbedPanelsTabGroup") used in this selector is not * necessary to make the widget function. You can use any class name you * want to style the TabGroup container. */ .TabbedPanelsTabGroup { margin: 0px; padding: 0px; } /* This is the selector for the TabbedPanelsTab. This container houses * the title for the panel. This is also the tab "button" that the user clicks * on to activate the corresponding content panel so that it appears on top * of the other tabbed panels contained in the widget. * * For our default style, each tab is positioned relatively 1 pixel down from * where it wold normally render. This allows each tab to overlap the content * panel that renders below it. Each tab is rendered with a 1 pixel bottom * border that has a color that matches the top border of the current content * panel. This gives the appearance that the tab is being drawn behind the * content panel. * * The name of the class ("TabbedPanelsTab") used in this selector is not * necessary to make the widget function. You can use any class name you want * to style this tab container. */ .TabbedPanelsTab { position: relative; top: 1px; float: left; padding: 5px 20px; margin: 0px 1px 0px 0px; font: bold 12px sans-serif; background-color: #f1c185; list-style: none; border-left: solid 1px #CCC; border-bottom: solid 1px #999; border-top: solid 1px #999; border-right: solid 1px #999; border-radius: 5px 5px 0px 0px; -moz-user-select: none; -khtml-user-select: none; cursor: pointer; } /* This selector is an example of how to change the appearnce of a tab button * container as the mouse enters it. The class "TabbedPanelsTabHover" is * programatically added and removed from the tab element as the mouse enters * and exits the container. */ .TabbedPanelsTabHover { background-color: #ffd197; } /* This selector is an example of how to change the appearance of a tab button * container after the user has clicked on it to activate a content panel. * The class "TabbedPanelsTabSelected" is programatically added and removed * from the tab element as the user clicks on the tab button containers in * the widget. * * As mentioned above, for our default style, tab buttons are positioned * 1 pixel down from where it would normally render. When the tab button is * selected, we change its bottom border to match the background color of the * content panel so that it looks like the tab is part of the content panel. */ .TabbedPanelsTabSelected { background-color: #ffe9cd; border-bottom: 1px solid #EEE; } /* This selector is an example of how to make a link inside of a tab button * look like normal text. Users may want to use links inside of a tab button * so that when it gets focus, the text *inside* the tab button gets a focus * ring around it, instead of the focus ring around the entire tab. */ .TabbedPanelsTab a { color: black; text-decoration: none; } /* This is the selector for the ContentGroup. The ContentGroup container houses * all of the content panels for each tabbed panel in the widget. For our * default style, this container provides the background color and borders that * surround the content. * * The name of the class ("TabbedPanelsContentGroup") used in this selector is * not necessary to make the widget function. You can use any class name you * want to style the ContentGroup container. */ .TabbedPanelsContentGroup { clear: both; border-top: solid 1px #999; background-color: #FFF; } /* This is the selector for the Content panel. The Content panel holds the * content for a single tabbed panel. For our default style, this container * provides some padding, so that the content is not pushed up against the * widget borders. * * The name of the class ("TabbedPanelsContent") used in this selector is * not necessary to make the widget function. You can use any class name you * want to style the Content container. */ .TabbedPanelsContent { overflow: hidden; padding: 4px; } /* This selector is an example of how to change the appearnce of the currently * active container panel. The class "TabbedPanelsContentVisible" is * programatically added and removed from the content element as the panel * is activated/deactivated. */ .TabbedPanelsContentVisible { } /* Vertical Tabbed Panels * * The following rules override some of the default rules above so that the * TabbedPanels widget renders with its tab buttons along the left side of * the currently active content panel. * * With the rules defined below, the only change that will have to be made * to switch a horizontal tabbed panels widget to a vertical tabbed panels * widget, is to use the "VTabbedPanels" class on the top-level widget * container element, instead of "TabbedPanels". */ .VTabbedPanels { overflow: hidden; zoom: 1; } /* This selector floats the TabGroup so that the tab buttons it contains * render to the left of the active content panel. A border is drawn around * the group container to make it look like a list container. */ .VTabbedPanels .TabbedPanelsTabGroup { float: left; width: 10em; height: 20em; background-color: #EEE; position: relative; border-top: solid 1px #999; border-right: solid 1px #999; border-left: solid 1px #CCC; border-bottom: solid 1px #CCC; } /* This selector disables the float property that is placed on each tab button * by the default TabbedPanelsTab selector rule above. It also draws a bottom * border for the tab. The tab button will get its left and right border from * the TabGroup, and its top border from the TabGroup or tab button above it. */ .VTabbedPanels .TabbedPanelsTab { float: none; margin: 0px; border-top: none; border-left: none; border-right: none; } /* This selector disables the float property that is placed on each tab button * by the default TabbedPanelsTab selector rule above. It also draws a bottom * border for the tab. The tab button will get its left and right border from * the TabGroup, and its top border from the TabGroup or tab button above it. */ .VTabbedPanels .TabbedPanelsTabSelected { background-color: #EEE; border-bottom: solid 1px #999; } /* This selector floats the content panels for the widget so that they * render to the right of the tabbed buttons. */ .VTabbedPanels .TabbedPanelsContentGroup { clear: none; float: left; padding: 0px; width: 30em; height: 20em; } /* Styles for Printing */ @media print { .TabbedPanels { overflow: visible !important; } .TabbedPanelsContentGroup { display: block !important; overflow: visible !important; height: auto !important; } .TabbedPanelsContent { overflow: visible !important; display: block !important; clear:both !important; } .TabbedPanelsTab { overflow: visible !important; display: block !important; clear:both !important; } }!-[CodeBlockStart:dffe5525-a787-4a98-a87f-f24554b12141]-->@charset 'UTF-8'; / * SpryTabbedPanels.css - 0.6 - pre-release Spry 1.6.1 version * / / * Copyright (c) 2006] Adobe Systems Incorporated. All rights reserved. * / / * Horizontal tabbed panels * the default style for a TabbedPanels widget puts all the tab buttons * (stalled left) above the content panel. * / / * This is the selector for the main container of TabbedPanels. For our * style by default, this container does not contribute anything visually, * but it is floated to the left to ensure that all floating or compensation done * with any which of her children the elements lie entirely within the limits the * TabbedPanels container, in order to minimize any impact or unwanted * interaction with other floating elements on the page which may be used * for page layout. * If you want to limit the width of the widget TabbedPanels, define a * width of the container TabbedPanels. By default, the widget TabbedPanels * extends horizontally to fill the available space. * The name of the class ("TabbedPanels") used in this selector is not * necessary to make the widget service. You can use a class name, you * want to style the TabbedPanels container. */ . TabbedPanels {overflow: hidden;} margin: 0px; padding: 0px; Clear: none; Width: 100%; / * Hack IE to force the layout correct when preceded by a paragraph. (hasLayout bug) * /} / * this is the selector for the TabGroup. The container of TabGroup houses * all buttons on the tab for each tabs in the widget panel. This container * does not contribute to what both visually in the appearance of the widget for our * default style. * The name of the class ("TabbedPanelsTabGroup") used in this selector is not * necessary to make the widget service. You can use a class name, you * want to style the TabGroup container. */ . TabbedPanelsTabGroup {margin: 0px;} padding: 0px; } / * This is the selector for the TabbedPanelsTab. This container houses * the title of the Panel. It is also tab 'button' that the user clicks on * to activate the corresponding content panel so that it appears on top * of the other tabs in the widget panels. * For our style by default, each tab is positioned relatively 1 pixel down from * where it would normally. This allows each tab overlap content * panel that renders underneath. Each tab is rendered with a background of 1 pixel * border which has a color that corresponds to the upper edge of the current content * panel. This gives the appearance that the tab is drawn behind the * content panel. * The name of the class ("TabbedPanelsTab") used in this selector is not * necessary to make the widget service. You can use any class name you want * to style the tab container. */ . TabbedPanelsTab {position: relative;} Top: 1px; float: left; padding: 5px 20px; margin: 0px 1px 0px 0px; Police: bold 12px without serif. background-color: #f1c185; list-style: none; border-left: 1px solid #CCC; border-bottom: 1px solid #999; border-top: 1px solid #999; border-right: 1px solid #999; border-radius: 5px 0px 5px 0px; -moz-user-select: none; -khtml-user-select: none; cursor: pointer; } / * This selector is an example how to change the appearance of a button in the tab * container as the mouse enters in the it. The class is "TabbedPanelsTabHover" * programatically add and remove the element tab as the mouse between in * in and out of the container. */ . TabbedPanelsTabHover {background-color: #ffd197 ;} / * this selector is an example how to do to change the appearance of a button in the tab * container after the user has clicked on it to activate a content panel.} * The 'TabbedPanelsTabSelected' class is programmatically added and removed * the tab element as long as the user clicks button tab containers in * the widget. * As mentioned above, for our style by default, the tab buttons are positioned * 1 pixel down where he would normally. What is the tab key * selected, we change its bottom border to match the background color of the * content panel so that it looks like the tab is the content panel. */ . TabbedPanelsTabSelected {background-color: #ffe9cd;} border-bottom: 1px solid #EEE; } / * This selector is an example of how to make a link inside a tab button * look like normal text. Users may want to use the links within a tab button * so that when it gets the focus, the text * inside * the tab button gets a focus * ring around it, instead of the ring around the whole tab. * /. TabbedPanelsTab a {color: black;} text-decoration: none; } / * This is the selector for the ContentGroup. The ContentGroup container houses * all panels of content for each tabs in the widget panel. For our * style by default, this container provides the background color and borders that * surround content. * The name of the class ("TabbedPanelsContentGroup") used in this selector is * not necessary to make the widget function. You can use a class name, you * want to style the ContentGroup container. */ . TabbedPanelsContentGroup {clear: both;} border-top: 1px solid #999; background-color: #FFF; } / * This is the selector for the content panel. The content panel contains the * content for a single panel tabs. For our default style, this container * provides some padding, so that content is not pushed upward against the * widget borders. * The name of the class ("TabbedPanelsContent") used in this selector is * not necessary to make the widget function. You can use a class name, you * want to style the content container. */ . TabbedPanelsContent {overflow: hidden;} padding: 4px; } / * This selector is an example of how to change the appearance of the currently * active panel container. The class is "TabbedPanelsContentVisible" * programatically added and removed from the content as the Panel item * is enabled/disabled. */ . TabbedPanelsContentVisible {} / * vertical tabbed panels * following rules override some of the default rules above so that the * TabbedPanels widget is rendered with its buttons on the tab on the left of * the active content panel. * With the rules defined below, the only change that will be made * to move a widget panels to horizontal tabs to vertical tabbed panels * widget, is to use the 'VTabbedPanels' class on the top-level widget * element container, instead of "TabbedPanels. */ . VTabbedPanels {overflow: hidden;} Zoom: 1; } / * This selector floats the TabGroup so that the tab buttons it contains * make left of active content panel. A border is drawn around * the group container to make it look like a container from the list. */ . VTabbedPanels. TabbedPanelsTabGroup {float: left;} Width: 10em; height: 20em; background-color: #EEE; position: relative; border-top: 1px solid #999; border-right: 1px solid #999; border-left: 1px solid #CCC; border-bottom: 1px solid #CCC; } / * This selector disables the float property that is placed on each button of the tab * by the rule above TabbedPanelsTab default selector. He also draws a background * border for the tab. The tab button will get his left and right border of * the TabGroup and its superior border of the tab above it or button TabGroup. */ . VTabbedPanels. TabbedPanelsTab {float: none;} margin: 0px; border-top: none; border-left: none; border-right: none; } / * This selector disables the float property that is placed on each button of the tab * by the rule above TabbedPanelsTab default selector. He also draws a background * border for the tab. The tab button will get his left and right border of * the TabGroup and its superior border of the tab above it or button TabGroup. */ . VTabbedPanels. TabbedPanelsTabSelected {background-color: #EEE;} border-bottom: 1px solid #999; } / * This selector fleet contained signs of the widget while they * make it to the right of the tabs buttons. */ . VTabbedPanels. TabbedPanelsContentGroup {clear: none;} float: left; padding: 0px; Width: 30em; height: 20em; } / * Printing styles * / @media print {.} TabbedPanels {overflow: visible! important;}. TabbedPanelsContentGroup {display: block! important;} overflow: visible! important; height: auto! important; } . TabbedPanelsContent {overflow: visible! important;} display: block! important; clear: both! important; } . TabbedPanelsTab {overflow: visible! important;} display: block! important; clear: both! important; } }
Add the class like below:
- Open Ocean


Delete the following in your css spry as file its in the ' query print media "and has no effect on the screen - have added you it to the wrong place."
{.alignRight}
position: relative;
Top: 1px;
float: right! important;
padding: 5px 20px;
margin: 0px 1px 0px 0px;
Police: bold 12px without serif.
background-color: #f1c185;
list-style: none;
border-left: 1px solid #CCC;
border-bottom: 1px solid #999;
border-top: 1px solid #999;
border-right: 1px solid #999;
border-radius: 5px 0px 5px 0px;
-moz-user-select: none;
-khtml-user-select: none;
cursor: pointer;
}
Add the below css just above the press query written:
{.alignRight}
float: right! important;
}
/ * Print styles * /.
@media print {}
Maybe you are looking for
-
Try to rename the profile, now cannot start FF because it says it is already running
So I wanted to rename the profile from my laptop. I went in the profile menu (on the laptop not Firefox) and finished by unchecking and rechecking the "read only"box. ". After that, Firefox would give an error saying that she could not access the sec
-
I NEED A SOUND CARD FOR MAC PRO 3.1
I NEED A SOUND CARD FOR MAC PRO 3.1
-
Key to increase volume, decrease key and mute the button worked very well until I have updated by audio drivers from hp support assistant. they no longer work. How to solve this problem?
-
I have an icloud account is disabled but not yet restored
I have an icloud account is disabled but not yet recovered. ID: *. I proposed to recover the passwords, but messages sent to e-mail addresses ending with ".". cloud.com. While the account is locked, how can identify you? Now, I remember just the old
-
individual hotfixes not available for COM + 1.5 error 0x800706BA realating kb935677
I need the individual hotfix for this article. Anyone know how I can get it? The fix was wrapped in XP SP3 and is not available online. Unfortunately, XP SP3 produced other problems and I need to get the hotfix to a customer who cannot use the SP3 be