How to get a minimum Image display VI
I am building a GUI for a multi camera ROVS (underwater Robot), and I want to include multiple streams of live image on the screen.
I can get the workflow, but I seem to be stuck using one of the "Image display" VI two on the range of Vision.
These have a range of additional features that I don't want and can't seem to turn off completely.
for example:
-There is a "high zone" with border around the image which is just take to the top of the real estate. I can't reduce it to zero. (I tried the new and classic vi)
-There is a range of tool that I don't want. I have different windows "Preview" that just needs to be dumb views. The tools are not only unnecessary, but a problem is that someone clicks on the image by accident.
Then. Bottom line, I would like to just a stupid little Image display window VI which I feed with a wire IMAQ Image.ctl and who accepts no user intervention.
Such a thing is available?
Phil.
You can turn off scroll bars, tool palette, as well as the Image information string. Then just resize the viewable area on boders:
See attachment
Andrey.
Tags: NI Hardware
Similar Questions
-
How to get the icons to display correctly in the Finder?
At the time of the "classic" Mac OS, if the icons are not correctly display in the Finder, we could 'rebuild the desktop file' to correct the problem. I've recently updated to Yosemite, and most things work well, but for some reason, most of the files in the Finder .webloc now show as blank icons (but not all; a few show the correct icon). There is no model, I can see: some very old .webloc files now show a white icon (where I know that their icons used to be correct), while the most recent show the icon of correct - although I just created four (by dragging the URL of the Safari, the usual method) which are all empty. Sometimes they appear with the older icon, with the symbol @ (although those who seem to have changed vacuum after running and restart maintenance). I tried from an external disk, repair permissions and repair the file system, as well as cleaning with the utility of Maintenance (which clears the web browser and other caches), nothing works. Does anyone know how to get the computer to display these icons correctly?
May be a corrupt .plist.
Make a backup, preferably 2 backups on 2 separate drives.
Go to Finder and select your user folder. With this Finder window as the windshield, select Finder/display/display options for presenting or order - J. When the display options opens, check "show the library folder. This should make your visible user library folder in your user folder. Select the library. Then go to Preferences/com.apple.finder.plist and com.apple.desktop.plist. Move the .plists on your desktop.
Relaunch the Finder by restarting the computer and test. If it works fine, delete the plists from the desktop.
If the same, return the .plists to where you obtained since, by crushing the latest.
Thanks to leonie for certain information contained in this.
-
How to get a static Image location (Lon & Lat)
Hi, I have a location (long & Lat),
How to get a static Image of these data?
Thank you
JAM373 blackberry jam europe reading
and
Found the solution using MapImageGenerator
I am applying like this
on .qml:
function getImage() {
   mapImage.getImageMap(lat, lon, screenWidth);
}

attachedObjects: [
   StaticMapImage {
     id: mapImage
     onGetProperties: {
       staticMapImage.image = aPropertyMap.img;
     }
  }
]

ImageView {
   id: staticMapImage
   preferredWidth: screenWidth
   preferredHeight: 300
}
on StaticMapImage.cpp:
StaticMapImage::StaticMapImage(QObject *parent):
    QObject(parent)
    {

    }

void StaticMapImage::getImageMap(const double &aLatitude, const double &aLongitude, int width)
    {
    ViewProperties mapProperties;
    mapProperties.setLatitude(aLatitude);
    mapProperties.setLongitude(aLongitude);
    QRect windowRect(0,0, width, 300);
    mapProperties.setWindow(windowRect);
//  mapProperties.setAltitude(500);

    iMapImageGenerator = new MapImageGenerator(mapProperties);
    bool result = connect(iMapImageGenerator,
            SIGNAL(finished(bb::cascades::maps::MapImageGenerator *)),
            this, SLOT(imageFinished(bb::cascades::maps::MapImageGenerator *)));
    Q_ASSERT(result);
    Q_UNUSED(result);

    iMapImageGenerator->start();
    }

void StaticMapImage::imageFinished(bb::cascades::maps::MapImageGenerator *aMapImageGenerator)
    {
    bb::cascades::Image img(aMapImageGenerator->imageData());

    QDeclarativePropertyMap* propertyMap = new QDeclarativePropertyMap;
    propertyMap->insert("img",  QVariant(QVariant::fromValue(img)));
    setProperties(propertyMap);

//  delete iMapImageGenerator;
    }

QDeclarativePropertyMap *StaticMapImage::properties()
    {
    return iPropertyMap;
    }

void StaticMapImage::setProperties(QDeclarativePropertyMap *aPropertyMap)
    {
    iPropertyMap = aPropertyMap;
    emit getProperties(iPropertyMap);
    }
on StaticMapImage.hpp:
class StaticMapImage: public QObject
{
    Q_OBJECT
    Q_PROPERTY(QDeclarativePropertyMap *properties READ properties WRITE setProperties NOTIFY getProperties)
public:
    StaticMapImage(QObject *parent = 0);
    Q_INVOKABLE void getImageMap(const double &aLatitude, const double &aLongitude, int width);

private slots:
    void imageFinished(bb::cascades::maps::MapImageGenerator *aMapImageGenerator);

public slots:
    QDeclarativePropertyMap *properties();
    void setProperties(QDeclarativePropertyMap *aPropertyMap);

signals:
    void getProperties(QObject *aPropertyMap);

private:
    MapImageGenerator *iMapImageGenerator;
    QDeclarativePropertyMap *iPropertyMap;
};
Thank you
-
How to get the icon to display for a Midlet app?
Does anyone know how can I fix? It's all over on my application with the exception of the icon. It is ready for release, but the icon does not appear. I tried for a week now get the icon to display.
-
How to get a second image in the layer panel
In item 13, I have two images that I want from. I brought here them both of the Organizer to the editor, but I can't seem to get them both in the layer panel to use one as a background. Someone just tell me how to get an image from the photo bin toward the layer panel?
ligian2505 wrote:
In item 13, I have two images that I want from. I brought here them both of the Organizer to the editor, but I can't seem to get them both in the layer panel to use one as a background. Someone just tell me how to get an image from the photo bin toward the layer panel?
Several solutions. I advise to begin:
You have your two visible photos the of in "basket" (area of the bottom of the screen). Choose the one that will serve as "background by double clicking on its icon. She apparaiit in the editing space. Now, click the second image basket of the in and drag on the edit box. You have a preview of this new layer, ready to be resized, moved or such. Use the handles of the frame of this image pour what control do. When you post by clicking the green check mark, your new layer should appear in the layers of the screen Panel.
You can adjust the dimensions etc. without loss of quality; This layer is UN 'smart object' as long as you don't choose "simplifier" (freeze) the layer which becomes a regular layer.
Some operations on the layers cannot be carried out only after having simplified.
-
How to get out a 'Store Display Mode "(demo mode)?
I just bought a Sony Bravia KDL-55BX520
She was exposed to store and I can't get out of "Store Display Mode"(demo mode)
I tried a search on the web and everyone repeat to hold the arrow facing upwards and press the power button, but nothing happens.Hold down the HOME button on the bottom right TV for 10 seconds. It makes alternate the demo mode ON / OFF
-
Adobe Stock-dubious Marketing? [How to get 10 free images without registering for Adobe Stock?]
Recently signed up for a subscription of photography CC and was happy to see that I would be able to get 10 free Stock images. But when you actually go to get your free images you said then you get 10 free images with a @29.00 month subscription to Adobe Stock. While in the fine print, it says that you can cancel at any time during the first month, it actually requires an account with your credit card. Not impressed - if you get 10 free images why don't we just let users select 10 images free of charge without registration? After all that you say it is that they are free
MK
Hello
Thanks for your comments. As you have seen, registration is required for the 30 days test where you get 10 frames. There is no charge for the first month, and if you do not want to continue with the subscription, you can cancel during the first month.
Kind regards
Bev
-
How to get a particular image coordinated?
Dear friends:
as if to say, the image has the House, River, tree... etc.
If I click on home, it will alert you "it's a house", if I click on the River, it will alert 'it's a river
so, how to set up each image object coordinate? an example of code? Thank for help.http://blog.flexexamples.com/2010/03/22/creating-a-simple-image-map-in-Flex-4/
HTH,
FTQuest
-
I have a licensed version of Win 7 64 professional, how to get your DVD Image
I bought a new Dell PC and they ship no Windows Installation DVD where can I get a
If you have recently purchased a Dell computer with Windows 7 operating system and have
DataSafe Local 2.0 on your system, you can create a set of recovery disks that contain a complete copy of all the software installed on your Dell computer.Also how to request backup media:
http://support.Dell.com/support/topics/global.aspx/support/DellCare/en/backupcd_formProbably you have a "Recovery" partition on the hard drive,
control owner / manual to find out how to retrieve the user.Alternatively, you can call Dell (have your serial # ready) and see if they will be able to send you a set of DVD media
(there may be a small fee).Create a "System repair disc" recovery: click Start, and then type in the search box: System repair
OR
Download Windows 7 proper. ISO file (must match for your product key version)
Windows 7 Professional 32 bit: http://msft.digitalrivercontent.net/win/X17-59183.iso
Windows 7 Professional 64-bit: http://msft.digitalrivercontent.net/win/X17-59186.isoAfter you download the .iso file using ImgBurn or gear to create a DVD ISO bootable.
Create a Windows 7 Bootable DVD using the. ISO file
Engraving of a file of Windows 7 ISO on a DVD
http://support.Microsoft.com/default.aspx/KB/977640ImgBurn - in addition to supporting the creation of CD/DVD of. ISO files,
It supports a wide range of image file formats, and it's free.
(BIN, CUE, DI, DVD, GI, IMG, MDS, NRG, PDI and ISO)
http://www.ImgBurn.com/Projectiles help you to use ImgBurn to screen: http://www.imgburn.com/index.php?act=screenshots
Burn the ISO Images with ImgBurn article: http://neosmart.net/wiki/display/G/Burning+ISO+Images+with+ImgBurn
(The steps are the same, except that you do not create a repair disk but complete an installation DVD)Note: Always use DVD + R media and slower burning (4 x or 6 x) speed is offered a choice.
J W Stuart: http://www.pagestart.com
-
How to programmatically clear the Image display control in LabVIEW 2010
Hello... I need to do what I say in the title above... I went here,
http://digital.NI.com/public.nsf/allkb/514FD61A5F1829EA86256DF6004FDE13
and bother to follow the directions. I am, moreover, work in snapshot mode. So I followed the instructions to clear the display of the Image when you are working in the Snapshot mode, but it didn't work. Either I'm doing something wrong or maybe (as the instructions seem to imply) that this example was written for LabVIEW 7.1 and 8, but perhaps not for LabVIEW 2010? Hard to say, but can someone help me understand how to clear display of images (IMAQ/Vision). I just want to be able to clear an existing image before implementing a new. How can I do this in LabVIEW 2010?
Thanks bob...
Hello Paris1_
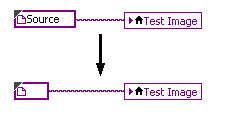
Make this change:
You write the constant Source image in the display of the images, but the Source image is already displayed.
Select a constant vacuum image to clear the display of the Image.

-
6830 OfficejetPro e-all-in-one: how to get setup in 6830 display?
The user 6830's manual said, I can get a printer status report in the touch screen by pressing the Setup program, but there is no configuration — anywhere. The default view's time on top (touch it only allows you to change the time/date, nothing else), 3 large touch areas marked copy, Fax, Scan (same thing happens when I touch one of them), and a row of 6 works icons (ePrint, Direct wireless, Wireless summary parameters, environmental parameters, Fax status, & estimated ink levels) and touch any of these returns a display that shows the installation program. How do the installation menu?
This should be quite irrelevant, but this printer is connected to a computer running Linux Mint KDE 17.1 and four other Linux operating systems (each a variation on Ubuntu), one at a time. And I have the hplipopensource printer driver, c. HP - 3.15.11, installed in each of them.
I found it! I didn't know I could slip my fingers on the middle row of the contact areas to reveal areas of contact more to the right. Once I did, I found the installation icon. Thank you.
-
How to get the #APP_VERSION # to display in a region
Request Express 3.2.1.00.11
Using a page template (home page > Application Builder > ApplicationNUM > shared components > models > modify the Page template) I can get the version of the Application to display on a page, using the following substitution #APP_VERSION string # in the foot.
But how do I get the version of the application to display (#APP_VERSION #) in a region.
If I place the #APP_VERSION text # in a model of the region, it displays the text #APP_VERSION.
I tried to use the Panel of dispatches Home > Application Builder > Application 221 > shared components > change the definition of request but the same thing happens.
Ben
Benton says:
I tried to use substitutions Panel to access the Version of the Application in the same way that I could do this;
Replacement replacement value string
-------------------------------------------------------
MY_ALIAS & APP_ALIAS.
Replacement replacement value string
-------------------------------------------------------
MY_APP_VERSION what is happening here - I want to access the value which is next to the * Version text in the panel titled 'Name' under Home > Application Builder > Application 221 > shared components > change the definition of request
I can to the Version of the Application other than its use #APP_VERSION # in a page template. I don't want to use static text.
The only way to access the application Version attribute using the #APP_VERSION model # substitution string in a template header or footer, or interviewing in the APEX_APPLICATIONS view SQL. Create an application APPLICATION_VERSION element and set it in a calculation of application of SQL query executed about calculation on the new Session:
select
    version
from
    apex_applications
where
  application_id = :app_id
The question of the application can now be referenced in the HTML source code like & APPLICATION_VERSION. or in SQL and PL/SQL like: APPLICATION_VERSION
-
How to get the background image to fill the browser and stay fixed in IE and Firefox?
Basically what it says in the title. I came very close to achieve, but something comes to Moor in the html and css code...
First of all, I use the latest version of Firefox and IE8 to test this situation.
I used 2 sources of information to get this done: 1) http://css-tricks.com/perfect-full-page-background-image/ and ) 2 http://stackoverflow.com/questions/8958697/css3-background-size-cover-doesn ' t-make-image-co-ver-vertical
In 1 case , the example of the called page CSS-Only Technique #1 gives the code that works almost perfectly for me, except that obviously I need to a background image, but the CSS provided ago obviously just for an image has fallen in the body of a page without taking account of any other content that may already be there. "The html code that I put on the page is simply < img class ="bg"src ="... / pictures/background_image.jpg "> "
Of course, I used the CSS code in the example, less the last piece which is "@media screen" etc., which seems irrelevant to me. Of course by replacing the values according to the picture on my page.
So what happened was that it worked almost as expected in both browsers (which means the image filled both browsers first as it should and also remained fixed when I zoomed in, inside or outside, in each case), except that the picture went on top of the current content that I already there precisely because there isn't a background in this 'technical '. (A note on the side of curious, is that the image didn't turn down content, I expected under normal circumstances, but he went right on top of it so she she hidden (like the z-index).)
One thing that bothers me in this regard 'technical' is that if you click on view the demo just below the code provided, you will see on the example of work page (bottom of the forest), the image clearly works as a backdrop and the content is fortunately located on top! So I don't know if the person who provides the example was trying to deceive people or what! Or he got lazy and showed another page which did not use the exact code, he has provided. No matter.
In any case this leaves me with only half-completed work, because I still need a background image that functions as the 'normal image' code provided.
In 2 cases and on this page, the first example provided gives the CSS for clutter - namely the code in the html {...} part and shows also the same "normal image" code as shown in box 1. In this case however, that the person provide a suggestion, the html and the css is not really properly more Moor some css and html seems a little redundant. So this time, when I used the part "html" in the CSS code (i.e. just the bit that was no longer relevant), I had two different behaviors in each browser and neither of which was quite what I'm looking for. In IE8, initially the page seems well (background fills the page and the content is on top) but when I Zoom in or out the background also zooms in or out accordingly so is NOT fixed. In Firefox, the background image stays fixed, but because the image is initially not the height of the browser I guess the code it extends down (keeping the proportions - so the image enlarges essentially) to fill it. The fast way to get around it is probably add white space at the bottom of the image just to give it sufficient height is not extensible / resize automatically. But it would be nice to know at least how to work around this problem in the code. Overall, I would say that the result in Firefox is closest to the desired solution, but of course it is not arranged things with IE8.
Apologies for the long description, but which should at least provide much info for anyone who might have a possible solution for me. Essentially what would be great is if someone could advise me how to take the code of case 1 and apply it to a piece of 'background' coding as the type that is contained in html {...} in Case 2 . Like I said, it is almost there, but I just can't operate atm after trying to combine different bits of code this way and that... Also, if anyone has another version of html-css that works well to achieve then please by all means of let me know! V thanks a lot in advance!
It works in modern browsers of the CSS3 support. But not pre - IE9.
http://ALT-Web.com/test/resizable-BG.shtml
Nancy O.
-
There is an option for this, but it only partially works... and I was wondering if there is something else I'm supposed to know about to make the feature work as described...?
I can activate the option to display thumbnails... transmission in works for the bitmap stuff. None of my vector masks are shown in the size of their layer. (Note - I layer in the form of transparency disabled - which means that the layer is shaped by the vector mask and not any content.) It is verifiable by checking the option to display the boundaries of the layer).
Yet, when I do this, it's obvious on the biggest screen (if the boundaries of the layer are displayed), than the vector contains the complete layer. But in the thumbnail, I often can't even the shape of all , not very useful.
So what don't understand me? How can I get thumbnails of vector to display the size of their layer?
Thank you!
I think it is supposed to work this way - vector layers are basically always full document size and the path determines only the pixelation and the visibility of the content based on the rule of filling in the path box. Don't say that there could be no way to determine the bounding box on the fly and use it for the thumbnails does not, but I do not know there is a certain reasoning / logic for this behavior. I guess it is also a matter of preference - in Illustrator, it's like that and it makes me crazy, because we never see where the substance is compared to the artboard.
Mylenium
-
How to get a RAW image not adjusted EPS
How do you get a picture no adjusted Adobe Camera Raw in Photoshop Elements? When I open a RAW file in ACR, the image is slightly different from the RAW (.nef) image as seen in other viewers the image. I believe that the difference may be due to default settings in ACR. What parameters corresponding to no adjustment at all?
The default settings or in the context menu where it says
Camera Raw default is closest to an unadjusted raw file
This camera raw provides. The default settings can be changed,
so, you might want to click on the shortcut menu and choose Reset Camera Raw default.
Other spectators as decision-makers in the camera software, can bring up the different file
because he can read the settings from the camera this camera raw reads no and some
viewers aren't really color management.
The idea of camera raw adobe is really to make the raw file resemble
you want through the use of various adjustments in camera raw.
MTSTUNER
Maybe you are looking for
-
That's all.
-
Periodically, when I want to search by default a local company or organization, Firefox automatically to a city in another State instead of the city where I live. In addition, weather and new local is listed for this town instead of my city. To corre
-
Re: Qosmio F30 - 112 - special buttons do not work after Windows 7 upgrade
Hello world I upgraded my Toshiba Qosmio F30-112 from XP to Windows 7, everything is ok. The only problem is with the buttons its does not work none of them (play, record, stop, pause, BRIGHTNESS-, BRIGHTNESS +, dolby, etc.) I installed the value add
-
Need password on the reactivation is grayed out
I'm having the same problem. In fact, what is happening on both of my pc running Windows 10. One is an Asus laptop and the other is a Sony Viao. Frustrating dinner! Safety is a priority for me, and after seeing my computer wake up with all my previou
-
A setting can be imported to 4.5?
I know it's something sick and wrong, but I've worn libraries personalized this in java applications, so I'm curious to know if anyone has looked at how do on a BB? Thank you