HP 7640: Negative-positive Conversion
Hello! Can I use my HP7640 to convert negatives possitive images and print them? If so, what are the steps. Thank you.
No, you cannot scan negatives on these all-in-one. To scan negatives, the scanner must have the special adapter, as well as the right sensor technology. You must get a scanner/AiO which is designed for scanning of negatives. Or get reprints of first from negatives.
Tags: HP Printers
Similar Questions
-
Makes a negative positive field entry
I have created a form for transfer of funds from the account a budget to another. Thus, the person between the account numbers and amounts for increase/decrease each to move effectively dollars.
How to make the display column decrease as one number negative to two decimal places in parentheses - example (200.00) even if it is entered as a positive number - 200.00 for example?
Probably the easiest way is to convert all the positive values for negatives and set up field format so that negative numbers to display you want. You can use a custom validation script to do this:
If event.value (+ event.value > 0) = - event.value;
-
Negative, positive value check
I have a slider and
My requirement would be, if the amount that is negative (for example,-8) type = 9 aligns the correspondent ve (e.g., 8) amount of type 10, we create a record type = 10 with + ve quantity in the product table
declare
cursor cur_find is
Select p.qty, p.id, p.group, p.loc, x.catog
product P, Prodline Pr
where and p.type = 9 and p.qty < 0 and Pr.id = p.id and p.qty in (select (-qty) of the product where type = 10);
Start
for x in cur_find loop
insert into values of product (x.id x.group,-x.qty, 10, x.catog); -He has only five columns and four first fields combined to create the primary key
end loop;
commit;
end
I doubt that this part (select (-qty) of the product where type = 10) will get the reqd result. ? pls help me, y at - it not best way to implementPlease confirm if this is correct or helpful to me to analyze to code better. :)
-
How to call a negative value in a PIE chart
We have some picky users that want the data that some of these negative in a pie chart. I use ABS() for show as positive negative measures and to make them appear, but I would like a way to be able to scream if one of the calculated items that appears in the PIE charts as negative when it is. Is there a way to color the pieces of pie by any other calculation that would show if the value is negative or a textbox communicate this element calculated is negative for this year?
Seriously... the PIE is the wrong visualization for + ve and ve - values (a PIE is to compare the values of %)... Use the bar and then the values of ve - go below the x-axis. You use ABS() bad negative positioning the real %s from the rest of the numbers - results in the wrong information that gives rise to wrong decisions - push this obligation!

-
channel search and move decimal places
Hello
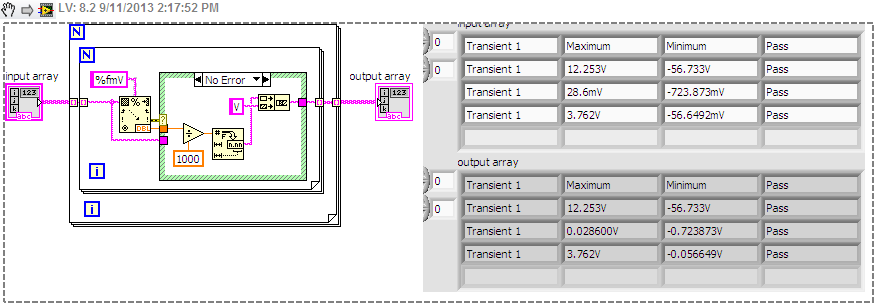
I'm writing the code looking for a fractional string in an array and convert MV V in order to be properly compared to the other fractional numbers of string in the table.
I have a chart that displays x iterations each with a column of minimum and maximum, including several types of decimal strings (negative/positive with several decimal places) each end with mV and V (example of a string:-725.543mV).
Then, I divided the table in columns that contain the minimum and maximum values for each iteration. I want to compare the minimum values for each iteration and find the minimum, and do the same thing with the maximum values.
Unfortunately, the way that I do, when I convert a fractional string numbering it removes label the unit V or mV but does not convert the number of mV V. so he compares - 725.543mV with - 52.334V as - 725.543 &-52.334, declaring the minimum value mV. I need the program to recognize that mV is less than V, or search in each table for the values marked with mV and move the decimal place is to the standard format of V.
The unit label is actually a part of the string and not the screen (as you can see in the code that I have attached) and I understand that it is a little tricky in the way I need to do. But it's a dumbed down piece of code that I have possibly fit in my largest program that reads the values and their units of several different types of oscilloscopes. The laid out the values as strings as they appear on the screen and don't make the difference between mV and V unless they are asked for units that the tags right on the end of the output string.
I'm sorry for the great post. SO to sum up, I need to find a table to ensure that all values have the same units, if they are not I need to convert each value of the unit appropriate, then output the max and min to the resulting table. my code is attached. Thank you for your help.
-
I use an AL2002W monitor with my 32-bit computer. It is connected from a DisplayPort output to an adapter to the DVI - D monitor entry. Whites out monitor intermittently, often enough it's causing programs to be unusable at times. Sometimes the question flashes on / off power for about one second at a time, and sometimes it will remain idle for several seconds. I don't want to 'off', the monitor is turned off the power, it is simply losing all the Visual effects. Looking up my display settings and the adapter in Windows 10, I see that my monitor is not recognized, he simply called a 'generic PnP view', and the refresh rate is at 59 Hertz. I spent 60 several times, but it keeps coming back to 59. I would like to know where I can get a driver for the monitor, because the only listed by Acer is for Vista (64 and 32-bit versions), and I rather would not try that if there is something more recent or closer to the compatibility of Windows 10. Any help with my situation would be very much appreciated, thank you for your time.
PS Also, I wish I could refine my parameters display a bit, to see if something works just outside of recommended beaches, if possible, except that any manual I found online for the AL2002W shows an arrangment of button front slightly different from mine, and complicates the navigation in the OSD menu. My button layout is: Page (possibly menu?) symbol, arrow down, negative, positive symbol symbol/Auto and symbol of power.
My DVI - D DisplayPort cable arrived much earlier than expected and has resolved my intermittent loss of visuals. I have not yet checked the solution 59Hz you suggested, but the screen seems to work very well, I suspect the DVI - D adapter DisplayPort that I used previously was the culprit, perhaps, he was not shielded well and was interference or something. In any case, thank you very mcuh for your time and effort and feel free to mark this as resolved issue.
-
Reinvest a presentation Manager and detect any changes in size
Hello
I am trying to create a user interface that mixes elements I draw myself with native widgets and I do this by substituting the painting and drawing to an image in the background before drawing the fields themselves.
To position the fields, I created my own Manager and position fields in absolute position based on my own component positions. For the base case works very well...
When I type in a field, it grows, I do not detect this growth so I can not ebb the user interface. How can I detect a change to the default size of the field? I followed the field muddy/Sales status but that doesn't seem to help here is a picture of my test case, white in the middle is a native field and find it me difficult to follow its growth in real time:
When I start the native UI scroll fields remain in place, I tried calling invalidateLayout, but it throws an exception? How to trigger the IU blackberry to call sublayout again?
That's what I mean fields are now on top of my drawn text box:
Thank you
Shai.
Yes, I noticed that you implement LWUIT. Two big thumbs up!
First of all - don't spend just a new Manager (...) as a parameter in your full screen (I hope you meant that when you wrote FullCanvas). Create a handler that is personalized with its own sublayout() and do the work there. In this way, you will be able to instantiate this Manager custom rather than writing the same code over and over again.
Second - substitute object it inside the Manager, not the screen. Not necessary, but once again - for the best control.
Third - It's weird that sublayout of your Manager is not called automatically, but you can force it anyway:
// in your MyClass:
protected void sublayout(int width, int height) {
  layoutDelegate(width, height);
}
Have not tested but it should work. This way, you should be able to rearrange and re - position your fields in the same manager that has all the knowledge, he needs.
One problem remains, though - how are you going to partially show these fields when they slide to the edge of the screen? I hope that you can set negative positions for them. Documentation for the manager class specifies all IllegalArgumentException on negative x and y in setPositionChild, so you might be lucky
 .
. -
Problems of UI to render with scrolling
Hello experts!
I developed an application that has a child field of verticalManager with a specific height, example:
VerticalFieldManager vfm = new VerticalFieldManager(Manager.VERTICAL_SCROLL | Manager.VERTICAL_SCROLLBAR | Manager.USE_ALL_WIDTH) {
       protected void sublayout(int maxWidth, int maxHeight) {
        int width = maxWidth;
        int height = 200;

        super.sublayout(width, height);
        setExtent(width, height);
    }};
Then, I added a few manager´s with label fields and confines internally, example:
HorizontalFieldManager hfm = new HorizontalFieldManager(Field.FIELD_LEFT);
hfm.setBorder(anyborder);
final LabelField idLabel = new LabelField("BLA ");
hfm.add(idLabel);
final LabelField idValue = new LabelField(" BLA");
hfm.add(idValue);
Well, unfortunately when appear scrolls and I scroll the last element with focus doesn´t appear.
If I scroll down again the element which should have appeared focusing appear without focus and update the point passed to the order of the day and he didn t show again, unless the item is the last one.
Any sugestion?
Best regards, Rampelotti.
I hoped the calculation would be obvious, but here are a few tips. This means that the field is added directly to the Manager within which you want to Center. If this isn't the case, travel managers of the field via getManager() until you get to the one you need and adjust the position of your domain with each Manager (add their x to x of your domain and their y-to-y in your domain).
1. decide in which Manager you want to visually Center your target area. Discover the height as using int visualHeight =
. getHeight(); 2. find out the scope of your targeted using XYRect fieldExtent =
. getExtent(). This is where you can browse your field managers until you get to the one you need.
3 calculate the position to reach:
int newScrollPosition = Math.max (fieldExtent.y - (visualHeight - fieldExtent.height) / 2, 0); cannot access a negative position
.setVerticalScroll (newScrollPosition); If you find it useful, please mark this message as a solution for the benefit of others who may come here via search.
-
Hi gurus,
I'm using ODI 11 g.
How will you do the map below in odi
Take the value before lengh and insert 0 and decimal is 12 for 0 before and after decimal length is 6.
Source Target
99,20 + 000000000099200000
100,20 + 000000000100200000
-2520.365 - 000000002520360000The source value is: DECIMAL (11.2)
Target value is: + 9 (12) V9 (6)Example:
Value source: 456.78
Target value: + 000000000456780000Thank you
Hi Marc,
I agree with the code you posted but dynamically, it won't hold.
Hello
I corrected the code and tested, please find below the code change and it will support dynamically based on values - (negative) + (positive) according to the prefix next to the source
Select decode (substr('-2520.365',1,1), '-','-', '+').
LPAD (substr (Replace('-2520.365','-',''), 1, InStr (Replace('-2520.365','-',''),'. ', 1)-1), 12, 0)
|| RPAD (substr (Replace('-2520.365','-',''), InStr (Replace('-2520.365','-',''),'. ', 1) + 1), 6, 0) twice;-->-000000002520365000 (exit)
Select decode (substr ('2520.365', 1, 1), '-','-', '+').
LPAD (substr (Replace('2520.365','-',''), 1, InStr (Replace('2520.365','-',''),'. ', 1)-1), 12, 0)
|| RPAD (substr (Replace('2520.365','-',''), InStr (Replace('2520.365','-',''),'. ', 1) + 1), 6, 0) twice;+ 000000002520365000 (exit)
Hope this can help you
Kind regards
Phanikanth
-
Interesting things, however, strangers? StackPane, animations and filters.
CHANGE (17/01/2014):
As suggested by jsmith , I changed this thread so we could treat the on only one thing. Other issues that existed here before I put each in its own separate discussion. I hope that now we can deal with it properly, so start New:
For the first test case, I tried to create a program that has some controls and I put a animated background behind her done with nodes in transition. With such a test, I received the following Visual result:
http://s24.postimg.org/tk0psfm2t/programa_errado.jpg
The background is made of white circles que increase and decrease more than time asynchronously. Notice how the interface (controls) is put on the top, and Unfortunately, it is not aligned for what is of the application window. Tthere resulting code from the image above can be seen below:
import javafx.animation.Animation;
import javafx.animation.KeyFrame;
import javafx.animation.KeyValue;
import javafx.animation.Timeline;
import javafx.application.Application;
import javafx.event.ActionEvent;
import javafx.event.EventHandler;
import javafx.geometry.Pos;
import javafx.scene.Group;
import javafx.scene.Node;
import javafx.scene.Scene;
import javafx.scene.control.Button;
import javafx.scene.control.Label;
import javafx.scene.control.TextArea;
import javafx.scene.effect.GaussianBlur;
import javafx.scene.layout.StackPane;
import javafx.scene.layout.VBox;
import javafx.scene.paint.Color;
import javafx.scene.shape.Circle;
import javafx.scene.shape.Rectangle;
import javafx.scene.text.Font;
import javafx.stage.Stage;
import javafx.util.Duration;

public class AnimatedBackground extends Application
{
    // #########################################################################################################
    //                                                                                                      MAIN
    // #########################################################################################################

    public static void main(String[] args)
    {
        Application.launch(args);
    }

    // #########################################################################################################
    //                                                                                                INSTANCES
    // #########################################################################################################

    private Group root;
    private Group grp_hexagons;
    private Rectangle rect_background;
    private Scene cenario;

    // UI

    private VBox lay_box_controls;

    private Label lab_test;
    private TextArea texA_test;
    private Button but_test;

    // #########################################################################################################
    //                                                                                                 FX INIT
    // #########################################################################################################

    @Override public void start(Stage stage) throws Exception
    {
        this.confFX();

        cenario = new Scene(this.root , 640 , 480);

        this.rect_background.widthProperty().bind(this.cenario.widthProperty());
        this.rect_background.heightProperty().bind(this.cenario.heightProperty());

        stage.setScene(cenario);
        stage.setTitle("Meu programa JavaFX - R.D.S.");
        stage.show();
    }

    protected void confFX()
    {
        this.root = new Group();
        this.grp_hexagons = new Group();

        // Initiate the circles and all animation asynchronously.
        for(int cont = 0 ; cont < 15 ; cont++)
        {
            Circle circle = new Circle();
            circle.setFill(Color.WHITE);
            circle.setEffect(new GaussianBlur(Math.random() * 8 + 2));
            circle.setOpacity(Math.random());
            circle.setRadius(20);

            this.grp_hexagons.getChildren().add(circle);

            double randScale = (Math.random() * 4) + 1;

            KeyValue kValueX = new KeyValue(circle.scaleXProperty() , randScale);
            KeyValue kValueY = new KeyValue(circle.scaleYProperty() , randScale);
            KeyFrame kFrame = new KeyFrame(Duration.millis(5000 + (Math.random() * 5000)) , kValueX , kValueY);

            Timeline timeL = new Timeline();
            timeL.getKeyFrames().add(kFrame);
            timeL.setAutoReverse(true);
            timeL.setCycleCount(Animation.INDEFINITE);
            timeL.play();
        }

        this.rect_background = new Rectangle();

        this.root.getChildren().add(this.rect_background);
        this.root.getChildren().add(this.grp_hexagons);

        // UI

        this.lay_box_controls = new VBox();
        this.lay_box_controls.setSpacing(20);
        this.lay_box_controls.setAlignment(Pos.CENTER);

        this.but_test = new Button("CHANGE POSITIONS");
        this.but_test.setAlignment(Pos.CENTER);

// Change circles position when button is pressed.
        this.but_test.setOnAction(new EventHandler<ActionEvent>()
        {
            @Override public void handle(ActionEvent e)
            {
                for(Node hexagon : grp_hexagons.getChildren())
                {
                    hexagon.setTranslateX(Math.random() * cenario.getWidth());
                    hexagon.setTranslateY(Math.random() * cenario.getHeight());
                }
            }
        });

        this.texA_test = new TextArea();
        this.texA_test.setText("This is just a test.");

        this.lab_test = new Label("This is just a label.");
        this.lab_test.setTextFill(Color.WHITE);
        this.lab_test.setFont(new Font(32));

        this.lay_box_controls.getChildren().add(this.lab_test);
        this.lay_box_controls.getChildren().add(this.texA_test);
        this.lay_box_controls.getChildren().add(this.but_test);

        this.root.getChildren().add(this.lay_box_controls);
    }
}
I think that my tree of nodes is structured as follows :http://S27.postimg.org/pjpvnlywz/rvore_de_n_s.jpg
I also have tried to change the root of my scene graph to StackPane. Unfortunately, the result was weird. Despite my interface controls went to the middle of the window (which is what I wanted), the bottom began to to animate in a totally weird way. I don't know what else to do on this subject. , It would be strange If this type of feature is not exist in JavaFX, because I could easily do this kind of thing to the Swing Framework library and timming. So far, I still can't understand how I could get around this problem. As a user of JavaFX, I think that it would be more interesting if the JavaFX developers would put more cool similar things to present in the documentation us. Well... If someone can help me Iwill be really grateful. I don't know a lot of people peut Can also take advantage of this too.
Thank you for your attention and patience in any case.
Editada por Mensagem: Loa
It seems to me that I finally got the result I wanted, thanks to God and to you for this. I'd love to share with the community here:
Using StackPane as root, it seemed to me that I was not getting the desired result. As you say, make use of the group for circles, causes odd effect I spoke. That's because you showed me in the JavaFX API, group is committed to the size of its child nodes. As in this type of animation background changes its size in transition (and because it's in a layout that centralizes things like StackPane), it seems that the circles are not calm and move every time they becoming or shrinkage. Using StackPane as one parent node to the circles, they are all mainly in the center of the Panel, as it is one of the goals of StackPane. As I intend to change their positions, I used the following code block so that it is possible (in the case where triggered when the button is clicked):
circle.setTranslateX(Math.random() * cenario.getWidth());
circle.setTranslateY(Math.random() * cenario.getHeight());
He was supposed to distribute the circles in the background of the window. However, it was not quite what happened. This that this resulted in circles in the background OF THE CENTER OF THE BACKGROUND, not distributing from the upper left, as initially planned by me. This means that the starting position in the center of a StackPane node leaves, that is to say StackPane not only centralizes things, but also change the initial position of them. For the circles to be distributed properly, I had to take into account the negative positions, since their origin was like being in the Center. With that, I could find the following code:
circle.setTranslateX( random.nextInt((int) cenario.getWidth()) - cenario.getWidth() / 2 );
circle.setTranslateY( random.nextInt((int) cenario.getHeight()) - cenario.getHeight() / 2 );
All this race about ended up giving me the tree of the following nodes:
http://S14.postimg.org/y887ps3zz/finalnodes.jpg
And also the following final code:
import java.util.Random;

import javafx.animation.Animation;
import javafx.animation.KeyFrame;
import javafx.animation.KeyValue;
import javafx.animation.Timeline;
import javafx.application.Application;
import javafx.event.ActionEvent;
import javafx.event.EventHandler;
import javafx.geometry.Insets;
import javafx.geometry.Pos;
import javafx.scene.Node;
import javafx.scene.Scene;
import javafx.scene.control.Button;
import javafx.scene.control.Label;
import javafx.scene.control.TextArea;
import javafx.scene.effect.GaussianBlur;
import javafx.scene.layout.StackPane;
import javafx.scene.layout.VBox;
import javafx.scene.paint.Color;
import javafx.scene.shape.Circle;
import javafx.scene.shape.Rectangle;
import javafx.scene.text.Font;
import javafx.stage.Stage;
import javafx.util.Duration;

public class AnimatedBackground extends Application
{
    // #########################################################################################################
    //                                                                                                      MAIN
    // #########################################################################################################

    public static void main(String[] args)
    {
        Application.launch(args);
    }

    // #########################################################################################################
    //                                                                                                INSTÂNCIAS
    // #########################################################################################################

    private StackPane root;
    private StackPane circles;
    private Rectangle rect_background;
    private Scene cenario;

    // UI

    private VBox lay_box_controls;

    private Label lab_test;
    private TextArea texA_test;
    private Button but_test;

    // #########################################################################################################
    //                                                                                                 INÍCIO FX
    // #########################################################################################################

    @Override public void start(Stage stage) throws Exception
    {
        this.confFX();

        cenario = new Scene(this.root , 640 , 480);

        this.rect_background.widthProperty().bind(this.cenario.widthProperty());
        this.rect_background.heightProperty().bind(this.cenario.heightProperty());

        stage.setScene(cenario);
        stage.setTitle("Meu programa JavaFX - R.D.S.");
        stage.show();
    }

    protected void confFX()
    {
        this.root = new StackPane();

        this.circles = new StackPane();
        this.circles.setStyle("-fx-border-color:blue");

        // Initiate the circles and all animation stuff.
        for(int cont = 0 ; cont < 15 ; cont++)
        {
            Circle circle = new Circle();
            circle.setFill(Color.WHITE);
            circle.setEffect(new GaussianBlur(Math.random() * 8 + 2));
            circle.setOpacity(Math.random());
            circle.setRadius(20);

            this.circles.getChildren().add(circle);

            double randScale = (Math.random() * 4) + 1;

            KeyValue kValueX = new KeyValue(circle.scaleXProperty() , randScale);
            KeyValue kValueY = new KeyValue(circle.scaleYProperty() , randScale);
            KeyFrame kFrame = new KeyFrame(Duration.millis(5000 + (Math.random() * 5000)) , kValueX , kValueY);

            Timeline timeL = new Timeline();
            timeL.getKeyFrames().add(kFrame);
            timeL.setAutoReverse(true);
            timeL.setCycleCount(Animation.INDEFINITE);
            timeL.play();
        }

        this.rect_background = new Rectangle();

        this.root.getChildren().add(this.rect_background);
        this.root.getChildren().add(this.circles);

        // UI

        this.lay_box_controls = new VBox();
        this.lay_box_controls.setSpacing(20);
        this.lay_box_controls.setAlignment(Pos.CENTER);
        this.lay_box_controls.setPadding(new Insets(0 , 90 , 0 , 90));

        this.but_test = new Button("CHANGE POSITIONS");
        this.but_test.setAlignment(Pos.CENTER);

        // Pressing the button, the circles will change to random positions.
        this.but_test.setOnAction(new EventHandler()
        {
            @Override public void handle(ActionEvent e)
            {
                Random random = new Random();

                for(Node circle : circles.getChildren())
                {
                    // The layout behaves in a very unexpected way.
                    circle.setTranslateX( random.nextInt((int) cenario.getWidth()) - cenario.getWidth() / 2 );
                    circle.setTranslateY( random.nextInt((int) cenario.getHeight()) - cenario.getHeight() / 2 );
                }
            }
        });

        this.texA_test = new TextArea();
        this.texA_test.setText("This is just a test.");

        this.lab_test = new Label("This is just a label.");
        this.lab_test.setTextFill(Color.WHITE);
        this.lab_test.setFont(new Font(32));

        this.lay_box_controls.getChildren().add(this.lab_test);
        this.lay_box_controls.getChildren().add(this.texA_test);
        this.lay_box_controls.getChildren().add(this.but_test);

        this.root.getChildren().add(this.lay_box_controls);
    }
}
The only little problem that 'left' now is when the user resizes the application. Once that circles are distributed whenever the application is resized they need be distributed again. My test application doesn't have with that in mind, but I think I can solve this problem easily using a layout that arranges the nodes by the edges of a panel using a proportional positioning. For example, should be a sign of provision for organizing nodes always a certain percentage of the edges. This can be done easily with a layout of the custom panel, because AnchorPane behaves in a different way.
I think that what I have to do now is go back and learn how to create a custom layout Panel. I want to thank all of you for your patience and your good intention to help. Thank you, really!
If anyone has anything to add, or corrections to what I said earlier, I would be very happy. The richest is this thread, best JavaFX is accepted for other users.
-
OracleDataAdapter.fill causing ArgumentOutOfRangeException
We have data recorded by an Oracle Forms application. This data includes a Date field for the time that the data of the last recording. If I try to read the data in a DataTable, a call to the OracleDataAdapter.Fill method causes an ArgumentOutOfRangeException exception.
"Year, month, and day parameters describe a not representable DateTime."
at System.DateTime.DateToTicks (Int32 year, month of Int32, Int32 day)
at System.DateTime... ctor (an Int32, Int32, Int32 day, hour, minute Int32 Int32, Int32 second)
at Oracle.DataAccess.Client.OracleDataReader.GetValue (Object [] values)
Looking at the data with Oracle Developer I noticed something interesting. The raw view the date since the application of forms differs a date saved from developer or a .NET application.
Select dump (savedate), to_char (' both, ' ddmmyyyy hh24miss ") of xxxTable;
Typ = Len 12 = 7: 80,86,1,9,17,13,4 09012014 161203
Typ = Len 12 = 7: 120,114,1,9,17,13,4 09012014 161203
The first is a date since the application of forms. The latter is a date saved app Developer/.NET. Yet developer seems to know how to get in shape together. Is this a bug in the database or in the OracleDataAdapter or Oracle Forms or in our code?
Oracle.DataAccess.dll v.2.102.2.20
Well, it turns out that the wrong date have a negative year, i.e. from BC. I mentioned cela our devs Oracle Forms.
The way in which Oracle stores the date internally is like that.
1 January 2014 16:12:03
Typ = Len 12 = 7: 120,114,1,9,17,13,4 09012014 161203
120 - 100 = 20
114 - 100 = 14
==> year 2014
1 ==> January
9 ==> 1
17 - 1 = 16
13 - 1 = 12
4 - 1 = 03
If you do the same for the wrong date, the year is negative.
80 - 100 =-20
86 - 100 =-14
==>-2014 or 2014 BC
I think that it a bit of a misstep by default of this Oracle Developer formatting does not use SYYYY (S being the negative/positive sign).
EDIT.
You can also change the date formatting in Oracle Developer go tools > Preferences > Database > NLS.
-
Original from the fake - everything is done on board
Hello
I asked at an earlier session, but unfortunately he had no answer.
It is my next try.
But before... I have some work.
I saw an interesting site of 'Range Rover' and wondered if this is possible on board.
My experience is more After Effects, but I felt comfortable with the tool edge verry.
I worked on a "Fake_Site", I tried to rebuild everything in Adobe_Edge as a practical test.
and see what I've done:
Source language:
https://victoriabeckham.landrover.com/de
My fake:
It's a huge timeline - only with stops-labels between the two.
But as you can see, there is the missing scroll function.
It is perhaps much more complicated than I can imagine.
To me, it seems that there is a script that connects the scrolling
to the timeline.
But I'm not a coder.
Question:
Who knows the script that connects the scroll to the timeline?
If all goes well there is little outside help and if it's only the answer:
"Forget it, no luck. «
Thanks in advance and greetings from the Germany
Oliver
Hi Oliver,.
I reworked a little example. Instead of listening to the built in case of Stage.scroll, I implemented a very cool jQuery plugin: http://brandonaaron.net/code/mousewheel/demos. You can keep the Stage.Overflow property as 'hidden', that this plugin listens to the raw, not a real event of scrolling mousewheel event.
Example:
http://www.timjaramillo.com/code/edge/mousewheel_timeline/scroll.html
Source:
www.timjaramillo.com/code/Edge/_source/mousewheel_timeline.zip
Code Stage.compositionReady:
() yepnope
{
Nope:]
' jquery.mousewheel.min.js'// path to the .js file to load
],
full: init
}
);
var timelinePos = 0; / / track current mounting position
var multiplier = 100; / / that multiply by the speed of the mouse to get the value of usable scroll
var timelineLength = sym.getDuration (); / / total length chronology
When yepnope has loaded everything run init();
function init () {}
$("html,_body").mousewheel (function (event, delta) {}
scroll up to the negative position of timeline
If (timelinePos > = 0) {}
timelinePos += (delta * multiplier);
SYM. Stop (timelinePos);
Console.log ("timelinePos =" + timelinePos);
reset values within the range
If (timelinePos< 0="">
timelinePos = 0;
} ElseIf (timelinePos > timelineLength) {}
timelinePos = timelineLength;
}
}
Event.preventDefault ();
});
}
-
Re: Cursor noise LR4 at the Local adjustment brush
Hello everyone. In the local adjustment brush, the position of the cursor to default noise is 0 t - it reduce more noise if the cursor is in a positive position or negative position . Thank you in advance.
Negative reduced the noise reduction that you applied on a global scale.
-
Have a page with a menu on the bottom bar using 3 horizontal divs above 7 horizontal divs. Have them placed Center on a 1024px width page. The top three float left and all have left margins. It is the same for the low 7. Each div is a link.
The problem I have is the spacing between the two bars. On the left are where I want them to be. Tried a margin left: 70px for one third of left and he climbs in the second line. The largest number is the left margin: 26px.
Bottom menu items have no space between them. However, to focus all I would left margin: 114px for the left most div. Once more is without number that works to get the last div on the same line.
The page in question is: http://kellymaglia.com/test/links.html
It is the first page with all the divs. When it works (?) all tables is converted.
Thank you.
Well, I'm back. New theory: float the Facebook to the right and the rest of the content (before shipping) allow to flow to the left:

{#links_pic}
#facebook {float: right; margin-top: 72px; margin-right: 20px ;}}
#kmphoto {margin-top: 26px ;}}
#abennett {margin-top: 42px ;}}
#bespun {margin-top: 42px ;}}
#upartists {margin-top: 46px ;}}
#menubar {width: 838px; margin: 25px auto 0 ;}}
/ * large menu * /.
#couture {width: 220px; float: left ;}}
#dancewear {width: 286px; float: left, margin left: 60px banner ;}}
#theatre {width: 200px; float: left, margin left: 60px banner ;}}
/ * small menu items * /.
#menuitems {width: 816px; margin: 0 auto ;}}
#shop {float: left; width: 91px ;}}
#noslip {width: 114px; float: left ;}}
#contact {width: 136px; float: left ;}}
#home {float: left; width: 124px ;}}
#faq {float: left; width: 104px ;}}
#policies {float: left; width: 124px ;}}
#links {width: 103px; float: left ;}}
. Clear {clear: both ;}}
BASIC CONSTRUCTION ORDER:
- #container. Note that I added overflow: hidden; to the definition of the rule. This will force the bottom of #container to frame all divs menubar.
- #links_pic (like today)
- #facebook. Note that it now floats to the right with a top and a right margin. Use a negative positioning as you had breaks in several browsers. Better insert Facebook first and leave the other stream of content up to his left.
- #kmphoto. Note that it has a margin-top only and not floating, because he didn't need to.
- #abennett. Even
- #bespun. Even
- #upartists. Even
- #menubar. Added to your margin-top: 25px; is margin-left and margin-right: auto (expresses the margin: 25px auto 0 ;))
- #couture. Now fleet left no extra margin on the left.
- #dancewear. Floats left with a left margin
- #theatre. Floats left with a left margin
- . Clear only the elements on both sides and maintains the smaller menuitems to move upward in the menu element large
- #menuitems. 816px width; margin: 0 auto; centers within the element parent (#container).
- Articles here; they have the width and float: left;
Here's a wireframe of the HTML:
imageFacebook badge
Image/linkImage/linkImage/linkImage/linkBeth
-
How can I convert a negative image of the film a positive image in Lightroom 6?
I've seen a number of online tutorials that explains how you can reverse/return line in the Module development of tone curve by dragging either end of the line, top / bottom for converting a negative to a positive image. This however does not seem possible in LR 6? So, how are you? (My scanner is able to produce positives TIFF or JPEG of the film I've been scanning, but I would have preferred to edit pictures using Raw DNG files that it produces, which are negative).
You must click on the small icon in the lower right curved panel to make editing possible.
If it comes to color film, I don't know how good a conversion that would be, it will certainly color adjustments, because of the orange mask in the negative.
And a scanner DNG files? I doubt that they will be real raw files...
You can scan an image tiff with all the cliches and to highlight the present details, and that will be as good as any raw file.


Maybe you are looking for
-
Network in Developer Tools tab does not work
In Developer Tools Network Monitor does not work for me. No request appears in when I open or reload a page or during the execution of an AJAX request.By clicking on the button Performance analysis does nothing no more. What could be wrong?
-
I want to add a new paper size in the print paper for this printer list. I read on one of the answers where you could click the HP folder and add it. I don't know where the folder is only that they are talking about
-
WUSB54GC rev.1 failed on Windows 7 x 64
Hello I installed Windows 7 x 64 and used my WUSB54GC rev.1 with Windows drivers by default, until... I moved it to the other USB port. Windows could not find the drivers. I tried a lot of things. The native drivers on the disk, installed the drivers
-
OCR software with more than 8600
Can I use paperport ocr software instead of the IRIS?
-
Dell Inspiron 15 speakers out from time to time?
It's strange, I'm new to this forum and I'm sure this has been asked over and over again. However I can't find an answer to my particular problem. First off, I love this phone I got it one year exactly. No problem whatsoever so far. A week ago, I tur