Lightroom, Nik plugins and color spaces
I'm having a problem and do not know who is holding the smoking gun. I have the ultimate collection of Nik installed covering Lightroom and Photoshop CS5 extended. I mainly work in Lightroom and apply to most of the corrections in the world, but sometimes I need to make localized settings, the picture gets boarded to Photoshop. Here's a typical scenario:
(1) from Lightroom edit in Dfine 2.0 for the noise - like copy with Lightroom adjustments that is copied to the tiff format.
(2) to Lightroom edit Viveza 2 - under the original name since we are now working with a tiff file and I don't want a copy for each thing I do.
3) edit in Photoshop
Now there are two questions at this stage:
(1) the changes appear not in the history of Lightroom - it's as if nothing happened.
(2) Photoshop will complain that the assigned profile is sRGB. Really?
#1 is a PITA because if I go back I have to start all over again because there is no history - which is exactly responbsible to set a tool for editing as history? Lightroom or the plugin?
#2 is by far the most serious because it degrades the work in a manner seriously bad. I mean, WTH - I'm moving along in the ProPhoto NET space and all of a sudden - * boom *-I'm running moped sRGB mode.
I looked at the edit-> Preferences-> editing external-> additional External Editor and indeed the default for plugins when I select the Nik plugins in combo box preferences is sRGB. I can change the ProPhoto and leave. I repeated for each plugin, assuming that somewhere the setting has been selected. Nope LR silent acts as a rock and watch sRGB as the default values for all except the currently selected plugin.
So my questions are:
-who's going to own up to the problem - LR or Nik?
-How can I work around it?
-How can I make LR remember the settings? Not a key of registry or INI file in order to set them - so where and how the plugins are followed?
Thanks for any help!
Jon
Jon,
The User Interface for the evolution of publishers how external are called is about as smart as your average piece of granite.
After you change the color space to the one you want, you must click on the preset box and choose "Save current settings as new preset...". ». Not really intuitive, but you're there.
HAL
Tags: Photoshop Lightroom
Similar Questions
-
When Lightroom does not display color space?
When Lightroom does not display color space is assigned to an image? It should be in the metadata Panel. In Bridge, it displays color Mode: RGB/B & W and color space: sRGB/Gray Gamma 2.2. Or Lightroom all converted Adobe RGB or ProPhoto RGB?
The ExifMeta plugin (free) will show the color profile in the metadata Panel.
-
Trouble with PS CC recognizing my NIK plugin and Photomatix software?
I have a new PC and that you have installed PS CC 2015 and his works on Windows 7.
I also installed two plug-ins to improve my images end.
I have the NIK software bundle and also installed Photomatix HDR software.
The major part of my RAW images from my Nikon D3 and I also have a Nikon D80, I've converted to shoot infrared images.
I never shoot in RAW
When I change the D80 RAW images, the options 'NIK Collection' and 'Photomatix' in the menu drop-down filter are not available.
All images taken with my D3 do not perfectly this problem and my old working version of PS.
I think that the original D80 was built in approximately 2009 (I bought it converted in 2011), I think that these images are not supported with the software more modern.
It is particularly frustrating that the NIK Silver Efex 2 pro plugin is superb for the finishing of the black and white IR images.
Everyone knows the problem?
Any suggestions to correct?
Move on to the Discussion of Photoshop
-
Problem with LR5.4 and NIK plugins Collection
I recently installed the collection of Google NIK plugins for Lighroom. All the plugins seem to work except that Vivesa 2 is extremely slow in response times well. When a control point is placed on an image, it can take as long as 5 seconds for the screen to refresh. I searched the internet for 2 days and have not found anything useful. The tab settings of Vivesa has nothing to change relative to the execution of GPU. I installed the latest video card drivers. My system Details are as follows:
software: Adobe Lightroom Version 5.4
hardware: Dell XPS8300 with the processor i7-2600 to 3.4 GHz with 16 GB of RAM
OS: Windows 7 Pro SP1 Build 7601
video card: ATI Radeon HD 5700 Series with 1 GB on-board memory
Someone at - it similar problems or have any suggestions?
I have no response to my problem, but after a few days of trial and error and testing, I was able to solve my problem with Lightroom 5.5 and the plugin from NIK Vivesa 2 - sort of.
Apparently, the question has something to do with the AMD Catalyst Control Center software that is normally installed with ATI video card drivers. After making sure I had the latest drivers for my ATI Radeon HD5700 series graphics card, I completely uninstalled the video driver and catalyst software and then continued by installing the video driver by itself. With only the video driver installed, the plugin from NIK Vivesa 2 was transformed into an almost immediate response time - no matter how many points control I dropped in the image from a slow animal with a response time of 3 to 5 seconds.
But there was one caveat - on my system with just the video driver installed the image displayed on my 27 "Samsung HD monitor does not fully cover the whole property available. There is about a 1/2 "black border all about the picture together, even with the resolution of the screen being reported in 1920 x 1080. The adjustment of sizing options in the menu of the monitor have not been able to compensate for that. The only way to solve this problem is through the setting parameters of the Catalyst Control software scaling. So, after testing all the collection of NIK plugins and have good success with each of them, I reinstalled the catalyst software - expecting the worst. But, to my great joy, the Vivesa 2 plugin is always sensitive and I was able to use the scale slider to fill the screen with the image displayed. I don't know what was the exact problem, and I don't know if I'd be able to reproduce the solution once again, but it works for now. Maybe it was just the order of installation - safe. I just wanted to post my provisional success in case anyone reading this is fighting a similar problem with an ATI graphics card.
-
PIXMA Pro 100 color space issues
Hello
I have a few questions related to printing from lightroom, I'm new on this bare with me.
(1) I have a canon 7 d I shoot in Raw 12-14 bit? and most of my treatment is done in lightroom, so no need to export to photoshop, however if I would be this export as 16-bit tiff or Jpeg? So, if I had to after post-processing in photoshop then back in lightroom, this would allow only me to print in tiff or jpeg format is correct as a psd/jpeg file?
(2) given that I only edit in lightroom I can print directly in Raw CR2 format 12-14 bit using canon plugin pro printing studio? or is it exported to the translator as a 16-bit file? and then use the ICC profile that is (canon paper) for best results paper mill, I lose a quality of colour printing by printing from Raw 12-14 bits instead of 16-bit tiff/jpeg.
(3) using the profiles of ICC paper mill, the original raw will deposit 12-14 bit sRGB 7Dcamera be translated to the printer default Lightroom or is the color space is not necessary because I have not converted to 16-bit in post processing?
(3) I did not have my calibrated monitor yet but intend to do so in the future, but until then I'm not messing around with pro, photoRGB Pro or Adobe RGB or sRGB mode.
(4) if I use lightrooms canon pro printing studio Player is the color space translated automatically the settings of my camera or do I have to activate it in lightroom first?.
(5) I use a Mac running yosemite 10.10 and to learn more about ICC profiles where the factory ICC profiles download how and where to store can you recommend a joint Web site to learn how to do this on a mac?
(6) as you can see I want to just print the best images from the camera to the printer without much science involved but I'm willing to learn, but get confused with the post-production of workspace different menu software for best results, that I'd do it prosume until I get my proffesionally calibrated monitor would print from Raw with the factory ICC profiles?
7) color space and calibration of the parameters are all about what you have on the print screen or it is mainly for the depth of extra color to print?
I can calibrate my monitor on adobe RGB and have my camera shoot on adobe RGB-calibration with the software, but said I need correct color surveillance devices? If I were to do this and still just used paper ICC profiles the footprints would be better?
My first impressions were excellent, very similar to what I see on the screen in all cases but I checked the lightrooms settings and these are on Pro photo RGB for external editing and it of color space for printing pluggin also studio, or is it just native Raw sRGB if I change the settings it says I'll lose the color space maxium potential.
Sorry for the influx of questions :-)
Thomas
Hahnemühle has an excellent explanation on downloading and adding profiles for PC and Mac
http://www.Hahnemuehle.com/en/digital-FineArt/ICC-profiles/installing-profiles.html
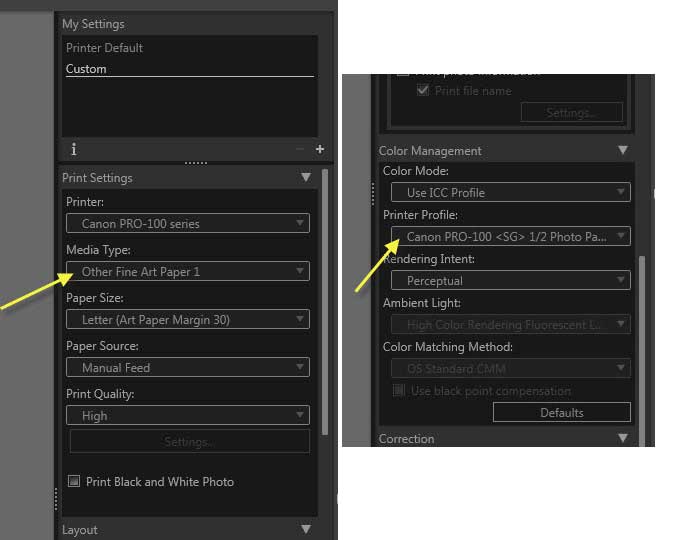
Print Studio Pro is rather obscure on the use of profiles than those installed, but it's pretty simple.
In the area of setting printer settings choosing fine arts I or II (I used one and it seems to work)
Then in the color management box, use the pull down to find the right profile added.
(I posted this before, but the post was deleted for some unknown reason)
-
What is confusing: I have a layered file, assigned color space is sRGB. I save a png file via save for Web, check the option to convert the export in sRGB. Everything looks good in the save to preview 2 - up web. But when I opened the new png file, it's the color profile is defined in Adobe RGB and color space appears off - is not as he did in the SFW preview.
Details: My default color space is Adobe RGB. Synchronized on all CS5 applications. I have the option checked to warn me on the inadequacy of the profile when opening a file. So far so good.
So it seems that my working space (Adobe RGB) color is the substitution of parameters SFW and my document color space settings
Same thing happens when registering as a jpg.
Any thoughts?
Economy on a PNG in save for Web will delete the profile. The box converts the numbers in sRGB, but the profile itself is stripped. So when you reopen this file untagged, the workspace is assigned.
A regular PNG, however, will keep the profile, even if the checkbox "add profile" is gray.
It's just how the current implementation of PNG in Photoshop. It makes no sense, but that's it. What you see is actually the standard "normal" behavior.
Regarding the jpeg, the default to save for Web is also to strip the profile, but you have the choice to incorporate at least here (you have not with PNG).
-
Projection of images and the question of the color space
We are having a discussion in our photo club. We use a projector to project the images of the competition. For years, we used Faststone Viewer to project images. We have the usual problems of people not calibrate their monitors and sometimes the colors match does not, but it worked pretty well. Now that the people who handle the projection are competent in LR, they use LR on a Windows laptop, to organize and display the images via the projector. The projector is a projector of sRGB VGA. Some argue that LR will cause problems because it uses the Adobe RGB color space as the space of display colors. (We know that the native color space is ProPhoto). Others think it will display images in space sRGB color to the projector as you can when you export an image. I can't find anything in Adobe help pages on this subject.
Here is a contribution to the debate to give you an idea of what some people are talking about:
I understand that LR will send bits of images (in the Adobe RGB color space) to the Windows API and in turn the bits are returned on the LCD screen and exit VGA via LCD/VGA color profiles associated. That is my understanding of the viewer FastStone sends the image bits being without modification in the color space. LR sends the bits altered the Adobe RGB color space. Assuming that both programs require the same Windows API, the images must return the same, but they do not. My conclusion is that the former is in sRGB and the latter in Adobe RGB. I guess they call the same APIs because you can open a jpeg file in Windows Picture Viewer (applet in Win7) and see a different rendering of FastStone, it does not use the color managed API.
Anyone who can shed some light on this delicate subject?
You actually want an app like Lightroom or Bridge to view images on your projector and not the unmanaged faststone Viewer or something like. Lightroom translated correctly the image on the destination for the projector profile regardless of the original color of images space. It is best to calibrate them and profile projector in addition to your monitor. Some of the highest fine adjustment washers support projectors too. It is rare that these projectors really are sRGB. They are usually somewhat narrower. Some of the more recent are wider gamut when using LEDs or lasers instead of bulbs.
-
Colors do not match from Lightroom (checked ICC, cab version and color settings)
Greetings,
I have a picture of the water in the rocks in Lightroom CC 2015. Do you have all my settings and it looks the way I want it. He sent to Photoshop CC 2015 and I get this strange halo neon-aqua in the water.
The image has a DNG from a Panorama in Lightroom, so I tried the following:
1. check that the treatment of color Aqua/Blue in Lightroom. Restore all files source panorama 0 and rebuilt. Same question.
2. export file looking for good Lightroom as TIFF, then open it directly from Lightroom. Same question.
3. open the TIFF file in other applications (e.g., Pixelmator, Raw Therapee). Image looks exactly as it does in Lightroom, so question should be in Photoshop.
4. change the settings in the color settings in Photoshop. Tried of perceptual and Relative. Have all the options under "Color management policies" as "Preserve" and all options are checked. All combinations led to the same question.
5 enabled setting in Camera Raw by bridge and resynched setting for the CC apps. Same question.
6a changed to write the settings Lightroom develop in format JPG, TIFF, PSD files (I always checked even when XMP). Same question.
7. calibrate the monitor with X - Rite ColorMunki Photo. Same question.
8 calibrate the monitor with a gain of X-Rite ColorMunki Photo, but this time with the ICC v2 profile. Same question.
9. turned on GPU (MacBook Pro retina end 2013). Same question.
10. tried to re-assiging and profile ProPhoto RGB conversion. Same question.
11. I usually export to Photoshop as 16 bit, ZIP, 300 dpi, ProPhoto RGB TIFF. Tried to export to Photoshop as PSD. Same question.
12 tried exporting as sRGB and AdobeRGB. Who worked in the sense that the halos of aqua has disappeared, but the image is duller than in Lightroom (although a so slightly).
In view of the fact that the image is displayed as expected in all applications, but Photoshop (well, Illustrator as well, but it converts the subtle colors of the water in 8-bit, so I'm not sure that the problem is the same), I suspect I'm missing something in Photoshop. In addition, it seems to only affect how Photoshop interprets the images with ProPhoto RGB profiles. I don't remember having this problem with previous versions.
All the foregoing is CC versions and is up to date. ACR is 9.2.
Steps 1 through 9 were the ideas that I found elsewhere in the forums, but I'm out of ideas.
A reflection as to how I can continue to use ProPhoto RGB, given that my entire workflow is based on that?
Thank you very much
Paul
Screenshots would help, but from what you describe this must be your monitor profile. A problem with the profile itself, or an application is not loading the correct profile.
It does not matter what color space you export from Lightroom. These applications are the two color managed and will display the file correctly regardless of the color space. They must be synchronized (the exception is the threshold effect that can happen from Adobe RGB to sRGB, but you won't see that on a range wide-screen.) Any cutting of ProPhoto was moot because you don't see, in any case, on any monitor).
So when you say you see a difference between a file exported as ProPhoto and exported as Adobe RGB or sRGB, it's a smoking gun. Something wrong here, and the main suspect is still the monitor profile.
The two find themselves in the same monitor profile, but the source profiles are different. In Lightroom, it is linear (gamma 1.0) ProPhoto, in Photoshop gamma 1.8 ProPhoto, Adobe RGB or sRGB. Conversions are so different. This is why a bad profile may appear differently in different scenarios.
Basic troubleshooting is to replace the monitor with a known good profile. That would be the sRGB or Adobe RGB, depending on whether your monitor is a standard or wide range. Then see if there is still a difference. Be sure to restart both applications when done - they load the profile screen on startup.

-
Color space of internal processing of Lightroom - CIELAB (1976)?
Dear reader,
just for your interest:
I created an image with a lot of spots of color and desaturated it in Lightroom.
Especially on the Blues there is a change of important to the purple hue, as usually with the color CIELAB(1976!), due to a fault, 'van Kries' space transform in CIELAB (source: Mark D. Fairchild, color appearance models). Other colors are hue shifted when desaturated, too, but the blue are the worst cases.
Color space of internal processing seems to be CIELAB.
There are several perceptual uniform color as CIECAM02 spaces, but this one is calculate maybe too intensive. other alternatives might be RLAB or ZLAB.
I wonder why in the profile of the monitors, cameras, etc., then Lightroom use CIELAB?
Kind regards
i4711
Lightroom uses RGB "Melissa", which is a Variant of Gamma ProPhoto RGB. It's quite well documented. http://ptgmedia.pearsoncmg.com/imprint_downloads/Peachpit/Peachpit/lightroom4/pdf_files/Li ghtroomRGB_Space.pdf
-
Apple TV and YCbCr color space
Sorry for my bad English.
I want to know if we can expect from Apple TV to support as their previous versions YCbCr color space.
Thank you
Ivan
Yes the current version 4 allows you to select:
Auto, high and low of RGB RGB, YCbCr
-
Hi can someone help me... I try to open my microscope fluorescnece images and they are all just empty black screen while the merged file shows the image. I can't change grayscale in RGB color space (like my single images the info on them is gray and the merged image color space is RGB)
Try to update your video card driver to exclude
Then reset your preferences - with Photoshop CC you can do it in the preferences. Earlier versions require that you press the modifier keys that you launch Photoshop. Ctrl alt shift on Windows or cmd opt shift on Mac.
-
B & W and color mobile version of the same image Lightroom?
Small question. Say I have a photo in Lightroom for mobile and I want to make a color and a black and white of this version. How can I do? Copy of another collection does not work (a photo in two collections is always considered as pictured) and there are no duplicate function, no version control as it is on the desktop version of Lightroom.
How can I make a color and a black and white photo version and stay in Lightroom?
Thank you!
Brett
You can do this in LrMobile purely. Instead, you create virtual copies in LrDesktop.
-
I have lightroom 4.4 and want to spend at 6.4. I downloaded the installer but it means it cannot download and contact the customer service. I have Vista and a lot of space.
That is what it is?
I don't think that Vista will work with this version
Scroll down and check each program
-http://helpx.adobe.com/creative-cloud/system-requirements.html
-
What is the best color space for workflow photo where the goal is marketing and selling prints?
What is the best color space for workflow photo where the goal is marketing and selling prints?
The really important thing here is not work in the color space. The important thing is that you set up your calibration targets so they correspond to the document that you are printing on. This means that the white monitor should be a Visual match white paper and black monitor a match to the density of the ink max for the paper.
But to answer the question - assuming that you print on an inkjet printer, Adobe RGB should cover most of what the printer can reproduce on a glossy paper of good quality. If you have or get a range wide screen you will also be able to see the range of the file to the screen and you can then test your profile to print with confidence that "what you see is what you get".
Some will say that good inkjet reproduce some colors that are in fact outside the Adobe RGB, and so you have to work in ProPhoto. While technically true, this superior to Adobe RGB color range is very small and very limited and IMO a fairly minor concern.
-
I use upstream, that allowed color spaces are CMYK. When I place a RGB file, preflight reports an error (very good). But when I add the Fx (effect) does not forward flight "Bevel and Emboss", report an error, which is really annoying. How can I fix? I like to have 'The transparency blend space' on "Document CMYK" and in the preflight profile "Fusion of transparent space" required: "CMYK".
Interestingly, if I copy and paste your images into a new doc 2 points scored.
I think that the solution is to assign the CMYK printer profile in the document. In this case, you no longer control upstream for RGB color, because by default it is converted to CMYK space correct on export or print output.

Maybe you are looking for
-
Qosmio G30-162 - BIOS update problem
Hi, I have a problem with the update the BIOS on a Qosmio G30-162, which seems to be running the following version: -.Version 1.20Version 2.3 of DMIDate of the BIOS 21/01/06 Whenever I run the update V3.90 it is said that it is not valid for this mac
-
Thread and ThreadStart functions stop in Labwindows
Hello I'm trying to access a card PCI Express, which uses the ThreadStart functions and ThreadStop driver. When I compile my code, LabWindows generate an error "missing" prototype I looked at the source code for the driver and the following line is i
-
Trying to airprint from iPad 2 with a new 6510. message of frequently without air printer found help
HP 6510; error-1 message; About 10% of the time printing works of the 1st try. More frequently, it is a painful process. Have an ATT & T wireless connection that appears strong. At least 3bar and shells, but the error message is that no printer no ai
-
No video in Media Player 11 for Vista
AVI files from my digital camera used to play in Media Player 11 for Vista. All of a sudden Media Player only plays sound, but no video for them. Or, it shows the first frame as a still image or a musical note icon. AVI files play again fine in Quick
-
Error 711; Remore access connection manager service will not start
Error 711; Remore access connection manager service will not start