Problem flashing with live viewing with IMAQ Image display
Hello world
I am writing a program for live imaging with camera Andor. I use some examples from Andor. The images are acquired in sequence and send in Image IMAQ and also graphical intensity display. There is minimal flicker issue in the graph of the intensity, but it is very bad flickering problem in display Image IMAQ. Maybe I wrong understand how to optimize vision tools. Does anyone know how to fix this? I enclose the code that I have tested. Thanks in advance.
Best regards
Han Yen
HI Han,.
You should try a right-click on the screen and choosing "snapshot". Who help me? In addition, you have a while loop nested in a while loop and the Interior more than while loop I see you have a Subvi I have not (GetMostRecentImage16) according to what is in this VI, this could slow down things - especially since the chart and display have to wait for the most secret while loop at the end of execution before the update.
You can remove the inside while loop?
Tags: NI Software
Similar Questions
-
Canon 6 d not focus or flash in ' Live view '.
My Canon 6 d not focus or flash in ' Live view '. I have a canon 430ex II and an E - ttl flash with a sync for the function E - ttl cable. The camera to simulate the action of the shutter, but no picture is taken. How can I overcome this problem.
From time to time, after trying to take several pictures, it will begin to work, but usually isn't.
Hey Shadowcat.
Thanks for posting.
It seems that the AF method is set in fast Mode. When the device is set for Live View shooting, there are different methods of AF that can be set. In fast Mode, the device uses the AF sensor dedicated to focus when you press the shutter button halfway.
The image on the LCD is stopped while the camera tries to focus because the shutter closes and the mirror falls on the image sensor. It may seem as if the camera is taken a picture, but this isn't, it focuses only. No flash is triggered during this process either. Continue to hold the shutter halfway button until the focus is reached, how the image will be back on the LCD screen. Then you can press the shutter button the rest of the way down to take the picture. The flash fires and the image will be saved.
This has not answered your question? Find more help contact us.
-
Problems with the images displayed in the document... but not errors
Hello
I created a download page for CFFile simple within the administration of a content management system, that I built. I am able to download image files in a directory image designated without error.
< cffile action = "upload" accept = ' image/jpg, image/jpeg, image/gif, image/png' nameconflict = "makeunique" filefield = destination 'imagefile' = "" / > "
In a separate area of the CMS I use to display and select the images in the directory < directory cf >.
< cfdirectory action = "list" directory = "" name = "rsImages" type = "name" filter = "*.jpg" / > "
Everything seems great and I get no errors. The images are actually transferred to the web server, but they do not appear in the document. No errors, if. I'm completely stumped. I have tried several things without success. Any help is greatly appreciated.
Thank you
Luis
Look at the HTML source of the page. Make a copy of the image URL in a separate window. You can view the image?
-
How to create a file with 2 images displayed side by side?
Hello
I have two photo files and I just want to create a folder, displaying two pictures side by side. I studied all the functions in my Adobe Photoshop elements Version 11 and I can't understand how do.
Thank you
Kevin
Hi Kevin
Open both of your images in expert mode - they will appear in the photo tray.
In the top menu click on file > new file empty
Choose your width and height, and resolution (72 for PC/web) or 300 for printing and the background color set to white or whatever you prefer.
Drag your first image of the photo tray to the top on your model. Select the move tool to drag and where you want. You can also drag the handles to angle to scale/re-size.
Repeat for the second photo and when registered as a PSD to preserve the layers for futire editing or use the file > save as to create a jpeg file.
-
IMAQ image display turn off completely in executable mode
Hi all
I created an executable file with a display imaq and ran on several PC. In all cases except one, I can manipulate the scroll bars, and other properties without any problem. Run the executable is not running on a specific PC. I can't change the display properties. This include the scroll bars and tool KING. It does not resemble the imaq display is completely locked.
I even generate the executable file in the same PC. It still does not work. The normal VI (non-executable) operate OK in this machine.
On another PC with exactly the same motherboad and video tips works fine.
Thanks in advance if anyone can provide suggestions.
JK4
Hello jk4.
Just to clarify, the VI would go well on this particular PC. The executable seems to work as well, but you can't manipulate the properties of a view? Is that IMAQ display or the regular waveform view? You can create a simple VI (executable) access the node display IMAQ property?
-
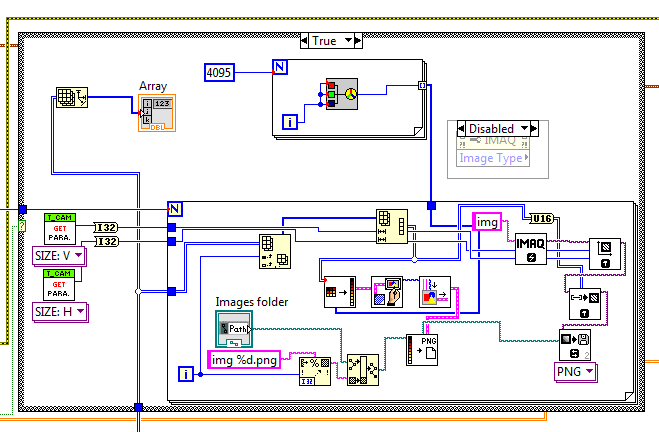
Save image 12 bit < with > imaq
Following a previous question, I've done here, I discovered that I am able to install and use IMAQ.
So I try to do what I need, is to record a 12-bit grayscale with IMAQ image.
I read somewhere here that more can I go to save as 16 bit - I hope that it will not create problems in the final image.
in any case, is to know how far I could go - trying to understand works IMAQ:
(Sorry for the confusion - the lower left part deals with it without imaq, the party is on the right)
It works, I get a "error-1074396154 occurred at WritePNGFile IMAQ - or the possible reasons: IMAQ Vision: the image is not big enough for that operation.
-but just for this reason that I have inserted a SetImageSize IMAQ!
any clue?
Thanks for any help...
Alessandro
I have not installed imaq/SAV/vdm, so I'm going from memory here, but
(1) you will encounter many problems with memory. you create a new image for each iteration of the loop and never remove. At the very least put an image destroy after imaq functions. The way I have always done things is to create the image once and then just re-use before destroying once at the end.
(2) I think that your problem is perhaps the fact that you need to explicitly set the type of image in grayscale 16 on the imaq create functions, but I'm not positive
This article refers
http://digital.NI.com/public.nsf/allkb/B51CCE62D00112B68625735C0000DDCF
These
http://www.NI.com/example/28120/en/
examples that may help you more
-
use of display and IMAQ image memory
Hello
I wonder how much memory is used when updating from imaq image display.
I need to display images (512 x 512 size) acquired by a camera in real time. But I don't necessarily need show each of them so that can save me some memory. The camera runs at 50 fps and I can live with display rate 5 frames per second.
Right now my image display is updated from the buffer (updated at 50 fps) continuous (Snapshot mode off). I guess I have 3 options:
1 use the lifestyle snapshot and say explicitly on the screen to update. Whenever the display is refreshed, a copy of the image is created. But I guess that the previous copy is destroyed at the next update. If this method costs an extra copy of the image in memory.
2. create an extra copy of the image that is updated only at 5 fps and connect it to the display of the image (Snapshot mode off). I think this is equivalent to method 1, with respect to the use of the memory.
3. in the State. No additional copies of the image is stored. But the display is updated at 50 fps.
Which is more expensive, update the display 10 times faster or holding an extra image even copy of the memory size?
Thank you!
It is not really a memory problem: you have an indicator to display images. Display an image requires additional resources, but there is no continuous memory allocation! Once the resources are allocated, the use of the memory of your application will remain stable. (Otherwise, something goes wrong and need to be identified and fixed.)
-
Problems with the mode live view
I created a new page yesterday (first with the bootstrap information). Everything went well.
When I opened again today, the 'live' view displays a blank page with a "unknown error: problem loading page". No idea what is the problem? TR
You must have a server installed test and running to preview PHP pages in Live View mode.
Your local testing server running?
-
Problem with styles Css does not display mode live view or when I browse
I use Mac OS x 10.6 and construction Web site with Dreamweaver CS5. I sometimes create div tags no styles or rendering mode display live view or when I browse but showing in design mode. I looked in dreamwever faq and they speak not no projection in Design view to toggle the display styles. This isn't the problem because it is checked, and I tried to turn on and off and made no difference. I use the firefox browser.
It happened before the other day too. But all my other pages of this website that I created in the same way the construction with DIV tags and css styles So, not sure what is the problem. Maybe someone has a suggestion here.
Johanna
http://johannabresnahan.com/CSS/jbstyles.CSS
{Line 420 is missing a closing brace} for the rest of the style sheet is either misinterpreted, including rules #mm1thumb and #mm2thumb.
#footer {}
background-color: #263f64;
Clear: both;
float: left;
height: 150px;
Width: 881px;
position: relative;
do-family: "Lucida Sans Unicode", "Lucida Grande", without serif.
do-size: 9pt;
make-style: normal;
line-height: 9pt;
make-weight: normal;
do-variant: normal;
text-transform: none;
color: #FFF;
text-decoration: none;
padding-right: 0px;
padding-bottom: 0px;
padding-left: 0px;
text-indent: 525px;
} / * THIS CLOSING BRACE IS MISSING * /. -
Contact information for return pixel Imaq image with the mouse click event
Hello
I'm trying to get the coordinates in pixels of an image Imaq based on a mouse click event, similar to this post and this post. The problem is that with the first post, I get the coordinates in the image control and hesitate to trust them, they seem to have the Center origin, may return negative coordinates and do not represent the actual size of the detector that I use (512 x 512). It also returns the coordinates outside the actual data when it is clicked on the image control framework. The second method returns simply null coordinates. What I want are the coordinates of the pixel displayed when hovering the mouse imaq image control framework.
What baffles me, is that I tried the second method with a png stock file and it works fine, it is only when I create an image from the data of my camera than the coordinates are returned null. Note data views of camera under control of image very well.
Any ideas would be useful. Enclosed is a picture of the offending code and the Panel before displaying the camera data is coming (I know it needs some cleaning).
Thank you
Tyler
for help, please send your vi
but I think that this example vi is your solution
check this vi
-
I have a hp laptop with Windows 8.
Whenever I turn my laptop on, it flashes with a blue message appearing saying "your PC came across a problem..." »
I tried repeatedly pressing f8 as soon as I start my pc, however nothing appears when I try this.
Is that what I can do to fix this?
Original title: System Restore
Hello
Check with the help of HP, their online documentation and drivers, diagnostics and ask
in their forums on known problems.HP support/troubleshooting & drivers
http://welcome.HP.com/country/us/en/support.htmlContact HP
http://welcome.HP.com/country/us/en/contact_us.htmlHP forums
http://h30434.www3.HP.com/PSG/=========================
In 'some' case will help this article.
Crashes Windows or freezes
http://support.Microsoft.com/kb/2681286Do not forget to check with support of system manufacturer (manufacturer of motherboard for custom
online systems), their resources and the drivers and ask in their forums (if any)
on known problems. Don't forget to update BIOS, drivers of low level chipset,
and the other pilots of major on-board and separate devices. Those who alone can
set all or part of these issues.Note the use of Win Key + X and Win Key + W (to go on the Control Panel, Run and parameters
According to needs). Win + D key calls the office and using Win Key active / disable the Office
and the splash screen.Translate Windows 7 methods and use them on Windows 8.
Resolution of the blue screen in Windows 8/8.1 errors
http://Windows.Microsoft.com/en-CA/Windows-8/resolve-Windows-blue-screen-errors
Resolve errors stop (blue screen) in Windows 7 - has a section for if you can or can not
Start Windows (applies to Windows 8). If you cannot start Windows 8 try using a repair
Disc (see methods of doing a below) to access Mode without failure and other troubleshooting
steps.
http://Windows.Microsoft.com/en-us/Windows7/resolving-stop-blue-screen-errors-in-Windows-7Check this thread for more information using BlueScreenView, MyEventViewer and other methods
to troubleshoot the BlueScreens - top 3 responses (+ 1 other) (applies to Windows 8).We can analyze the minidumps if make you it available to the SkyDrive or another file
sharing sites (such as MediaFire). If you have problems to download the copy of minidumps
for the office or in the Documents folder and download them from there.ZIP or download the content of the C:\Windows\minidump
Use SkyDrive to upload collected files
http://social.technet.Microsoft.com/forums/en-us/w7itproui/thread/4fc10639-02dB-4665-993a-08d865088d65-------------------------------------------------------------------------
Also this, so you can see the probable bluescreens.
Windows Vista restarts automatically if your computer encounters an error that requires him to plant.
(also, Windows 7 and Windows 8)
http://www.winvistatips.com/disable-automatic-restart-T84.html===========================================================
Check out these utilities to see if information may be collected:
It is an excellent tool for displaying the blue screen error information
-Free - BlueScreenView scans all your minidump files created during 'blue screen of death '.
hangs and displays information about all accidents of a table.
http://www.NirSoft.NET/utils/blue_screen_view.html-------------
MyEventViewer can be verified at the time of the blue screen (BSOD) to in a
second or so time of the BSOD to provide more information as possible
cause: see TIP.MyEventViewer - free - a simple alternative in the standard Windows Event Viewer.
TIP - Options - Advanced filter allows you to see a period of time instead of the whole of the record-
Set it for a bit before and after the time of the BSOD.
http://www.NirSoft.NET/utils/my_event_viewer.html------------
AppCrashView - free - a small utility for Windows Vista and Windows 7 which shows the
Details of all application crashes occurred in your system. The information of the plant are extracted
the .wer files created by the Windows Error Reporting (WER) of exploitation component
system each time that an accident has occurred. AppCrashView also allows you to easily record the
list of accidents to the text/html/csv/xml file.
http://www.NirSoft.NET/utils/app_crash_view.html===========================================================
Windows 8 includes special discount methods (keep files and settings) or a reset
(new installation remove all).How to restore, refresh or reset your PC
http://Windows.Microsoft.com/en-us/Windows-8/restore-refresh-reset-PCHow to create a system image to refresh your PC in Windows 8
http://support.Microsoft.com/kb/2748351How to update Windows 8
http://www.eightforums.com/tutorials/2293-refresh-Windows-8-a.htmlHow to reset Windows 8
http://www.eightforums.com/tutorials/2302-reset-Windows-8-a.htmlIf you have need of a system repair disc or other methods:
How to create a "system repair disc" (CD/DVD) in Windows 8
http://www.eightforums.com/tutorials/2855-system-repair-disc-create-Windows-8-a.htmlHow to create a recovery USB in Windows 8
http://www.eightforums.com/tutorials/5132-recovery-drive-create-USB-flash-drive-Windows-8-a.html
How to start on the "System Recovery Options" in Windows 8
http://www.eightforums.com/tutorials/2269-system-recovery-options-boot-Windows-8-a.htmlBoot to the tip "Startup parameters" in Windows 8
http://www.eightforums.com/tutorials/4924-advanced-startup-settings-boot-Windows-8-a.htmlI hope this helps.
Rob Brown - Microsoft MVP<- profile="" -="" windows="" expert="" -="" consumer="" :="" bicycle=""><- mark="" twain="" said="" it="">
-
I am bad with Live View and display in web browser
I followed a tut on lynda.com to make a banner in rotation using JQuery and CSS, but I'm a little hung up with html, anyone who is willing to lend a hand?
My div containers and images show in Design view, but when I try to preview them in Safari or live mode view, it is empty!

I downloaded the project at http://nelsongifts.com/animated_banner/index.html
Here is the code I have a way for the body.
< body >
< div class = "marquee_container" >
< div class = "marquee_photos" >
"< img src="images/photos/Facebook.jpg "class ="marquee_panel_photo"alt ="Facebook"width ="625"height ="400"/ >
< / div >
< div class = "marquee_caption" >
< div class = "marquee_caption_content" >
"< img src="images/template/logo_facebook.png "class ="marquee_logo"width ="20"height ="13"/ >
< H2 > join us on Facebook < / h2 >
Test legend < p > < br / > < /p > more tests
< p > < a href = "#" > check it out! < /a > < /p >
< / div >
< / div >
< div class = "marquee_nav" >
< a class = "marquee_nav_item" > < / a >
< a class = "selected marquee_nav_item" > < /a >
< a class = "marquee_nav_item" > < / a >
< / div >
< / div >
< div class = "marquee_panels" > < / div >
< / body >
And here's the css.
@charset "UTF-8";
/ * CSS document * /.
{.marquee_container}
margin-top: 0px;
margin-right: 0px;
margin-bottom: 30px;
left margin: 0px;
overflow: hidden;
position: relative;
}
{.marquee_photos}
position: absolute;
left: 0px;
Top: 0px;
}
{.marquee_caption}
color: #FFF;
background-image: url (.. / images/template/marquee_caption.png);
background-repeat: no-repeat;
background-position: 0px 0px;
margin: 0px;
Width: 625px;
padding-top: 15px;
padding-right: 0px;
padding-bottom: 10px;
padding-left: 0px;
position: absolute;
left: 0px;
top: 390px;
}
{.marquee_caption_content}
Width: 410px;
padding-top: 0px;
padding-right: 0px;
padding-bottom: 0px;
padding-left: 25px;
}
.marquee_caption h2 {}
font size: 1.25em;
make-weight: normal;
text-transform: uppercase;
color: #FFF;
margin-top: 0px;
margin-right: 0px;
margin-bottom: 12px;
left margin: 0px;
}
.marquee_caption_content p {}
color: #FFF;
margin-top: 0px;
margin-right: 0px;
margin-bottom: 12px;
left margin: 0px;
}
.marquee_caption_content a {}
color: #FC0;
}
.marquee_caption_content a: hover {}
color: #FFF;
}
.marquee_caption_content .marquee_logo {}
float: left;
margin-right: 10px;
}
{.marquee_nav}
text-align: right;
position: absolute;
Width: 240px;
top: 390px;
right: 321px.
}
.marquee_nav a {}
background-image: url (.. / images/template/buttons.png);
background-repeat: no-repeat;
background-position: 0px 0px;
display: inline-block;
height: 20px;
Width: 20px;
margin left: 15px;
cursor: pointer;
}
Thanks for the help guys!
By removing the overflow: hidden CSS rule it appears mode live view... but infinity rule is supposed to hide everything outside the .marquee_container div, so I still need. When I get rid of position = absolute on the marquee_photos class, it seems to fix the problem, but I don't understand why.
-
If someone has the time to help, I would be very grateful. I am new to dreamweaver and I try to make a transparent Web page with columns and text box using styles. It looks perfect in 'live view', but when I look in any browser all the formatting has disappeared. It looks like the background with the text at the top of installed on wrapped throughout the entire page. I was not able to understand what is wrong in the days of research. Anyone know the answer?
Presents all first format I want and that's what it looks like in mode Live View, the second is what it looks like to most browsers.


Here's the code I used:
< / style >
"" < link href = "... / styles/tcastyles.css" rel = "stylesheet" type = "text/css" >
< style type = "text/css" >
{body
background-image: url (bamboo. (JPG);
margin left: 150px;
}
a: link {}
color: #600;
text-decoration: none;
}
a: visited {}
text-decoration: none;
}
a: hover {}
text-decoration: none;
}
a: active {}
text-decoration: none;
do-family: Verdana, Geneva, without serif.
do-size: 12px;
make-weight: bold;
}
a {}
do-size: 12px;
}
body, td, th {}
do-family: Verdana, Geneva, without serif.
}
. Container .faqs h2 {}
line-height: 40px;
}
. Container .faqs ul li {}
text-align: left;
}
.footer {}
Padding: 5;
position: relative;
Clear: both;
}
< / style >
< div class = "container" >
< div class = "header" > < span class = "menutable" > < / span > < img border = "0" src = "navigate_projects.jpg" width = "307" height = "167" well = "#FPMap0" alt = "Conservation agency - project Menu" align = "absmiddle" / > "
< map name = "FPMap0" >
< area shape = "rect" coords = "112, 132, 172, 127" href = "asia.htm" alt = "Asia" / >
< area shape = "rect" coords = "138, 92, 286, 110" href = "west.htm" alt = "Western Hemisphere" / >
< area shape = "rect" coords = "138, 73, 279, 89" href = "flamingos.htm" alt = "British Virgin Islands" / >
< area shape = "rect" coords = "131, 55, 249, 72" href = "turkscaicos.htm" alt = "Turks and Caicos" / >
< area shape = "rect" coords = "121, 35, 244, 52" href = "newengland.htm" alt = "Narragansett Bay" / >
< area shape = "rect" coords = "103, 17, 306, 32" href = "coyote.htm" alt = "The Coyote Study Narragansett Bay" / >
< area shape = "rect" coords = "121, 128, 173, 144" href = "pacific.htm" alt = "Pacific" / >
< / map >
< / div >
< div class = "menu" >
< table width = "100%" border = "0" align = "center" id = "menutable" >
< b >
< td height = "30" align = "center" valign = "middle" > < p > < strong > < a href = "mission.htm" > Mission < /a > < / strong > < /p > < table > ' "
< td height = "30" align = "center" valign = "middle" > < p > < strong > < a href = "pubs.htm" > Publications < /a > < / strong > < /p > < table > ' "
< td height = "30" align = "center" valign = "middle" > < p > < strong > < a href = "projects.htm" > project < /a > < / strong > < /p > < table > ' "
< td height = "30" align = "center" valign = "middle" > < p > < strong > < a href = "opps.htm" > opportunity < /a > < / strong > < /p > < table > ' "
< td height = "30" align = "center" valign = "middle" > < p > < strong > < a href = "sponsors.htm" > Sponsors < /a > < / strong > < /p > < table > ' "
< td height = "30" align = "center" valign = "middle" > < p > < strong > < a href = "coyote.htm" > NBCS < /a > < / strong > < /p > < table > ' "
< td height = "30" align = "center" valign = "middle" > < p > < strong > < a href = "guana.htm" > Guana < /a > < / strong > < /p > < table > ' "
< td height = "30" align = "center" valign = "middle" > < p > < strong > < a href = "tca.htm" > contact us < /a > < / strong > < /p > < table >
< td height = "30" align = "center" valign = "middle" > < p > < strong > < a href = "index.htm" > home < /a > < / strong > < /p > < table >
< /tr >
< /table >
< / div >
< div class = "banner" > study of the Bay of Narragansett Coyote < / div >
< d/div >
< div class = "box739" >
< h3 > what do NBCS? < / h3 >
< p > since 2004 the Bay of Narragansett Coyote study (NBCS) has developed strategies of coexistence and based management sciences for our most recent top-level predator. Coyotes, originally a species of Prairie, have successfully colonized all parts of the continental and coastal us over the past 100 years. They reached the islands of Narragansett Bay in the middle of the 1990s. Since then the coyotes have become more and more abundant and problematic in some communities of the island. < /p >
< p > in our history of cohabitation with the coyotes people constantly tried to eliminate them by hunting, trapping and poisoning. Lethal removal worked for individual problem animals but did not work as a strategy of population control. Why? Coyotes have physiological and behavioural abilities intrinsic to control their own numbers. If the coyotes are removed they increase reproduction and numbers to rebound quickly. The trigger of critical population regulation is competition for food. As long as the coyotes are well fed (with a few coyotes competing for food) their populations will grow. < /p >
< p > we know also that the opposite effect occurs if the coyotes if the coyotes are stressed by competition for food. If there are too many coyotes competing for the available food coyotes will drop the sustainable level of these resources. < /p >
< p > understanding of this relationship, the NBCS scientists decided to study the use of the resources of coyotes on two islands of Narragansett Bay, Rhode Island. We used GPS to find out location necklaces where coyotes are spending their time. We have made the assumption that if we could identify food resources important coyote - control - coyotes defray their own numbers. NBCS called & quot; management passive coyote. & quot; < /p >
< p > since 2005 when we are caught in the trap and to collar our first coyotes on the island that we found continuously as the most important food resources of our study are provided people. This means that they are in our command this means that we can control the coyotes. If we remove anthropogenic resources (human grants) coyote numbers will drop to the sustainable level of natural resources. When the coyotes are fed only natural prey number of coyotes (mice, woodchucks, rabbits, geese and deer) will be lower and they will provide useful pest services. < /p >
< p > according to our science NBCS generated a set of < has href = ' coyotes/best' practices for Coexistence with Coyotes - 8 Nov 2010.pdf management target = "_new" > best management practices for Coexistence with Coyotes < /a > - essentially a Toolbox for safe and sustainable community management, coyote. We work with the cities in our study area to adopt the CBMPs and be the first community in the nation to successfully and sustainably manage coyotes. We believe also in other cities and towns might be able to use our results as a template if they have problems of coyote. We have barely begun to implement the CBMPs on our islands. We soon hope to have all our implementation of the CBMPs cities - only, then we will see the full impact they make on the coyote numbers and behavior problems. You can follow our progress on this Web site. < /p >
< / div >
< div class = "footer" >
< table width = "100%" border = "0" cellspacing = "5" >
< b >
< td > top < table >
< td > < a href = "mailto: " [email protected] "> [email protected] < /a > < table > "
< /tr >
< /table >
< / div >
< / div >
< / div >
< p > < / p >
< / div > class iv = "FAQ" >
< H2 > FAQS < / h2 >
< ul >
How can < li > I coyotes control their own population? < /li >
< li > blah blah blah < /li >
< /ul >
< / div >
< div class = "content" >
< div class = "Yopougon" >
< div class = "col1" >
< h3 > Middletown adopts the CBMPs and passes an order of non-Feeding! < / h3 >
< / div >
< div class = "col2" >
< h3 > driver, Java and the Valley Pack < / h3 >
<
And here's the styles:
. Container {}
height: 1500px.
Width: 975px;
border: 8px solid #660000;
float: left;
}
. Header {}
float: left;
height: 170px;
Width: 975px;
background-color: #033000;
}
.menu {}
background-color: #FFC;
float: left;
height: 30px;
Width: 975px;
do-family: Verdana, Geneva, without serif.
do-size: 9px;
color: #660000;
make-weight: bold;
margin-bottom: 5px;
}
.table {}
do-family: Verdana, Geneva, without serif.
do-size: 8px;
make-weight: bold;
}
. Banner {}
float: left;
height: 100px;
Width: 739px;
do-family: Verdana, Geneva, without serif.
font size: 37px;
make-weight: bold;
color: rgba (0,51,0,1);
background-color: rgba (255,255,204,.7);
text-align: center;
line-height: 75px;
border-radius: 5px;
padding: 5px;
margin: 5px;
}
{.clearbox}
float: left;
height: auto;
Width: 760px;
}
{.box739}
Width: 739px;
float: left;
height: auto;
background-color: rgba (255,255,204,.7);
do-size: 12px;
color: rgba (0,51,0,1);
border-radius: 5px;
padding: 5px;
margin: 5px;
}
{.faqs}
float: right;
height: 620px;
Width: 205px;
do-family: Verdana, Geneva, without serif.
do-size: 12px;
make-style: normal;
line-height: normal;
overflow: scroll;
background-color: rgba (255,255,204,.7);
margin: 5px;
border-radius: 5px;
make-weight: bold;
color: rgba (0,51,0,1);
text-align: center;
}
{.col1}
float: left;
height: 500px;
Width: 359px;
background-color: rgba (255,255,204,.7);
do-size: 12px;
border-radius: 5px;
color: rgba (0,51,0,1);
margin: 5px;
padding: 5px;
}
{.col2}
float: left;
height: 500px;
Width: 359px;
background-color: rgba (255,255,204,.7);
do-size: 12px;
border-radius: 5px 5px 5px 5px;
color: rgba (0,0,0,1);
padding: 5px;
margin: 5px;
}
.footer {}
position: relative;
Clear: both;
background-color: rgba (255,255,204,1);
do-size: 12px;
color: rgba (0,51,0,1);
}
From the looks of your screenshot, I'd say it's a path problem. Are you sure that you downloaded the CSS document when you loaded the page and that the path is correct? It appears in your second screenshot that there is no style applied so your stylesheet is not included for a wrong path or because it is simply not there.
-
How to focus with live view on 70 d
Hello
My girlfriend recently bought the 70 d and while that it "is a neat device, we would hit a problem: how to place your focus using live view in M mode?
I want only to place the point and to focus with half the press as usual. Instead, when I place the focus by pressing the touch screen, it should be immediately shot.And why there is no possibility to move the update using the wheel apperture as on my 6 d?
Thank you much in advance.
N.B: Please excuse my English

When in live view, you can use the rear dial to move the focus "place".
As for the second request, when in mode live view press the info button to bring up the options. Take a look in the lower left corner, there is an icon that allows you to enable or disable the option to instantly take the photo. It will show it OFF or
-
Working in Live View when I press the zoom button to focus, I get a white screen with an x 5 or x 10 written. I do not get the image of zoom. He just started this today and I used it for years. Any help? Thank you. OH, I have a 450 d (rebel xsi)
Thank you very much


Maybe you are looking for
-
Up and down had the icons and the information that I use, of course. It should be clear how these are masked and not masked, while I spent a ridiculous amount of time trying to get in all sorts of items 'help' and can't find anything. Very frustratin
-
T430s: boot from an external USB DVD drive
I wanted to change the boot sequence to boot from external DVD drive to install Win8. To access the BIOS I hit Enter (empty password I guess) but in the BIOS everything is grey: I can't make changes. What is going on?
-
my tv is not regonizing my hdmi cable,
I have windows vista. on my audio controller says hdmi not connected to the nvidia hdmi outputSamsung tv, new hdmi cable.It works once, but without sound now my tv does not regonize my hdmi cable
-
typing and keyboard automatically goes back a few words and start typing from there. How can I stop it? so boring
-
How can I install Canon mx920 for windows laptop Toshiba 8?
How can I install Canon mx920 for windows laptop Toshiba 8? Can someone please help? I've never done this before. Any help or advice would be especially appreciated, thank you.