pushing a clip by a smidge
Howdy,
I am creating my acting reel. So I have scenes from movies, in that I was. I try to use only a part of the scene. And I can sort, select the 16s I want out 45 scene. Except, that when I try to push the cut end a little bit, I find myself another addition of 2 seconds. I just want to add maybe. 5 s. How to push just the part of the selection on a smidge?
iMovie 10.1.2
The right and left arrow keys move the playback cursor, an image by clicking back and forth, respectively.
Tags: iLife
Similar Questions
-
Pushing a clip in the multitrack CS6 - no go
Hello world
I can't push the audio clips in hearing CS6. I use Win 7.
When I have several clips in multitrack view, I click on one, and then I hold down the ALT key and press the left or right arrows, but the clip does not move. I'm doing something wrong?
When I'm in Premiere Pro CS6, on the other hand, I can click on a clip and boost using ALT left or right arrow.
Any ideas?
Thank you!
Petey
Premiere Pro, Production Premium CS6 for Windows
Windows 7 (64-bit)P_Forrest wrote:
In hearing... I do not get this and get really weird results like a greyed on the area of selection at the beginning of the workarea to current cursor. Would you know how I can just move the cursor to the beginning or end of a selected clip?
Uh, that is the sort of do what Ctrl + arrows! They don't just clip selected, but on all the clips in your session - so the CTI (what you think of as the cursor) will jump, since point you run it, after each start of clip and the end it comes to the session in order. In general this is not a problem at all, because it's lightning fast to it.
And of course, it's the conflict that you would have to pay if you to change the behavior of boost...
-
Clip Bo pushing video clips on site
What I am doing wrong? I added mp3 clips audio ok until now, when I find the track I insert in the bar of the soundtrack grows all the video clips to the right for the distance of the melody.
If I put the track at the end, I tried right click the blank space when I supposed to option "delete and close the gap". But it doesn't matter.
Any help much appreciated.
Tim (PE10, Win 7).
Tim,
When you drag your Audio Clip to any empty Audio track, hold down the CTRL key modifier, insert Edit, rather than Ripple Edit.
You can only delete and close space, if there are no Clips above or below this Clip/Gap should be deleted.
In addition, the MP3 can be problematic. This ARTICLE goes into detail. However, from your description, I think it's the difference between insert edit and modify the Ripple.
Good luck
Hunt
-
Classification of clips from many sources
I have a pretty unique "Finish" challenge that I hope that some Pro users can sound the.
I'm an editor of finishing in a press social media company. We do short recaps of the breaking news, social stories, political events, etc. A project can have clips from CNN, HBO, Getty, a feature film, a youtuber and graphic animation, all sewn together in a second of 50-80 story. Of course, these sources vary between highly ranked, professionally shot footage all the way up to intact amateur clips. I started "reverse grade" and clips of "reclassify" in an attempt to establish a consistent look for our brand, but am often questioned by the extreme dynamic range in the images we use.
The biggest challenge is our deadlines, usually in an hour or two to get the project, so I'm limited to the ranking within Premiere pro, extremely fast. I am currently using Lumetri color Panel during the major part of the correction / rank, with a curves here and a fast color corrector here.
My goal is to establish a workflow where I can:
1. quickly push all the clips in a relatively neutral Center (think: log footage)
2. apply a LUT overall, with a uniform result
3 win a Webby
The problem I have is actually reach this neutral starting point, systematically all projects.
-Do I have to painstakingly fix manual 'from scratch' correction?
-Are there techniques quickly push the clips already sorted to a neutral Center?
-Are there methods recommended for reclassification already ranking footage?
Here's my current workflow:
-Rub the sequence to correct the problems of major contrast - pulling usually contrast way back (pushing for that look of journal)
-Hustles blackheads / white to match
-Fill temperatures - usually warm new footy and cool amateur footy, still trying to hit this neutral Center
-Make a second contrast / black point pass
-If necessary, add RGB or Fast curves / three corrector chromatic way if there is always something is not sitting right
-Add an adjustment layer above all the clips, to apply LUT, add cereal
What do you think?
Any ideas on how to improve this process (or it rewrite entirely!) is very much appreciated!
Much love to everyone on the forum!
-A quick How-To-Guide to match all the clips to a waveform standard easy 3 steps in first.
Before you begin, open vectorscope HLS, YUV vectorscope and waveform type luma
-Add the color corrector effect to clip fast
1 view the waveform luma:
using the color corrector effect fast:
the value of point black ire 7.5
set the white point ire 90
If the black and white points are already overexploited, adjust the output level while they are defined.
Point Grey (the Middle slider), discovers the vectorscope HLS, make as small a point as possible, increase until you see elsewhere increase. a large part of the shadow will automatically match 30% on the luma of waveform. You can find this also creates a uniform slightly journal watch so it is easier to rank and later reconciliation.
2. white balance (white balance of the click dropper) or... If you can't find a white spot, place temporarily saturation so that it fits inside HLS vectorscope. Watch the vectorscope HLS so the hue wheel defines the lightest part weighted at the Center.
There is a secret tip for any skin tone to match and thus correspond to a faster color between shots, "line of skin tone.
Temporaily set 200% Saturation easily see the line of light saturation.
Align - quick corrector color-Hue - Angle brighest vectorscope HLS (no YUV) line between where the red and yellow line would be in the vectorscope YUV (around 11:00 o clock). It's the angle of the overall hue to the skin tone.
3. adjust color saturation fast correctior to 90% of edge vectorscope downtown YUV (100% is in contact with sides) so all the clips have the same saturation.
Now you have perfectly matched to black point, white point, contrast, gamma, saturation, tint to like 10 seconds per video. And the best part is, they are all easily dimmable.
a tip:
don't forget to keep an eye on your histogram for any sharp peaks, it means your footage is probably 8 bit and you might introduce quantization errors in your grade.
-
This is probably very simple for most. I'm new in preview! Whenever I go to drag a clip between other videos in my sequence, it sort of removes what it covers, rather than push the clip to the right, above. I'm on a pc.
Find more detailed information here:
Insert and overwrite the changes. Work with the timeline in Adobe Premiere Pro CC | Peachpit
Thank you
-
Is there a way to 'smart move' a clip?
So I'm quite a newbie here and probably don't have the right term for this...
I have four clips-
A B C D
I just want to go D in order so that the new sequence will be:
A B D C
But when I do drag and drop it appears just beneath it.
Sort to move smartly, it fits into the slot between the other two clips and push successive clips before the right amount?
Try ctrl + alt while moving.
-
In recent days, I noticed that my Photosmart C4680 is blower bike itself on and off. Anyone else have this same problem?
Does anyone know why its doing? Y at - it a solution?
Just do the repair. It was a bad capacitor on the logic board (TEAPO brand). There's that one to replace on this printer and it will probably look like curved on top (which indicates which are blown). It is 330uF 6.3V, but I got in a little bigger (16V, whatever they had in 330uF) and it works perfectly now. It's an easy fix, if you aren't afraid of soldering a component. It will cost about 60 c with a value of components. (and a kit of solder so you do not have a)
Open the scanner cover and the door of replacement ink. Reach behind the control panel and gently push a clip for the exit sign. He will reveal a hidden torx screw. There are four total screws to remove the top, and you can use a torx bit, or if no practice, the right to an allen key size.
Once you get the top up the rest of the printer, you must pull carefully on some connectors that attach to the logical map of its orbits. Some are simply Ribbon connectors and some wire connectors. Set the top aside.
Identify the bad capacitor on the Board by checking the upper surface. It is a green, a thin color that says TEAPO on it and if it is indeed the defective component it must feel to be curved on top.
Remove all the other connectors on the Board and unscrew 3 torx screws to remove the Board of Directors of the printer.
To unsolder the bad capacitor, it can be easier at first it break so you can extract each lead with pliers, one at a time when the application of heat on the side welding.
Respect the polarity, the negative side (identified by the sign on the new capacitor less) on the shady side to the Board of Directors.
Solder the new capacitor, clip wide leads, any excess back together. Your ' e did! Good luck!
-
OK, I don't know if it is already a device, if there is a plugin that does this or if I should just drop off as a request for feature/desire.
The background:
The workflow I discovered that runs the best for me is the following. Animate in Flash (now animate). Can I export as PNG files and import those first do overlay graphics and calendar and sound. And if need be I push the clip through after effects to make the finishing touches.
The issue/obstacle:
As I animate I have to animate virtually only one image by image key. This so that when I export I don't end up with a ton of duplicate PNG files. Of course, I can work with that in mind but the preview of images and loops becomes quite difficult especially when I have several animation layers animating at the same pace.
example:
L4: Layer of hair (a loop of framework 6 keyframe animated in three)
L3: Layer of body (with maybe a 5 image in the middle of the second 5 animation tour)
L2: Animation wallpaper (a Cape beat loop animated two for example)
L1: Natures background
For now, I have to do these three and two in those and kind of guess how they'll end up watching when I export them finally.
What I want:
I want to have some sort of option to export the sequence image exporter to export only the keyframes. Not the double frames. Just a checkbox that ignores any possibility of duplication and interpolation. If the image is a keyframe, export it. If it's something else. Do not.
Bonus:
If possible, it would be good to have an export the layers separately check box automatically. Right now, I have to go manually check and uncheck the eyes (visibility) of all layers to export layers. It would be great just check a "export layers separately" and it will look just the timeline. If the layer is visible, it is exported with a change to the name of the file. Like L01, or something. If the layer is invisible. Just ignore it.
This way I can press the export button and it will spit on all concerned managers.
Filename_L01_F001.png for example.
Then...
That way, everyone here know a feature like this? Or even a plugin that I can get that done?
Sure that there is no everything simply because this is not how to animate is supposed to work, BUT you can probably do with JSFL somehow. I do not know kglad can point you in the right direction.
-
Record streaming video from the internet
I work with a league sports games of webcasts of all stages. We want the record highlites of ability to be uploaded to an FTP, but that cannot make the Stadium during the broadcast on the Internet.
So, I was wondering if someone could do remotely by recording the stream in PR and then pushing the clips to be uploaded to a FTP server.
Does anyone have experience with this?
Any help would be appreciated
Premiere Pro doesn't have this capability
NOTE: do NOT use a Variable set... capture rate it NOT to edit well!
Free Open Source software http://camstudio.org/
-use with Lagarith Lossless http://forums.adobe.com/thread/875797
-
Activation of video while moving under the cursor on the timeline
Hi all!
I was wondering if there was a way to allow the abilty to see the video when you move on the timeline under the cursor. I´ll try to explain a little better:
I do a lot of clips, based on the Action takes, and I put the video (or certain moments in the video, like the firing of a gun) at the appropriate time with the music, for example on the first beat of a 4/4 timing. The problem is, I try to put this point in the video under the cursor (I found the point in the Audio where I hold to come out, adjust my cursor on the timeline and move the video clip of left/right below). The problem in this is that when I move the video clip to get the points aligned, I can´t see the video, it just shuts down. I do it a lot in Sony Vegas, I am able to see the video as I move under the cursor on the timeline and it works fine, but I really prefer to use the first place, but exactly this problem is what is going to send me back to Vegas.
My question basically boils down to: is there a way I can have first SHOW me the video under the cursor on the Timeline AS I MOVE it?
Thank you very much in advance!
War
I don't know of a way to get the framework under the read head display when dragging a clip. However, if you use keyboard shortcuts to 'push' the clip left or right, the current image is shown.
A completely different approach, if you have not tried, would be to use markers of audio video synchronization. Put a marker about synchronization in two clips, then select both, right click and select Synchronize. In the dialog box synchronize, select markers.
-
CTRL-e-dial in the project window.
I LOVE being able to zoom in/out of a Microsoft Word document (or icons of resizing in any folder of Windows 7) on-the-fly holding the key CTRL key while turning the mouse scroll wheel upwards or downwards (high-CTRL zooms in, CTRL-down, zoom out). It's lightning fast, intuitive, and fun!
QUESTION: Where is the smart zoom in Premiere Pro project window to increase/decrease the thumbnails?
ANSWER: There is none!
The scale of the zoom at the bottom of the project window, although functional, is not quick and fun to use. It requires the user to carefully move the cursor on a small icon of the user interface: an irritant, laborious and inefficient method compared to the ease and speed of resizing by using a shortcut of keyboard-mouse combo that Word and Windows allow so intelligently. By allowing users to resize the thumbnails in the list display using my proposed method, users can even skip the tedious step of having to turn the thumbnails in the menu of the wing! To activate thumbnails on, CTRL-wheel upwards to zoom forward to how the thumbnails are displayed automatically. To disable the thumbnails, just do the opposite, CTRL-wheel downwards. It would work in the same way that Windows allows users not only to resize the thumbnails of files, but also easily scroll through the option to display different folder with CTRL-scroll wheel. Simple. Intuitive. Brilliant. and Yes, even fun! Another big advantage of my proposed method is that unlike the current zoom bar, using a shortcut keyboard and mouse might allow users to zoom in 'around' of the current position of the cursor (like what happens when ALT-mouse wheeling in the timeline). In other words, if the cursor is on a clip to the bottom of the project window, increasing the size of the thumbnails would always the closest guard of slider clips in sight, instead of pushing the clip desired down out of sight, as would the zoom bar.
Adobe, please add CTRL-wheel zoom in the project window. And while you're at it, why not add this type of zoom to the window controls effect, Source and program monitors as well? Keyboard and mouse shortcuts are always much more effective to have to meticulously hover over tiny user interface elements, so please, do us a favor and add this functionally as soon as possible!
I was very happy when you finally added in CS6 the ability to control the scrolling timeline mouse behavior, which I and probably many others, asked the CS5 beta program. Now let's take this a bit further with a smart zoom, to the scale of the program! ""Is a small step for Adobe, a giant Bond for publishers of ' OK, maybe not just a small step for Adobe, but the fact is that the return on investment in this function would be great because it's something that could help all single Publisher PP there. "
If you have ideas on other parts of first that could benefit from having better methods to zoom in, please share!
QUESTION: The shortcut would make CHRL + mouse wheel to keep the combo that is consistent with the behavior of Windows and Word users are already used to, or should it be ALT + mouse wheel, to keep in line with the zoom combo first uses currently in the Timeline?
(By the way, I'll send a formal request for Adobe feature.)
Kevin Monahan, if it is not already on the radar of Adobe, it would be great if you could recommend to add this feature for us! I hope I expressed the benefits with sufficient clarity that put this on their list of tasks is a no-brainer.
PierreLouisBeranek wrote:
QUESTION: Where is the smart zoom in Premiere Pro project window to increase/decrease the thumbnails?
ANSWER: There is none!
Have you tried Shift + [or SHIFT +]?
All applications, you know what to do: http://www.adobe.com/go/wish
-
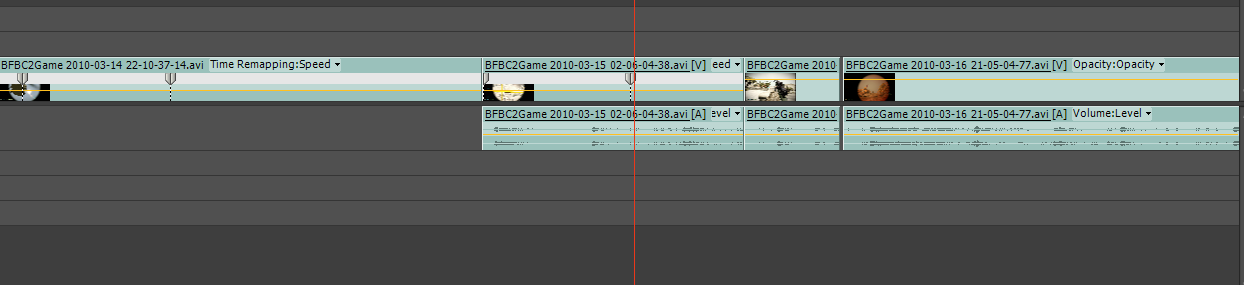
Need help with the remapping of speed
So here's my question. (check the photo below to see the chronology)
I'm working on a script and I have a clip somewhere in the middle of this timeline. Now, I put two markers that close off the area of the clip I want to idle. And then I drag the rubberband now at 50%. This causes the clip obviously become longer.
But the problem is that it doesn't push the clip that comes later, it submerges just sort of and I lose a part of the clip that I put in slow-mo.
http://gyazo.com/0cce5ab07e22897f21a25e3308a9cbb5.PNG Here is a picture of my calendar.
So my question is how can I make sure that the clip is pushed forward automatically?
I know how to solve this problem with some dragging and pulling, but I want to be as effective as I can not get into bad habits.
Thank you!
If all you want to do is simply slow down or speed up a clip, use the settings speed/duration - it is probably the simplest way to induce a change in speed. It is a change of pace, you can also do it with the time remapping effect - which is what I think you did.
The advantage of the time remapping effect, is that it allows variable speed changes within a single instance of an element. For example, suppose that you would like your item to start at 100% speed, slow down immediately at 25%, then immediately speed up to 200%. You can do this with speed/duration, simply by razoring the clip to the specific points where you want the speed change occur and then change the setting of the speed/duration to this instance of the item. With the time remapping effect, not only can you do this without having to cut the clip, but you can also create "ramps" from one speed to the other - where the aspect of variable speed. You can even freeze a clip or reverse the trend, all without having to edit the clip into small pieces. This can result in a much smoother effect, but it would still be not what you're after. Redefinition of the time has a bit of a learning curve, but it's really the most powerful of the two. Simply decide what is best for your application.
An additional advantage and I may be wrong on this, but I think that using the remapping effect temporal results function of (theoretically) more high quality speed change effect thanks to an algorithm different or some-such. It uses different techniques to generate the interpolated images created in a change of speed, which should look smoother than if they were done with the command of speed/duration.
Hope the helps a little.
-
TravelMate P645-MG how to remove the main battery? Nothing happens when I push with a paper clip in the hole of the battery icon at the back of the computer. A video UTube said that a cover opens, but I can't find where there is a cover of the battery compartment.
Hello
Your laptop is equipped with an internal battery. You need to remove some modules and the bottom of the laptop to have access to it. The pinhole is only to reset the battery.
-
Video clips get pushed by Audio Clips
When I add an audio clip on my CC calendar it always pushes my videos down. Why is this happening? It happens even when I lock my video clips. I'm sure it's something simple, but I can't understand it. Thank you.
All fees. No problem
How are lengthen you the audio?
I guess you drag the end of the tool... but with what tool (edit mode)?
I suspect that you are waving edition. Try to Drag control with only audio selected.
This action CTRL modifier depends somewhat on one of your settings preferences (something like modifier With or without modifier)
-
Clip on keyboard broken in Satellite A200
Hi there of the computer guru! First time poster, I was replacing my speakers in my laptop satellite A200 when the Clip that keeps the keyboard inside the motherboard cable broke.
Now, the bit that broke is not the part attached to the motherboard itself, it is a plastic clip that pushes the cable in and the sort of clips in the main motherboard for the cable clip.
Any help would be great as im sick of using an external keyboard.
Thank you in advance.I just need to know what the clip and where to get one of. Thank you
Hello
You will need contact your Toshiba ASP (certified partner) in your country.
Guys could order a new keyboard for this laptop.Welcome them
Maybe you are looking for
-
Impossible to find which takes a huge amount of space on my macbook HARD drive
Hello with location problems which takes a big chunk of space on my hard drive - any software I use to check folder sizes, they don't add up at allI deleted all the files, and all the heavy files that I use often are stored in dropbox and erased from
-
Transfer files between the user accounts on the same computer?
How to share files with other users using my mac? Thank you
-
Why my iMac does not recognize my scanner Epson Perfection 1600 since the upgrade to ElCapitan 10.11.4?
-
Is it possible to replace the graphics card on the Satellite A200-1Ai
my girlfriend recently bought me this laptop and I am trying to find out if it is possible to update the graphics chip in it?
-
Windows 7 ultimate 64 bit with nevidea gforce 9800 card of 1 GB graphix
Hi, I am running windows 7 32-bit profecional, but I was wondering if I have upgraded to windows 7 ultimate 64-bit if the driver for my graphix card works with the driver I know there may be some compatibility issues Thank you very much Jonny