Question of Live View EOS 70 d
Hello
I just bought a 70 d EOS. My question relates using Live View under "auto". I understand that touch the display screen directly causes the camera to focus about to contact, and that's exactly what's happening on my camera. However, I also noticed that exposure changes as well. For example, if I touch a subject dark opening or time will change to allow for more light and vice versa if I touch a light object.
I don't see any reference to this in the manual. This is a very good feature, but I'd be curious to know where this feature is described in the manual, if anyone knows.
Thank you
D 70 has an iFCL 63-zone metering system. In other words, the area of the image you see in the viewfinder is divided into 63 different areas which are measured individually, with the collected info better interpreted the system and then used to get to what the camera "think" is a correct exposure.
When in 'Auto', it probably uses so-called evaluative method. This method places more emphasis on the area immediately around the active AF point. It's kind of like one-off measure related to the focus area turns, but evaluative measure also considers the rest of the area of the image in its calculations.
You probably also Simulation exhibition enabled (in fact it is not possible to turn it off using a fully automatic mode).
If you were using a rather 'creatives' (as Canon calls) auto exposure modes, you would have more flexibility in the setting of the camera upwards. For example, you can choose a different method of counting (weighted Central don't react just like evaluative, simply examines the entire image area, with slightly more emphasis on the central part of the image, but without link to special AF point), or you could dial in some more or less using Exposure Compensation adjustment. AV, Tv and P is the automatic exposure modes 'creative '. AV means "Aperture priority" and is where you choose the opening and automation of the camera selects an appropriate shutter speed to match. TV stands for "Shutter priority", where you choose a shutter speed and the camera rule opening automatically. P is "programming mode", where the device regulates the opening and priority. (Note: in three modes, you would have chosen and ISO, first.)
You could also disable Simulation exhibition, if you wish. Then the visible image on the LCD screen of the camera varies in the same way.
However, I really do not pretend that you do not use evaluative measurement or Simulation of exposure. They are both valuable tools at your disposal. I suggest that you learn to use them to your advantage. Also become familiar with the camera's three other methods of counting (Center weighted, partial and Spot).
Evaluative measure doesn't do a good job in a variety of situations. I suggest you learn to use it.
First, try to think about the world in shades of gray, rather than colors. Like all the reflective metering systems, it was designed to produce a "neutral gray" and is influenced by the tone of the subject. For example, if you are shooting a black bear in a coal mine, the camera tries it overexposing. Or, if you are shooting a polar bear in a snow storm, the camera will try to underexpose it. In both cases, the metering system is still trying to be out "neutral grey". He can't think... to do the thinking and to recognize the situations where it will be shifted, skip it and make the appropriate adjustments.
Simulation of exposure can help warn you of the top and bottom of the trends of the exhibition. You can also read your images and inspect the histogram, see if you over or underexposure issues, so that you can always re - draw the image if necessary.
Note: more of what the camera offers there are other types of meters that work differently. For example, measure frequency measures the light falling on the subject, rather than what is reflected off of him (such as reflective metering). Used right, it can make for a more precise dosage. However, there is simply no practical way to build a frequency counter in a camera and use it for automatic exposure control. Frequency counters are for the most part separated, handheld and many of them are also able to measure with precision the flash and strobe lighting.
It seems to me that if your device works just like it should. It's just a matter to become familiar with it and learn to use it.
In addition to the manual that came with the camera, there are guides available that can be very useful and complete the manual. I suggest you to check what guides are out for 70 days. Whenever I have started working with a new model of camera I always buy one or two of the guides, as a shortcut to get up to speed using the camera. From personal experience, I can recommend guides by Charlotte Lowrie, Michael Guncheon and David Busch. If you are looking for 70 "d" on Amazon in the books, I'm sure you will find guides by one or several of these authors and probably a few other very good (some authors a few I know).
If you are really new to photography, I also highly recommend getting a copy of "Understanding Exposure" by Bryan Peterson. It can also be very useful, and is more of a preview of the works the cameras in general. I think it should be mandatory reading for all new photographers, or at least for all those who want to move beyond the skill level of point-n-shoot.
***********
Alan Myers
San Jose, California, USA.
«Market softly and carry a great lens.»
MATERIAL: 5DII, 7D(x2), 50D(x3), some other cameras, various lenses & accessories
FLICKR & REPROGRAPHY
Tags: Canon Camera
Similar Questions
-
Canon 5dm 3, EOS utility - remote live view - can't stop the automatic exposure.
Canon 5dm 3. Addicted to the PC running view EOS utility - remote control - live. Utility EOS insists on auto exposure even if the camera is set to manual and ISO is NOT automatic.
Hi mannfilm!
Thanks for posting.
I would like to ask a questions in order to get a better understanding of the issue and what can be the cause of this.
- When you look at distance window, the letter M appears indicating manual exposure is defined?
- What exposure values change?
- You have activated exposure Simulation?
- The resulting image appears different from the image you see in the window?
If it is a time sensitive matter, additional support options are available to contact us.
-
EOS 6 d zoom in remote mode live view sharper?
Hello
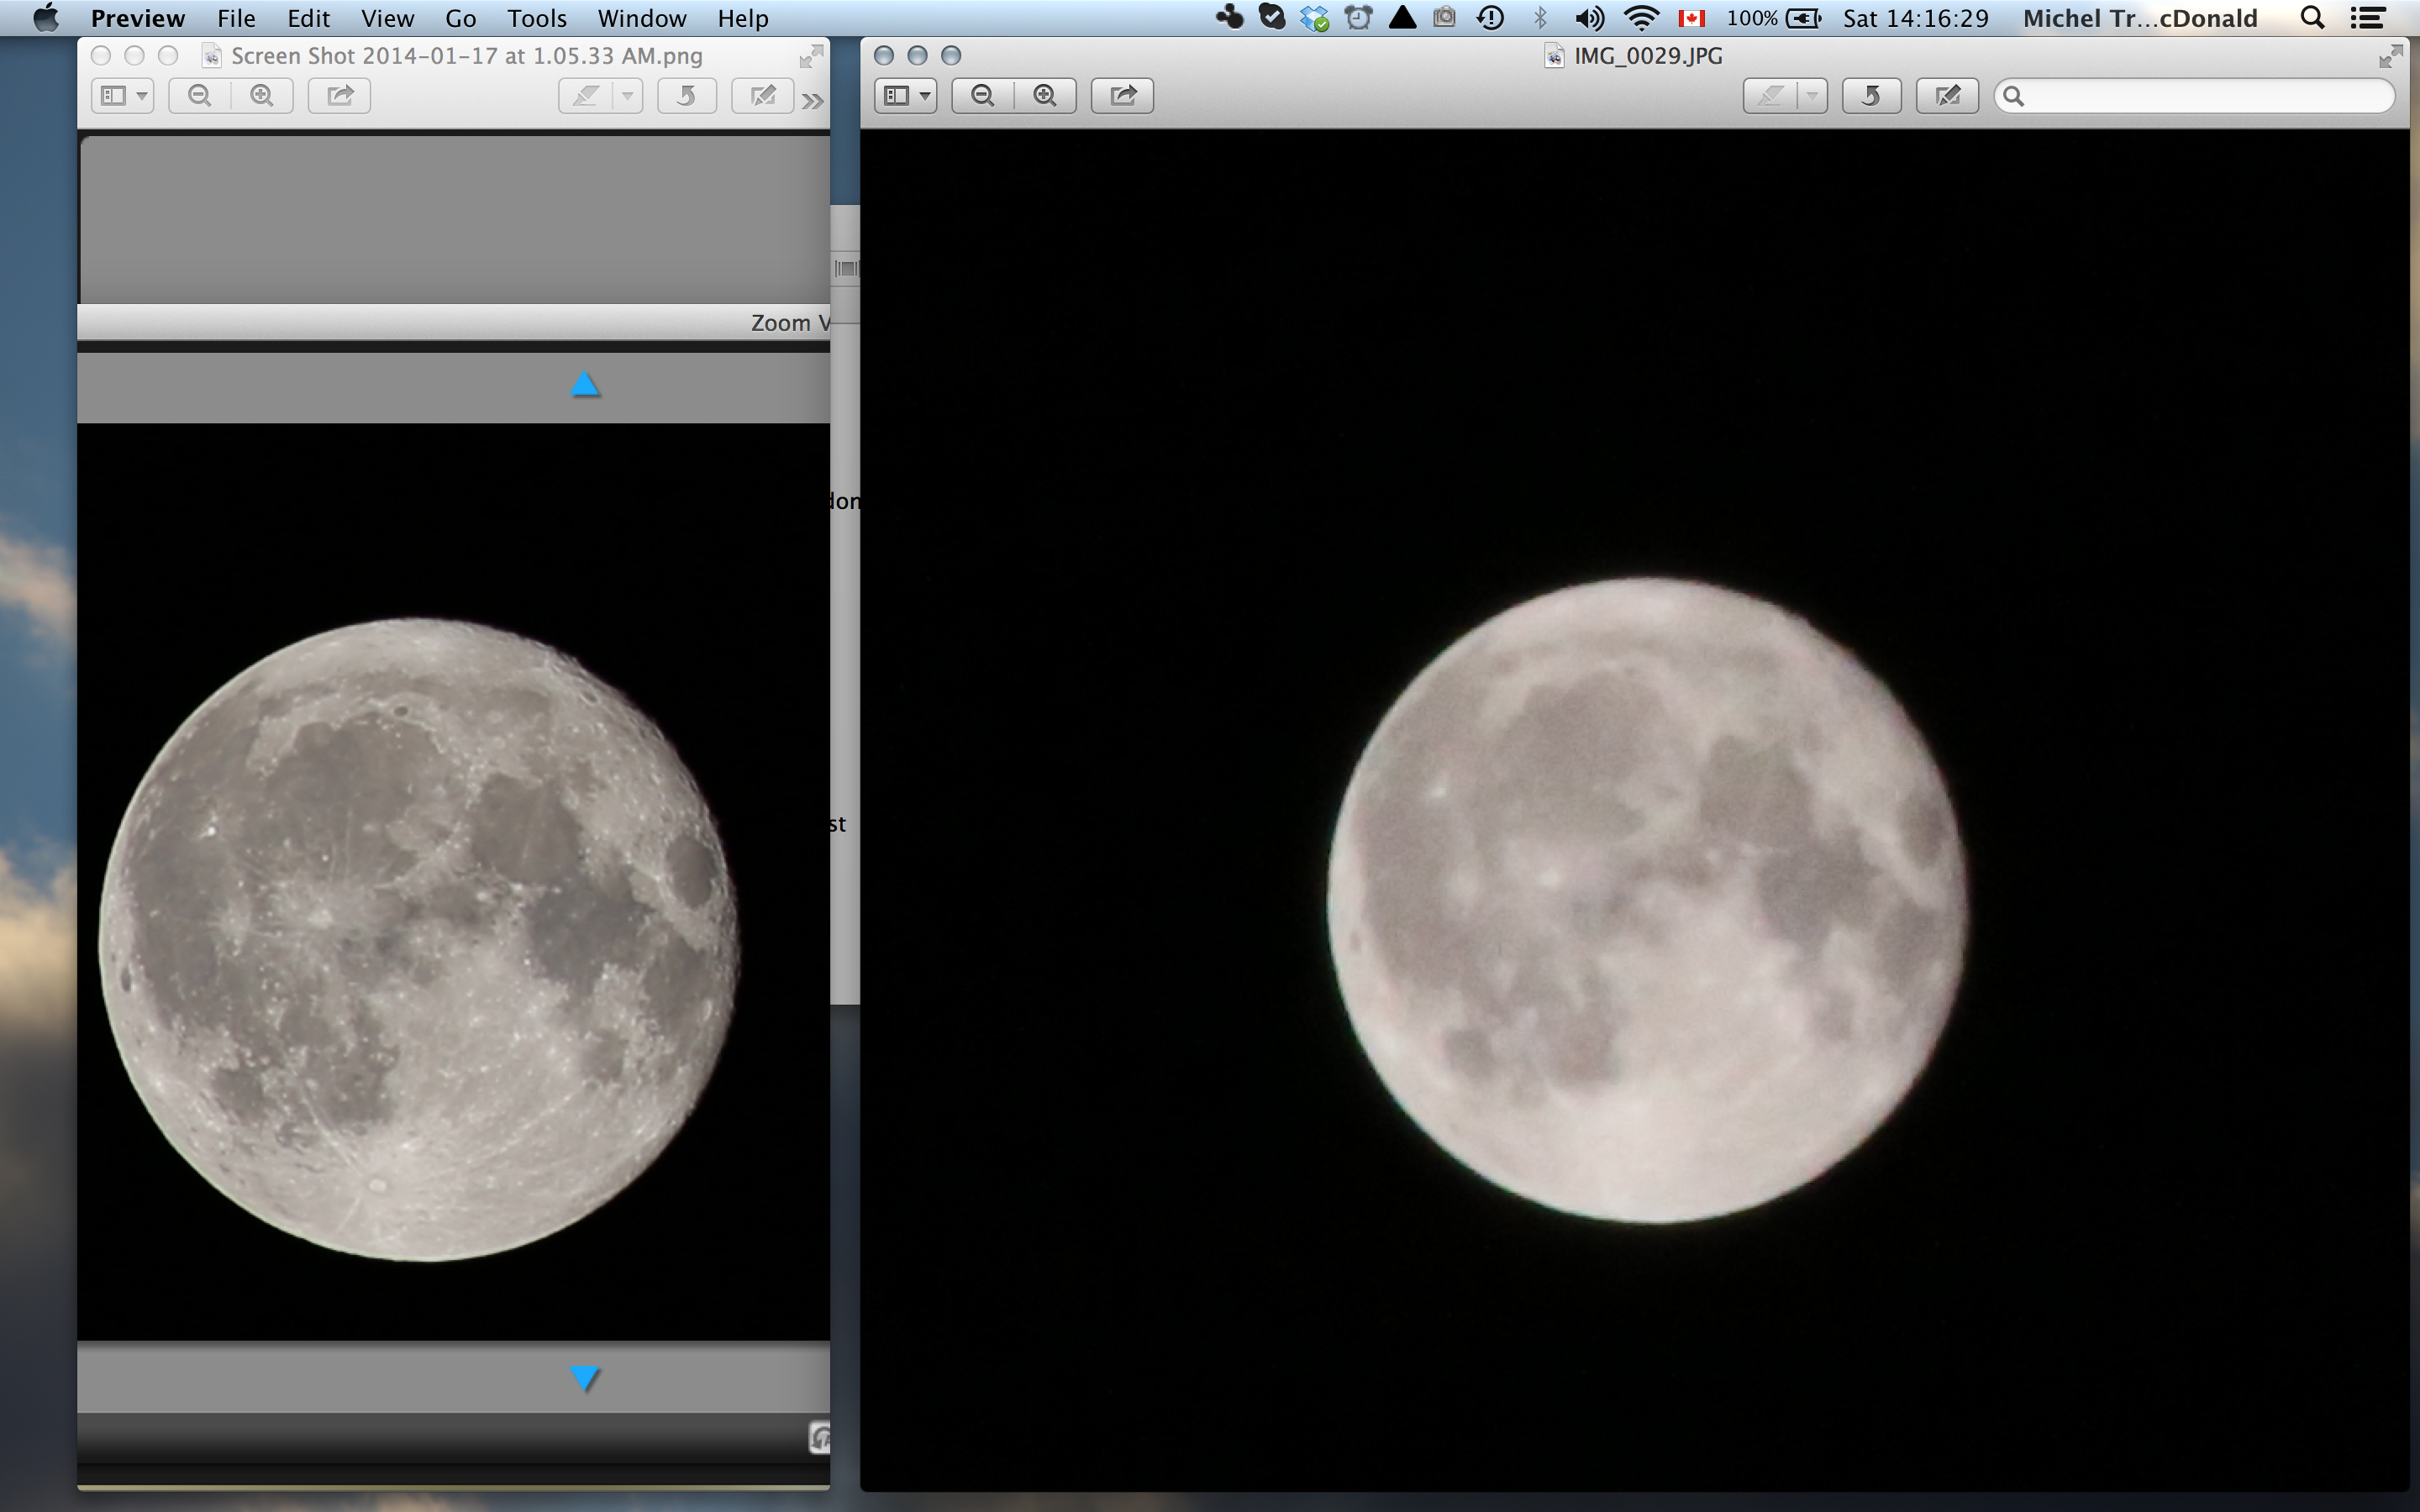
I have this Canon EF 70-300mm Zoom lens on my EOS 6 d, connected via EOS Utility Remote on my Macbook Pro running MacOS 10.9.1. Everything works very well, and I'm really impressed by the level of detail that I can achieve by zooming in on the Moon:
I thought, that looks really amazing! Imagine what the shot will look like when I break the real photo with these settings. And then I get it. This is a comparison of the screenshot of the Live View Zoom View (left) and the actual shooting (right):
I tried to change the quality of the image (I tried RAW) does not. I do not know whence the loss of details, I was wondering if anyone here had any idea about this or that she ran into similar problems.
Thank you
Michel
You can try and turn off High ISO NR? at ISO 12800, you can lose a lot of details with NR. The Moon is clear enough, you don't need an ISO high. And the Moon must be sharp, even at slow shutter speed. Try so the slow shutter speed, lower the ISO, turn off NR. Your shot looks like more on NR off focus or camera shake.
-
The question regarding the positioning (differences between Design view and live view)
I don't know how to perform the same search to see if this has been asked, nor how to properly ask the question... but here goes...
I have a div id "container" which is limited to large 968px. Inside that I want to have 2 columns (one containing nothing else than a background image) next to each other.
I called a left_column and other right_column.
The background image will be in the left column and is high by wide 290px 550px.
I used CSS to define the following:
{#left_column}
background-color: #FFF;
background-image: url (.. / images/waterfall.jpg);
background-repeat: no-repeat;
position: relative;
height: 550px;
Width: 290px;
margin-right: 10px;
float: left;
}
{#right_column}
height: 550px;
Width: 650px;
margin-left: 10px;
padding-left: 12px;
position: relative;
left: 10px;
}
In "design mode" everything seems wonderful. When I go to the live view (and/or browserlab) the text in the right-hand column shows the usable space is only 300px.
If I change the width of the right_column to 'auto' can live view (and/or browserlab) everything seems all I want, but in the view design right_column width is closer to 900px and goes the WAY out of the container (which makes it very difficult to see the text as I type).
No idea what I messed up? What other details do you need?
Thanks in advance.
mikemendo wrote:
I wanted the left and right columns to be the same height, so the footer doesn't look like it has been 'floating' lower from one side to the other. The width is controlled by the banner image 968px.
Columns of Google to 'false '. It is a technique that requires a background image set to "container".
. The image is repeated behind the "right columnto fill the depth and give the impression that the two columns are of equal height.mikemendo wrote:
In the left column photos is a background image, so if I put the height and width, then the image is not of appropriate size. The reason why I did a background image was to follow the advice of David Powers in his article on "your first site.
This technique is good to use.
At present the total width of all your elements adds to 982px that is wider than your container attached to 968px. Margin and padding ARE added to the width of a 'container' if:
290px + 10px = 300px
650px + 12px 10px 10px plus 682px
TOTAL = 982px
You can adjust the math for the total width does not exceed the width of your "container".
Use this css and everything should work:
#container {}
overflow: hidden;
margin: 0 auto;
Width: 968px;
background-image: url (.. / images/rightColBg.gif)
background-repeat: repeat-y;
}
{#left_column}
background-color: #FFF;
background-image: url (.. / images/waterfall.jpg);
background-repeat: no-repeat;
Width: 290px;
margin-right: 10px;
float: left;
}
{#right_column}
Width: 656px;
padding-left: 12px;
float: left;
}
#footer {}
Clear: both;
}
-
Canon 6 d not focus or flash in ' Live view '.
My Canon 6 d not focus or flash in ' Live view '. I have a canon 430ex II and an E - ttl flash with a sync for the function E - ttl cable. The camera to simulate the action of the shutter, but no picture is taken. How can I overcome this problem.
From time to time, after trying to take several pictures, it will begin to work, but usually isn't.
Hey Shadowcat.
Thanks for posting.
It seems that the AF method is set in fast Mode. When the device is set for Live View shooting, there are different methods of AF that can be set. In fast Mode, the device uses the AF sensor dedicated to focus when you press the shutter button halfway.
The image on the LCD is stopped while the camera tries to focus because the shutter closes and the mirror falls on the image sensor. It may seem as if the camera is taken a picture, but this isn't, it focuses only. No flash is triggered during this process either. Continue to hold the shutter halfway button until the focus is reached, how the image will be back on the LCD screen. Then you can press the shutter button the rest of the way down to take the picture. The flash fires and the image will be saved.
This has not answered your question? Find more help contact us.
-
Viewfinder and live view focus
Before the AF points while looking through the viewfinder, I had it places generic development of the box, as well as for the liveview one. Now I have these annoying red red AF points. I would like to revert to the earlier version of the format/system, but do not know how. Can someone please explain?
For more information, I read on (and it the manual) and done a reset with nothing doesn't.
Thank you
Phoenix
What camera do you use?
You say you have 'small red dots' in the viewfinder, or mode live view. These points are your focus points does not with Live View (which uses a different, lower development system). They are actually quite important for the use of a digital SLR, but you can choose to use or not.
For the viewfinder you don't have choice (assuming you are using a digital SLR). You look at the actual image, through the lens. There is no graphics in there, other than the LED on the bottom that you tell your settings and these focus areas incorporated into the screen. If you are using a device with an electronic viewfinder, which is not necessarily true, but that the way this is the EOS forum I will assume that you are using a digital SLR, which don't have an electronic viewfinder.
If you try to change the settings in Live View mode, I have to rely on someone else, I don't really use it. But I would not be surprised if you can choose between the box and the points.
-
Display of the Live view for Nex - C3
... my nex - c3 seems to be missing LIVE VIEW DISPLAY, setting on / off... I could really use this function for studio shooting... is a way or work around to get this feature? Thanks, Ronnie_B
It is true that the NEX - C3 does not view display life setting. To work around the problem, you can set the mode of the camera shoot backwards, or S to frame the subject. Once this is done, you can set the shooting in M mode and take the picture.
If my post answered your question, please mark it as "accept as a Solution.
-
My Live View would not start or start...
Had this problem until I saw all of a sudden screen cleared and I could not start no matter how hard I pressed the buttons. In order to reset I took it to the store I bought. The display took the piece and after almost 2 days he returned saying that COMTEL would not cover up for accessories. I called the service center and asked how when offers a limited warranty, they are supported. This gentleman had no answer, but that he would accept neither of my room. Instead he suggested me to get a replacement from the store, I bought. As we were talking about the issue, the display has tried to load my mode live view and the red light on to my great surprise, which indicates that it worked. Then he started to initiate and work. When I got home, I got to know the mode Live View has had an update, I did. 2 months after there was no question too... But still today, after a full charge, it would not start again. I tried to plug into my laptop to update the software, but my laptop indicates that the USB malfunction, indicating that the Live View mode is a.
I don't know what to do... I love my Live View... Its great use while driving, on a session and in places outside, where the silent noise your cell phone ringing...
But, I think that the problem starts, if we have to charge the unit. Which could be considered if you are developing a software update for the same.
Sorry to be too eloborate... Thank you for your time.
First of all - welcome to the forum!

Where are you from and how old is your LiveView? All the accessories are getting 12 months warranty on most of the markets (6 months in some markets).
It might be that the service contracted by your dealer Center isn't HVC (high volume Center). They should, however, help and if so send the LiveView to a service center that allows to fix it.
You can try to contact local support Office and ask for a service center that can fix your LiveView.
Click on this link: http://www.sonymobile.com/gb/support/contact-us/
Be sure to choose your country in the drop-down menu for the displayed correct phone number.
What do you think on this forum? Let us know by doing this small survey.
-
FancyBox - Working in Live View mode, but not in the preview
Hello!
I searched the forums for some answers, but I can't just understand what I am doing wrong. I'm really a beginner with Dreamweaver and coding, so I think I'm just something wrong. I hope that someone will be able to point me in the right direction! Anyway, here's my problem...
I could not get the Fancybox to work properly. When I test my page through Live View, it seems to work very well. However, Fancybox does not work as expected when I test through various browsers in preview. Instead of bring the image in a Fancybox object, it transfers me to a page that contains only the image. I've read several posts that have raised the same issue, but I can't simply solve this problem on my own.
In order to understand this point, I created a simple test page that contains only the content of my Fancybox and a single image. I'll list the code below:
<! doctype html >
< html >
< head >
< meta charset = "UTF-8" >
< title > FancyBox Test < /title >
<! - load jquery - >
" < script type =" text/javascript"src =" http://code.jQuery.com/jQuery-latest.min.js "> < / script > .
<!--> fb style sheet
"< link rel ="stylesheet"href="/fancybox/source/jquery.fancybox.css "type =" text/css"media ="screen"/ >
<!-pack jquery fb->
"< script type =" text/javascript"src="/fancybox/source/jquery.fancybox.pack.js "> < / script >
< / head >
< body >
< a class = "fancybox" rel = "group1" href = "images/Illustration_1.png" > < img src = "images/Illustration_1.png" width = "620" class = "fancybox image" height = "662" / > < / a > "
< script type = "text/javascript" >
{$(document) .ready (function ()}
$(".fancybox").fancybox ();
});
< /script >
< / body >
< / html >
I kept all the Fancybox files in a folder called 'fancybox' in my root directory. I know that I do not need to place the image in a group, since I don't currently have more than one image, but finally, I would like to have multiple images, so I went ahead and assigned to a group. I added the class 'fancybox-image' to the image so that I was messing around and it seemed to make it work inside of Live View, but I does nothing for me when I use an excerpt.
I tested in several browsers, but I tend to use Firefox to test the most. Using the Firefox web developer tools, I found some fundamental questions. The Console gives me the following error: "TypeError: $(...).» FancyBox is not a function"and the Style Editor told me that the style sheet can be loaded. I thought this might give me enough information to solve this problem on my own, but I'm obviously missing something here. Any help would be greatly appreciated!
Is your folder fancybox on the same level of your images folder directory in your site definition?
If so, just get rid of the bar oblique leader in your links to the fancybox scripts.
-
Hello
I have my site defined and stable and a connected remote server.
When I go to Live View the overview of my site is empty.
This works very well with HTML Web sites, is there an extra step for HTML5?
Am I missing something?
I know it's a n00b question, but any help will be appreciated.
I'm sorry that you don't like my answer. It was not my intention to you a slight or hurt your feelings somehow. It's just that we're all busy and we give our time on this forum among other challenges as web professionals. A simple link to your site from the start is the best way for help us to you quickly. .
Long story short, that your culprit is the storm.css file & not a HTML5 document type.
I don't know exactly what in this file is originally DW to choke, but if you comment in your source code, you should be able to see everything in Live View mode.
http://www.rankubator.com/CSS/storm.CSS
Good luck with your project!
Nancy O.
-
Resize the width of the mode live view for resets overview sensitive to the top of the page
Almost every time I move the scrubber in live view to verify sensitive breakpoints are correct, it scrolls by me to the top of the page.
Unfortunately, it's a problem for the sites of scrolling a page, as the question that I am trying to fix is a path down a long page, and the only way to see the responsiveness in action is to zoom stupidly far. Y at - it an option to enable the circumvention of this off, or reasonable?
Edit: I use Mac OS on a MacBook Pro 10.10.4
MrJW gave you a good work around in Live View mode. But honestly, when I work with the reagents long pages, I saw in the browsers and keep them open while I do a few code tweaks. Then refresh browser (F5 or Ctrl + R) to check my progress. I almost never work without one or several browsers open at all times.
Right click > inspect element is another feature of good browser to use.
If you have Firefox with the Web Developer Toolbar extension, you can use Resize > sensitive view layouts to see the appearance of your page (s) on multiple devices. This is a handy feature.
In addition, you can edit the CSS in real-time to see how it effects your work and lots of other good things.
I highly recommend the FF Web Developer Toolbar. It's free. I use mine constantly.
Web Developer: Modules for Firefox
Nancy O.
-
Resources shared mode live view
I use CS6/Windows.
I have all the static resources (CSS, JS, etc) in a shared network called [WHICH] directory / res.
I have my site HTML locally in the Sites Directory. All URLS of static resources begin as /res.
I have a local HTTP server. He points to my local site directory, but /res is redirected to the shared network directory.
This configuration works very well for the view browser and live view. But in edit mode, it cannot find the static resources that makes editing a little bit of a brake. I tried to put a link in the site called res directory, pointing to the shared network directory, but that did not work. Is there a way I can handle this without physically copying the files locally shared network?
To answer my own question, after only a couple of hours to play around, I got this:
- created res site with a test pointing to the shared network directory server
- Use the green arrow (download the test server files) from time to time to keep synchronized
Is not ideal, physically copied the files locally shared network, but at least this copy can be done from Dreamweaver in a relatively painless manner.
-
Some images not appearing is not in Live View mode?
Hello
Recently, I upgraded my Dreamweaver CS5 and have noticed that some images are appearing is no longer in Live View mode. When Live View is clicked, both images are displayed in Design view and preview in the browser; However, when you click on Live View, the question mark appears for new photos that have not been used in Dreamweaver before the update. Does anyone know a fix for this? I tried to uninstall/reinstall the software. Thanks for your help.
What is the exact code of images path?
How big are your images (file size)? You optimize them for the web in your graphics editor before you insert in your web page? Are they saved in RGB and CMYK not?
Nancy O.
-
Live view & all mode browser views are different from my creation mode
Hi all
I just started using dreamweaver CS5.
Yesterday I did a small site with the help of a tutorial, and everything went well.
Today I am back scratches and everything seemed fine, until I hit the display live from the any of the browsers.
It seems that there is no CSS mu!
Can someone help me please? I have also some print screens and please see below my source code.
Source coding
< ! DOCTYPE html PUBLIC "-//W3C//DTD XHTML 1.0 Transitional / / IN" "http://www.w3.org/TR/xhtml1/DTD/xhtml1-transitional.dtd" > ""
" < html xmlns =" http://www.w3.org/1999/xhtml ">
< head >
< meta http-equiv = "Content-Type" content = text/html"; Charset = UTF-8 "/ >"
< title > VINDDIT < / title >
< link href = "style.css" rel = "stylesheet" type = "text/css" / > "
< / head >
< body >
< div id = "container" >
< div id = "banner" > < img src = "images/logo.png" width = "145" height = "81" alt = "logo" / > HOME | " VINDDIT NU! | OVER ONS | CONTACT < / div >
< div id = "leftcollum" >
< p > < img src = "images/84ff9662bc612d651195fd73b5920552 - 33E08B027BEA49D09071EA4F9F7B9770.jpg" width = "200" height = "200" alt = "pic1" / > < / p >
< h1 > VINDDIT NU! < / h1 >
< h2 > Vertel ons wat I zoekt en wij gaan voor adept I opzoek! < a href = "Vinddit nu.html" > Doe een request... old < /a > < / h2 >
< / div >
< div id = "centercollum" >
< p > < img src = "images/84ff9662bc612d651195fd73b5920552 - 118F85251EC0EBEC2E46EA559D6C6FF8.jpg" width = "200" height = "200" alt = "pic2" / > < / p >
< h1 > machine production VIND < / h1 >
< h2 > Wij zijn geen search machine, wij VINDEN! Eleven special zoekers staff jouw zullen vinden naar aanleiding jouw specific wensen van artikel. < a href = "Overons.html" > Lees meer... < /a > < / h2 >
< / div >
< div id = "rightcollum" >
< p > < img src = "images/84ff9662bc612d651195fd73b5920552 - 3E7816F1A4271667AA6EEA3DF85033F7.jpeg" width = "200" height = "200" alt = "pic3" / > < / p >
< h1 > puts gemak SERVICE < / h1 >
< h2 > Ontvang een space selection van 1 tot 5 opties en besluit then zelf welke keuze I wil maken! < a href = "Vinddit nu.html" > Lees meer... < /a > < / h2 >
< / div >
< div id = "mainimage" >
< p > Jouw eigen personal VINDER.
< /p >
< p > eleven personal vinders bieden een Marchand service en het werk ITU handen played along. < /p >
< h2 > < / h2 >
< / div >
< div id = "mainbox" > < p > < / p >
< div id = "insideleft" >
< p > < img src = "images/studio_white.jpg" width = "250" height = "250" alt = "pic4" / > < / p > "
< / div >
< div id = "insideright" >
< p > Hoe VINDEN wij voor jou? < /p >
< p > Geef ons zo veel mogelijk information on het point wat I zoekt, hoe meer wij van I principled, hoe beter we I good helpen bij het vinden van het perfecte point! < /p >
< p > < a href = "Vinddit nu.html" > question yesterday old aan... < /a > < /p >
< / div >
< / div >
< div id = "leftcollum2" >
< p > < img src = "images/10123_1365687879_Fashion-Swap-event - Amsterdam.jpg" width = "200" height = "200" alt = "pic1" / > < / p >
VERTEL < h1 >. < / h1 >
< / div >
< div id = "centercollum2" >
< p > < img src = "images/x200.jpg" width = "200" height = "200" alt = "pic2" / > < / p > "
< h1 > RELAX! < / h1 >
< h2 > < / h2 >
< / div >
< div id = "rightcollum2" >
< p > < img src = "images/stoel-laura - interieur.jpg" width = "200" height = "200" alt = "pic3" / > < / p >
< h1 > KIES IN KOOP! < / h1 >
< h2 > < / h2 >
< / div >
< / div >
< / body >
< / html >
Design view

browser & mode live view

I saw a question immediately. You are missing an end} to the top of your css, in bold here...
#container {}
Width: 968px;
overflow: hidden;
Background: #FFF;
padding-right: 10px;
padding-left: 10px;
margin: 0 auto;
}<-- that="" one="" is="" missing="" in="" your="">
#main image {}
background-image: url (images/84ff9662bc612d651195fd73b5920552-0B6C3B7FC804D1CAF61CEA2FA 471E5AE.jpg);
background-repeat: no-repeat;
height: 968px;
Width: 376px;
}
-
Do not see changes in Live View mode until after 30 seconds
Mac OS X 10.7.5 Dreamweaver CS5.5
Running locally using MAMP
Site is configured to run on a PHP/MySQL local server and consists of a single index.php file with nothing more than an html header (I have no PHP even here yet).
When I use Dreamweaver to make a change in my index.php file (for example, change the text in the header), I save it and then go to Live View or preview of Web browser. In both cases, there are more than 30 seconds before I see my changes Live View or preview browser.
To get a better idea of my workflow:
(1) my indiex.php file header reads 'This is a test'... and that's OK in Live View and preview of the browser.
(2) I change the header to be 'Hello World '.
(3) select "Save" in the file menu.
4) click the "Live View".
(5) live view bed yet "this is a test."
(6) overview of browser open, always reads as "this is a test."
(7) I spam the button refresh in both Live View and preview Web, no change, bed 'this is a test. "
(8) after about 30 seconds of hitting the button refresh, change is finally visible in Live View and preview Web, reading "Hello World".
Has anyone seen something similar? Any ideas why I get such a long delay before you see my changes? Any suggestions to fix it (apart reboot my mac?
I did not, but I think I'll try XAMPP at some point.
However, your indication that MAMP is the issue, not Dreamweaver led me quickly to the solution I was looking for:
http://StackOverflow.com/questions/19073270/stop-caching-for-PHP-5-5-3-in-MAMP
It is essentially a cache issue with PHP 5.5.3... just disable OPcache lines in PHP.ini, restart the server and without delay!
Thank you for your help and your insight!
Good hunting!


Maybe you are looking for
-
I can't delete same as previous to a section
Under Document items, it has no option to select - "same as previous" I followed the advice so far - I'm go to disk utility - it wasn't option to 'Check disk' or 'Repair disc' - I ran the "first aid" that was available. I went to the library and move
-
How to reset many Solitaire games played and won Matches of the counters?
How to reset many Solitaire games played and won Matches of the counters?
-
some how APPSAAVE and FASTSEAALERU enabled in my downloads. I didn't download. Some programs but them on my computer. I tried to go to RUN and (x 86) to delete, but I can't. There are also other (x 86) to the bottom of charges that I don't want. How
-
Reminder for UCCX Office agent
Hello We use uccx 7 and had need to have a reminder pop up when the agent is not ready to remind them that they must change their status to ready. Our agents are not just sitting in the Chair and wait for the incoming call, they must move to another
-
Write a bitmap to a file *.bmp or *.png with JDE 4.5
Does anyone know a function to write a bitmap to a file standard riphics for example *. BMP *. PNG or something like that? I'm Trying with JDE 4.5 on the default curve Simulator.