written on the images
I'm new to all this, but is there a way to get the pictures without words? Or how can I get rid of the words on the chart? I like a lot of photos, but the words come with the download and I can't recreate the background in order to get rid of the words! Help please! Also, is there a way to search just JPEG files? I don't have the ability to upload AIS files... What are those who are
Thank you!
If these are .jpg files, you will need an image editor like Photoshop.
Tags: Adobe Stock
Similar Questions
-
Hi, the technology is a bit beyond me so I need help please.
I have a picture of a written text, but I see that there is also something written on the other side. Is there a way to somehow reverse the picture so I can see what he says on the other side? Someone says something on a reverse and I don't quite know what they are on everything. Thanks in advance, Vince
Can you give more details? How can you see the side 'inverse' of this image? I don't think that you are talking about 3D in Photoshop? If you mean that you see the text "mirrored", you can use, modify, transform and back horizontally.
-
We are working on the update of our thin clients HP T610 more. Update us the thin clients in the last image of the OS WES7P and also update to IE11 and Citrix receiver 4.4.
We use HPDM 4.6.4
We have successfully several T610s and update the image of the OS and related software with no problems. We are then able to use the 4.6.4 to successfully shoot HPDM and image of these thin clients updated in the master repository.
We then create a task to deploy the new image to several thin clients. We configure the task to use the imagery being cached, and then run the task. HPDM then successfully deploys the image for thin clients.
Customers accept the image cache and once the image is fully downloaded they restart to deploy the image. After the restart, the image unfolds and decompresses correctly, then the thin client, start the original installation of Windows.
But for 90% or more of these newly imaged thin clients that they get hung up during the installation of Windows (usually during the message that windows is written to the Registry). Once the thin clients get hung at this stage they are inaccessible and unrecoverable by HPDM and must be copied via USB.
We believe that the issue is somehow related monitors are connected to thin clients. If isolate us completely thin clients monitors, then deploy an image the new image is OK. HPDM reports that the image has been deployed successfully. If we then go back to thin clients and reconnect the monitors of the thin client is updated and the screen seems to be in standard vga mode low resolution. A restart of the thin client then recognizes and sets the appropriate screen resolution, and the thin client is good to go.
What is normal sound monitors must be separated to deploy a new image?
Thanks for any idea or thougts.
From the point of view HPDM, disconnect monitor is not required when you deploy the image. Personal thought is that there is a compatibility problem between the display driver, graphics card and the system. Installing Windows intend to write a default registry value based on connected monitor (maybe display settings), for some reason, he was stuck. I'm not the driver or the operating system that you are an expert, I would say that you submit a ticket to HP for additional troubleshooting.
-
IMAQ Vision: The image is not big enough for the operation (Imaq WriteToPNG.vi)
Hi all
I was stuck for a few days trying to get my work VI and get this error. It is as simple as to save a graph of intensity as an IMG, he works with JPEG formats but my graph is U16 grayscale and it is not supported by the jpeg format so I didn't get the expected results. Then I went to the PNG format and the error "the image is not big enough for that operation" appeared. I tried to resize as aid error NOR suggest, and got the same error, anyone has an idea on what could be the problem?
Hello Bob,
Thanks for the tips, I'll post my code in future issues (since I already solved this one). As you say, there was something wrong with my code, the code in the image actually worked well, but doesn't have the part where I wrote to the variable (the variable was not being written if its value is an array of 0x0, not big enough actually). Thank you!
-
How to programmatically clear the Image display control in LabVIEW 2010
Hello... I need to do what I say in the title above... I went here,
http://digital.NI.com/public.nsf/allkb/514FD61A5F1829EA86256DF6004FDE13
and bother to follow the directions. I am, moreover, work in snapshot mode. So I followed the instructions to clear the display of the Image when you are working in the Snapshot mode, but it didn't work. Either I'm doing something wrong or maybe (as the instructions seem to imply) that this example was written for LabVIEW 7.1 and 8, but perhaps not for LabVIEW 2010? Hard to say, but can someone help me understand how to clear display of images (IMAQ/Vision). I just want to be able to clear an existing image before implementing a new. How can I do this in LabVIEW 2010?
Thanks bob...
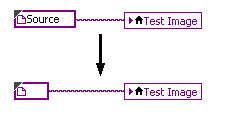
Hello Paris1_
Make this change:
You write the constant Source image in the display of the images, but the Source image is already displayed.
Select a constant vacuum image to clear the display of the Image.

-
I have an educational blog and design and sell the curriculum on teachers to pay. Talking with the people who create and sell curriculum, there was a lot of confusion regarding the type of licenses required and the way credit is given.
I would like clarification related to the following questions...
(1) If a photo is used to create an image of blog post (with text overlay, added background color or frame, or if the image is used to illustrate a title) and that the image is pinned to Pinterest or shared on Facebook, which is necessary for the license and credits?
(2) If a photo is used in coverage for a product or a product to illustrate the written text, what license is needed IF the finished product is sold to teachers in an electronic pdf (secure)?
The standard license is generally acceptable for the cover of the product. As illustrating text is concerned, the answer will vary from one case to the other. If, for example, in educational content, you use an Adobe Stock image of an exclamation point led to indicate particularly important information that the standard license is OK. If however, the image is used to provide educational content, then the licence would be required.
Examples of an image used as educational content could be in language books in which the foreign Word is placed adjacent to an image, or if the content taught the person how to count... "" how many apples you see in the picture? "" This kind of thing.
The best way to look at it is this, the content would make sense without the image? If Yes, then usually the standard license is OK. If the image is critical for content is to contribute to the primary value and the license is required.
As always, please consult the license agreement for more information on the permitted use.
Kind regards
Carpet
-
How to create multiple thumbnail images while creating the Image assets
Hi all!
I have a requirement to create several thumbnail images (of different sizes), while creating new assets of image. These vignettes must be associated with different attributes after the recording of assets. I thought you used miniature filter, but I read that it uses a library of swing, it's very very inefficient memory-wise and we can experience the memory leak and crashes with only a very limited number of images... Another solution is to set up the filter citing ImageMagick with a system exec: it's fast, it does not have the memory and it also generates a much greater quality of thumbnail image resizer that comes with swing.
What do you think, and how can I implement this?
Thank you very much!
Hello Elena,
We noticed some performance issues in our current client, so we changed the miniature filter by default:
A temporary file is no longer used for the input image. The source image is used directly, because it is not changed by the thumbnail generator.
This avoids some performance issues, we have detected. First of all, because of the way the image has been copied (a byte is read and written each time), and second, because of some file systems environments run badly.
In addition, it relies on "deleteOnExit", which can produce an impact on the performance of the application server, as the JAVA virtual machine must maintain a list of files to delete when leaving, and which consumes memory. It is even more problematic on servers that are not restarted very often. And if at the end the application server is not normally off, these files would not be removed.
On the other hand it seems that the thumbnail generator is not necessary that the image source file ends with the extension of the right.
Now we use the provided source image directly, it's a ".tmp" instead of a file (for example) the file ".gif".
It will be useful,
Gerardo
-
Send-LinkedCloneRecompose is not updated to the Image on the pool name
Hi all
Using the command "Send LinkedCloneRecompose", everything seems to work properly:
- The PS command indicates that the workstations will recompose (watch, unchanged VMs: 0).
- The pool has a task to reconstruct for all desktop computers.
- Pool tasks window shows that the action recompose for the correct snapshot.
- A new replica is created in vSphere.
- Desktop computers are recomposed OK.
Get-pool-Pool_id "$poolID" | Get-DesktopVM | Send-LinkedCloneRecompose - ParentVMPath "$parentPath" - ParentSnapshotPath "newSnapPath" - annex ((Get-Date).) AddMinutes (1)) - forceLogoff $false - stopOnError $true
Problem:
- Check information pool in view administrator, the name of "The Image" shows again the old cliché– it is obviously incorrect. This would normally change to the new name of snapshot if the operation recompose is performed from within the Administrator display.
- Using Powershell to query pool information, the same details appear - the old name of the snapshot is written.
> Get-pool-Pool_id "$poolID".
>...
> parentVMSnapshotPath: * original old cliché way *.
>...
So, is this a bug? Can it be reproduced, or - is this a problem that I am experiencing?
Any ideas?
Thank you.
Using LinkedCloneRecompose-sending does not update the configuration of the pool - it reconstructs only the virtual machines to the specified image.
You must use the command Update-AutomaticLinkedClonePool, use it as below only would change the parent VM and snapshot leaving all other pool settings as they are.
Run presents first, and then use the send-LinkedCloneRecompose to rebuild the VMs system to the last image.
Update-AutomaticLinkedClonePool-pool_id «$poolID' - '$parentPath' parentVMPath - parentSnapshotpath «newSnapPath»
Get-pool-Pool_id "$poolID" | Get-DesktopVM | Send-LinkedCloneRecompose - ParentVMPath "$parentPath" - ParentSnapshotPath "newSnapPath" - annex ((Get-Date).) AddMinutes (1)) - forceLogoff $false - stopOnError $true
-
the image appears correctly online, but they are in muse
I made a site with large boxes with a picture fill. These images display correctly in the muse, but they may not display correctly online. I recently added a menu widget of the themes of muse, this could be the problem. How can I fix?
See here: Food & Drink
(the image should be aligned with the one above)
Well, the same thing that I seem to be written once at least every day: there is no groups / layers nested, where alignment is determined by the size of browser window - change, that makes the positioning of your elements. It is even more obvious because there is no 'spaces' / padding anywhere and everything only for the sticks together like glued with cyano glue. More than anything else, you have to make your group / layer structure representative of the Visual result, so the browser actually uses the calculations of one element compared to the others.
Mylenium
-
Resize photos to the long side in the size of the Image
I want to use the size of the Image in the Image Menu to resize photos on the longer side (example: 3000 x xxxx). I know that I can do this in the processor for Image and Photo to adapt, but I want to enjoy the new resample in CC2014, preserve the details. Is it possible to do it in the size of the Image. Second question is if this is not possible what method of resampling Image Processor and Photo Fit uses it to resample images to a larger size.
Thanks for the help.
W Thorne wrote:
I want to use the size of the Image in the Image Menu to resize photos on the longer side (example: 3000 x xxxx). I know that I can do this in the processor for Image and Photo to adapt, but I want to enjoy the new resample in CC2014, preserve the details. Is it possible to do it in the size of the Image.
Check her resample, interpolation together to preserve the details have a width and height link to force the image resize it current aspect ratio, use of the width or the height of the menu drop down click pixel, set the side you want to be 3000 to 3000. Cannot be batch without a small script to set the long side to 3000

Second question is if this is not possible what method of resampling Image Processor and Photo Fit uses it to resample images to a larger size.
The standard image of the processor which is part of the Photoshop Image uses made the adjustment to resize the image always interpolation bicubic user. There is a process of image better second plugin script that you can download from the web once installed you will find in the file menu > Automate > Image Processor Pro. With Image Processor Pro, you can define which method of interpolation should be user for each resized image used. If the script is better then the standard image processor and works under Photoshop CC X got fed up with Adobe and will support no CC in order to preserve the details cannot be resolved. It would be possible to add an option if the version of Photoshop using the script supports the details preserved, it can be easy to add to the menu drop down and in the code. As you can choose one of the other methods

The Image Photoshop plugin is being implemented in a Photoshop script written in javascript. It would be very easy to change your copy of "If Image.jsx" always use preserve detail in CC. The must be changed line is an app.activeDocument.resizeImage '(newWidth, newHeight, resolution, ResampleMethod.BICUBIC); «Change it will only work if Adobe updated the scripting support cc to preserve detail.» In Adobe CS6 forgotten update scripts to support BicubicAtomatic fix in the superscription CS6 but not the perpetual CS6. I also note that preserve the details is not an option to interpolation in Photoshop CC preferences for the interpolation of the image.

-
How to create an item of the display of the Image with functions Apex?
Hi everyone :)
I'm working on the 4.1.1.00.23 Apex in an 11g database XE.
I want to display an Image in a report, I can do this by using the ' + BLOB download Format mask + ", but the images displayed in the original format and I want to display the smaller.
I read that you need to create a procedure, a SYNONYM and call them to the src of the img tag. as Zsuzsi Vadasz mentions here
http://blog.hilandco.com/2010/05/How-to-show-BLOB-type-column-as-image.html
But I remember that I was able to create items in reports with the functions of the Apex, I think they were APEX_ITEM package, so I want to know if there is a way to create the '+' display Image + element with a function of APEX.
Thank you.Diego (SniperCat) wrote:
I'm working on the 4.1.1.00.23 Apex in an 11g database XE.
I want to display an Image in a report
Always specify if "report" means the report standard or interactive.
I can do this by using the ' + BLOB download Format mask + ", but the images displayed in the original format and I want to display the smaller.
I read that you need to create a procedure, a SYNONYM and call them to the src of the img tag. as Zsuzsi Vadasz mentions here
http://blog.hilandco.com/2010/05/How-to-show-BLOB-type-column-as-image.htmlThis post was obsolete when it was written. Use the built-in support of BLOB.
Resizing of the declarative BLOB images in reports is simple using CSS. Add a style sheet with:
td[headers="PHOTO"] img {
  display: block;
  width: 40px;
  border: 1px solid #999;
  padding: 4px;
  background: #f6f6f6;
}
where the value of the PHOTO in the attribute selector is the ID of the image column table header. Define only a single dimension (in this case the width) will scale the image with the correct proportions. (Background, padding and border properties are just eye candy...)
However, the scaling of the images in the browser in this way is a huge waste of bandwidth and product of lower quality images than to create good scaled down versions using image tools. Image download megapixel and then to reduce them to the size of the thumbnail result in needlessly pushing millions of bytes which will never be seen.
For better performance and image quality, and where you need specific image scaling of the best approach is to use the ORDImage database object to produce thumbnail and preview automatically versions. Unfortunately, this is not possible in Oracle XE as multimedia is not included :-(.
-
Is this OK so my site is for most of the images?
Is this OK so my site is for most of the images? I created the site below in PS and glide in the tables. I have not taken the time to convert the images that contain the actual text of the text. This means that my first two layers of pages are pretty much just images.
In addition, there are moments where I had a line of images and used hot spots.
He was very fast, but I wonder if this is the way.
http://www.mytransformedclassroom.com/Midland
Thanks in advance for your comments!
Micky
Before you even open Dreamweaver, you'll need to get in tune with HTML, CSS and basic theory of Web design. It is an essential part of the creation of web sites. Without it, you will have a front very steep learning curve.
Start here:
- http://w3schools.com/
- http://www.csstutorial.NET/
- http://phrogz.NET/CSS/HowToDevelopWithCSS.html
- http://webdesign.tutsplus.com/sessions/Web-design-theory/
This tutorial into 3 parts following was written earlier for Fireworks, but the basic principles are the same, regardless of what graphics editor that you use.
Take a fireworks (or Photoshop) model for a setting in the form CSS in DW
Part 1 - initial design
http://www.Adobe.com/devnet/Dreamweaver/articles/dw_fw_css_pt1.html
Part 2 - markup preparation
http://www.Adobe.com/devnet/Dreamweaver/articles/dw_fw_css_pt2.html
Part 3: layout and CSS
http://www.Adobe.com/devnet/Dreamweaver/articles/dw_fw_css_pt3.html
Happy learning!
Nancy O.
-
Help to improve the Image Processor Pro Script to save transparency in TIF
Hello world
This is my first post in this community.
We have a droplet which reduces the resolution of tif images at 72 dpi and save the image tif with transparency. It works very well, but it took a long time for the whole process of many picture in different folders. This is the reason why we have sought another script that can preserve the folder structure and define the resolution of each image at 72 dpi tif.
We found Image Processor Pro, which does exactly what we needed. The script works perfectly in CS5 and CS5.5 save the tif with transparency. The tif images could be used in InDesign with transparency.
BUT Image Processor Pro script works not so perfectly in CS6 as it seems that this option to save a tif with transparency does not exist or does not work in the script. The result is that those converted tif images are without transparency in InDesign. It is a huge problem for us.
This is the point where I need your help. Neither I have experience yet with jsx-files or the right syntax of it.
Is it possible for someone of you to implement / improve Image Processor Pro so it will save tif with transparency?
We used the last German Image Processor Pro Version: 2.3.1 (link: http://www.russellbrown.com/scripts.html)
(The German version contains only German on the texts of the screen!)
I am very grateful for any help you can give.
Thanks in advance for your help.
The only reason why I can invision would happen, is that they change the default behavior on what to do when the transparency option is not specified.
The simplest solution, if you always want to have transparency with tif files is:
Find this piece of code or towards line 3811:
     case "tif": {
        var value = (isWindows() ? ByteOrder.IBM : ByteOrder.MACOS);
        var str = fsOpts.tiffByteOrder.toString();
Change to look like this:
case "tif": { saveOpts.transparency = true; var value = (isWindows() ? ByteOrder.IBM : ByteOrder.MACOS); var str = fsOpts.tiffByteOrder.toString();It will not work properly if there is transparency.
BTW, where did you get a German version of this? I've written PPI but never germanisés he...
-
Application of labels for all the images in a stack
Long ago, when I was with Photoshop métadata I found a plug-in that allowed to work with batteries as a unit.
If I have marked the image of the top of the stack lable has been applied to all the images in the stack; then when I've sorted the images, the battery remained in tact. instead of just the top image, with the label appears. I could also label the top image in a stack with flaga, and for example quickly remove all the image of an 'X '. Oterwise is seems the only option is to open each pile, by Ctrl-clicking on the number in the upper left corner, which opens to the stack; with all selected images, then click on help from stars labels I want to apply to all images in the stack.
I can't remember where I found that plug-in. I hope that the guy who wrote it; and all I can remember him is that he is from England, wrote a version of Lr?
I've never written anything for the elements, Mike, but I'm originally from England. Who get close you? Joke apart, looking for my Syncomatic plugin.
-
How to get captions to accompany the images when recording on a flash drive?
I SPENT ABOUT 2 WEEKS FOR NAMES OF PEOPLE TO MY GRANDDAUGHTERS OF MARRIAGE AND ADDING TO THE LEGENDS AS WELL AS THE PLACE WAS TAKEN AND THE DATE.
I have JUST COPY AND GLUE THE DE ADOBE PHOTOSHOP ELEMENTS 10 FOR FLASH DRIVE. HOWEVER, NO SUBTITLE. How can I DO?
OK, for your family to do, you really want to have the caption written on the photo: for them to 'delete it to print just the image', this legend would have to be registered in a separate layer, and the image stored in a format that takes in charge the layers PSD or TIF. Then your family members would have to mess around with some sort of software that allow them to hide this layer with the legend before printing and so forth of image editing...
This is what we must try (and you can test the procedure yourself on your computer):
- Right-click on a photo in the Organizer, and choose "Add Caption".
- Write your caption and click on 'OK '.
- Use the file... Export as a new file (s) to export this picture to your USB.
- Use Windows Explorer to look at the image on your USB. At the bottom of the Windows Explorer window, you will see the various pieces of information about the photo, and your caption will be listed as the "title".
Although you must do steps 1 and 2 one-at-a-time for each photo, when you have completed these steps, you can select all of the images and do step 3 for each of them at a time.
Which does what you're looking for?
Ken


Maybe you are looking for
-
can pay you once?
-
Hello, I am writing because I have a few problems with my favorite browser after update to 8.1 Windows. Here are some details. I've updated Windows 8.0 Windows 8.1, since Firefox run a bit oddly. In particular, when on sites with lots of images like
-
My Satellite phone (A305) stops operating on the sector/charger adapter
The problem is that my Toshiba laptop series _A300 (A305) stops when you try to run on the Charger AC/adapter_. You can start with the power cord plugged in and it goes to the Windows desktop and maybe a few more minutes to the maximum before turning
-
Hello apple support community! I found a few other discussions on the issue, that I care, but I could not solve this problem. I hope someone here can help. I have mid-2010 Macbook pro 10.10.5 Yosemite running. It keeps crashing and goes to a black sc
-
I would like to clean the vents on my hp pavilion dv6000, but they are not exposed. Should I remove the covers to the best remove all debris?