Automatic color balance adjusted for example white after importation
Hi Sir / Madam
Background:
I use Sony A7 Mark II and Voigtlander lens. Output of RAW file
Problem:
After you have imported the my file raw in LR, I found the color (for example, WB) is so different from what I've seen found my camera. At first, I thought it's just because of the color deviation between the display on my camera, the software and the monitor. However, I tried to get a glimpse of all the files in lightroom prior to importation. Surprised! They were all good. exactly what I want.
After I clicked on import, the first 10 seconds, they were still seemed well. Then Lightroom started to load. I don't know what it works on. When it is finished, the color of my photos has changed. I double check any preset in the import page. But all the fields to 'APPLY when importing' are 'none '.
Question:
Is it normal or I have to adjust a few settings?
It's so weird that I had no such problem. I use Canon lens before. Everything is great with LR. After that I changed the voigtlander, I found the problem in the import. but I don't think it is related to the objective. so strange.
It's super annoying. =' I uninstal, update and reinstal... try anything... but in vain...
Grateful if someone can help!
Thank you very much!
The first one you see is the preview stored in the RAW file. After a while, after seeing of buid LR LR, you see that one. I guess that's the problem you have described here:
However, I tried to get a glimpse of all the files in lightroom prior to importation. Surprised! They were all good. exactly what I want. After I clicked on import, the first 10 seconds, they were still seemed well. Then Lightroom started to load. I don't know what it works on. When it is finished, the color of my photos has changed.
Check here (develop module), this preset is set:

Tags: Photoshop Lightroom
Similar Questions
-
How to check the recently modified values for a color balance adjustment?
I just did a simple color balance adjustment to a layer, changing tones and shadows, but I need to record the exact values that I adjusted, i.e. Cyan:-20, Magenta: + 4, etc. I forgot how much I've changed each of these properties and need to tell someone how to reproduce the adjustment.
Is it possible to retrieve this information after you make the adjustment of color balance? When I return in the window of color balance once again, cursors have been reset to 0.
Thank you!
When you reopened the adjustment of color balance, did you press on cancel or OK?
If you click Cancel and then use Ctrl + Alt + B and who can open the color
balance with your most recently used values. If you click OK when you have opened the
layer before color balance, it won't work.
MTSTUNER
-
Hello
I use Photoshop CS2 on a work computer to edit and upload images of vehicles and I use the automatic color (Ctr + Alt + B) Balance very often. I am recently upgraded computers and installed the same version of Photoshop on my new and there is no longer automatic adjusts the color balance, it brings just the menu to set manually the photos. Can someone help me do this automatic setting again?
Yes, it will use the last settings used when using Ctrl + Alt + B, without I knowing the color balance dialog box still open with the last used parameters shown.
CTRL + B opens the dialog of balance of color, but with the settings to zero
-
Quick way to save and apply a new color balance adjustment
I have a number of photographs which have all disappeared due to age. I changed the color balance to make more realistic color photos in a separate layer, and I want to apply this change to all the photos.
Is there a quick way to do this in Photoshop CS3?
Do not copy and paste. Drag and drop.
-
Looking for examples of After Effects video for social media?
Hi all
Can someone suggest a Web site that shows samples of what has been done in Adobe After Effects for social media communications?
Thank you
There is a #aftereffects - a good place to perform a search on Twitter and Instagram, http://motionographer.com/ - AE, Art of the title - also without limitation to the AE and a bunch of other sites that show things that have been created with open-ended AE. If you are looking for specific examples where AE is used for the promotion of social media then you probably need to experiment with Google.
-
Automatically remove virtual machines for VDI pool after the period of time
Use us Vmware View 5.0 but soon move to 5.2 and have need features to automatically remove all the virtual machines in the pool selected after a certain period of time. We are at disposal VDI for a project that will end for 3 months and after this time, we want to remove this VMs automatically. Is this possible?
It depends a bit exactly what you want to do, but you can plan everything a powercli-script to remove the virtual desktop at a certain time.
Another option that I usually prefer is to manage the rights with the ad groups.
So when you want to revoke a users access to a desktop computer, simply remove the user from the group, which should be easy to do with a script.
Linjo
-
How can I get an impression of correct image size? Why my impression does not match the exact size I selected in the image size box, even when I turned off the automatic setting of the proportions? Example, I select a frame size of 10.8 x 8.4 inches and my printer prints an image 10 x 7.25. It wasn't a problem before installing Photoshop CC 2015.
Hi edwards61437238,
Have you tried to print from other applications outside of Photoshop and see if you get the correct impression.
And also you have selected the right Type of paper in the printer configuration?
Kind regards
Tanuj
-
This is illustrator

It's photoshop

Libraries are the same? The two RGB colors are different and they have different look on the screen.
None of this has to do if you are not working with color management and conversion of spot color to a CMYK process color, which seems to be the case here...
Mylenium
-
1 http://img842.imageshack.us/img842/9692/l7ac.png
2 http://img845.imageshack.us/img845/7918/7l2g.png
Difficulty already thx
-
Wo Color Balance layer features in CS4-CS5 >?
Maybe a guru with best connections to Adobe knows the answer to that. (or maybe I just forgot).
I just found out (and I don't think that it is pilot error) the characteristic behavior of the color Balance adjustment layer is different in CS5 and CS4/CS3. (Much stronger in CS4/CS3).
In addition, there also is an associated behavior that is like a buried legacy mode that is not visible to the user. Here's what I mean.
If I create an image in CS4 with a single layer of color balance Wo, I get an adjusted image.
If I open the PSD file in CS5, the same image is displayed.
If I use the same base image, yet to create the layer of color balance Adj to in CS5, the adjusted image is different than the two prerequisites. If the color adjustment layer acts like it has a hidden legacy mode where the features are an if created in CS4/CS3 yet another characteristic type if created in CS5.
My mind could be drag (or my cold got the best of me) because I do not remember this as a documented change and I searched the internet for "what's new in CS5" etc. I don't remember anything on other forums on this subject either.
I guess the good news is, the new feature of the color Balance adjustment layer is outperformed with a curve of transfer with the least amount of cutting for the lights and the shadows. Very similar to the better behavior of the diaper change for setting brightness/contrast from CS2 to CS3.
Here are a few comparison images.
This is the layer stack used with simple Base Image B to gradient W with CB layer on top with highlights pegged in the red. It's the exact same stack of layers for images shown:
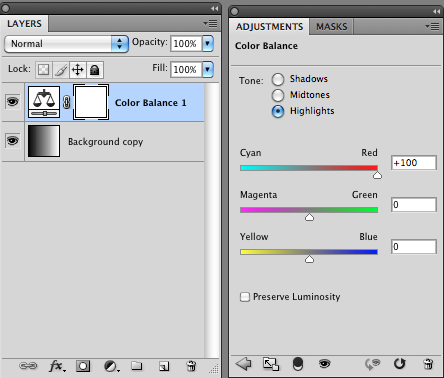
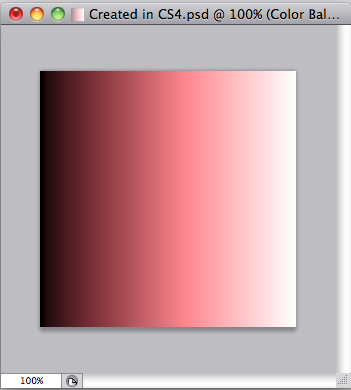
Here is the first picture. It was created in PS CS4 and displays CS4 versions with the spectacle of the above conditions:
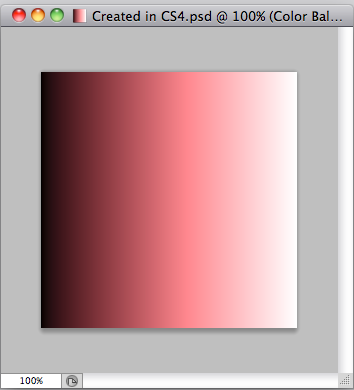
It is the same picture from above that has been saved as PSD with profile and them imported into PS CS5 with the same profile. There is no change:
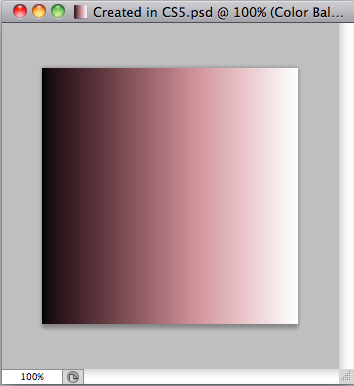
This next image is still using the same basic gradient, and then creating the CB layer from PS CS5 with the same parameters, only the Red linked highlights:
Does anyone have an easy answer for this. Can anyone reproduce this and confirm the change of CS4 CS5. A test by someone else could confirm either I'm off base with pilot error or there is something to this.
And Yes, all the images were sRGB and kept in sRGB for creation/display. All screenshot images were the images grow side by side on the same managed colour monitor. All edit > color settings are identical.
Thanks in advance for any help
John
AFAIK, the math for this adjustment has not changed a bit.
And automated our tests found no difference in the results.
You should probably double check all settings.
-
Lightroom adjusts the photos after importing
Hello.
My 4.4 lightroom automatically adjusts my raw files after import.
Exhibition - 1.73 and highlights - 50 on each image.
I have not added a presett during import.
Tried to delete the Lightroom settings file and created a new catalog.
But still no effectsAnnyone knows why lightroom sudently starts with this?
Help!
You may accidentally changed the default LR.
-
How files and the appropriate label color PMS separate for screen printing
Hello
I have to present a document Illustrator for a silkscreen t-shirt and instructions ask that I have "label own PMS color you expect the ink on the finished design." I don't know what that means, and even less how to do it. I googled and it seems to have something to do with the Pantone colours, but I couldn't find how to do this. The design is all one color, so I hope it helps me! In addition, it requires separate Illustrator files. I know this means separate into layers, but it does not design in layers. If I submit to the eps format does it matter that it's all in a single layer?
Could someone please help me with some details on this?
Thanks for any help you can offer.
Mary
.. .the instructions ask that «label own PMS colours...» I don't know what that means...
This is an example of so-called 'experts' in the various industries of printing using inaccurate terminology that confuses potential customers, even when they are ostensibly trying to provide instruction.
PMS stands for Pantone Matching System. PANTONE is a company that produces for commercial offset printing inks, and who publishes books swatch for these inks and color specifications. Because it has long been the player prevailing in this market for a very long before the general public graphic computers, he took the habit as a sort of de facto "standard" transmission of the colors you want. But isn't the only such system Pantone.
To my knowledge, Pantone does not even produce screen printing inks (which are more like a painting, really). When people throw around the 'PMS' and 'Pantone' words like that, they often reveal their own misunderstanding of what really is Pantone. In all likelihood, the silkscreen that you use think Pantone Matching System is a kind of a standard universal color. They will most likely find the Pantone color number give you them, then either look at a reference or simply manually mix their screen printing inks for a match.
... I googled and it seems to have something to do with the Pantone colours, but I couldn't find how do...
In most screen printing, your concern is to use spot colors in your design rather than process colors. PANTONE product specifications of colors for fairer inks spot. It produces references to the four-color, metallic inks and even fluorescent inks and inks. Different Pantone standards are represented in Illustrator as 'Libraries of nuances', which are accessible via the drop down Swatch palette menu.
You can set any Color Swatch you use Illustrator as a spot color. When you do so, all this means is that, when the file is printed as color separations, each spot color is printed on its own plate of separation. "Plate" is a throwback term that refers to the plate on which are the images for individual inks in commercial offset printing. Silkscreen, a separate screen is built to carry the image for each ink used in the design.
You can also name any Spot color swatch you define, using any name you want. The name has no functional effect on the printed result. Each plate separation of color is a black image, regardless. The actual color is determined by the actual ink that is loaded in the press (or serigraphy) when it is printed. That's why, when you are working in a program such as Illustrator for a project to print, you should not think in terms of inks, in terms of colors.
For example: you can define a Spot color swatch in Illustrator. It can be set to display any color you want. You don't want to, of course, but in the interest of explanation, assume that you set the Spot color swatch to display in Illustrator as a green color. Then, you name than Swatch "Pantone 185", which is actually a red. If you now print the file as color separations to a PostScript printer (or "print" to PDF separate colors), everything to which you applied the named Swatch "Pantone 185" will be printed on a single sheet (or page PDF).» This sheet contains a picture in black and will be titled "Pantone 185.
Actually, when you work with a local display store, I usually create tones color chart, and references to name them not according to Pantone (or other), but in the name of the actual brand of screen inks that will use the screen shop.
So, really, your screen printer is just requiring you to build your design using a limited number of color swatches, with each defined as a spot color. He's still implying that you must name your swatches Spot according to the numbers of colors in the Pantone Matching System, simply because it is the library for the most familiar to designers color naming.
The easiest way to do so is, for every ink that you want to print on the T-shirt:
1. go in the Swatches palette flyout menu.
2. select open Swatch Library > color books > Pantone Solid Coated (or solid Pantone unpaved; it isn't really very important to screen printing).
3 scroll through the list and select the color you want. It will be added to the list of the nuances of your document.
The design is all one color, so I hope it helps me.
As someone else said, because your design is one color, you could simply design using the black one and then tell the silkscreen what color ink to use. But there are some caveats.
You must print the as a composite file (normal, full color), not as separations. It is because if you simply use a shade that appears black on your screen, that swatch 'black' may in fact be built on a combination of RGB or CMYK values (depending on the colors in your document). To print separations colors can not result in a solid black on the black plate image. It goes same for design tips by using just one color. If you want the ink to be red, and you want to design using red, then red Swatch must be defined as a spot color. Otherwise, print as red as separations or composite will not give a solid black image.
In addition, it requires separate Illustrator files.
Once again, unclear. There is no such thing as a "separate Illustrator file." Any Illustrator file can be printed (or saved as PDF) as a color-separations. Once again, that the printer must be clear here, it is that you build your Illustrator file so that it can be printed as separations, with each split corresponding to an ink that is responsible in his silkscreens. In practice, this means just be sure to use only the color tones in your work.
Yet once, this illustrates the fact that a technician working in a particular printing environment can be 'expert' in his shop, is not because he know didly on the software and the workflow used on the design front.
For stores of the most banal local screen, the safest way to prepare an Illustrator file, which leaves nothing to question is:
1. make sure you know how much different inks are used for printing design. (Don't forget: think inks; not "color".)
2 build your design using nothing but the Spot color swatches and a Swatch for each ink. Do not use any process of nuances. In fact, recommended is to remove all the nuances that are not actually used in your design.
3 ' print' an Illustrator, Adobe PDF document as "printer." (I think that you need to have Adobe Acrobat installed in order to view a selection of the printer Adobe PDF.) I don't know, because I am never without Acrobat Professional.) In the output of the print dialog pane, specify separations, not composite.
This will result in a PDF file that contains a separate page for each ink. The image on each page will be black. That's exactly what the screen printing needs to print to 'positive film' (which nowadays are often translucent paper, not film) which it will use as masks then "burn" his screens.
... I know this means separate into layers, but I did not design it in layers...
Do not confuse with layers color separation. They are totally independent functions. Layers is just a way to organize objects that you create in your file. Color separation is a print function. It occurs when you print to a device which includes the separation of colors (e.g.: a PostScript device) or when you export to a PDF of the color separation, as described above.
It is a common misconception (miss-hypothesis) among beginners. Programs such as Illustrator may help you design with every object that is colored with ink of separation including residence in a layer that is dedicated to this particular ink, it would be absurd debilitating. Again, the layers is just a "fork" of the stack of objects in your file. These objects can be in any order on any number of layers and stacking. This has nothing to do with printing on color separations. (Stacking order comes into play when overprinting is involved, but even this does not yet require layers correspond to the inks of separation.)
If I submit to the eps format does it matter that it's all in a single layer?
EPS does not help. Think EPS is nothing but a file format that puts the contents of your Illustrator file in a 'black box' so that it can be "passed through" to the printer by programs that do not understand PostScript. If the content of your Illustrator file is built to target printing method, it will be the content of the EPS. Today, the PDF is more flexible and easier to work with than BPA anyway.
JET
-
eject the card after import option missing from Lightroom CC 2015.2
Yesterday, I upgraded to the last 2015.2 CC in Lightroom. The import Panel has changed a bit. But what worries me is that I can't find any where in the Panel to import for "eject card after import. And not the case in the preferences. I looked everywhere in this Panel.
I use a Mac Pro OS X 10.10.5
Can someone help me or explain what happened?
Thank you
Hi JJCAS
This feature is no longer supported.
Please ask for this feature to Photoshop community customer family
Concerning
~ Assani
-
Signs of adjustment for exposure and the white balance disappeared
I use Lr 5.3 to adjust some RAW images. My develop pane is now missing the pane for the white balance, hue and also the pane exposure, contrast, highlights etc. adjustments. I don't know how this happened or how to restore them. I use an iMac.
See you soon
There is a feature unknown in Lightroom to hide/show panels.
Looks like the base Panel has inadvertently hidden value. This is a common problem posted in this forum almost every week.
Right-click anywhere under the histogram in the develop module, click 'Home' to display this Panel.
-
Pipette in the curve adjustment dialog box average pixels, so the color balance is watered.
Hi all.
When you use the pipette to set the points black and white pixels of an image in the dialog box curve setting, I found that it seems not middle of the neighbouring pixels or provide a way to select a value "monochrome". Thus, the color balance is still impaired and is thrown way if you happen to choose a noisy pixel (for example).
I expect that there is an option to set the size of the sampling for the pipette area, but I don't see one. I have considered making the monochrome image, defining curves, save them as a preset, and then reload the image color and apply the preset (if she does not leave me); but this seems heavy and hokey. What is the usual procedure to adjust the tone curve of the image without changing its color balance?
Thanks for any idea.
When you select an eyedropper in the curves adjustment dialog box, you went to the eyedropper tool.
You then set the sample in the Options bar.
In the curves adjustment layer, any pipette also has sample settings in the Options bar.


Maybe you are looking for
-
I bought Commandos: battle pack (which has 2 and 3 commandos) on the DVD for my Mac. But when the disc starts there is a 'go' circle on the Commanods 2 and Commandos 3 install buttons. The explanation is that Power PC is not configured to install t
-
Download "Wood_m5.wmv" attempted to http://www.americancraftsmanwin.com/demo5.html
-
unlock (reset) password BIOS/CMOS for HP DV7-4177nr
I bought this HP pavilion laptop DV7-4000 on eBay and was not provided with its BIOS password so I can't use it because I do not know the BIOS/CMOS password previously used by the seller. Can someone help me torecover the passwor please? Help!
-
Can I customize the notification blocked on MS parental controls page?
Set the blocked notification page to display a design customized as a picture of the parents to remind children?
-
How to create such a list... Put the Image and the name of a cell in the list