Automatic color balance
Hello
I use Photoshop CS2 on a work computer to edit and upload images of vehicles and I use the automatic color (Ctr + Alt + B) Balance very often. I am recently upgraded computers and installed the same version of Photoshop on my new and there is no longer automatic adjusts the color balance, it brings just the menu to set manually the photos. Can someone help me do this automatic setting again?
Yes, it will use the last settings used when using Ctrl + Alt + B, without I knowing the color balance dialog box still open with the last used parameters shown.
CTRL + B opens the dialog of balance of color, but with the settings to zero
Tags: Photoshop
Similar Questions
-
Automatic color balance adjusted for example white after importation
Hi Sir / Madam
Background:
I use Sony A7 Mark II and Voigtlander lens. Output of RAW file
Problem:
After you have imported the my file raw in LR, I found the color (for example, WB) is so different from what I've seen found my camera. At first, I thought it's just because of the color deviation between the display on my camera, the software and the monitor. However, I tried to get a glimpse of all the files in lightroom prior to importation. Surprised! They were all good. exactly what I want.
After I clicked on import, the first 10 seconds, they were still seemed well. Then Lightroom started to load. I don't know what it works on. When it is finished, the color of my photos has changed. I double check any preset in the import page. But all the fields to 'APPLY when importing' are 'none '.
Question:
Is it normal or I have to adjust a few settings?
It's so weird that I had no such problem. I use Canon lens before. Everything is great with LR. After that I changed the voigtlander, I found the problem in the import. but I don't think it is related to the objective. so strange.
It's super annoying. =' I uninstal, update and reinstal... try anything... but in vain...
Grateful if someone can help!
Thank you very much!
The first one you see is the preview stored in the RAW file. After a while, after seeing of buid LR LR, you see that one. I guess that's the problem you have described here:
However, I tried to get a glimpse of all the files in lightroom prior to importation. Surprised! They were all good. exactly what I want. After I clicked on import, the first 10 seconds, they were still seemed well. Then Lightroom started to load. I don't know what it works on. When it is finished, the color of my photos has changed.
Check here (develop module), this preset is set:

-
Without any regular stopped working color balance. I.e. When you move cursors the image is not amended in any way. Without law, sometimes they work. But , and and then does not.
Windows 8.1 x 64, Quadro 4000
Option Preview seems to be not controlled as directed by your screenshot I think, so that could be the cause, it is not far out for you.
Check the option 'Preview' in the right-hand column under the Cancel button, and then, check.
-
Pipette in the curve adjustment dialog box average pixels, so the color balance is watered.
Hi all.
When you use the pipette to set the points black and white pixels of an image in the dialog box curve setting, I found that it seems not middle of the neighbouring pixels or provide a way to select a value "monochrome". Thus, the color balance is still impaired and is thrown way if you happen to choose a noisy pixel (for example).
I expect that there is an option to set the size of the sampling for the pipette area, but I don't see one. I have considered making the monochrome image, defining curves, save them as a preset, and then reload the image color and apply the preset (if she does not leave me); but this seems heavy and hokey. What is the usual procedure to adjust the tone curve of the image without changing its color balance?
Thanks for any idea.
When you select an eyedropper in the curves adjustment dialog box, you went to the eyedropper tool.
You then set the sample in the Options bar.
In the curves adjustment layer, any pipette also has sample settings in the Options bar.

-
Conversion of the naves in DNG - color balance problems
Hello
I am wanting to use DNG with Color Checker Passport Xrite requiring a DNG create a camera profile. I downloaded Adobe's DNG Converter, to convert the NAVE in a DNG and it does the job, but when you compare the NAVE and DNG, DNG format is completely different from the NAVE and it is completely blown out in terms of exposure and the color balance is terrible!
I am trying to create a camera profile for my studio where I use the flashes, but the DNG format is such poor quality compared to the NAVE, I know I'm doing something wrong!
Can anyone give me any help with this?
Thank you!
Hi PhotogJill,
I believe that the version of DNG converter that you use may be different.
As I said I used the steps above and you can see that when I did there is no difference in DNG and NEF.
And like you said putting the file in the same folder xmp, made the difference.
Can you please try the same thing with other NEF files and check the results?
-
Unable to save the color balance of the predefined... why?
What is the problem here? I'm sure that I was able to do this in earlier versions of photoshop. Please notify.

Hello
As far as I know or remember that you were never able to save the presets from color balance.
Although I always wondered why it's never been applied.
You can use an action or script to save the settings.
-
For the question of particles color balance.
I made a ring for special help and I want to change the color. It's multiple copies with fast blur applied to give them
the glow and it all compounds. Now, what I want is to change the color as a whole but curves seems not working on it.
Not even color balance. Is this something with the settings? And I received your comments saying that these are not the best means of
correct the color, similar to the use of the color balance, but who cares, why it's not working? I watch tutorials and they use it very well with their individual layers.
Please and thank you.
Best,
KennyTips: as you can set the mode of fusion to add or something like that, I would set the Alpha channel to channel completely in market and the R, G and B to Alpha. In this way, it darkens not - but your layer become completely opaque.
-
Wo Color Balance layer features in CS4-CS5 >?
Maybe a guru with best connections to Adobe knows the answer to that. (or maybe I just forgot).
I just found out (and I don't think that it is pilot error) the characteristic behavior of the color Balance adjustment layer is different in CS5 and CS4/CS3. (Much stronger in CS4/CS3).
In addition, there also is an associated behavior that is like a buried legacy mode that is not visible to the user. Here's what I mean.
If I create an image in CS4 with a single layer of color balance Wo, I get an adjusted image.
If I open the PSD file in CS5, the same image is displayed.
If I use the same base image, yet to create the layer of color balance Adj to in CS5, the adjusted image is different than the two prerequisites. If the color adjustment layer acts like it has a hidden legacy mode where the features are an if created in CS4/CS3 yet another characteristic type if created in CS5.
My mind could be drag (or my cold got the best of me) because I do not remember this as a documented change and I searched the internet for "what's new in CS5" etc. I don't remember anything on other forums on this subject either.
I guess the good news is, the new feature of the color Balance adjustment layer is outperformed with a curve of transfer with the least amount of cutting for the lights and the shadows. Very similar to the better behavior of the diaper change for setting brightness/contrast from CS2 to CS3.
Here are a few comparison images.
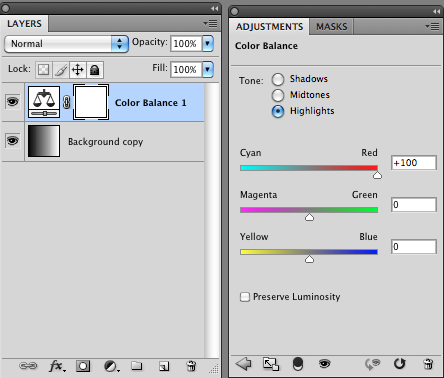
This is the layer stack used with simple Base Image B to gradient W with CB layer on top with highlights pegged in the red. It's the exact same stack of layers for images shown:
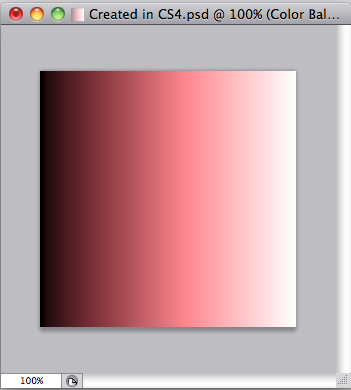
Here is the first picture. It was created in PS CS4 and displays CS4 versions with the spectacle of the above conditions:
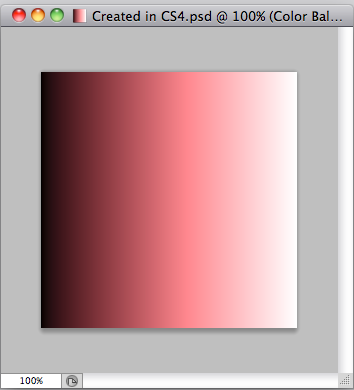
It is the same picture from above that has been saved as PSD with profile and them imported into PS CS5 with the same profile. There is no change:
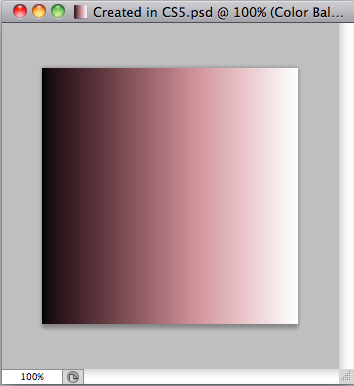
This next image is still using the same basic gradient, and then creating the CB layer from PS CS5 with the same parameters, only the Red linked highlights:
Does anyone have an easy answer for this. Can anyone reproduce this and confirm the change of CS4 CS5. A test by someone else could confirm either I'm off base with pilot error or there is something to this.
And Yes, all the images were sRGB and kept in sRGB for creation/display. All screenshot images were the images grow side by side on the same managed colour monitor. All edit > color settings are identical.
Thanks in advance for any help
John
AFAIK, the math for this adjustment has not changed a bit.
And automated our tests found no difference in the results.
You should probably double check all settings.
-
Is the tool in Photoshop elements or Photoshop color balance right?
I'm doing diploma in digital photography and I need to use a tool called Color Balance that says my textbook is in Image > adjustments > Color Balance. I can't find it. Is it in Photoshop elements 8 or it isn't altogether?
function() {return A.apply (null, [this] .concat ($A (arguments)))}
MTSTUNER wrote:
Added: There were once two plugins for elements that were very similar to the color balance, but I can't seem to locate them again.
Is that what you're looking for?

It's a free plug-in, found in:
http://www.Softpedia.com/get/multimedia/graphic/graphic-plugins/color-balance.shtml
Ken
-
How to check the recently modified values for a color balance adjustment?
I just did a simple color balance adjustment to a layer, changing tones and shadows, but I need to record the exact values that I adjusted, i.e. Cyan:-20, Magenta: + 4, etc. I forgot how much I've changed each of these properties and need to tell someone how to reproduce the adjustment.
Is it possible to retrieve this information after you make the adjustment of color balance? When I return in the window of color balance once again, cursors have been reset to 0.
Thank you!
When you reopened the adjustment of color balance, did you press on cancel or OK?
If you click Cancel and then use Ctrl + Alt + B and who can open the color
balance with your most recently used values. If you click OK when you have opened the
layer before color balance, it won't work.
MTSTUNER
-
Quick way to save and apply a new color balance adjustment
I have a number of photographs which have all disappeared due to age. I changed the color balance to make more realistic color photos in a separate layer, and I want to apply this change to all the photos.
Is there a quick way to do this in Photoshop CS3?
Do not copy and paste. Drag and drop.
-
How to remove automatic color "correction" in Lightroom?
I had a meeting this morning with a Canon IR-converted-rented 6 d, using a white balance custom from a photo. The Preview on the correction of exposure and in the thumbnails of my Mac Finder display exactly how I want them: a dreamlike green-brown. However, when I import the RAW files in Lightroom (or Photoshop), the program automatically sets on an effect terrible peachy that kills all the subtlety. I'm going to click on a thumbnail to appear normal, and it will raise the color appropriate for a moment as says "Loading" popup... ", then my beautiful image is replaced by a peachy monstrosity.


I struggled with the sliders of Lightroom for hours, but I can't return the colors the way I shot them. I tried upgrading to the latest versions of CC and no dice. The colors look when I open JPG files that comes with it, but I'd rather be able to do my changes with the flexibility of RAW format. And heck, I just want to understand the problem, to avoid similar problems in the future!
Thoughts? Any input would be greatly appreciated!
This happens because the white balance slider is blends with 2000K. Of trouble with Lightroom and camera raw is it not to deal with what they think are non-physical white balance settings and simply attach them to the limits of the range that it considers reasonable. This is what causes your shift and cannot be corrected in Lightroom or camera raw. Never understood why these limits are there also that it affects not only infrared cameras modified but also under water and even photos taken in strange conditions as snow storms 9Voir example this 8 years ago! Jao photo blog: the Extreme white balance). The only solution I know is to create a custom profile that gives you a little extra range. You can do this by using the editor dng profile editor. Here's a tutorial for infrared cameras updated the: sing http://photography.tutsplus.com/tutorials/an-in-depth-guide-to-infrared-photography-proces--photo-9540. There are many on the web a quick google search away. I hope this helps.
-
I've been a photographer for these last years, and it's the first time I have encountered this problem. I shot an event for a couple (reception) and I didn't have my grey card, so I put my Canon 5 d mkII on the white balance automatic (shooting with a Canon 24-70 2.8 and a Sigma 85 1.4, if it helps). As you will see on the photos of two examples - photos taken in the conference hall was going well, but the Favorites of the event itself were surprisingly saturated. The room had a ton of very bright uplighting in purple and pink - the shooting was going on in the viewfinder, but once I got them in the LR4, there was an almost complete cast of violet/rose above it all. Adjustment of the balance of whites in LR for auto, tungsten, fluorescent - nothing has worked. Adjust the temporary sliders - only a little better. Reducing the vibrance and saturation has helped a little more, but I really find a solution! I can't afford to pay back their money, but if I can't find a decent solution, I'll do it. I want to give them the best possible color correction, but I'm pretty new to LR and I could use some help. Just to be clear, I'm not looking for a link to a tutorial on how to adjust the white balance - I read all the... I'm hoping by using someone who has experienced this same thing or can still offers advanced solutions that "try to set the sliders more» Thank you in advance!
http://i.imgur.com/dCda964.jpg
http://i.imgur.com/uGoEuiB.jpg
This isn't a matter of White Balance, and you will not be able to adjust this image with the settings of white balance only - either behind closed doors or in Lr.
You shot this photo in colored light, and the effect you looks as if you want a fancy color filter in front of your lens.
I doubt if it can be adjusted to a 'normal' image looking at all. But for all its worth, here are the best I could come up with – even if I don't say it's THE best, in fact, it is still severely lacking.

And here's screenshots of the settings I used. I found that the most promising "adjustments" were in the calibration Panel. If you play a little bit maybe there is a better solution.


The image has a severe cast of purple, which is a red and blue combination. Increasing green will help. That is why I put the slider dyed in Basic-100.
In the calibration Panel, I put the still green hue, reduces the saturation of red and blue and changed the shades. Finally, in HSL, I reduced the saturation of blue.
PS: I think that the advice of Lee Jay is good. Create your own profile for counterweight in light color.
Post edited by: web-Weaver: added PS
-
Is it possible to have incoming e-mail messages automatically colored by priority?
I'm trying to find a way to automatically send incoming messages be displayed in a colour that I can link to its priority (defined by the sender). I need not be placed in a subfolder; I just want to make more high or more visible in my email inbox priority messages. I already know how to manually assign a color to messages. Thank you.
The only suggestion I can do is to designate some colours appropriate tags and use of Tools | Message filters to define the tags.
Myself, I rarely see messages with explicit priority flags, but I think you will see an entry similar to the following:
X Priority: 1 (highest)
in the header.
Go to Tools | Message filters and create a new filter. Priority is offered as a standard filter expression; If this does not work, you can go down to the end of the list of filter criteria and make a new, under Customize.
Of course, the action of the filter when the trigger, must be to apply a suitable label, which would result in the message being colorful. Repeat for each level of urgency, that you care to identify. Place your filters of marking at the top of your list of filters for the marking will take place before any other filter.
-
Strange yellow color balance in Photoshop / Lightroom
I have a strange yellow color indicating the balance upward in Photoshop and Lightroom, but NOT when the file is exported (or when the photo is displayed in the Windows Explorer file / Photo viewer app):
Take a look at this picture:
https://marinhomephotography.tinytake.com/SF/OTQwMTIwXzM5NTgwNTI
This is a screenshot with the picture open to (from left to right) Lightroom app Windows Photos and Photoshop). I use CC 2015.1.2
Note the yellow cast on the pictures left and right. The background is supposed to be neutral gray (color sampling says it's gray, and neutral in lightroom, I used the color picker to select the neutral gray gray background).
So if your monitor is calibrated, which photos have a more neutral background for you? One in the Middle? Or on the outside?
and what could be originally the photos seem a lot more yellow, seen in PS / LR, but not when exported (or opening directly in windows Photos)?
Thanks in advance.
You have a broken or defective monitor profile. Without color management applications do not use the profile and are not affected.
Raise your standard to make a new profile. If you do not, use sRGB IEC61966 - 2.1 for now. Go to control panel > color management > devices. Once completed, restart Photoshop / Lightroom so that they can load the new profile at startup:


Maybe you are looking for
-
Re: Links for Toshiba Satellite A215-S4697 Recovery Disc Images
I need help with the conclusion * Disc Images * Toshiba * Recovery and Applications / drivers * (2 DVDs) for the following Toshiba Satellite laptop model:Model name: * A215-S4697 *.Toshiba model part No.: * PSAEGU-00V00U *. The problem is that the re
-
Satellite L100-179 sometimes short, sometimes does not
Hello. My Satellite L100-179 is around the age of 9 months. A month after buying it is quite dead. Returned, and they replaced the card mother and keyboard. 4 months ago it does the same thing, but I left it for a day and she starts without a problem
-
ProBook 430 G2 - left trackpad button does not respond intermittently
I have a brand new ProBook. G2 430 (SKU # G6W35EA #ABB) with Windows 8.1, completely up to date. I find that every 10-15 minutes, the left button on the trackpad becomes unresponsive. The trackpad still moving the mouse pointer and the right button w
-
How to take a photo from facebook and download it to my photos?
I want to take a photo from facebook and save it in my files. How can I do this?
-
[WUSB11] + WRG45E + WRT54GS working in harmony todether
After a few days of trial and error and to play with the settings on my router and the Expander, I finally got my amplifier wireless g to work with my router and configure a suitable network key I have a laptop that can connect to this wireless witho