Batch render with substituted images
I'm so totally newbee. Sorry about that.
I have an AE project that has an IMAGE1. PNG, sliding left and IMAGE2. PNG sliding in right.
I need to make 600 animation files here. Each of these 600 has a different IMAGE1 and IMAGE2, but they all have the same format/size.
These images are the emblems of the (football) team.
I'm looking for a solution (a hint) where I can take my project and make. Then replace IMAGE1 and IMAGE2 and make it once again. And so on.
Its perfectly fine with an external file for him say what to restore:
Team1.PNG, team2.png
Team1.PNG, team3.png
Team1.PNG, team4.png
and so on...
I hope that makes sense - and also I'm in the right forum
Sincerely,
Henrik
This looks like a good job for the following tools:
Tags: After Effects
Similar Questions
-
Batch processing with an image overlay
Is it possible to batch processing with an image overlay in FW CS4?
I'm trying to resize several hundred images and place the corners rounded on them.
If this cannot be done in FW, does anyone know of another program that could do this?
Hi Marje,
It is possible to include resizing and image overlay in a custom Fireworks command that can be used in batch mode. For starters, you can check out this tutorial which deals with the first step.
This article describes how to perform the resizing of the image and the overlay (in this case, a watermark) and then how to record the steps and turn in a custom control that can be used later in batch mode.
Once you have registered the custom command, click on file > Batch process, follow the steps below:
- In the first window, select the images you want to process.
- On the next screen, open the drop-down menu commands , and select the custom command you created (it will probably be on the bottom of the list), and then click the Add button to include in the list of the batch process.
- Finally, on the next screen select the location of the processed files and possibly save the script of commands for later use.
Good luck!
-
Batch crop to the image format
Hi all, I use PS CC 2015.5 and am looking for some help on something I can't quite understand, but I'm sure is possible!
I am currently scanning a lot of old negatives and the scanning software is a culture arbitrary on the images that I can't control while they are all delivered to dimensions slightly different pixels and elongation and, occasionally, the image will have a thin inside edge. I am happy with the results of the scan and have a decent workflow going so I don't really want to use a 3rd party scanning app for additional control.
The ideal situation would be for a harvest of lots, centered in a 3:2 ratio. I don't mind losing a little of everything around the image so some previous posts on here, I see the canvas size is probably the best way to achieve. Play, make a 98% all round canvas resizing to get me almost what I want, but it obviously keeps the aspect ratio of the original which is not necessarily to 3:2.
Using a crop, I can control the AR but when you in the form of action, it seems to keep specific references for the departure and arrival, so it would not apply to every image.
To help straighten it and culture, the logic used to straighten quite often results in severe rotation who loses half of the image.
My apologies for the long post, but someone has a suggestion as to the best way I can get a harvest of 3:2 centered originals of different size?
In my package of action crafts there is a plugin script that I wrote. Selection of the image format plug-in can do path and selection report l / h. All you need is save a step two Action.
Menu stage 1 file > Automate > proportions selection...
Fill in the dialog as follows, so that the plug-in will save these settings in the action stage. When the action is played no dialog appears the saved setting will be used. The centered 3:2 or 2:3 selection will be defined. Depends on the orientation of the document, if the selection will be landscape Portrait 2:3 or 3:2.

Menu step 2 Image > Crop
You can batch action with Image Processor script if you want to add the sizing.
Package of shares of crafts UPDATE August 10, 2014 added conditional measures Action Palette tips.
Contains- Action Actions Palette Tips.txt
- Action creating Guidelines.txt
- Action dealing with Image Size.txt
- Strengthened through scripts functions.txt Photoshop action
- CraftedActions.atn sample Action set includes an example of Watermarking action
- Sample Photoshop Actions.txt CraftedActions the value stored in a text file.
- More then a dozen Scripts for actions
-
How to work with still Images in first items 10
I am faced with still images in my titles for my video project and would be really grateful for the help. I did a lot of searching on Google on this and searched this forum, but can't seem to find the answer I need, maybe not to seek the right questions or all just "don't get it". Not even PE Adobe tips or Adobe TV covers, although it seems important to know. I don't understand how PE10 will manage the resolution of graphics from Photoshop or any fixed image. Maybe this topic will also contribute to other institutions.
I'm working on a video project for my work, editing an old training video. New title graphics created in Photoshop, inserted images of title integrated with video clips, then exported the video segments in the form of MPEG files. I burned the entire video on DVD.
When the final DVD play on a computer or a television screen, the images of photo in the titles are unclear, although they were clearly 300 dpi images. (I know dpi is not serious in the video). The text of the title is also a little fuzzy and the text of the title which has applied animation to it is still more unclear. Yet, old video clips MPEG look good - it's just my title images and texts that have (annoying) look bad.
So I need to know how to improve the quality of the images/graphics even a video?
Project settings:
-Hard drive, Standard 48 kHz
-Editing mode: DV NTSC
-Frame: 720 x 480 (0.9091)
-Frame rate: 29.97 FPS
-with "optimize images" box checked
Using these settings because I work with an old training video CD MPEG files.
Exporting files: MPEG, NTSC DVD Standard
I export as MPEG video clips because they will be burned on a CD or a DVD for distribution to our management offices.
Job details:
In Photoshop, I still created graphic images for each title of format 720 x 480 with high resolution photos and logo of the company (300 dpi) and save as a bitmap for import into PE10. In the timeline panel, I insert the fixed image on the track "Vidéo 1", and then in the video track 2 create a top for the text title (some animated, some still). Sometimes I have the battery 2 or tracks of three titles with separate video text on an image fixed title. Yes, there is a red line on the top in the timeline because I do not still images.
Issues related to the:
• What is the best resolution for images imported into PE10 of Photoshop?
• Do I create title graphics/images to 720 x 480 or higher like 1920 x 1080 report so it will show better seen on a computer or a TV?
• Do I need to render each image title in the timeline panel so that it displays finally better in MPEG?
• Is it better to create a title and then insert the image in the title so that they are integrated, rather than layers on separate video tracks?
I would be very happy to help.
When the final DVD play on a computer or a television screen, the images of photo in the titles are unclear, although they were clearly 300 dpi images. (I know dpi is not serious in the video). The text of the title is also a little fuzzy and the text of the title which has applied animation to it is still more unclear. Yet, old video clips MPEG look good - it's just my title images and texts that have (annoying) look bad.
Please keep in mind that DVD-video has been designed for CRT TVs, and was a major step upward to a VHS tape. However, when displayed on a HD or HD TV computer monitor *, it of always ONLY 720 x 480, with is about 1/4 of the resolution 1920 x 1080, which is what we're used to seeing on display devices. It is, but only 25% of the quality. He can never look as good as HD material.
Good luck and if I missed something, please point out to me.
Hunt
* With the advent of BD players and players of DVD up-rezzing, things HAVE improved, watching a video DVD on an HDTV. New players have up-rezzing in chips, which do a very good job of "improving" the quality of the material considered. However, even with these amazing chips, DVD-video is NEVER as good as a full-HD source. In addition, the computers do not have these chips up-rezzing, so when contemplating a video DVD on a high-resolution computer monitor, it will still look pretty bad. There are a couple of new DVD players software, that allow to improve the quality of DVD-Video, played on a high-resolution computer monitor, and some look quite promising. I guess we'll see some more development in the region of DVD-video, especially since BD is not the seller basically promised a lot. Even in 3D is not helping BD fulfilling its promises.
-
Is there a way to access more of my codecs to render with AE 4.1?
Hi all
I am a new user using an older version of AE 4.1 on Windows 7.
Is there a way to access more of my available codecs to render with AE 4.1?
When I go to export in an AVI file in AE 4.1 I've only CINEPAK, DV-PAL, DV/DVCPRO-NTSC and PAL DVCPRO codecs available as a choice, click NONE for no compressed images.
Yet when I visited to AVI in Adobe Premiere, I the CAMSTUDIO LOSSLESS, CINEPAK, INTEL IYUV, HUFFYUV and LAGARITH LOSSLESS, MICROSOFT RLE, MICROSOFT VIDEO 1, MSU SCREEN CAPTURE LOSSLESS, x264VFW - H.264 / MPEG-4 AVC and available to view with XVID MPEG-4 codecs. I usually use the XVID MPEG-4 codec to render with for optimal quality for the size of the file, or the codec LAGARITH LOSSLESS to render with if I need to connect a file first since first verse has limited capacity to import the AVI file codec.
Why aren't the rest of my available codecs to render with AE 4.1?
The problems are (as seen in the screenshots below)...
(1) the CINEPAK codec makes the correct file size and format that my project is (1280 x 720), but generates an AVI file that can not be imported in to first and cannot be converted by two different converters.
(2) the option NONE UNCOMPRESSED makes the file size format correct but outputs an AVI so big (6 concerts) that can not be use practically in first and it will not play even in a video player.
(3) return codecs DV-PAL, DV/DVCPRO-NTSC and PAL DVCPRO format incorrect and sizes of format (770 x 576) without worrying about what proportions is selected (as seen at the bottom of the screenshot below), resize the size of my project and they will not matter first... these peut be converted an AVI H.264 file in one of my converters first will then import , but they are always the right size and they lose sharpness if they are resized (stretched) when converting.
Please see the screenshots below for details.

Thank you for any input,
Digi
Do not use the file/export option. Use the Composition/sequence, then define your needs of output in the render queue.
I would recommend the export of lossless files. Codec Animation QuickTime (100% quality) was my fav back in the day. If the files are too big, try Quicktime PhotoJPEG at good quality. Or, make AVI uncompressed as you have and use an external encoder to convert the first requirements. Do not use H264, it is a codec of final delivery and should not be used in your post production workflow.
Moreover, returned to the native resolution and codec you use in your creative projects. First will not import your DV file because the resolution does not - DV PAL must be 720 x 576 pixels, regardless of proportions.
-
The hard drive on the Macbook pro was repartioned, all the boot camp and other drivers updated and Windows installed from the installation DVD. All the Windows updates available from 2012 (installation disc is 2012) until today have been installed and Boot camp 5.1 with all its drivers installed. Restoration was launched with an image of an external hard drive and a system repair disc system. Once Windows loads after the login screen, it crashes. A blue screen appears with the error code 0 x 00000034 and mention cache_manager... Windows restarts by itself and I can only use it in safe mode, which means that I can't download or install upgrades or programs.
Analyze the dmp file since the first crash with Windows debugging tool showed that the problem seems to lie with
AppleHFS.sys and svchost.exe with Bug Check 34 {107, ffffffffc0000420, 0, 0}.
Here is the link to the complete analysis of the dmp for details file:
https://1drv.Ms/u/s! AuzUtP_j9nLagwWWqWUTre4qNYmu
Thank you very much in advance for your help
Moschtermeedchen
AppleHFS.sys/AppleMNT.sys are used to allow access to filesystems OSX JHFS +. Restoring Windows on Mac backups can be painful. If you have already fresh install of W7 on the internal drive, try the restore without installing any driver BC. Please be aware that such a restore is not aware of the partitions on your internal drive and can erase your internal drive.
-
I opened emails with many images. New version is having a problem opening a tab with images more than maybe 6 or 7. Of older versions sometimes had the same problem, but the images unopened is appeared on the page as a small box empty you can try to reload. No more. Now you must reload the tab all. Sometimes it works sometimes it doesn't.
You seem to be using a beta version. Maybe go back to a regular version and wait for V. 30 becoming a regular version, and maybe some bug.
-
Hello
I am stuck on this program, I can't seem to understand.
can someone guide me in the right direction please.
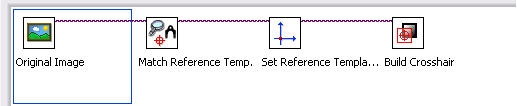
I did this program, and it is properly take a reference image and other images rotated and attract crosshair while the images are shot.
It works.
but when I put a COLOR image instead of the image in grayscale. It does not work. It gives me the error.
can someone help me with this please
I have to build the vision of this script Wizard

It seems to work with grayscale images and not the COLOR PHOTOS.
What can I do to make this work?
I need to work with images like this and I have to call reticle around the BLACK POINT on the left corner.

I also have a sample VI created vision Assistant?
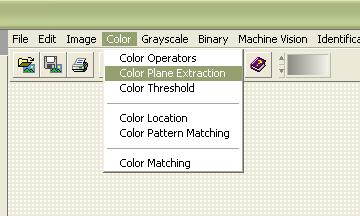
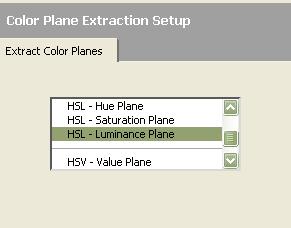
In the wizard of vision follow this
This, if your original image is a RGB one.
-
I can't put my wallpaper with an image of Windows Live Photo gallery.
I am currently using Windows XP sp3, and whenbever I'm trying to set my wallpaper with an image of Windows Live Photo Gallery, the image will be there for a few minutes then goes to blue screen. I can not change to any other image from those available or set it to any other image from the photo gallery. I tried to do a system restore and my old picrure Office will be there, but whenever I try to change to another is the same thing. Is there anyone that cn offers a solution to this problem?
I had the same problem and just think about it. The image must be saved in the folder "my pictures." Right-click of your screen and go down to "Properties" there, press the 'Desktop' tab and click on the 'Browse' button and select your image in the menu. After you have finished click the 'Settings' tab and click on the "Advanced" button, which will bring up a new window, under the section "compatibility, select the"restart the computer before applying the new display settings' option. " Apply then hit and your image should appear as background.
-
Original title: alidiskviewer.exe has stopped working
I have inserted a cd with medical images on this subject and received this message. What is a windows or another problem. I ran the diagnostic of fix - it, but this did not help.
Hello
This can happen if the file is not compatible with Windows Vista.
Have you tried the steps by Marilyn O, moderator of the Forum in the previous link to use the compatibility mode of the previous link?
If you are always faced with the question, then you can search the Alidisk Viewer option in programs and features and even uninstall and check.
For more information, you can read the following article to uninstall the program.
-
failure to communicate with the image drum?
My m175nw is only 2 weeks... Everything worked great until I did the Firmware update. Now, I get the following error and I think I printed only one (1) page since I bought this thing
10.0004 power error
10.1004 supply memory errorThere is a failure to communicate with the imaging drum.
The update of the firmware was "2012-08-27, Version: 20120806, 10.28 M" and the error message
10.0004 power error
10.1004 supply memory erroris the display on the printer control panel. I was running Windows 7 (64 bit) at the time of installation, but I also have a system dual boot and can run MAC EVALUATE which the same message after restarting the printer. Even with the computer turned off the M175nw displays the same error message. As stated earlier, the printer is only 2 weeks, I think that I've printed 2 pages (with no problems) and the above-mentioned error did not appear after the update of the Firmware... I tried a reset to the default settings, but unfortunately that has no effect when the firmware has been updated.
-
OfficeJet Pro 8600, Windows 7, any type of document with an image prints very slowly
OfficeJet Pro 8600 Premium. Windows 7 32 bit, any type of document with an image prints very slowly including .doc. Docx, pdf. Even when printing in draft mode. Other documents are very well
Take a look at this link.
-
Hello
I want to resize the image when running according to the display width.
I try some code below, but it shows me the white screen.
class image extends screen
{
EncodedImage bit;
BMF BitmapField;
image()
{
try {}
BMF = new BitmapField (Bitmap.getBitmapResource ("next.png"));
bmf.setImage (bit.scaleImage32 (50,50));
Add (BMF);
}
catch (System.Exception e)
{}
}
}Hey hardikkhamar,
Hey man, how do you think that this code is useful when dealing with the image url using http call?
Please Reffer to the code once more... its for the local image that is in your res folder...
you have loading.png image, right?
then get image coded this bitmap to aid
PNGEncodedImage encode = PNGEncodedImage.encode(Bitmap.getBitmapResource("loading.png"););and then going on to encode this method with the width and height required... its that simple man...
Bitmap Resizedbitmap = setsizeImage(encode, 200,150);
Not to say thanks, Press the congratulations
 on the right side to thank the user who has helped you.
Please mark as resolved messages if you found a solution. -
Problems with the image after the rotation of the
Hello world
I'm turning my .png image using the ImageManipulator library. Current rotation works fine, BUT - my image with alpha background is rendered on a gray square instead of alpha channel. What should I do with my image? How to preserve this alpha channel after rotation?
OK, finally I managed to solve it. For those who are facing the same bugs with alpha channel by using ImageManipulator, you must change the method ' private Sub paintTransformedBitmap (Graphics g, int textureOriginX, int textureOriginY)
private void paintTransformedBitmap(Graphics g, int textureOriginX, int textureOriginY) { // Make the drawing space transparent first before painting g.setGlobalAlpha(getBackgroundAlpha()); g.setBackgroundColor(getBackgroundColor()); g.clear(); g.setGlobalAlpha(255); /** * Keep the precision of our transformation and Scale the drawing as * well. Scale is applied as though a matrix of the form * ** | ScaleX 0 0| * | 0 ScaleY 0| * | 0 0 1| ** is multiplied by the Transformation matrix * / dux int = Fixed32.div (transformMatrix [UX], resultantScaleX); DVX int = Fixed32.div (transformMatrix [VX], resultantScaleY); Duy int = Fixed32.div (transformMatrix [UY], resultantScaleX); dvy int = Fixed32.div (transformMatrix [VY], resultantScaleY); Necessary for alpha changes with Graphics.Clear 6.0 / / g.setColor (Graphics.WHITE); g.drawFilledPath (bitmapXPts, bitmapYPts, null, null); g.drawTexturedPath (bitmapXPts, bitmapYPts, null, null, textureOriginX, textureOriginY, dux, dvx, duy, dvy, bitmap); }Notice the end of the method - setColor and drawFilledPath now commented and image appears.
-
My tags and labels will remain with the images when I move them to a new computer?
I want to assure you that if I take the time to enter the tags and labels for my images, these data will move with the images of my next computer.
Hello
I would ask you to view the query in the forum of photo gallery for more assistance.
Reference:
http://answers.Microsoft.com/en-us/windowslive/Forum/Gallery
Thank you.


Maybe you are looking for
-
Tecra S2 - Lan Controller is disabled after the installation of FritzCard PCMCIA
My laptop is a Tecra S2.Once a FritzCard PCMCIA v2.0 is plugged in, the Lan controller is disabled.Not until the PCMCIA FritzCard is removed and the S2 is restarted, the LAN controller can be re-enabled. The LAN controller is identified by the Device
-
Portege R500: Explorer crashes cured by installing the Driver Sound R600
The equipped Portege R500 of Vista is a great phone except that mine Windows Explorer (not IE) kept crashing without obvious reason. The taskbar would suddenly become unresponsive and then I would get the opportunity to restart Explorer. "Problem Rep
-
Slip and fall on the timeline images do not appear in the preview pane when the movie starts to play. The audio is OK. Until this problem arose, there was another: I couldn't save the film I've done to my computer. Check all the elements offered i
-
0xc007001d error during the installation of antivirus software
0xc007001d error during the installation of antivirus software. AVG is the brand name. Installation stops with error code. Help!?
-
I can't access one of my applications. or open all the windows. Because they are all open them in Notepad who say, this program must be run under Win32, or this program cannot be run in DOS mode. The only thing I can do is to use my browser and acces