Created in Adobe brush brushes appear in PS CC2014, but not PCCC2015 - me or them?
Created several brushes and saved to the PS format. They appear correctly, in the library I attribute them to use PS CC 2014, but the same access the PS CC 2015, libraries are not there. Suggestions. Thank you.
Answered my own question - reset the preferences file and now it's fine. Don't know what who was wobbly as the brushes of the dnuee is concerned, but all good to go now.
Tags: Adobe Capture
Similar Questions
-
How the brushes created in Adobe brush can be shared with others?
Once the brushes are created in Adobe brush and saved to my library of PSCC, how they be shared with other users of PS?
Julie, we are working on an update that will allow you to share your libraries containing brushes with other users. Coming soon!
-
I installed creative cloud LR6 this morning with PS CC. PS appears in "All programs" but not LR.
I installed creative cloud LR6 this morning with PS CC. PS appears in "All programs" but not LR.
Check under C: Program files > Adobe > Adobe Lightroom.

-
Find my iPhone - appear on my machine, but not get my iPhone
Find my iPhone - appear on my machine, but not get my iPhone
Welcome to the Apple community.
There is no 'Get my iPhone', not sure what you're talking about.
-
Lost my icon to send new messages in mail (appears in the toolbar, but not active). Can not send a new message in the mailbox (impossible to select) drop. I tried to use the toolbar Customize to drag an icon to the toolbar, but it doesn't work anymore. Using Mail 9.2 and OS X 10.11.2. Any help is appreciated.
The Send button will not be activated unless the message can be sent. Are you sure that you have entered a recipient and the account is online?
The connection doctor (window menu) displays errors.
-
I need to create a fillable pdf form which allows to print but not save. Is this possible?
I need to create a fillable pdf form which allows to print but not save. Is this possible?
Is not possible.
-
New videos appears in the Photos, but not in iMovie
Already when I imported video clips in iPhotos, the clips were made automatically available in iMovie so. Now, when I import video clips in Photos, it is made available in Photos but not in iMovie. Old clips still appear in iMovie, but not the new clips. It is not possible to import new clips with iMovie import function as iMovie cannot locate the file. Photo library only appears as a file in the Finder, and it cannot be opened with any program other than pictures.
How can I get the clips in iMovie?
OS X El Capitan 10.11.1 (B 15, 42)
Version 1.2 (340.4.0) of the Photos
iMovie 10.0.9
Hi a random string,.
The workflow I've always used is to create a folder for the videos and photos that I use in my video project and export (or drag) according to Photos or Aperture or iPhoto library in the folder. Then use the Finder application to import the files into iMovie.
The following resources explain why you can't see the Photos in the media browser:
If the media browser shows all your photo library
https://support.Apple.com/en-us/HT204669Sometimes the media browser, which allows applications like iMovie or Pages use images, pictures, shows all the available photos to your photo library.
This happens when you use iCloud photo library with the preference to optimize Mac storage enabled.
The media browser shows pictures that have the original image or a full preview size stored on your Mac. You can make a photo available temporarily for the media browser by double-clicking on it. This will download the original to your Mac, where it will be available in the media browser so that Photos optimizes still to save disk space.
If you want to take pictures in permanently available Photos in the media browser, follow these steps:
- Select file > New Album... from the menu bar of Photos. Name the new album.
- Click on the photos you want to make available in the media browser.
- Click the Add button.
- Click on the Albums tab at the top of Photos and find the new album you created.
- CTRL-click (or right-click) the album, then select Download this Mac originals.
This will download the full resolution of the images you have selected for your Mac, which makes them available at all times in the media browser.
Note: You can do all the photos in your photo library available at all times for the media browser allowing to download the originals of the Mac in the preferences of Photos, but you will lose the benefits of clutter in preference to optimize Mac storage.
Last modified: June 1, 2015
Take a look at this section of the iMovie User Guide:
Import on your Mac media
http://help.Apple.com/iMovie/Mac/10.0/#mov6fa10197dSometimes the media browser, which allows applications like iMovie or Pages use images, pictures, shows all the available photos to your photo library.
This happens when you use iCloud photo library with the preference to optimize Mac storage enabled.
The media browser shows pictures that have the original image or a full preview size stored on your Mac. You can make a photo available temporarily for the media browser by double-clicking on it. This will download the original to your Mac, where it will be available in the media browser so that Photos optimizes still to save disk space.
If you want to take pictures in permanently available Photos in the media browser, follow these steps:
- Select file > New Album... from the menu bar of Photos. Name the new album.
- Click on the photos you want to make available in the media browser.
- Click the Add button.
- Click on the Albums tab at the top of Photos and find the new album you created.
- CTRL-click (or right-click) the album, then select Download this Mac originals.
This will download the full resolution of the images you have selected for your Mac, which makes them available at all times in the media browser.
Note: You can do all the photos in your photo library available at all times for the media browser allowing to download the originals of the Mac in the preferences of Photos, but you will lose the benefits of clutter in preference to optimize Mac storage.
Last modified: June 1, 2015
Import media by dragging it from the Finder
Select a file, command-click to select several files, or select a folder of files and do drag the selection from the Finder to the event in the list of libraries in iMovie.
The clips appear in the event.
Import using the import window media
If the media you want to import is on an external hard drive, connect it to your Mac and turn it on.
Click Import on the toolbar.

In the devices section of the sidebar of the import window, select the drive or device you want to import media.
The contents of the drive or device is displayed in a list at the bottom of the import window. You can individually select the clipsin the list view, and a preview of the selected item appears at the top of the import window.
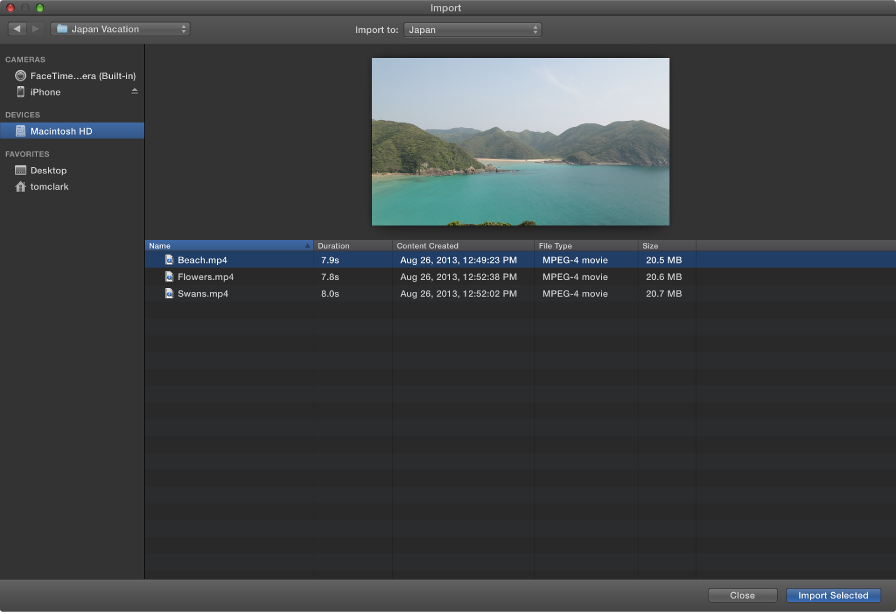
You can perform the following actions:
To sort videos in the view of list data such as time, creation date, size and so on: click on the column at the top of the display of the list headers.
To add a folder of press frequently used in the Favorites folder: drag a folder from the list on the right of the 'Favorites' header in the sidebar.
To remove a folder from the favorite section: Ctrl-click on the folder and select Remove from the context menu in the sidebar.
To quickly navigate between the clips, fast forward or rewind, move the pointer over the preview at the top of the import window, and do one of the following:

To play or pause the selected clip: click on the Play button (or press the space bar).
To access the next or previous item: click the next or previous button.
Note: If you are at or near the end of the selected item, you can click the back button to return at the beginning of the clip.
For fast forward: move the pointer over the following button and hold down the mouse or trackpad button.
To move backward: move the pointer on the back button and hold down the mouse or trackpad button.
Do one of the following:
Choose an existing event to import clips in: select the event in the context menu "import to" at the top of the import window.

To create a new event to import clips in: choose new event from the context menu "import to", type a name for the new event and click OK.
To learn more about the events, see organize the library.
Do one of the following:
To import all plans: click all import.
To import only some of the clips: command-click on each clip that you want to import, then click Import selected (the button import changes its name).
Close the import window, and your clips appear in the event. According to the length of each element and the number of clips that you import, you can see a progress indicator in the upper right of the window, while the clips are imported.

You can continue working in iMovie, then import finishes.
-
GIF images appear in the preview, but not on my site
I had problems with lately - image resolution never happened before - and solve only using GIF images. Everything was wonderful in the preview, but when I downloaded on my site - images do not appear:

The first of the above pictures is a PNG image.
Display the preview:

Live view from another page:

Overview:

The foregoing is a slide show - which works in preview mode, but not on the live site – which is not only to make the gif images are not displayed, but the slide show does not (the text is part of the slideshow).
Other info - I download html via filezilla, to publish my site.
Any help appreciated,
Thank you
The answer is that this is my problem and not question of Adobe. GIF appeared in the catalyst and go daddy publish.
-
My contacts appear in the iCloud, but I would like to export/import in Microsoft Outlook 7. How can I accomplish this?
The iCloud Control Panel for Windows will synchronize your iCloud, calendar and Messaging Contacts in Outlook:
Alternatively you can export icloud.com and import in Outlook:
Export from icloud.com Windows seems to only work using Firefox according to other information on these forums, so if you have problems with the web browser, give firefox a go.
-
Reminders appear on my iphone, but not my watch. Any suggestions?
No matter where I'm Recalling (watch or phone), the reminder appears on my phone as planned, but not my watch. I get all my other notifications.
Hello
How notifications behave depends on the State of your devices. In order to provide notifications to your attention as soon as possible:
-If your iPhone is unlocked, you will receive notifications on your iPhone instead of on your watch.
-If your iPhone is locked or mode and your watch is unlocked (regardless of the question of whether the screen saver is awake or asleep) and on your wrist, you will receive notifications on your watch.
-If your watch is locked or allowed to do not disturb, notifications will be sent to your iPhone.
More information:
-
USB disk appears on disk management, but not on 'my computer '.
Hello
I have a WD Passport Drive 500GB 2.5 USB external ".
I have it plugged into the PC (Windows XP Home SP3), material has been recognized and installed correctly, but no additional disk appears on "My Computer".
I entered "Disk management", the disc appears with the name, but without drive letter, I attributed to "G:" to it.
Disk management I can right click above and "Open" the disc to see the content, but still it does not appear under "My Computer".
BTW, another USB Disk-On-Key they receive a drive letter and appears on "My Computer" as it should.
Best regards
AVI Glam
Hi AviGlam,
Try the methods below:
Method 1:
1. Uninstall USB drivers
a. Click Start and then click Run.
b. type devmgmt.msc, and then click OK. Device Manager opens.
c. right click on USB and then click on uninstall to remove it.
2 analyze the change of material and let Windows automatically re - install driver for your device.
To check the hardware changes, follow these steps:
a. Click Start and then click Run.
b. in Device Manager, click on your computer so that it appears highlighted.
c. click Action and then click Scan for hardware changes.
d. check the USB device to see if it works.
3. find if your device is recorded and assigned a letter.
Important: this section, method, or task contains steps that tell you how to modify the registry. However, serious problems can occur if you modify the registry incorrectly. Therefore, make sure that you proceed with caution. For added protection, back up the registry before you edit it. Then you can restore the registry if a problem occurs. For more information about how to back up and restore the registry, click on the number below to view the article in the Microsoft Knowledge Base:
How to back up and restore the registry in Windows:http://support.microsoft.com/kb/322756
a. click on start
b. Select run, in the Run dialog box type regedit
c. open the registry editor, navigate to the following item:
HKEY_LOCAL_MACHINE\SYSTEM\MountedDevices
Method 2:
If method 1 does not then you can follow the steps below:
Access the external hard drive via a command prompt, copy the data, and then format the hard drive.
a. Click Start, type: cmd in the search bar.
b. right click on cmd, and then click Run as administrator.
c. type the following command:
Copy [source] [destination]
Note:
Source: Specifies the location from which you want to copy a file or set of files. Source can consist of a drive letter and colon, a folder name, a file name, or a combination of these.
Destination: required. Specifies the location to which you want to copy a file or set of files. Destination can consist of a drive letter and colon, a folder name, a file name, or a combination of these.
With regard to:
Samhrutha G S - Microsoft technical support.
Visit our Microsoft answers feedback Forum and let us know what you think.
-
I did the following steps:
1. create a user
2. assign the Group root (remove all the other group of the user)
What's my not just?
Thank you!
It is the way to do it. Either you must be part of the root group to be given to the role admin (or a bespoke) at the level of the host to access the DCUI.
If you create a user is added to the root group, but is assigned all permissions (either singularly or through a group) on the host then, then the user will be able to connect to the DCUI but not the client vSphere (or any other method of the API).
-
Text caption appears in "Edit" mode but not in the preview of project or a Web browser
I use Cp4 and have downloaded Adobe Flash 10 Active X, it's worm 10.1.82.76. I added a simple text with the following caption:
Calendar view: rest of slide
Appear after: 2.0 seconds
Transition effect: fade in only
In:.5 seconds
And Visible is checked
I'm also a single line I have drawn with the line drawing tool and included an arrow at the end of it.
Everything on the screen works including the click box, animated text, and the legend of the failure. For some reason any caption text and arrow do not appear except in "Edit" mode. In preview project, they disapper, but the click box, legend of failure and animated text work fine.
I rebooted, copied this screen in a new instance of Cp4, recreated these objects on a freshly registered screen, chose the order: face, created a new brand completely from scratch screen and downloaded the above mentioned version of Flash 10 Active X.
They is funnier, is that works of legend and boom of text very well on other screens in the project. I have 76 total screens.
I am running Windows XP.
Any suggestions?
Hello
You can post a screenshot of what looks like your Timeline?
Chances are that your click box is a break in a weird place.
See you soon... Rick

Useful and practical links
Begin to learn Captivate 5 times now! $29.95
Captivate wish form/Bug report form
-
all of a sudden I can't add css to a newly created page in the existing folder/site that works very well
well by copying and pasting a stay of a css property half was stuck
in another block of css and prevented all this fromworking proplerly
Thank you to reread its good to know there is a place like this
Wednesday, February 11, 2015 15:31 Jeff A Wright [email protected]>
-
My company provides many educational resources via adobe flash essentially presentation Manager. Can I play flash in most circumstances under linux with firefox, just not these. Chrome, with exactly the same plugin dll, is able to read the presentations very well.
Remove the part after the last slash in the URL of the page and add player/playershell.swf
On this page, it is this link, but of course, that won't work.
https://support.mozilla.com/en-US/questions/
https://support.mozilla.com/en-US/questions/player/playershell.swf

Happy holidays!


Maybe you are looking for
-
"Error 1402.Could not open key" during the installation of Adobe reader or acrobat in server 2008r2
This error has been reported previously and in the PC, the solution is to go to the MSFS file. In the registry of the server 2008r2 software / CurrentVersion / run: there is no OpticalComponents/MSFS. Really need help. Thanks Chris
-
HelloI recently bought an HP g200ax laptop. He got two graphics cards. An integrated APU A8 512 MB. And other 2GB AMD HD 8500. When I check in the only hardware monitor is working IE the 512 MB card. The other is inactive and temperature displays zer
-
type it the password of the account, it says the user profile service Service failed the profile logon.user cannot be loaded.on from the system restore, it said: System Restore could not start. What should I do?
-
Hello.My friend a notebook with program ultimate.he uninstalled windows 7 from the Control Panel, program folder not deleted.i am trying to delete it in safe mode but I get same error.i have not permission to uninstall it.when I try the owner this fo
-
Very well - so a few days ago (Saturday ~ 2) (25. 2012) I connected to my XBOX 360 (Wired) controller on my Toshiba Satellite L655 computer laptop with Windows 7 ~ Home Premium 64-Bit. To my surprise, a Notification bubble popped up from the taskbar,