How to change the width of the column guide itself?
I make a brochure trifold and put in this way in the layout. the space between the column (represented by the fine purple lines) guides is too narrow. I want to make it wider. I thought that this space was the 'gutter' but when I change the default of gutter. 25 "nothing changes on the page. I expect the purple streaks ever further out. am I adjust the wrong thing or what? Thank you!
The guides themselves aren't really doing anything. They are simply Visual that you as a developer can use or ignore. To get the column gutters to change you must go into "options of text block. Use the command-B (Mac) or control-B (PC) or right-click to access contextual menus and choose text block in a list options. Once the dialog box appears, you can change the gutters. If you want real gutters and guides to match, you must also change the guides. You can do this under the menu layout, «margins and guides»
Hope that helps
Tags: InDesign
Similar Questions
-
How to change the column ordering the interactive report?
How to change the column ordering the interactive report?Hello
Run the report as a developer, click on the "wonder wheel", click "Select columns" and reorder your columns in the box 'report '.
Then click again on the "wonder wheel", click on save report and save the default state.Greetings,
Roel
http://roelhartman.blogspot.com/
You can reward this response in marking it as useful or Correct ;-) -
How to change the runtime of height and width of the front panel
How to change the front height and width during execution. Basically, I want to decide height or width according to some parameters that I'm in the moment of execution.
Ed johnsold was first

-
How to change the font, color line, column and Grand Total labels in PivotTable
Hello Guru
Can you get it some one please let me know how to change the look and feel of the reports in Pivot table using css files. I want to have the dimension and the measure to be of different color columns and grand total different color. I want to achieve for all pivot table reports instead of manually change each report so I want to do in css files.under s_SRIKI\b_mozilla_4\views.css I've seen a lot of options but nothing has worked. So can you please exactly tell what class we need to change to make changes. Thank you!!!
Thank you
SR
For values
. OORT {}
text-align: right;
vertical-align: top;
color: Red;
}
For the product if you got hyper link
Code OOB is
. PTL {}
color: #039;
text-decoration: none;
cursor: pointer;
}
If brand aid
-
How can I change the columns in File-> Open views program?
I use El Capitan 10.11.3 on a MacBook Pro. I start with a clean system. I copied my files from my backup and reinstall my programs.
This created a problem, seeking to resolve by changing the column headings in the views of program "file-> open.
Whatever program I use, when I open a file, the window displays currently "Date added". It is of no use to me as the "Date added" to all my files is exactly the same - date, I have copied them on my own hard drive brilliant from my backup.
In finder views, I can opt to display "update" instead of "added". So I order the files by date, whenever this is useful.
However, whenever I try to open a file in a program, it is impossible to find things by date, because they all have the same "date added". I need to be able to see the "change date".
I find anywhere that allows me to change this, either in the system preferences, or when opening a specific program. Don't I found clues to aid or the forum.
Can someone tell me what I need to do?
Thanks in advance.
Mike
Right click on the headers (if in list view) and select the headers you want to see.

Alternatively, use the Arrangement to organize the desired date.
-
How to add the column to Adobe flex mxml or actionsctpt mx:DataGrid?
I have the simple mxml code
<mx:DataGrid id="DGG"
             editable="true">
    <mx:dataProvider>
        <mx:Object scheduledDate="4/1/2006"/>
    </mx:dataProvider>
</mx:DataGrid>
<mx:Button id="SetBut"
           label="Set Array as Data Provider"
           click="SetDP(); AddBut.visible = true;"
           x="100.5"
           y="164"
           width="211"/>
<mx:Button id="AddBut"
           label="Add a column!"
           click="AddCol();"
           x="100.5"
           y="194"
           width="211"
           visible="false"/>
<mx:Script>
    <![CDATA[
        import mx.controls.dataGridClasses.DataGridColumn;
        import mx.collections.ArrayCollection;

        [Bindable]
        public var MyAC:ArrayCollection=new ArrayCollection([{scheduledDate: "4/1/2006", homeTeam: "Chester Bucks"}]);

        public function SetDP():void
        {
            DGG.dataProvider=MyAC
        }

        public function AddCol():void
        {
            MyAC.addItem({scheduledDate: "4/5/2007", homeTeam: "Long Valley Hitters", Umpire: "Amanda Hugenkis"});
            DGG.columns.push(new DataGridColumn("Umpire"));
        }
    ]]>
</mx:Script>
I want to add lines to my datagrid table how do such thing?
How to add the column to Adobe flex mxml or actionsctpt mx:DataGrid?
(You can place this code in a Flash or AIR application - it compiles without error, but will not add any columns =)
Change this:
public void SetDP (): void
{
DGG.dataProvider = MyAC
MyAC.addItem ({scheduledDate: "05/04/2007", homeTeam: "long hitters Valley", umpire: "Amanda Hugenkis"});
}
public void AddCol (): void
{
var dgc:DataGridColumn = new DataGridColumn ("Umpire");
var ca:Array = DGG.columns;
CA.push (DGC);
DGG.columns = ca;
}Dany
-
How I change the fonts and colors of default return?
I changed the font and the color of the text through the Tools button and the button options and the tab content. I can't find anything tell me how to change the fonts and colors to the colors and fonts by default. Can you advise me? I use Windows 7 Home Premium OS. Thank you.
Hi Brenda19605,
You can use this article to set the fonts and colors: https://support.mozilla.org/en-US/kb/change-fonts-and-colors-websites-use?esab=a & s = do & r = 0 & s = as
The default settings for the police are in this article:
https://support.Mozilla.org/en-us/KB/some%20text%20shows%20up%20bold%20after%20upgradeUnfortunately for the default color has no good reference. For the text, but it is black (most lower-left), the background is white (color above left). Unvisited links is blue (column 8, line 5) and the visited link is purple (column 9, line 5).
Let me know if you need help more!
Lordfreak
-
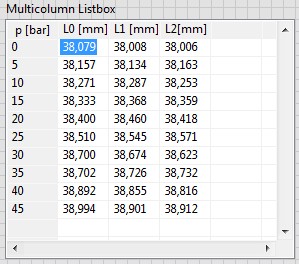
How to change the upper-left corner of the multicolumn listbox?
Can I change the properties of the cell (-1, -1), but I don't know how to change the text.
Is it too simple or impossible?
Kind regards
Ljubo.
In Excel, you cannot change the headers of columns (A, B, c...) and headers of lines (1, 2, 3,...).
I have a 2D data table Y a 1 d of data table X. data of X are the same for all the columns of Y. The first idea was to use X values as row headings to give him special attention. There should be a header above the data of X (name, quantity, unit,...). See the example below.
The solution is very simple: I created a label and put it on the upper left corner of the listbox.
Good day
Ljubo.
-
Windows Media Player - change the columns that appear under 'Now Playing'
I would like to change the columns displayed in the views now play and Windows Media Player play list. The factory default is to show only the fields title and length. It wouldn't be that big a deal this is something fairly simple to access the page layout options, hit choose columns and select the check boxes for the columns I want to show... but the title and duration are the only fields that it allows me to select from. He still refuses to allow me to select anything else. I know that there is a way to display more information, but for the life of me I don't remember how to do so that he can do. Help?
Hey,.
I've recreated the scenario on my Windows Media Player. It shows all the info like length, side, title, album, artist to contribute. Appoint you.
Scan SFC should be your friend.
-
Hello
Happy New Year to ALL
On the Login area:
I would like to know how to change the size of the region of Login and its place.
For example: Login area should have a = 600 height and width = 100 and should be on the right side, not in the center of the screen.
This problem concerns oracle12, apex 4.2 and html5 theme.
Ziut
Ziut wrote:
Hello
for example: apex.oracle.com
workspace: tb2, tb2/tb2
App = 23705
My comp (for example):

style = "height: 600px;" Width: 100px; »
This is only an example. Theme 26.
Ziut
Ziut,
This is the closest I could come to your comp. The simplest implementation, I found was:
- A region has added to the Information
- Place the Login area in a Sidebar area model
- Kept the two regions in the same Point on the screen and the same grid.

I have attempted to substitute the CSS for the Login region but made very little progress and make a slurry in a perspective of support. You should always keep in mind that another person will have to support your claim, a day, and play the more you with him, it may be more difficult to maintain if it is not well documented.
Here's my demo:
Username and password are all two - demo
https://Apex.Oracle.com/pls/Apex/f?p=11956:101
Jeff
-
How to change the Spry CSS tab
I like to use these old screens provided with the former DW Spry tab. I just looked in DW CC and it looks like they aren't there and more. But anyway, I made one for my client. Now, they want to get one of the tabs on the far right of the margin. See the image below:

I don't know yet if it's possible to do and if someone has done this before, can you tell me what code I need to change in the CSS? I would have joined the CSS file, but it seems that you cannot attach files in this forum, so I've copied below.
Please offer any means to change the color of the tabs, etc. - I just need to know how - or at all - this tab can be moved to the right.
Thanks, Guy deaf
PS I'm sorry that the CSS code does not correctly appear in this forum. When I type this message, looks like it will display line-by-line, but it's not. I'm sorry.
---------------------------------------------
@charset "UTF-8"; /* SpryTabbedPanels.css - version 0.6 - Spry Pre-Release 1.6.1 */ /* Copyright (c) 2006. Adobe Systems Incorporated. All rights reserved. */ /* Horizontal Tabbed Panels * * The default style for a TabbedPanels widget places all tab buttons * (left aligned) above the content panel. */ /* This is the selector for the main TabbedPanels container. For our * default style, this container does not contribute anything visually, * but it is floated left to make sure that any floating or clearing done * with any of its child elements are contained completely within the * TabbedPanels container, to minimize any impact or undesireable * interaction with other floated elements on the page that may be used * for layout. * * If you want to constrain the width of the TabbedPanels widget, set a * width on the TabbedPanels container. By default, the TabbedPanels widget * expands horizontally to fill up available space. * * The name of the class ("TabbedPanels") used in this selector is not * necessary to make the widget function. You can use any class name you * want to style the TabbedPanels container. */ .TabbedPanels { overflow: hidden; margin: 0px; padding: 0px; clear: none; width: 100%; /* IE Hack to force proper layout when preceded by a paragraph. (hasLayout Bug)*/ } /* This is the selector for the TabGroup. The TabGroup container houses * all of the tab buttons for each tabbed panel in the widget. This container * does not contribute anything visually to the look of the widget for our * default style. * * The name of the class ("TabbedPanelsTabGroup") used in this selector is not * necessary to make the widget function. You can use any class name you * want to style the TabGroup container. */ .TabbedPanelsTabGroup { margin: 0px; padding: 0px; } /* This is the selector for the TabbedPanelsTab. This container houses * the title for the panel. This is also the tab "button" that the user clicks * on to activate the corresponding content panel so that it appears on top * of the other tabbed panels contained in the widget. * * For our default style, each tab is positioned relatively 1 pixel down from * where it wold normally render. This allows each tab to overlap the content * panel that renders below it. Each tab is rendered with a 1 pixel bottom * border that has a color that matches the top border of the current content * panel. This gives the appearance that the tab is being drawn behind the * content panel. * * The name of the class ("TabbedPanelsTab") used in this selector is not * necessary to make the widget function. You can use any class name you want * to style this tab container. */ .TabbedPanelsTab { position: relative; top: 1px; float: left; padding: 5px 20px; margin: 0px 1px 0px 0px; font: bold 12px sans-serif; background-color: #f1c185; list-style: none; border-left: solid 1px #CCC; border-bottom: solid 1px #999; border-top: solid 1px #999; border-right: solid 1px #999; border-radius: 5px 5px 0px 0px; -moz-user-select: none; -khtml-user-select: none; cursor: pointer; } /* This selector is an example of how to change the appearnce of a tab button * container as the mouse enters it. The class "TabbedPanelsTabHover" is * programatically added and removed from the tab element as the mouse enters * and exits the container. */ .TabbedPanelsTabHover { background-color: #ffd197; } /* This selector is an example of how to change the appearance of a tab button * container after the user has clicked on it to activate a content panel. * The class "TabbedPanelsTabSelected" is programatically added and removed * from the tab element as the user clicks on the tab button containers in * the widget. * * As mentioned above, for our default style, tab buttons are positioned * 1 pixel down from where it would normally render. When the tab button is * selected, we change its bottom border to match the background color of the * content panel so that it looks like the tab is part of the content panel. */ .TabbedPanelsTabSelected { background-color: #ffe9cd; border-bottom: 1px solid #EEE; } /* This selector is an example of how to make a link inside of a tab button * look like normal text. Users may want to use links inside of a tab button * so that when it gets focus, the text *inside* the tab button gets a focus * ring around it, instead of the focus ring around the entire tab. */ .TabbedPanelsTab a { color: black; text-decoration: none; } /* This is the selector for the ContentGroup. The ContentGroup container houses * all of the content panels for each tabbed panel in the widget. For our * default style, this container provides the background color and borders that * surround the content. * * The name of the class ("TabbedPanelsContentGroup") used in this selector is * not necessary to make the widget function. You can use any class name you * want to style the ContentGroup container. */ .TabbedPanelsContentGroup { clear: both; border-top: solid 1px #999; background-color: #FFF; } /* This is the selector for the Content panel. The Content panel holds the * content for a single tabbed panel. For our default style, this container * provides some padding, so that the content is not pushed up against the * widget borders. * * The name of the class ("TabbedPanelsContent") used in this selector is * not necessary to make the widget function. You can use any class name you * want to style the Content container. */ .TabbedPanelsContent { overflow: hidden; padding: 4px; } /* This selector is an example of how to change the appearnce of the currently * active container panel. The class "TabbedPanelsContentVisible" is * programatically added and removed from the content element as the panel * is activated/deactivated. */ .TabbedPanelsContentVisible { } /* Vertical Tabbed Panels * * The following rules override some of the default rules above so that the * TabbedPanels widget renders with its tab buttons along the left side of * the currently active content panel. * * With the rules defined below, the only change that will have to be made * to switch a horizontal tabbed panels widget to a vertical tabbed panels * widget, is to use the "VTabbedPanels" class on the top-level widget * container element, instead of "TabbedPanels". */ .VTabbedPanels { overflow: hidden; zoom: 1; } /* This selector floats the TabGroup so that the tab buttons it contains * render to the left of the active content panel. A border is drawn around * the group container to make it look like a list container. */ .VTabbedPanels .TabbedPanelsTabGroup { float: left; width: 10em; height: 20em; background-color: #EEE; position: relative; border-top: solid 1px #999; border-right: solid 1px #999; border-left: solid 1px #CCC; border-bottom: solid 1px #CCC; } /* This selector disables the float property that is placed on each tab button * by the default TabbedPanelsTab selector rule above. It also draws a bottom * border for the tab. The tab button will get its left and right border from * the TabGroup, and its top border from the TabGroup or tab button above it. */ .VTabbedPanels .TabbedPanelsTab { float: none; margin: 0px; border-top: none; border-left: none; border-right: none; } /* This selector disables the float property that is placed on each tab button * by the default TabbedPanelsTab selector rule above. It also draws a bottom * border for the tab. The tab button will get its left and right border from * the TabGroup, and its top border from the TabGroup or tab button above it. */ .VTabbedPanels .TabbedPanelsTabSelected { background-color: #EEE; border-bottom: solid 1px #999; } /* This selector floats the content panels for the widget so that they * render to the right of the tabbed buttons. */ .VTabbedPanels .TabbedPanelsContentGroup { clear: none; float: left; padding: 0px; width: 30em; height: 20em; } /* Styles for Printing */ @media print { .TabbedPanels { overflow: visible !important; } .TabbedPanelsContentGroup { display: block !important; overflow: visible !important; height: auto !important; } .TabbedPanelsContent { overflow: visible !important; display: block !important; clear:both !important; } .TabbedPanelsTab { overflow: visible !important; display: block !important; clear:both !important; } }!-[CodeBlockStart:dffe5525-a787-4a98-a87f-f24554b12141]-->@charset 'UTF-8'; / * SpryTabbedPanels.css - 0.6 - pre-release Spry 1.6.1 version * / / * Copyright (c) 2006] Adobe Systems Incorporated. All rights reserved. * / / * Horizontal tabbed panels * the default style for a TabbedPanels widget puts all the tab buttons * (stalled left) above the content panel. * / / * This is the selector for the main container of TabbedPanels. For our * style by default, this container does not contribute anything visually, * but it is floated to the left to ensure that all floating or compensation done * with any which of her children the elements lie entirely within the limits the * TabbedPanels container, in order to minimize any impact or unwanted * interaction with other floating elements on the page which may be used * for page layout. * If you want to limit the width of the widget TabbedPanels, define a * width of the container TabbedPanels. By default, the widget TabbedPanels * extends horizontally to fill the available space. * The name of the class ("TabbedPanels") used in this selector is not * necessary to make the widget service. You can use a class name, you * want to style the TabbedPanels container. */ . TabbedPanels {overflow: hidden;} margin: 0px; padding: 0px; Clear: none; Width: 100%; / * Hack IE to force the layout correct when preceded by a paragraph. (hasLayout bug) * /} / * this is the selector for the TabGroup. The container of TabGroup houses * all buttons on the tab for each tabs in the widget panel. This container * does not contribute to what both visually in the appearance of the widget for our * default style. * The name of the class ("TabbedPanelsTabGroup") used in this selector is not * necessary to make the widget service. You can use a class name, you * want to style the TabGroup container. */ . TabbedPanelsTabGroup {margin: 0px;} padding: 0px; } / * This is the selector for the TabbedPanelsTab. This container houses * the title of the Panel. It is also tab 'button' that the user clicks on * to activate the corresponding content panel so that it appears on top * of the other tabs in the widget panels. * For our style by default, each tab is positioned relatively 1 pixel down from * where it would normally. This allows each tab overlap content * panel that renders underneath. Each tab is rendered with a background of 1 pixel * border which has a color that corresponds to the upper edge of the current content * panel. This gives the appearance that the tab is drawn behind the * content panel. * The name of the class ("TabbedPanelsTab") used in this selector is not * necessary to make the widget service. You can use any class name you want * to style the tab container. */ . TabbedPanelsTab {position: relative;} Top: 1px; float: left; padding: 5px 20px; margin: 0px 1px 0px 0px; Police: bold 12px without serif. background-color: #f1c185; list-style: none; border-left: 1px solid #CCC; border-bottom: 1px solid #999; border-top: 1px solid #999; border-right: 1px solid #999; border-radius: 5px 0px 5px 0px; -moz-user-select: none; -khtml-user-select: none; cursor: pointer; } / * This selector is an example how to change the appearance of a button in the tab * container as the mouse enters in the it. The class is "TabbedPanelsTabHover" * programatically add and remove the element tab as the mouse between in * in and out of the container. */ . TabbedPanelsTabHover {background-color: #ffd197 ;} / * this selector is an example how to do to change the appearance of a button in the tab * container after the user has clicked on it to activate a content panel.} * The 'TabbedPanelsTabSelected' class is programmatically added and removed * the tab element as long as the user clicks button tab containers in * the widget. * As mentioned above, for our style by default, the tab buttons are positioned * 1 pixel down where he would normally. What is the tab key * selected, we change its bottom border to match the background color of the * content panel so that it looks like the tab is the content panel. */ . TabbedPanelsTabSelected {background-color: #ffe9cd;} border-bottom: 1px solid #EEE; } / * This selector is an example of how to make a link inside a tab button * look like normal text. Users may want to use the links within a tab button * so that when it gets the focus, the text * inside * the tab button gets a focus * ring around it, instead of the ring around the whole tab. * /. TabbedPanelsTab a {color: black;} text-decoration: none; } / * This is the selector for the ContentGroup. The ContentGroup container houses * all panels of content for each tabs in the widget panel. For our * style by default, this container provides the background color and borders that * surround content. * The name of the class ("TabbedPanelsContentGroup") used in this selector is * not necessary to make the widget function. You can use a class name, you * want to style the ContentGroup container. */ . TabbedPanelsContentGroup {clear: both;} border-top: 1px solid #999; background-color: #FFF; } / * This is the selector for the content panel. The content panel contains the * content for a single panel tabs. For our default style, this container * provides some padding, so that content is not pushed upward against the * widget borders. * The name of the class ("TabbedPanelsContent") used in this selector is * not necessary to make the widget function. You can use a class name, you * want to style the content container. */ . TabbedPanelsContent {overflow: hidden;} padding: 4px; } / * This selector is an example of how to change the appearance of the currently * active panel container. The class is "TabbedPanelsContentVisible" * programatically added and removed from the content as the Panel item * is enabled/disabled. */ . TabbedPanelsContentVisible {} / * vertical tabbed panels * following rules override some of the default rules above so that the * TabbedPanels widget is rendered with its buttons on the tab on the left of * the active content panel. * With the rules defined below, the only change that will be made * to move a widget panels to horizontal tabs to vertical tabbed panels * widget, is to use the 'VTabbedPanels' class on the top-level widget * element container, instead of "TabbedPanels. */ . VTabbedPanels {overflow: hidden;} Zoom: 1; } / * This selector floats the TabGroup so that the tab buttons it contains * make left of active content panel. A border is drawn around * the group container to make it look like a container from the list. */ . VTabbedPanels. TabbedPanelsTabGroup {float: left;} Width: 10em; height: 20em; background-color: #EEE; position: relative; border-top: 1px solid #999; border-right: 1px solid #999; border-left: 1px solid #CCC; border-bottom: 1px solid #CCC; } / * This selector disables the float property that is placed on each button of the tab * by the rule above TabbedPanelsTab default selector. He also draws a background * border for the tab. The tab button will get his left and right border of * the TabGroup and its superior border of the tab above it or button TabGroup. */ . VTabbedPanels. TabbedPanelsTab {float: none;} margin: 0px; border-top: none; border-left: none; border-right: none; } / * This selector disables the float property that is placed on each button of the tab * by the rule above TabbedPanelsTab default selector. He also draws a background * border for the tab. The tab button will get his left and right border of * the TabGroup and its superior border of the tab above it or button TabGroup. */ . VTabbedPanels. TabbedPanelsTabSelected {background-color: #EEE;} border-bottom: 1px solid #999; } / * This selector fleet contained signs of the widget while they * make it to the right of the tabs buttons. */ . VTabbedPanels. TabbedPanelsContentGroup {clear: none;} float: left; padding: 0px; Width: 30em; height: 20em; } / * Printing styles * / @media print {.} TabbedPanels {overflow: visible! important;}. TabbedPanelsContentGroup {display: block! important;} overflow: visible! important; height: auto! important; } . TabbedPanelsContent {overflow: visible! important;} display: block! important; clear: both! important; } . TabbedPanelsTab {overflow: visible! important;} display: block! important; clear: both! important; } }
Add the class like below:
- Open Ocean
-
How to change the page numbers after you add and save the page numbers in the pdf document - need to change the existing page printed on the upper right in the header numbers.
These page numbers were initially created using Acrobat PDF header and footer.
I have a 750 page pdf document that I've created.
I have to sometimes the pages up and down after that I added the page numbers in the document by using the Header_Footer tool on the right column of tools.
But after you save the document, if I get a few pages around, I can't go back and change the page numbers.
I thought that the page numbers, as indicated in the header and footer must have changed automatically, but I guess that once its print, that it cannot be edited - is that, as what is?
So I guess we should always first get a copy without numbers of pages before confirming the documents and the creation of an index.
A way to remove these page numbers already there and add new page numbers.
Its a lot of work to align 750 court documents and then realize that you must move some and then realize the page numbers cannot be changed and thus begin to do this all over again to compile which can take about 10 hours.
My question is quite simple, but I hope that overall, I got my point. Sorry if I made it is too complex.
If no simple way, want to know if anyone has another different tool or a few recommendations to better highlight what I'm doing wrong.
Thank you for your review and response.
You should be able to update with tools - Pages - header & foot-
Update... It not work for you?
If this isn't the case, then try to remove from this menu and then re - adding them.
Tuesday, June 23, 2015 23:55, Fortune Mile [email protected]>
-
How to change the user interface of the entity object indicators / Validation msg when running?
Hello
I use JDeveloper with version 11.1.1.6.3. Given my requirment details below.
Suppose I have a (say 'EMPLOYEE_RATING') table in DB with the following structure.
Columns:
1 EmployeeId (Employee Id)
2 RatingType (values can be in Stock or Bonus)
3 RatingLevel (values can be 1, 2, and 3)
Constraint:
EmployeeId, RatingType and RatingLevel all together must be unique.
Requirement:
The customer's requirement is to have two screens of rating (one for Bonus another stock) and display different user interface boards and validations as follows.
1 RatingType is a hidden field, are defined with the default (Bonus or Stock) based on the screen that the user opens.
1. for the Stock screen, RatingLevel label should be "Stock note.
2. for the Bonus screen, the label should be 'Bonus Rating'.
3. for validation, the message must be 'Bonus note level must be unique' or 'Level of Stock of notes must be unique' ADB on the user screen opens.
Implementation:
I have a def EO (for example "RatingEO") and VO (for example ' RatingVO') def. Tips UI (Label) are given at the level of the OS. Also the unique constraint validation is made to EO with the message ' {0} and {1} must be unique, where {0} is source.hints.EmployeeId.label "and {1} is source.hints.RatingLevel.label. I also did the shuttle two different instances of the VO (EmployeeRatingBonusVO and EmployeeRatingStockVO) in the request form (although BonusTaskFlow and StockTaskFlow are set to open with the new transaction, Intension of the two shuttle different named instances is to have the common code in VO. impl class but can run different business logic code by checking the name of the instance of VO)
Question:
Since I have two different pages, I can define two different labels in the jsff, but I can't change the commit message defined at the level of object entity based on open display. At the opening of the screen, depending on the type of screen, I should be able to change the label specified at the level of the entity object. (It should not affect the definition but only the instance). As this entity object cannot be distinguished (if it belongs to Bonus or Stock), I have problem on how to change the indicators of UI during execution.
Any help on this would be appreciated! Thank you.
Rami
Post edited by: rami
I tried your script.
I created the secondary key with EmployId and rating level. I added validation of Unique key. In failure handling handling section of the validator, I gave the error message like: {0} must be unique. For token 0: I gave RatingType (here RatingType is the name of the attribute in OT).
We give the default for RatingType as Stock Bonus in VO. kind RatingType get its value or Stock Bonus based on the original Version that we use.
I hope this helps.
-
How to change the tag page layouts
I'm trying to change my great model produced. When adding the tag related products he puts them with horrible HTML full of Tables etc. I can't seam to figure out how to change the layout for the tags. What Miss me?
{module_facebookcomments, url ="http://www.impactnations.org/{tag_itemurl_nolink}", moduleTemplateGroup = "Default", local = 'en_US', message = '2', width is '500', olorScheme = 'light' c}{tag_name}
{tag_poplets}- Price:
{tag_saleprice}
- {tag_attributes}
- {tag_grouping}
- Quantity: {tag_addtocartinputfield}
- {tag_buynow}
Description
{tag_description}Related products
{tag_relatedproducts}You have a few options with the configuration of the tag:
But what makes a tag on is what you have to work with.
- Price:
-
How to change the default orientation?
Hello
I am new to Adobe Flash Builder and am currently a mobile application for a school project. I was wondering how to change the default application in landscape mode orientation. I tried to go into my app.xml and change the proportions in mode landscape with no luck, and it is very difficult to find answers on the internet. I would greatly appreciate your help.
Code HomeView.mxml:
<? XML version = "1.0" encoding = "utf-8"? >
" < = xmlns:fx s:View ' http://ns.Adobe.com/MXML/2009 "
xmlns:s = "library://ns.adobe.com/flex/spark".
actionBarVisible = "false" tabBarVisible = "false" title = "HomeView" >
< fx:Declarations >
< / fx:Declarations >
< s:Image left = "0" right = "0" top = low "0" = "0" scaleMode = 'zoom' smooth = 'true '.
smoothingQuality = 'high' source="@Embed('file:///C:/Users/Owner/Downloads/48127-solarsystem-teaser.jpg')" / > "
< s:Button = "-5" x = "0" width = "410" height = "1504.
skinClass = "spark.skins.mobile.TransparentNavigationButtonSkin" click ="navigator.pushView (Sun)" / > "
< s:Button = "444" x = "852" width = '80' height = '80 '.
skinClass = "spark.skins.mobile.TransparentNavigationButtonSkin" click ="navigator.pushView (Mercury)" / > "
< s:Button "628" = x y = "742" width = "120" height = "124".
skinClass = "spark.skins.mobile.TransparentNavigationButtonSkin" click ="navigator.pushView (Venus)" / > "
< s:Button "836" = x y = "632" width = "127" height = "117".
skinClass = "spark.skins.mobile.TransparentNavigationButtonSkin" click ="navigator.pushView (Earth)" / > "
< s:Button "994" = x y = "506" width = "99" height = "96".
skinClass = "spark.skins.mobile.TransparentNavigationButtonSkin" click ="navigator.pushView (March)" / > "
< s:Button "1255" = x y = "464" width = "298" height = "279".
skinClass = "spark.skins.mobile.TransparentNavigationButtonSkin" click ="navigator.pushView (Jupiter)" / > "
< s:Button "1626" = x y = '302' width = '274' height = '270 '.
skinClass = "spark.skins.mobile.TransparentNavigationButtonSkin" click ="navigator.pushView (Saturn)" / > "
< s:Button "1965" = x y = "196" width = "175" height = "174".
skinClass = "spark.skins.mobile.TransparentNavigationButtonSkin" click ="navigator.pushView (Uranus)" / > "
< s:Button "2201" = x y = "66" width = "175" height = "174".
skinClass = "spark.skins.mobile.TransparentNavigationButtonSkin" click ="navigator.pushView (Neptune)" / > "
< / s:View >
App.xml code:
<!-the original proportions of the application at the launch ('portrait' or 'landscape').
As an option. Mobile only. By default, it is the natural orientation of the device->
<!-landscape < aspectRatio > < / aspectRatio >->
<!-if the app will start to auto-orienter the launch. As an option. Mobile
only. Default value false->
<!-false < autoOrients > < / autoOrients >->
I need to make sure the app is constantly in the landscape.
Thanks again.
8 student
In XML, while is a comment. You must remove the :
landscape fake


Delete the following in your css spry as file its in the ' query print media "and has no effect on the screen - have added you it to the wrong place."
{.alignRight}
position: relative;
Top: 1px;
float: right! important;
padding: 5px 20px;
margin: 0px 1px 0px 0px;
Police: bold 12px without serif.
background-color: #f1c185;
list-style: none;
border-left: 1px solid #CCC;
border-bottom: 1px solid #999;
border-top: 1px solid #999;
border-right: 1px solid #999;
border-radius: 5px 0px 5px 0px;
-moz-user-select: none;
-khtml-user-select: none;
cursor: pointer;
}
Add the below css just above the press query written:
{.alignRight}
float: right! important;
}
/ * Print styles * /.
@media print {}
Maybe you are looking for
-
I have reset my yahoo on my iPad password. I do not receive yahoo mail on my Macbook. Help, please
My yahoo password has been reset on my phone. Yahoo mail not received the Mac Air. What should I do? I won't change the password again. Thank you
-
Faced with the conversion of an U8 2D array data in a Matlab file format?
I'm trying to convert a simple 2D array of U8 (3 channels) data in a matlab file format. I was manipulate the examples in the labview2matlabni record - but I can't read in Matlab - the matrix is not readable - said inconsistent number of columns. I
-
How to print labels from dvd hp 1400
-
Acer E5 573G - problem with the front audio Panel
Hey,. I recently bought a new Acer E5 - 573 notebook computer G and when I connect my helmet on the front panel - nothing happens. I installed the latest drivers from Realtek HD Audio. 10 Windows does not see my helmet that works very well on my desk
-
This just started today, but after I log on to my computer, the screen goes all black. I can see the mouse move, but that's all. Screen works perfectly well until after I connect. How and what do I do about it?