LabVIEW Builder configuration
Hello
The Labview manufacturer that makes an exe can be configured to copy support files to the destination where the exe file? If so, how do you?
It's the job of the installer that you create.
Tags: NI Software
Similar Questions
-
Return value of DLL LabVIEW Build to the Prototype of the function
Hi all
I know LabVIEW can generate a DLL with return value with a function like prototype
Sub nomfonction (arguments);
We could define the return value to arguments.
However, LabVIEW build a DLL with return value instead of "null" in the United States
int nomfonction (arguments);
In fact, I could achieve this when my part of connector VI has a 1 linked indicator.
I could get my prototype of function dll in the application as Builder
Double functioname (void); or well functioname (void); or some
Although I could do above, this applies only when my VI has 1 single output. If the VI
1 more arguments, I still get
Sub nomfonction (arguments);
So I missed something? Or is this a limit of LabVIEW?
Please don't get angry if this question has been asked before, I'm lack of subject
LabVIEW to communicate with other languages.
Thank you
Jean Cyril
You can. In the construction specifications, under source files, go to set your prototype. on the right, there is a drop down 'Output VI' which is what you want. Note that I only saw him able to return numeric values.
-
Creating a new build configuration
wants to create a new configuration in Momentics in this compiles differently my app (it will pass a few macros to the compiler C preprocessor when my project is built).
Let's say I want to base it on the release device, but I want to call device-release-test instead. I can see how to do this step through the IDE already: (project-> Build Configurations-> Manage)
This will (I assume) build my project on top of the arm/o-le.v7/ directory. What I want, is to have the project built in a new location, so that I can ensure that my binary output never get confused upward.
I want this configuration rather to be built under the arm-test /o - the .v7 / directory. I believe that this should be possible because the 'Device-profile' configuration made something similar, with builds end up under the arm-p.
My question is, how is the build in momentics configuration (stored in the .cproject configuration file) specifies this change? I can see the configuraiton of 'Device-profile' in the directory .cproject - but there is no reference to a 'arm-p' directory, and there is nothing in the file PRO of my app which gives an indication of a configuration of 'profile '.
I grep has my entire code base and I don't see how to do it - but it must be possible. What I'm missing here?
I figured out how to do this, in case anyone else is interested. The key is to understand that the compilation life cycle begins with the brand and not qmake / myapp.pro I first thought.
By default, a Makefile waterfalls looks like:
QMAKE_TARGET  =  myapp
PROJECT_DIR   := $(dir $(word $(words $(MAKEFILE_LIST)),$(MAKEFILE_LIST)))
I18N_DIR      := $(PROJECT_DIR)/translations

include mk/cs-base.mk
The cs - base.mk (found in your NDK) contains everything you need to understand how the process works. In cs - base.mk you can see the built-in rules for unit-Debug, device-liberation, Simulator-Debug configurations. These are hard-coded in the build system.
You do not want to change cs - base.mk to add your own configurations, to fix this add the following lines at the end of the Makefile in the root of your application:
QMAKE_TARGET  = myapp
PROJECT_DIR   := $(dir $(word $(words $(MAKEFILE_LIST)),$(MAKEFILE_LIST)))
I18N_DIR      := $(PROJECT_DIR)/translations

include mk/cs-base.mk

# add the following:
arm-test/Makefile: $(QMAKE_TARGET).pro

Device-Test-Release:
   $(info ***** This is my custom make target ***** )
   @mkdir -p arm-test
   cd arm-test && $(QMAKE) -spec blackberry-armv7le-qcc ../$(QMAKE_TARGET).pro CONFIG+=release CONFIG+=device CONFIG+=test
   $(MAKE) -C ./arm-test -f Makefile release
I wasn't the most appropriate copy rules of cs - base.mk and defined my own rule for the configuration of device-Test-version. The foregoing rules follow these steps:
- Creates the arm-test directory
- Adds 'test' to the variable CONFIG - this will be available in my PRO account
Now, you must create a new Configuration of build in the momentics IDE.
- Right click on your project in the project (myapp) Explorer. From the context menu, select:
- -> Manage the Build Configurations
In the dialog box handle Configurations, click 'new '.... "and create a new configuration called 'Device-Test-Release' (or whatever you wish to call your. Make sure that copy you the settings from a Configuration of 'existing '. Choose the most appropriate for your scenario. In my case, I started my new configuration of generation on 'Device-Release.
At this stage, you select the new build configuration when you build your project:
- Right click on your project in the Project Explorer
- Build - Configuraitons-> current value
- Select the new "device-Test-version" configuration.
- Build!
However, you will find that different nothing happens. This is because the device-Test-version is based on device-release, so exactly the same thing happens when build you. Therefore, change the device-Test-version so that our custom in our makefile rule is called, instead of the default peripheral release target
Bring up the project properties:
- Right click on your project in the Project Explorer
- Select Properties
- Goto the tab generating C/C++
- Select Device-Test-version in the Configuration drop-down list
- The behavior of Goto tab
- There is two-text fields ('Generation on resource save' and 'Building')
- Change the textfields that say "Device-liberation" for "Device-Test-Release.
- Click on apply
The procedure above "links" your configuraiton of build in the IDE, with the brand target in your Makefile. Now, when you build your project (in the configuration of the device-version-Test), it will be integrated in the arm-test / directory
There are still two other things you need to do if:
Edit your file of bar - descriptor.xml and add a new configuration, based on what you see for release device. Just copy the
article release device that is already defined, as follows: Qnx/Cascades armle-v7 myapp You must make sure that the
Once you have done this, you can finally edit the myapp.pro file and specify some custom in there rules. I didn't add the following rule:
# put this in the myapp.pro file

test {
  DEFINES += TEST_BUILD_WHOOP
}
Don't forget the ' test of += CONFIG "that we put into the Makefile project? In the PRO file above, we leverage this by creating a test rule {}, which applies only when we build the configuration of device-Test-version. Whenever the rule of test runs, we can add a TEST_BUILD_WHOOP preprocessor definition. Now every time our source files are compiled (in the test configuration), the TEST_BUILD_WHOOP macro is defined, and we can put custom code that gets compiled only when we test.
for example in your myapp.cpp file:
#ifdef TEST_BUILD_WHOOP

/* whoohoo! building for test */

#endif
-
Is not a simulator debug option in the build configurations
Hello. All the
I'm a newbie in the cascades.
After installing the mac OS x ndk (stunts for blackberry 10 beta 2), I tried to set up the IDE.
When I right click on the project and select the build configurations. There is only one option: default value.
No Simulator debug option.
So, when I try to run the application, he still received the error 8.
How to fix it.
Thank you very much.
OK, reimport the project using the following options:
Import-> General-> 'existing projects in the workspace.
instead of "as a project makefile" and let me know if it works
Martin
-
How to use the build configuration options in the JDE
Hello
I have a few questions on the build options:
1 could someone explain to me: how to use Build-> Configuration-> opt as private, Debug, Release?
2. is it possible to add any option in the construction of rules in the official release, as all the lines as System.out.println ("... "); appear not in debug mode?
Thank you for your answer
Krzysztof
They allow you to quickly enable and disable sets of projects. For example, you can have a workspace with 4 projects, where some are dependent on each other, or you want to build different sets for different projects. You can set up something like:
Private = all active projects
Debug = 1 and 4 are active
Output = project 1, 2 and 3 are active.
You can then proceed to change the set of projects that are active.
-
Multi folio in DPS App Builder configuration problems
Hi all
I apologize for my bad English.
I'll put a folio Multi App for my client.
I insert the Adobe ID and it does not work, as you can see in the screen "error 1".
Administrator with the same Adobe Id, I jump on the dashboard to create a new account as requested, but the Adobe ID is denied, you can see in "Error 2".
The Adobe ID is correct because I use it to log on to both the table edge and in the DPS App Builder.
Why is - that it is rejected?
I also tried with another Adobe (mine) ID to create an administrator account, but does not work too.
Please can you help me understand what I am doing wrong?
I thank in advance for the answer.
Michela


You should have three Adobe ID configured to make it work:
(1) Adobe ID of the master account buy DPS Pro or business
(2) a second Adobe ID, that you create in the Dashboard Administration accounts, that is set up as an account Application. That's what you put in the App Builder screen you posted above and are the account you must publish the folios to
(3) a third Adobe ID which has rights App Builder and is used to connect to the App Builder. It is not strictly necessary (it can be the same as that of the other two accounts), but it is advisable to have separate him.
You can't add an account in the Administration of DPS page if it has already been used with DPS. You can only add the Adobe ID who did not used/signed for DPS before.
Make sure that when you create the account #2 and #3 you to open in the DPS dashboard with these accounts and that you agree to the terms and conditions of the screen that is displayed, otherwise the accounts do not work. Also, make sure that you check e-mail through the verification email addresses, you will receive, otherwise the accounts won't work.
Neil
-
myRIO LabView Network Configuration, can not [SAVE] connection to activate the WIFI running.
Recently acquired a new myRIO of NOR. Now implementing the WIFI option on the Configuration Page of network OR.
Following the instructions, connected to the router, getting 5 green bars. and a big check.
The instructions ask to press the [SAVE] button, but save it button is not active, only two
other buttons are active, the [Certificate Management] button and the [refresh] button.
I clicked the [refresh] button, but nothing happened. I don't know what to do with the
Button [certificate Management], given that the instructions do not attack it.
Thus, myRIO State indicates that it is connected to the router via the USB cable and not wireless.
If the USB cable is disconnected myRIO, a pop up message saying "Connection to target Lost!
Please contact me on my dilemma.
I wasn't aware of it, but the configuration myRio
has saved it's self automatically and the
function of this module was complete.
I'm now able to operate myRIO wireless.
4j1a
-
Why labview build program does not directly work on the laptop
We have created a labview program to run our test bench. It works very well when things are plugged into the program were made on the desktop. However, when we do a 'construction site' to be able to run it on a laptop it does not work. I installed the latest drivers, the labview runtime error and the hotfix package. It still does not work. What is missing?
-
Installer and labview 2016 app builder
After building an executable on a computer and install it on another with the installer nor, overlap the controls on the front panel, the fonts and graphics (box high etc.) are banging on each other overlap with other objects, text etc. How can I solve this problem? Course made window size was set to maintain proportions on different monitors. Installer has a file XXXXX.ini (name of my startup vi) but no labview.ini (configuration information?). Any ideas? Thank you.
Right click on your screen on the Windows desktop, select Customize, and then select Show. Check that the fonts are on either 100, 125 or 150%. According to what has been defined when you generated your VI, this could be the difference. You can change it to match the other computer or follow these steps.
Edit the INI file for your Application with the following lines:
FPFont = "Segoe UI" 15
appFont = "Segoe UI" 15
dialogFont = "Segoe UI" 15
systemFont = "Segoe UI" 15
BDFont = "Segoe UI" 15(Use your & size of font, Segoe UI is Windows 7 by default).
See you soon,.
McDuff
-
LabVIEW FPGA: Deploy fpga with host program
Hello people,
I develop using a pxi-7831R (FPGA), 7.1 LabVIEW and Labview FPGA 1.1.0. I wrote the fpga code and a host vi and they work well on my development computer. However, I need to create an executable file and take it to my development computer to another computer (which also contains a pxi-7831R), and I don't know how to do it.
Then I just build an executable from my host program and place the 'bit' fpga file in the same folder as the exe and copy it to the target computer, or what I need to somehow add the bit file to my build configuration?
Thanks for any help!
Chris
Hi chassan,.
In LabVIEW 8.x, the exe will offer the bitfile automatically. I imagine it works similarly in LabVIEW 7, but it's probably best that manually regroup you the bitfile in your build options.
-
Compilation of Xilinx not installed labview 2015 FPGA tools
Hello
I just installed Labview 2015 + FPGA Module on my computer with an older version of Labview 8.6.
When I compile a labview FPGA project 2015 I got this error message "year error occurred while communicating with the server compilation" and warning "tools of Compilation of Xilinx not installed."
I can assure you that my server of 2015 lunch perfectly and I installed everything correctly. I assure that it is a conflict between labview 8.6 and 2015 therefore uninstalled the older one.
The problem is my build configuration is set to Xilinx 10.1 (which should be 14.7) and there is no way to change this.
After looking around I found that Labview looking for best compilation tools then maybe this is not the problem
Is there something I missed?
Kind regards
Hello
I found the source of the problem. The FPGA, I used was based on a FPGA Virtex II matrix that is not compatible with this version of the build tools.
Thanks for helping me!
-
Upgrade to LabVIEW caused 2012 issue additional installers
Hello again all you lovers forum useful!
I've been using LabVIEW 2010 (SP1) for awhile on my Windows XP computer, but I recently bought and installed LabVIEW 2012 for a future project. In the meantime, my previous projects should always use LabVIEW 2010 until I use the tracking system of formal changes to my company to upgrade. However, when I opened recently one of my old projects in 2010 to update and rebuild the installer, I saw in the tab other installers a bunch of empty lines at the end of the list (see screenshot). This is not directly the hurt, but I think it's a symptom of the root problem.
Most directly concerned, the NI VISA Run-Time 5.0.3 which had been checked before was now gone and the NI-VISA Run-Time 5.2 driver which had replaced it has NOT been verified. That seems like an upgrade oops on part of National Instruments for me. I decided that it was just a thing, and that the installer of 2012 had replaced my 5.0.3 version with version 5.2 (removal of the old version), so I checked the version 5.2 to build my Installer, and after having demanded that my DVD to copy the software on my computer, which seemed to work ok.
Now the immediate problem: when I distributed the project file to a colleague that has LabVIEW 2010, she was not able to build my software installation, because he asked her to drive "FADEC_Emulator". "FADEC_Emulator" is the name of my software. Expansion of the error dialog box showed that he wanted the drive for access to NI VISA Run-Time 5.0.3. Open the properties of the installer in the project file in LabVIEW showed NEITHER VISA Run-Time checked 5.0.3. However, the project of opening with Wordpad file showed that NEITHER VISA Run-Time 5.2 has been listed as an extra Installer (and NOT 5.0.3 Maybe its system because I wanted NEITHER VISA Run-Time 5.2 and replaced it automatically with the latest version, he had, 5.0.3? Confusing! And if he did it, why he had that version already practicing? And versions of switching as it seems it would be a bad idea to do it silently, in case I was counting on a specific feature of the new version.
I'm afraid that since installing LabVIEW 2012 my system got in an unstable state, and now I possibly corrupted my LV project project file. I need to have in 2010 and 2012 on my computer at the moment.
Does anyone have an idea of what's going on with my system, or how to fix it?
Thank you very much in advance for your suggestions and time!
-Joe
Hey Joe,
I tried to reproduce your problems and met with mixed results. Please check with what I have provided below that we test in the same conditions
jmorris wrote:
Most directly concerned, the NI VISA Run-Time 5.0.3 which had been checked before was now gone and the NI-VISA Run-Time 5.2 driver which had replaced it has NOT been verified. That seems like an upgrade oops on part of National Instruments for me. I decided that it was just a thing, and that the installer of 2012 had replaced my 5.0.3 version with version 5.2 (removal of the old version), so I checked the version 5.2 to build my Installer, and after having demanded that my DVD to copy the software on my computer, which seemed to work ok.
In this scenario, I built a test project with VISA RT 5.0.3 and LabVIEW 2010 configuration. I then installed LabVIEW 2012 and VISA 5.2.0 on top of the above configuration. When I opened the project from 2010 to 2012, VISA Run-Time 5.2 has been verified (as expected, dissimilar to your configuration). As I mentioned earlier, this may have been because VISA 5.2.0 did not install correctly.
jmorris wrote:
Now the immediate problem: when I distributed the project file to a colleague that has LabVIEW 2010, she was not able to build my software installation, because he asked her to drive "FADEC_Emulator". "FADEC_Emulator" is the name of my software. Expansion of the error dialog box showed that he wanted the drive for access to NI VISA Run-Time 5.0.3. Open the properties of the installer in the project file in LabVIEW showed NEITHER VISA Run-Time checked 5.0.3. However, the project of opening with Wordpad file showed that NEITHER VISA Run-Time 5.2 has been listed as an extra Installer (and NOT 5.0.3 Maybe its system because I wanted NEITHER VISA Run-Time 5.2 and replaced it automatically with the latest version, he had, 5.0.3? Confusing! And if he did it, why he had that version already practicing? And versions of switching as it seems it would be a bad idea to do it silently, in case I was counting on a specific feature of the new version.
In this case, I built the installation program on LabVIEW 2012 with VISA RT 5.2.0 then saved for LabVIEW 2010 compatibility. When I open the installer in a LabVIEW with VISA 5.0.3 2010 environment, VISA 5.0.3 has been verified (as planned since LabVIEW by default to the latest version of VISA on the PC, no matter what the original installer referenced). I did, however, see three additional empty lines in the additional installers (see below) tab. I also tried to build the Setup program that you have indicated, but did not get all the guests for the discs and was able to successfully build.
One thing to keep in mind is that default LabVIEW uses the version of the driver that is installed on the PC version, whether it is newer or older than the installer references. If you feel that this has a negative impact on your success as a developer, please do not hesitate to post a feature request (for example, a guest at changes of the version of the driver) in our forum for the exchange of idea (http://forums.ni.com/t5/LabVIEW-Idea-Exchange/idb-p/labviewideas ).
Finally, regarding empty lines in the additional installation specifications, this problem seems to be fixed in LabVIEW 2012 and manifests itself only in 2010. During my trial class, this does not affect installers of construction and is a minor inconvenience that has been fixed in later versions.
Please let me know if you have other questions/comments on these issues.
Concerning
Doug W
-
How to build testStandLVRTS for TestStand 4.1
Section http://digital.ni.com/public.nsf/allkb/5CD8196D39880CDF86257450000B7C44 says that
TestStand 4.1 no longer ships an executable version of TestStand LabVIEW Runtime (TestStandLVRTS.exe) server. The LabVIEW TestStand execution server must be generated before it can be used in an executable file. To build the TestStandLVRTS, you must follow the instructions in the
\Components\RuntimeServers\readme.txt I installed TestStand 4.1, but I do not see this Readme, the RuntimeServers directory is empty. Is there any place I can see this statement?
Hi Ray,
Forget my previous question. I thought about it. Use TestStandLVRTS as other executables in LabVIEW, adapter configuration window use not TestStandLVRTS.exe. Mybe TestStand should be smart enough to ignore .exe to avoid the error.
cfyao
-
How can I switch between configurations in XCode 7?
I use XCode 3.2 on Snow Leopard. This week I also bought a new iMac and installed XCode7 on it. It is completely different and is not entirely clear. With the old XCode, I have a menu at the top left of the project window. I use this menu to switch between the two configurations (debug and release). I can't understand what is the equivalent in version 7. Also, I find the target compiled in its usual place (the 'build' folder). I can find it elsewhere with the projector, fortunately. So my main problem is: how to switch between configurations? The problem is: How can I know who is the active configuration? I will be grateful to anyone who is kind enough to help me.
Use the schema editor in the toolbar to set the active build configuration. It is next Run and Stop buttons. Click on the name of your application to open a menu. Choose change the schema to open the schema editor.

You can set the active build configuration in the stage of the race.

Xcode changed a ton in Xcode 4. If you're in transition to Xcode 3.2, you can find the following useful:
-
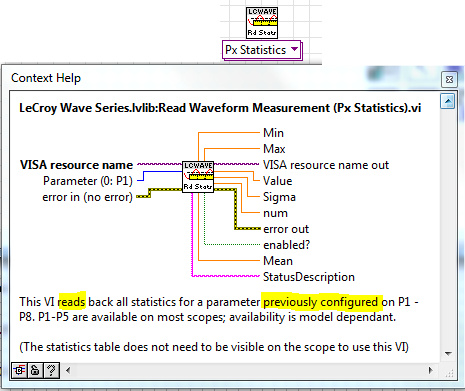
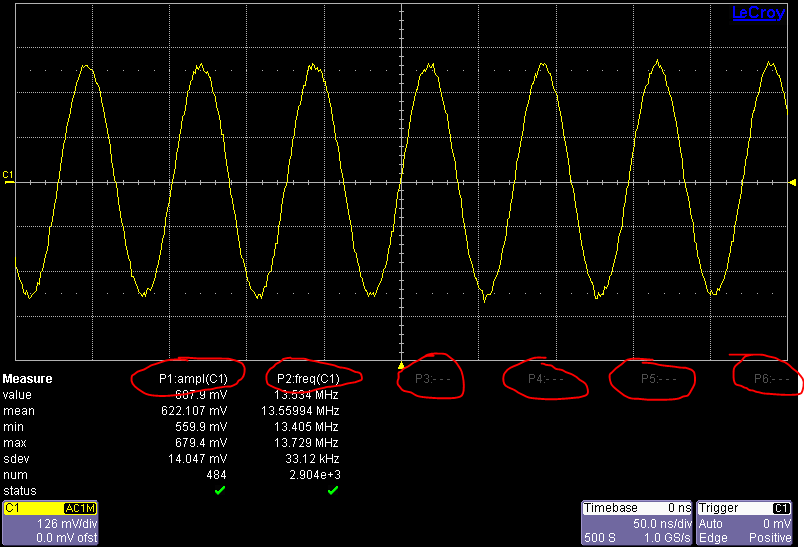
How to configure statistics Px in a LeCroy DSO?
Hello
I am trying to automate a series of tests. One of the requirements is to save all the screens with the relevant information. To do this, I need to configure programs P1 to P6 according to my needs.
I already understood all that I need (save the screen, change the trigger, the scales...) but how to change through LabVIEW, Px configurations.
To be as clear as possible, I attached and highlighted two images. In the first it is written: "previously set", I want to know is exactly how to do this configuration.
In another image, the Pxs parameter accompany the red circles: How can I turn on/off, choose from 4 channels and what information (Amplitude, frequency...) through LabVIEW?
Thank you
PS: I use LabVIEW 2015 and a LeCroy WaveRunner in the 6000 series, connection via TCP/IP
Hello Tiago,
For custom settings, you must use the command of PACU to be implemented, then you can use the query to get results.
The driver can set those up with all scopes of basic, but there are many parameters that can be added or which are not available on all scopes. For those, you will need to use the command of the USPA.
The quick way to find the settings for the command (a good thing for all parameters) is to configure the scope manually then send PACU? : CUSTx (where x = parameter, i.e. CUST3 P3).
Then read back the response. The scope will show you the settings you would send to him implement the same measure.
The etc controls are located in the remote control and documentation of automation for the scope.
Here's a link to a FAQ that contains links to documentation etc. that will help you get: remote control controls and automation
Kind regards
Leonard Brown
Technical sales engineer
Teledyne LeCroy


Maybe you are looking for
-
How to open an attachment to e-mail and not wanting to download it?
I click on the attachment and it downloads automatically. Not always what I want to do. I used to have a box pop up Firefox asking me if I want to open or download... no longer appears. Help please.
-
Suggestion for replacement of HDD on my dv7t-CTO
My laptop is now about 3 years old and works ok, but my 250 GB hard drive is too full, despite deleting and archiving of photos, music, etc. I would like suggestions as to what size of disk hard I should think to (I think a 1 TB) but am open to sugge
-
Fix KB925681 for xp sp3 will work on sp2?
Hello! I downloaded the patch KB925681. I run xp sp2 but since they had no option download for sp2 and was only for sp3 I had to download the sp3 one and to my amazement it completely installed on my system. My question is it will show its effect on
-
When I check my ads on Ebay - old information is still there and is not added new info - I'm always refreshing pages - what I can do to fix this?
-
Clean install of Windows 7 Pro (upgrade of the disc) - Activation error
Trying to install Win7 Pro (upgrade CD) on the laptop. Laptop computer has been previously installed with Ubuntu. Installation is fine and Win7 Pro can be used, but activation gives the error "0xC004F061"... code say that the license is upgraded only