Lightroom 2.5 size of the Image when printing
I have searched and tried several approaches but can't LR to adjust the size of the image when printing. For example, I have a Page of Laboratory Test tif image that has a size of 23 "wide x 29" H paper and resolution 180 dpi. I can use CSR 4 Image/Image size to change this in a 8 "W x 10.5" H and a resolution of 320 DPI using resampling. The reduced image prints correctly in CSR 4 on paper 8.5 "x 11" and translates. 25 "top and bottom margins. The same thing happens in LR 2.5 with the reduced size image. However, if I try to print the original image using LR 2.5 to automatically resize the image it is malfunctioning. I tried all kinds of combinations of settings so that it can reduce the image (as is done in 4 CSR) and print with. 25 "down the margins without success. The image can not resize correctly. Is it a bug, a feature?, or operator error? Can anyone tell how LR 2.5 will resize automatically so it prints correctly? I tested on other computers with the same results. Thank you
Go to the print module.
Select print to jpg.
Set the resolution at 180 dpi.
Other output parameters, sharpening, profile of such paper as required.
Determine the size of margin according to the needs.
Set the size of the cell to the size of the image
Set the Dimensions of the custom paper size... 29 "x 23" in this case.
You can drag the size of the cells and the edges around until get you exactly the layout on paper, you need. So how successful final print to the file, name the file, and the work is done.
If you want to print a different size, with different resolution, on paper of different size, with different borders all this can be done in the print module and it is WYSIWYG if no guess work (or calculations) involved. LR rather PS this also has the advantage of use much better algorithms for images of migration than PS and application output sharpening for the specific media type, to which you intend to print, using the RAW data
Tags: Photoshop Lightroom
Similar Questions
-
Loss of the size of the image when exporting .tif
I have a series of .tif images that have original dimensions of ~ 4700 x 4700. However, when I open them in illustrator, they invariably under ~ 1750 x 1750. TIF, even if no changes have been made. How to preserve the size of the image?
Lol Illustrator will always respect the resolution setting. You will need to put the image in Illustrator, if you want to keep the resolution.
-
not the same size of the image when I import it
I want to import an e imagexactly the same size he is, but I can't do...
someone at - it an idea? Thank you.
I'm using flash pro cs5.
Hi Jakob,
Try this first-
(1) Insert the following code into a new document and check the system screenDPI:
import flash.system.Capabilities;
trace ("Capabilities.screenDPI:" + Capabilities.screenDPI);
(2) If for example, the output is 72 dpi, when you import an image, it seems that Flash is resized to match what he thinks it's the resolution of the screen and in this case, its 72 dpi. So if the image has a higher resolution, he dimensionnera it down.
You can try the following-
Create an image in Photoshop with say 300 dpi. Create a new one with a 72 dpi. Import both of them in Flash. The first image will be scaled down, but the second image retains its original size.
The solution is to make sure the graphic that you import is 72 dpi resolution.
You can use an image editor like IrfanView to check or adjust the DPI of the image that you use.
Let me know if it helps.
Thank you and best regards,
Roger Simon
Adobe Flash Professional Team.
-
Change the size of the image when I click it.
I want to have the effect, I hover over or click on a picture and it gets bigger. But without having to open a new page. It must just zoom up a little bit. Is this possible? Thank you
Hey Unterwaldt.
That proposed Parikshit was to increase the size of the rectangle of the size of working capital that you have indicated in the second screenshot and in normal state uses the smaller image, but that the approach will trigger the effect as soon as you enter the rectangle and roll over not exactly part of the image.
A better way to do this would use the Composition Widget - ToolTips. You can place the trigger on top of your image and give him a void fill and then place the target where you want with the big picture, be triggered by the substitution effect and hide as soon as the mouse rollsout.
I hope this helps.
- Abhishek Maurya
-
streaming
Using the wide/Wide Zoom / Zoom feature in the settings of the TV adjust accordingly.
-
Question on "Scale to the size of the image by default"
Hello
I put my sequence of 1080 p at 25 fps.
However, my source material are a mixture of 4K video and also extracts of 720 p and also some pictures.
I noticed that if I uncheck the "Default scale to the size of the image" box, each time, I put the clips imported into the timeline, it's too big and I have to go the effect controls panel to reduce the size. It is very time consuming especially if I have a lot of 4K video clips on the timeline.
According to me, that if I check the box of 'Default scale to the size of the image', when I put the 4K video on the timeline, it fits very well. My question is when I enlarge him to say the Pan effect, of the resolution will be downgraded compared to when I do not check the "default scale to the size of the image" box?
Thank you
If you use the scale to the size of the image, either in manual application or by ticking the "default image size scale" in preferences, your clips will be scaled down (in the case of the 4 K sequence) or upwards (in the case of the sequence of 720 p). In both cases, the clips on the timeline for reference the original source material, so all of the pixel content present in the 4K source, for example, is always available for you to resize.
You will notice, however, that if you open Motion and see the scale component - it will read 100% because - the clip on the timeline has indeed been reduced to sequence frame size - making it difficult to * how the clip was be reduced or enlarged as the balance indicates the same.
A better way to edit the clips to the timeline the clip on the timeline, and then select and right click or control click and choose the size of the image, the value and now scale will reflect the percentage reduction or expansion, so you can see how much you can resize until you start to lose resolution.
Unfortunately, the set to the size of the image is not yet available as a default, you will need to use it manually.
MtD
-
Enlarge/reduce the image for print on HPC309A
How to enlarge or reduce the size of the image when copying on the HPC309A?
Thanks for your help,
TEHACHAP
Press OK button to turn on the screen if it is in power save mode. Move the up or down arrow to 'Copy', press OK, press the 'Settings' button then scroll down to 'Size', OK, then scroll upward or down to the appropriate setting. If you select "Custom", OK, you can use the up and down arrows to select the reduce/enlarge scale factor, then press OK.
-
Size of the image changes when you move an image between Lightroom and CC.
Size of the image changes when you move an image between Lightroom and CC.
I opened a .dng image in LR and then opened it in the develop module. I clicked on Crop Overlay and then on the "As Shot" (the lock is closed) menu drop-down and cropped to 11 x 17 and click 'Done '-.
I click Ctrl-E and the image opens in the CC. I click on the Image > Image size and the size of the Image is 13,288 inches on 20,533.
Why change the size of the image?
I believe that there is a menu to control the size of the image, and I've looked everywhere I see in LR and CC, I have googled various descriptions and I checked both Kelby books, but I can't understand not just how to keep the image at a uniform height when moving between LR and CC.
Help!... Please?
The size of the image has not changed. The number of pixels has not changed. Let me tell you. The number of pixels has not changed to a single pixel.
The numbers relatively meaningless displayed by your software have changed.
The image is always format 11 x 17 (17 divided by 11 = 1.545 and 20.533 divided by 13.288 = 1.545)
-
Pixelation when scaled to "scale to the size of the image?
Hey all,.
When I put a clip from 4 k to 'adapt to the size of the image' on a timeline of 1080 p and then it swings a bit, are there any negative pixelation/aliasing occurring as opposed to simply scaling the 4 k clip to the timeline 1080?
In my view, that it is impossible to discern, but I was wondering if I do something wrong in my workflow.
Thank you!
Yes, "Scale to frame size" is destructive. If you open the effect controls panel and look at the scale parameter that you choose this option, you will see that the setting remains at "100" means that your newly reduced film is now 100% and everything above that will cause the loss of resolution.
What you want is the much better "to the image size" option just below (in the context menu), which will scale your footage to 50%, in order to preserve your goodness in 4 K.
-
Black boxes shows images when you set the size of the image?
Hello
I have problems with black boxes appear in the image when you set the size. Please look at the screenshots. If his clue, all the problems started after I ran the El Captain update last week. What can I do? Everything works perfectly on my retina new Macbook Pro.


Hi henrike43022551.
Greetings.
- This phenomenon occurs with all the files.
- Also try this
- Open PS, preferences - performance and uncheck CPU chart use
- Restart PS and check again.
~ Rohit
-
Photoshop 7 (Windows 10), when you select the size of the Image or the size of the canvas, he now is suspended and does not bring the selector upwards.
It works fine, but I suspect that some Win 10 update in the last couple days has skewed anything. Any ideas?
I know it of old, but even after the upgrade to Windows 10 4 weeks, Photoshop 7 installed always OK, so I'm happy with it.
It worked until yesterday.
I could start by resetting the photoshop preferences file and see if that solves the problem.
Press on and hold Shift + Ctrl + Alt just after the beginning of the launch of photoshop 7
(you have to be fast while pressing down or you won't get the dialog box)
Keep possession of the keys down until you get a dialog box asking if you want to delete the adobe photoshop settings file
Press Yes

Also, if you have not applied the update of photoshop 7.0.1 you should do the same.
Adobe - Photoshop: For Windows: Adobe Photoshop 7.0.1 update
-
Select an exact size of the image to be copied when you use the "Marquee" tool
How can I select an exact size of the image to be copied when you use the "marquee"?...
I like to choose a section image of 14.00 x 12,00... When you use the marquee selection tool, you can not control the mouse to select exactly 14.00 12.00 x is always a little higher or lower at 14:00 or 12: 00 am...
is there a way that you can easily select the exact size of 14,00 x 12,00?...
Please advise...
see you soon,
Hi wong168,
You can use the fixed size option and enter the size in the input fields using the unit of measure of your choice; That is to say in, px, cm etc.
If you right click in the entry boxes there are the list of measured values.


-
Size of the image in the Module Development vs. explore
I'm taking a 17 MB in LR CC DNG file and export to PS CC or NIK software for editing. I set the preferences of external changes as follows:
Export as TIF, 1998 ADOBE RGB, 600 pixels. When I go on save the file to the NIK Software or PS CC the file size is reduced in a 5 MB file that is unacceptable for printing (for example the grain of the image is an exaggeration). The grain was correct in 17 file DNG LR megabyte but the 5 megabytes of unusable files.Someone asked if the same thing that happens if I go to PS CC and save it as a PSD file:
So I worked the image initially as a DNG file and exported for PS CC and made some minor changes as suggested, and that's what I found:
Get go and open a particular photo in LR and the press 'I' for more information, it shows a megapixel of only 2.8 million pixels (psd). When I go to display the same image by selecting "(afficher dans l'Explorateur-j'utilise un PC) and right click for the properties the megapixel appear as 36 megapixel (psd)." A person in a forum said that LR can be emphasized the wrong file but I do not understand why this would be the case because there is only a single file. Could LR doesn't point to a 'preview' of the vice photo version the original somehow? Why LR show me in the library module or develop a reduction of the size, and then when I go and look at LR said the photo where in Explorer it shows me a much larger file size?
This is driving me crazy.
Thanks in advance.
I guess that my case that from 16 bit to 8 bit TIFF JPEG was much more to cut the size of the file in two (i.e. 17 megs TIFF in 2.8 MB JPEG).
I realize that you did not create a jpg file (at least this isn't what you've posted screenshots of) but a PSD. And this isn't 2.8 MB, but 2.8 megapixel (MP). Megapixels is the number of pixels in an image (see post #1) - MB is the size of the file.
Once again, I invite you to read which is a digital image?
It is absolutely necessary to understand the difference between the two when it comes to digital images.
I do not have the original file to DNG. It is an image that I took years ago. Regarding the 'sharpness on the export", I got the default value set for this parameter.
According to your original message, your source file in Lightroom. is a DNG.
If this is not the case, what kind of file you start with?
To be able to see the problem of grain, you have screenshots of the original (any file that is) post at 1:1, including the details pane and the exported file (which became more grainy), also at 1:1.
So far, you have posted only a screenshot which really is 1:1, and it is unclear whether it is the original, or the exported image reimported into Lightroom.
Regarding output sharpening, I don't know which is the default setting. If you choose export to LR even once, it should still be on the setting you used last. You export, or have you used edit in Photoshop? If you used Edit in PS, no sharpness is added, with the exception of any sharpening you applied to develop.
I'll send the images to print for the first time, and that's how I discovered the spectacular evolution of the size of the files.
What you should be concerned about is the pixel dimensions and allow without print size enlargement.
This image will print at 6,387 x 4.79 inches at 300 dpi. (divide the pixel with 300 dimensions for dimensions in inches)
If this is the case, since some printing companies that I send my images via the internet only take JPEGs must I send my images for businesses that also accept TIFF files to maximize the spectrum of color/quality of my images and also to reduce the amount of grain in my images (i.e. the TIFF converted to 8-bit)?
Most of the images printed fine of a maximum quality jpg, but there are cases where a TIFF file will print better. If you want to be on the safe side, use TIFF. Send files from 8-bit to the printer, but always edit 16 - bit and convert 8 - bit as the last step. Do this on a double, then you will always have the 16-bit file if you want to edit it further.
(1) on the other questions regarding sending the images to printers, can I use the Pro Photo setting... the menu pop up in LR CC suggests that to do this in the menu Preferences.
Most of the printers want files in the sRGB color space, some could use Adobe RGB. Find out what they want.
You can edit in ProPhoto, but the file you send to the printer should be sRGB or Adobe RGB.
(2) my workflow has me usually start LR CC. When you work between LR CC and CC Photoshop must I send files back to PS CC as TIFF files to keep as much as possible of the resolution?
Yes, use 16 bit TIFF.
-
Is it possible to see the size of an image in millimeters in the room light? I can see that the size of the image in pixels in the metadata so is possible to change this? Of course, I can move the image to Photoshop to see the size of the image.
Digital photos do not have a length in millimeters or inches. Only, they are measured in pixels. If Lightroom does not report millimeters or inches.
Prints can be measured in millimeters or inches.
In Photoshop, the inches or millimeters shown is a hypothesis that you want to print to a specific ppi, when in fact there is a large number of PPI values you can print, even while the Photoshop numbers are meaningless, you can still print the picture to a different size.
-
Size of the image in the quiz?
I have pictures of 1028 x 768 and drop them as part of image in the quiz questions. A part of the image presented in the cross-slot and generally that it's Ok. But sometimes the image cannot be used as the required detail is not displayed. Is the size of the image better and has everyone optimized this feature?
Hi kenfromUK,
The resources below explains an option for your photos. The mask tool will allow you to choose which part of the image you want to see the image.
iBooks author: Add and edit photos and other images
Mask (crop) photo
You can crop photos without changing the original image by masking the edges to hide the unwanted parts.
Select the picture you want to hide.
Do one of the following:
Hide the picture with a rectangle shape: click the button mask
 in the bar of the formats. If the format bar is not visible, choose View > show the Format bar.
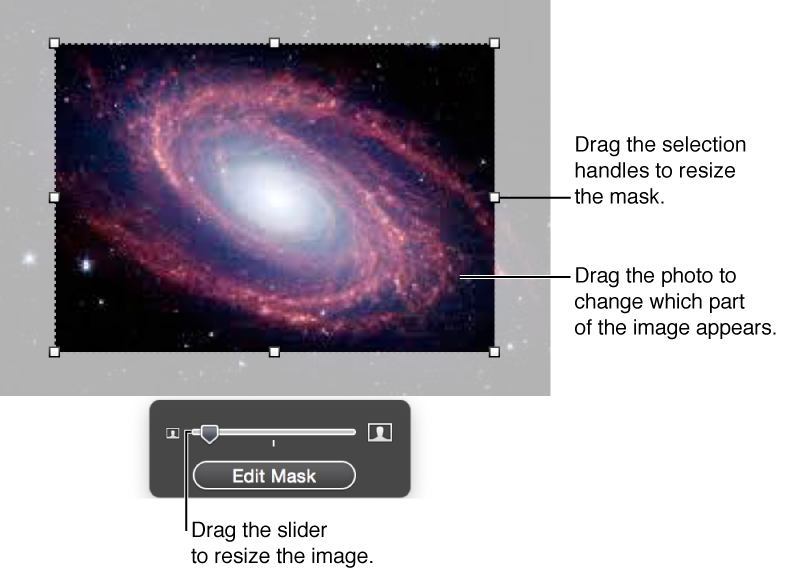
Hide the picture with a form: choose Format > Image > mask with shape > shape.
Do one of the following:
Resize the photo: drag the cursor over the button Edit mask.
Reposition the photo in the frame: drag the photo.
Move the mask: drag the edge of the mask dotted.
Resize the mask: drag the selection handles on the edge of the mask dotted. To constrain the proportions of the mask, hold down the SHIFT key when you drag.
Rotate the mask: hold down the command key when you drag a selection of angle on the master handle.
When you are satisfied with the position and the size of your picture and the mask, do one of the following ways to complete:
Double-click the mask or the photo.
Press return.
Click outside the photo.
Click the input mask.
To remove the mask of the photo, choose Format > Image > unmask.
Hope that helps...


Maybe you are looking for
-
Which 3D glasses are supported for the Toshiba 40TL838 TV
Hello I'm looking for a support in the 3D glasses choose for my Toshiba TV 40TL838.The TV this 2 models of sunglasses product page (FPTAG01G / / FPTAG02G) but there are more models now available in stores (i.e.FPT - AG03). Can you please advise if al
-
Satellite P100-347 - nVidia drivers day?
Can support Toshiba fix some vista updated drivers for: Satellite P100-347... (pspa6e) This should be up to date on Toshiba site, because the drivers onNVIDIA.com do not work on my Toshiba laptop... Thnx
-
I experienced this once already in October 09. The solution I used was to manually install each update via microsoft updates web site. Then I noticed that there was a "I agree" to check. No such "I agree" can be found with my automatic updates. They
-
Can I upgrade my 4 GB ao722 memory 8 GB? Of memory should what brand I use?
I have an AO722-0825. I am looking to increase the speed and performance of this machine, and I wanted to upgrade the memory (and possibly Exchange in an SSD). So my questions are: (1) is it possible to upgrade the memory on this machine? (2) what
-
Photos will NOT print when I attribute Elements 9 to manage colors - Hmmm...
HP Photosmart Premium C310a Mac mountain lion Photoshop Elements 9 So, I've been printing with this beautiful printer for a while now. I love. I have Photoshop Elements 9 (Yes, a while back, but whatever.) Today, I found where you can override the c