replacement of the installer
I created 2 different installers for 2 different programs. I want to have them in the same folder of target. However, when I install the second program, it replaces (replaces) first. 2 programs have different names. How to prevent this?
Generate a new code upgrade solves the problem
Thank you very much
Tags: NI Software
Similar Questions
-
How can I get replacement lost the installation DVD for?
I lost my original installation dvd for design standard cs5, how can I replace it?
You can get the download link for only the most recent version of the software from the Adobe Web site and support Adobe, but there is a site that can help you downlaoding the Roop version.
http://prodesigntools.com/all-Adobe-CS5-direct-download-links.html
Read the instructions properly to avoid the error and also write the file downloaded to a Flash DRIVE or a DVD for future use.
-
Replaced during the installation of Windows Mac
I have a little problem. I used boot camp to create a drive USB in Windows Installer. I then tried to install it on an SSD to a Windows laptop, but I accidentally deleted and the Windows installed on my main hard drive. Is there anyway I could reinstall OSX on my mac (the data has been saved, so no problem)?
You can try to boot your Mac through restoration of the Internet to try to restore your backup. To do this, hold down the control, Alt and R keys during start up your Mac to the top. Your Mac may ask you to connect to a Wi - Fi.
After boot, connect the external drive with the backup, choose the option to restore a Time Machine backup and follow the steps. I guess you did the backup with Time Machine; If you have a clone of your OS X disk, you must follow the steps.
-
error 0 x 80040705 occurred during the installation of windows essentials.what to do?
error 0 x 80040705 is produced during the installation of windows essentials.what do? Help me please.
Hello
Thank you for contacting Microsoft Answers.
This error is caused by a lack of installation of DirectX. Usually some DX files are already installed, but Setup cannot overwrite them. In my case, some of the files in \windows\SystemWOW64 have been accidentally encrypted, and the Setup program does not overwrite them. I had to manually delete these files for the Setup program to succeed. The cause may be different for you, but following these steps should help to understand which files DX are the cause of the problem.
1. Install DirectX User Runtimes (refreshed June 2010) of http://www.microsoft.com/download/en...ang=en&id=8109
You will be asked to choose the directory to put the files extracted from the cabin.2. run dxsetup.exe from the directory in step 1.
3. installation failure will probably happen. Look at \Windows\Logs\DXError.log and find the report. INF in the error log file.
For example:
[13/07/11 20:36:35] module: dxupdate (Mar 30 2011), file: dxupdate.cpp, line: 2056, function: ExecuteInf
Has no API: SetupInstallFromInfSection()
Error: (5) - access is denied.
Cannot install C:\Users\Foo\AppData\Local\Temp\DXA1BC.tmp\d3dx9_31_x86.inf: [x64_install]. The file is possibly corrupted.
4. the INF files are files of configuration information, which are used to install the files listed in these. In this example, d3dx9_31_x86.inf is the. INF file. First, try to determine the. DLL file installed with this INF using the name of the INF file and look for a DLL with a name similar to \windows\systemwow64, if you are using 64-bit Windows, in \windows\system32, if you are using 32-bit Windows. In many cases, the name of the INF should tell you what DLL it installs, as shown in the examples below:
xinput1_3_x86.inf install xinput1_3.dll
d3dx9_33_x86.inf installs d3dx9_33.dll
d3dx9_31_x86.inf install d3dx9_31.dllif you can't say the name that installs DLL has failed, you will need to watch the CAB file. See \Windows\Logs\DirectX.log to determine what CAB file has been processed before the error. Go to the directory you have chosen in step 1, and then open this CAB file in Explorer file by double clicking it. That will open a window of the Explorer showing the files in the cabin, including a file INF open the INF file, by right-clicking on the file and choosing extractin the menu contextual. The INF file has entries indicating that it installs the DLL as follows:[DirectX_System]
D3dx9_38.dll [DirectX_SysWOW64]
D3dx9_38.dll
5. the likely installation failed because this DLL could not be replaced by the installation program. Find out why it could not be crushed and delete it manually from \windows\systemwow64 or \windows\system32.6. go to step 2 and repeat until the installation is successful.
See you soon.
-
Satellite A300 - HARD and the Installation of the OS disk replacement
Hello world
I watched a few videos online regarding how can I do to replace the two HARD drive in my laptop Toshiba Satellite A300 PSAG4E-04901CEN. However, I have a few inquires before that I undertake this task:
(1) are there any recommendation to which HARD drive should I buy for this laptop. I want something affordable with speed and relatively good ability.
(2) how I would go about installing Windows 7 OS on the new HARD drive. I have to update my BIOS and drivers when I finished installing?
(3) are there other guides (written or video) that you would recommend that I go through before making the replacement?I appreciate any help on this matter.
A few days ago a friend of mine asked me to help. HARD on its A300 disc was defective. We bought the new 250GB SATA HDD, succeeded him, and after that, I installed Win7 32 bit.
Now the machine works perfectly.Do not do anything as the BIOS update. Just put the new HARD drive and launch the installation of Win7. All the necessary drivers, tools and utilities, you can find and download from the Toshiba download page - http://www.toshiba.eu/innovation/download_drivers_bios.jsp
Here's how I installed all the stuff on A300 friends:
-Win7
-chipset driver
-Storage Manager
-display driver
-driver sound
-modem driver
-utility supervisor
-infrared
-patches
-configfree
-VAP
Hardware - toshiba
Control - HDMI
-WLAN driverEverything works well but lacks some drivers
Added Vista tips:
Toshiba - help - working properly
-Card reader - installed correctly
-Webcam driver for A500 - tested with Skype - works correctly.
Driver - SynapticsWin7 works well and I am very satisfied.
If you need help more made me know.
-
Replace a hard drive in dv6 but is not completed the installation phase
I replaced my hard drive with a disks recommended by an expert from HP in this forum, and he seemed fine. After starting with my #1 recovery and loading of each disk when you are prompted, I got the final guest/message: "preparation of the recovery is complete. Remove the system recovery media. Once the computer is restarted, the installation of recovery process will begin... Support on continue restart the computer. "When I hit the"Continue"button, the screen went black as if it has been restarted. But instead, a black screen with the HP logo in the centre appeared, with the text: "Press ESC for Boot Menu" in white letters in the lower left corner. Waited about half an hour, and then you press the ESC key, but it changed nothing. Same screen HP. And that's all - nothing else has happened. I left it on all night, thinking perhaps that it takes time to get there, but in the morning, the same screen was there and my phone was hot as if in use. So I turned it off right there. What would not, and that I should try now?
Turns out that I don't need to download the Microsoft Windows software and then struggle to find the right drivers, thank God. My recovery discs works perfectly after all.
Having read tons and tons of forum posts about this problem, I finally found a solution that worked really - posted by another user, GoodTimes81 (thanks!). This solution is pasted below (with numbers and an additional note added by me):
(1) put the recovery disk #1 in and
(2) when the Recovery Manager screen loads, you will get a few options, but the one you want is the command prompt (which appears after you select "Run a computer check.")
(3) in the command prompt, I typed bootrec.exe/fixmbr, you press on enter and waited it says the operation completed successfully.
(4) I typed bootrec/fixboot and then you press on enter and again waited until he said the operation has completed successfully.
(5) after having done that I left the command line, restarted my computer and waited until my recovery disk #1 loaded up again.
(6) then, I chose the recovery system to the Recovery Manager screen and went through the process of insertion of disks 1 to 4. When the 4th disc is complete, it says remove the recovery disc and press on continue, which I did, then it restarts, except that this time it restarted and actually started the installation and facilities it is supposed to do and has completed the recovery process.
_________The other user said these steps solved the problem for her, and they could work for you. Finally, they worked for me, except after step 5, the recovery disk #1 would not load again. I received an error message (the black screen, white letters) mentioning a problem of location startup (sorry, that I did not write down exactly what he says). I pressed the button power to restart, but got the same error message.
So I pressed the button to power again but this time, you press F11 repeatedly until I had a menu of options. The option to boot was F9, then I pressed F9 and selected "CD/DVD player" (which I had already done elsewhere earlier in the process, but maybe it had reset after entering the command request?) and then restarted again.
This time, it worked, and I was back in step 6 above. Load the discs one at a time (note: I have 7 discs instead of the 4 mentioned by another user), and after that the disc was done and I got the prompt to "Press continued to restart", it restarted and he proceeded to load all the software, drivers, etc as it is supposed to. Yay!
-
I want to install Photoshop 5.5, but have lost the installation disc. Can I get a replacement?
I want to install Photoshop 5.5, but have lost the installation disc. I have the serial number. Can I get a replacement CD?
Thank you very much.
Rosemary
No, but you can download the installation files (and burn you clean cd If you really want one).
Available downloadable Setup files:
- Suites and programs: CC 2015 | CC 2014 | CC | CS6 | CS5.5 | CS5 | CS4, CS4 Web Standard | CS3
- Acrobat: DC, XI, X | Suite X | 9,8 | 9 standard | 8 standard
- Captivate: 8 | 7 | 6 | 5.5, 5 | 1
- Cold Fusion: 11: 10 | 9.0.2 version 9.0.0, 9.0.1, 8.0.1, 8.0.0, 7.0, 6.1, 6.0, 5.0, 4.0
- Contribute: CS5 | CS4, CS3 | 3,2
- FrameMaker: 12, 11, 10, 9, 8, 7.2
- Lightroom: 6| 5.7.1| 5 | 4 | 3
- Photoshop Elements: 14,13,12,11,10 | 9,8,7 win | 8 mac | 7 mac
- Premiere Elements: 14,13,12,11,10| 9, 8, 7 win | 8 mac | 7 mac
Download and installation help links Adobe
Help download and installation to Prodesigntools links can be found on the most linked pages. They are essential; especially steps 1, 2 and 3. If you click on a link that does not have these listed steps, open a second window by using the link to Lightroom 3 to see these "important Instructions".
-
I had to replace the hard drive on my computer and lost the installation that I pay every month for. How to install the Adobe Acrobat Pro XI on the computer again?
You can download using any one of the 3 methods.
But if it's XI Acrobat Standard, only the first step will work.
For Acrobat Pro XI, you can use one of the 3 methods.
1)
Sign in to www.cloud.acrobat.com
Then sign Adobe ID and password, and once logged in, click on the Acrobat button, it will provide you download link.
2)
You can download Adobe Creative Cloud applications:
https://creative.Adobe.com/products/creative-cloud
Reference: download, install, update or uninstall applications
3)
You can download it from Acrobat Pro XI of direct download link.
During installation, select the optoin: installation using the serial number / subscription.
-
Download the installer of replacement for Adobe Photoshop elements 11
How can I download the installer of replacement for Adobe Photoshop elements 11. I need to reinstall it on a new PC. I have my serial number.
Happy to help you.
-
Unable to boot from the installation disc
I am trying to run repair on my imac 10.6 disk utility snow leopard. I have no problem with the Superdrive drive. The installation disc is fine. I inserted the disc in the drive. When it mounted on my desktop I stopped. I pressed the c key and pressing the Start button. The Apple logo appeared with the spinning wheel. After two or three minuets logo Apple disappeared and replaced a circle with slash. I had to pull the plug at this point here.
Try instead boot into recovery mode.
-
The installation disc could not be found
I get the same message continuously when I am bootcamp Windows 7 on my iMac mid 2010.
I have read through the other threads here and searched online and nothing that I don't seem to make any difference.
I have a iso, tried to burn on an external drive and a FAT format USB key.
Downloaded the package of appropriate support bootcamp for my system.
Followed all the instructions on the help page of training camp, but still can't make it work.
I am gradually abandoned so any help would be greatly appreciated.
Chrischarge g ' Day,.
Thank you for using communities of Apple Support.
I understand from your post, that you have a problem installing Windows 7 on iMac (21.5 inch, mid 2010). I use Boot Camp dual-boot my system as well, so I know that it is important we have this installation problem solved. I have several things for you to try.
First of all, it's a good idea to make sure you have a recent backup of important data from your iMac. The article below will help ensure that you have a recent backup:
Use Time Machine to back up or restore your Mac
Then, I see you are using Mac OS 10.6.6. Let us make sure that you have the latest version of the software installed for this OS (10.6.8). Please try to update by following this path: Apple menu > software update.
Finally, it is important to respect the requirements and installation steps to install Windows 7 and older versions on your Mac with Boot Camp. The installation steps are unique depending on whether it is a new installation of Windows 7 or an upgrade installation of Windows 7.
Perform a new installation of Windows 7
Follow these steps if you install Windows 7 on your Mac for the first time.
- Start your Mac in OS X.
- Use the tables at the end of this article to make sure that you have a Mac that takes in charge the version of Windows that you are installing.
- If your copy of Windows 7 has come on a DVD, create a disk image of the installation disc for use with Boot Camp.
- Connect a 16 GB or more large USB flash drive you want to erase. Leave this connected to your Mac, flash player until the Windows installation completed.
- Open Boot Camp Assistant in the Utilities folder (or use Spotlight to find it) and click on continue.
- Select only the options to create a Windows Setup disk and download the latest version of Windows software Apple support. Then click on continue.

- Insert your Windows installation disc, or choose your ISO Windows installation, then click on continue. Boot Camp erases your USB and he prepares for the installation of Windows. Once the flash player is prepared, close the Boot Camp Assistant window to exit the application.
- Use the tables at the end of this article to find that Windows supports the software (drivers) you need for the version of Windows and the Mac you're using.
- Click on the link in the table to download related software.
- Once the file is downloaded, double-click it in the Finder to decompress (unzip) it.
- Open the folder that results. Look for the following files in this folder and drag them to your USB Flash drive. When you are prompted if you want to replace the existing items on the flash drive, click Yes.
$WinPEDriver$ (file)
AutoUnattend.xml
BootCamp (folder) - Open the Boot Camp Assistant again, and then click on continue.
- Only select the option "Install Windows... or later."
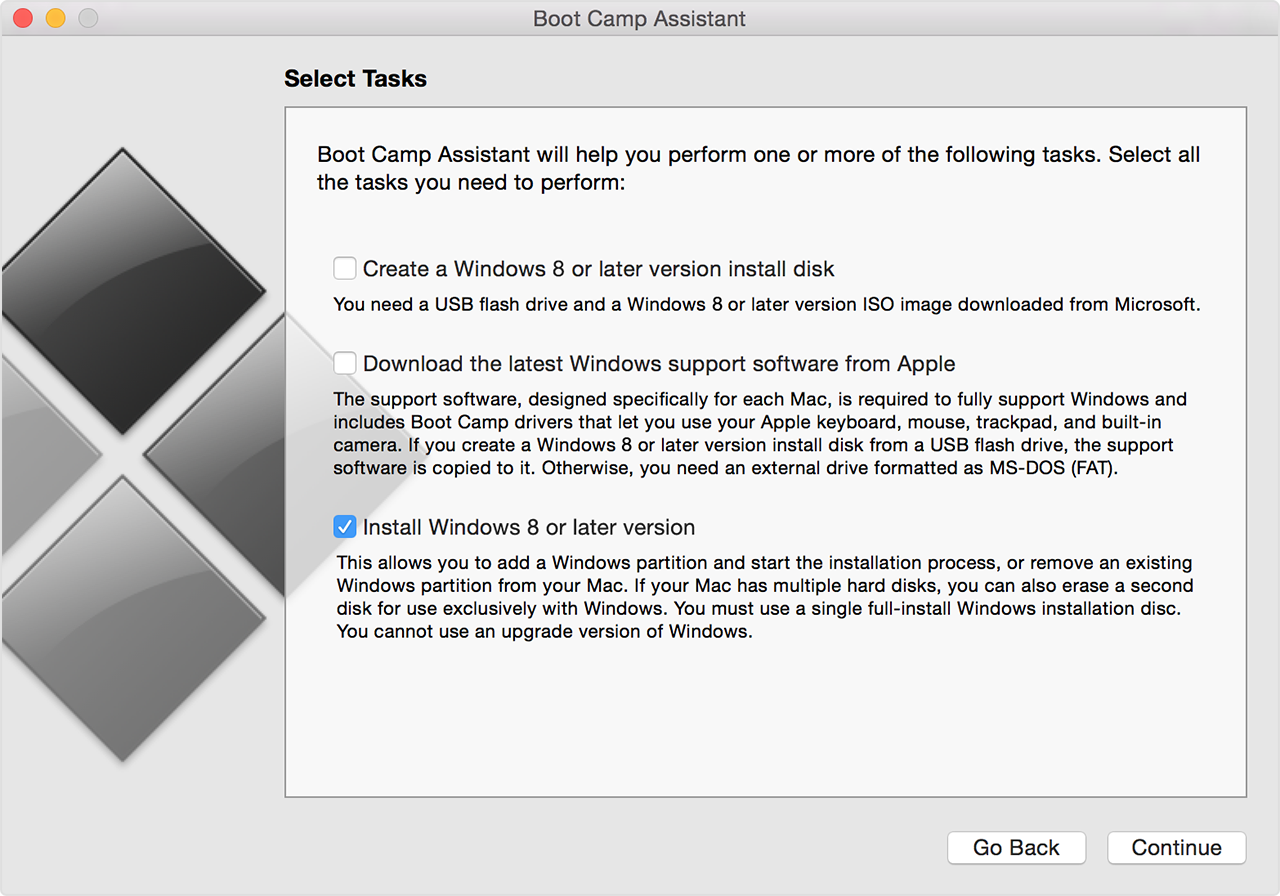
- Click on install, and then follow the prompts on the screen to re-partition your hard drive and install Windows.
- When you have completed the wizard, your Mac restarts with Windows Setup. When you are asked where you want to install Windows, select the BOOTCAMP partition, then click on drive Options and format your Boot Camp partition.
- Follow the prompts on the screen to complete the installation of Windows.
- Start your Mac in OS X.
- Use the tables at the end of this article to make sure that you have a Mac that takes in charge the version of Windows that you are installing.
- Download software support for Windows (drivers) bound to the table, or locate the OS X Install or the restore disc supplied with your Mac so rated.
- Decompress (unzip) download it and place it on a USB drive formatted in FAT (MS-DOS). Let this flash drive connected to your Mac during installation.
- Start your Mac from the version of Windows that you currently have installed.
- Use the Windows Installer to upgrade to Windows.
- After Windows Setup is complete, your Mac starts in Windows. In Windows, open the file "BootCamp.exe" on your USB stick or the installation disc supplied with your Mac. Follow the prompts on the screen to install the related drivers for your Mac.
-
Install Snow Leopard Retail: Checking the Installation failed
Hi all!
I currently own a MacBook (mid-to-late 2010) with the identifier MacBook7, 1 and I want to reinstall 10.6 after a few questions. I got my retail disk, and it says that it cannot be installed on my computer. I check the logs and it says the following (not all that, only the errors, sorry)
21-24 June at 20:18:03 localhost OSInstaller [140]: controls Installation failed.
22-24 June at 20:18:03 localhost OSInstaller [140]: verification of the Installation failure:
What puzzles me is that the reason is empty! Any help would be appreciated!
(BTW, I tried to do a format, disc check and repair and all the "solutions" and none of them worked.)
Sometimes the retail drives do not work if they are the same major version than the original installation disc provided with a computer. I just checked, but as the best I could with the information that you provide and it seems that your computer was shipped with 10.6.3 and this is the same version as the retail drives. Yet, I wonder if there is a specific build characteristic which is absent in the commercial version. Contact Apple support to get a replacement original disk.
-
When I logout on my Macbook Air, Safari 9.1, my screen darkens, and there is a box that asks if I want to continue or cancel the installation. But I can't click on one. I have not tried to install anything for awhile. Is this something I can fix it or what I have to visit the Apple store?
You may have installed one or more variants of the Trojan 'InstallMac '. Please take the following steps to disable.
The criminal behind this attack tries to make the malware difficult to remove by varying names of the files it installs. This procedure works now, I know. It will not work in the future. Anyone finding this comment a couple of days or more after it was published should look for a more recent discussion, or start a new one.
Back up all data before proceeding.
1 triple - click on the line below on this page to select, then copy the text to the Clipboard by pressing Control-C key combination:
~/Library/LaunchAgents
In the Finder, select
Go ▹ go to the folder...
from the menu bar and paste it into the box that opens by pressing command + V. You won't see what you pasted a newline being included. Press return. A folder named "LaunchAgents" opens.
Press command-2 key combination to select the display of the list, if it is not already selected.
There should be a column in the update Finder window. Click on this title to sort the content by date. This will make the related files easy to identify regardless of their names, because they will have the same modification date.
2A inside of the folder that you just opened, there may be files with the name of all these forms:
something. AppRemoval.plist
Something.download.plist
Something.ltvbit.plist
Something.notification.plist
Something.Update.plist
Here, something is usually an empty string of sense, for example one of the following:
Epolife
InstallMac
Javeview
Kuklorest
Manroling
Otwexplain
Here are examples, not a comprehensive list. The chain could be anything, and there might be more value of something. Looking for a group of files with the same date of change who match the description.
Lately, the striker of "InstallMac" a were quick strings 'AppRemoval', 'download', 'ltvbit' and 'update' in the names of its records. For example, you might see file names such as these, instead of the above:
something. AppVemoral.plist
Something.dolnwoad.plist
Something.btvlit.plist
Something.uadpte.plist
You may have more than one copy of the malware, with different values of something.
Place all of these in the trash. If there are other files whose name begins with something, those in the trash also move. You can get a caveat that some files are locked; Delete them anyway.
Once you've done that, we may not have anything left in the LaunchAgents folder; in this case, you can remove the folder, but otherwise does not delete it. Other files in the folder are not necessarily malicious (though they may be, if you have also installed another type of malware).
Log off or restart the computer. The Trojan horse should now be inactive.
3. This step is optional. Open the folder as in step 1:
~/Library/Application Support
and move it to the trash of the subfolders with the name, something you found in step 2.
Do not move the Application Support folder or anything else inside.
4. open the Applications folder. If there is an element named something, or "Hell Zip", or with any of the other names listed in step 2, then drag it to the trash.
If in doubt, press option-command-4 key combination to get the apps by date added. Look at the apps that have been added since you first noticed the problem. If there is one, that you don't recognize, drag it to the trash.
You can get an alert that the item is locked. Confirm that you want to move to the trash.
Empty the trash.
If you receive an alert that the application is running, force it to quit.
5. from the Safari menu bar, select
▹ Safari preferences... ▹ Extensions
Uninstall all extensions, you don't know that you need. When in doubt, remove all of them. None is required for normal operation. Do the equivalent with Chrome and Firefox browsers, if you use one of the people.
If the window does not open, restart the computer in safe mode. Some caches maintained by the system will be rebuilt.
6. replace the search engine and home page in each of your browsers, if either has been changed. In Safari, first load the desired home page, then select
▹ Safari preferences... ▹ General
and click on
Set on the current Page
-
Where the installation software unzip the driver files
I have a Photosmart C309g-m, which worked fine under Windows XP and recently replaced my computer with Windows 7-64 system and this is where the problem started. The drivers I have download block due to a theough to halfway 'Fatal Error', the installation and will not be installed. I just need to see if I can know where in the world the classified unpack so I can direct Windows to .inf files to complete the installation. I would rather do it manually because the installation of the software is about as useful as a door on a submarine.
Click Start, computer, type "%temp%" (without the quotes) in the address bar. Search a directory starting with 7z... next, the files you need should be there.
-
I have a HP Compaq 6300 Small Form Factor in which I just replaced the motherboad. It works very well. I can start on a USB bootable and (1) start a Windows 8 or a clean installation of Windows 10. I can (2). boot from a USB drive capable of Linux Mint 17.3 Startup and load that OS fine. When I try the installation of any of the aforementioned OSs (Windows 8/10-Linux Mint 17) they all will get an error of memory or hard drive and the installation at the beginning of the installation to fail. I tried this on two SSD drives and two HDs standard. I am at a loss on what to try next. Any help would be great. Thank you. -Matt
I have it. It was a bad memory stick.
Perform an upgrade of Windows 7 installation or an earlier version
You can upgrade to the existing installations of Windows XP or Vista to Windows 7. You need at least 10 GB of free space on your Windows partition.
After the driver installation is complete, connect to Windows to start using it on your Mac.
Have a great day!
Maybe you are looking for
-
Improved the Qosmio X 500-10T to win 8.1: Sound drivers for 5.1 on HDMI
Hello * brilliant * Toshiba community. I recently updated my Qosmio X 500-10T of 64-bit Windows 7 to 64 - bit Windows 8.1.I left Windows for driver updates. My configuration:-online (HDMI) Yamaha AV receiver (HDMI) Qosmio => TV LCD Samsun. _The probl
-
CURRENTLY TO GET A DEACTIVATION OF THE SYSTEM [75101991] CODE ON MY HP LAPTOP FORGOT PASSWORD CAUSE ITS BEEN SITTING IN MY CLOSET FOR A FEW YEARS BECAUSE OF THE KEYBOARD, NOT WORKING AND HAVING TO USE A USB CONNECT KEYBOARD ANYWAY I WANT TO RESET AND
-
I tried to install an update for Microsoft Works 8.0 security Whenever I try, the update is cancelled at the last minute and the 52D error code is displayed. Any idea on how I can fix this?
-
I recently installed a new color cartridge, printed on the alignment sheet and aligned according to the instructions. My problem is that I use my computer that the message arrives that I need to align again everytime. I traced changed several times
-
Updates can be removed from Add/Remove programs?
while I was in the "add and remove programs", I noticed a slew of windows updates and windows security updates. my? : can it be deleted or am I remove the update?