The effects of mask
Hello. Is it possible to use the effect of solarization on an object in a video without affecting the background? Basically, I want to have a person covered by the solarization effect and background not affected. Is it still possible? I would love to have some feedback on this request.
[Please choose only a brief description to the title of the thread.]
Post edited by: Jim Simon
First of all, it is easier in After Effects. That said...
Possible? Yes. The use of masks.
Create masks? This can be difficult.
If the person stands out from the background in a way that you can create a mask based on a combination of the cache of transparency and the luminance values, you might be able to use the levels to create a forground black and white background or vice versa. Then use it as matte.
But it's not easy, and most video is not out in a way that will work for you.
Most of the people like rotoscoping the person away from the background, image by image. A very time consuming process.
Depending on what you really want to do, you may be able to apply a collection of masks and feather them so that they cover the person enough in General, covering about.
Tags: Premiere
Similar Questions
-
Door after the effects of mask
I opened a door, and inside I want to put an image. When opening the door, I want the image inside the show that I open the door. But I can't understand the layers in After Effects and masking. Cannot find any tutorials that will fit on Youtube. I want the mask to follow the edge of the door, so the image inside reveals slowly. But I don't know how to set the mask. No matter how I do it, the mask turns out to be black. I started to do this in FCPX. The image inside is keyed (blue screen), so there is only one tiny inside. I have now two clips. One where I opened the door without someone inside and the same clip with the person inside.
Can someone help me?
Any suggestions?
Sounds like you should start here: starting After Effects
If you don't get things like layers and masking, it is a great place to start. It covers you many things you have probably not yet realized what will make your life AE a lot better in addition to get you the essential info you need work as how to animate masks.
If you are determined to ignore the fundamental things (please do not jump), go over these resources: using After Effects | Management and animation of masks and paths of the form
-
I created an image with shadows and internal light. I want to hide the shadows in several places, so that they do not appear in the sky, or something that is supposed to be in front of the shadow, for example. How can I accomplish this?
Thanks in advance!
Please refer to edit, my apologies for the confusion
1. duplicate the layer with effects.
2. on the top layer to remove the effects
3. on the original layer change fill to zero
4 put the underlying layer in a new group
5. Add a mask to regroup and paint as you wish
Post edited by: Printer_Rick pointed end part
If you don't do the underlying layer group and add a mask to the group he will not work correctly
-
Advance image sliding effect and masking
Hello
Please help me...
can you please someone help me create the effect of animation at the edge of the adobe
as: www.elconvento.com actually, he created in flash.
This tool supports the effect of mask like flash or not?
Thank you
Pierre Koffi
Hello
You can use the tool clip. So, no code.

You can download demos here: https://www.box.com/s/6qdxvkkzq86todbhtgla Watch: clippingImageCenter.an
More about css clipping: http://tympanus.net/codrops/2013/01/16/understanding-the-css-clip-property/
-
After the effects of Pépin masking in adobe
I have a small problem when you try to put a mask on a lightsaber for a video, it shows the effects before it is supposed to appear.
If you don't know what I mean here is a link to whats happening
Maybe it's my editing, but I can not understand how to fix it
Just post a picture or pictures showing the problem gives us nothing to work with others that you may have a problem of image cache or you are not using the right workflow.

To diagnose your problem are open to the top of the model, move the CTI on an image where a layer or effect appeared a problem and start to turn things around at the same time. Start by purging the cache using the edition a lot. Then try to find the layer is the source of the problem. Depends on how you created the glow looks like you have a coup; the additional shots or forms in the model. One in front of her face and a little over his shoulder.
When find you what layer is causing the glitch appear solo this layer, press U twice to reveal all changed properties and then start to turn things off or redefinition of values. If you cannot resolve the problem, then we need to see a screenshot of what you found and have a detailed description of your workflow.
Composition settings, OS and AE version up to the last comma would also help.
It's very strange for me that your sample film still has the green screen. My workflow would be key to the actor, so if there is a lot more that should be added to the stage I would make a DI with a channel alpha and 10 bits or better codec and continue from there. At least I'm moving dial my shot at key and then start building the composite. According to the accessory used for the light saber I would be either follow-up or roto and then start to build this effect. The actor already indexed will be much easier to make any roto.
I hope this makes you in the right direction. If it does not cache problems, it's probably user error.
-
How can I access the buttons on mask for effect?
I found this video for a 'novelty' that allows you to create a mask on an effect. (See link below)
However, the mask of "buttons" says this video should be available by virtue of the 'mosaic' (or other), the effects do not show up for me. I use the first Pro CC... Why don't I have access to this feature?
Thank you!
How a face moving with masking and tracking the blur | Adobe first Pro CC tutorials
You need CC2014 for these masks.
-
Hello!
I'm going to preface this cry for help by saying that I am pretty inexperienced when it comes to motion tracking, so there is a good chance that I use this incorrect functionality.
I'm working on my first student film and try to take advantage of the effects in the first follow-up masks. To be precise, I have a car in movement (which is surprisingly stable in the shot), I want to hide around the windows for the color correction. Yet once again, the window is not erratic movement or something like that. However, when I first track the mask, it ensures follow-up of random areas such as if he has no idea of what I'm trying to follow. I think it is all hidden properly and I don't know what the problem is. Any thoughts?
I took two screenshots of the mask itself. These two shots are about 50 frames apart:

Any help would be appreciated!
I thought the same thing. I found myself there followed manually, but I wanted to go to the others about it because whenever I try to follow a mask, I met the same problem. It could be a coincidence; It could be that I just keep trying to follow the sequence that has very little contrast. I just wanted to check if it was something technical that I'm missing.
Thanks for your reply, Richard.
-
Hello.
I am impressed with the new feature of Adobe 'Follow-up of objects' using mask. As I understand it, we could implement all filters for the treatment of the masking of image area.
But I do not understand how to crop the area of masking.
For example, I want to do close up shot of a person, and then change the position of the culture around area where the person moves automatically. Is it possible for Premiere Pro or After Effects?
I guess what it must be like in this video:You can do it automatically, you must set keyframes manually or do it in AE.
AE is the perfect tool for this. First is an editor not a fx program.
-
Change to the Question of the effect of color
Hi This is only my second year really using after effects and I've not really used this feature before. But basically, I want to make the color of the water kettle. His white origin. Now, I don't expect the change of color to exactly match the kettle. But when I use the function to color the kettle from white to pink (a bright color), it works pretty well actually. But when I try to color as a darker color, that it does not work. I need to change the hue, brightness and Sam for this has no effect, but it is not fully complete as the rose. How can I change the color of a brown colour only. Ive has messed around with it for a couple of hours now and I'm kind of stuck. Is it possible to do what I did for the pink kettle for the Brown kettle. I hope it's clear. Let me know if something needs to be clarified.
I recorded my workflow here. As you could see the brown color change is very wet and does not work with only the hue. While the pink kettle has functioned very well. I don't understand how I got the pink color in the video, but I just enabled the effect on this clip.
2016 04 04 16 01 42 669 - YouTube Bandicam
Any help is appreciated thank you.
There is nothing to do. In: it's all just a bad workflow and you wait too long. You answered your own question already in part: use other effects, use several layers manually create masks and hiding.
Mylenium
-
What type of layer should be used when using the effects lighitng filters "I can't using the way I expect to work -
I want to add lights to he image - and to inform the parties of the image - I duplicated the layer add the lights in the filters, but it does not act as a process additive-
Check out this tutorial from Phlearn on YouTube. It is a bit more flexible, but, of course, requires a bit of elbow grease more Photoshop-wise.
Create beams of light in Photoshop - YouTube
Using this technique, you can adjust the 'lights' as you want by manipulating setting masks. See screenshot below. (Still once again, excuse the butchering.)

-
How to create the effect of spray paint
I'm trying to understand how another person who worked on an illustration carried out the effect below:

You will notice how she did this vaporized black light effect where it seems that oil floats on top of the blue water (circled in blue above).
I went in the file HAVE and can't seem to find it after you remove the parts of the file to get sprayed therefor. Can someone tell me how I can reproduce this effect? I use Illustrator CS4. I can easily do this in Photoshop, but I'm lost in Illustrator.
Thank you in advance.
You are on the right track.
A clipping mask is created automatically when you use the mode to draw inside.

-
Recently, after consideration of a draft with the Director, we decided to disable some color in the first corrections, because they were not ready for prime time. I just disabled Lumetri in effect options. I then sat down later to correct the color correction in SpeedGrade. Of course, the effect of Lumetri was always off in the project file. Is there a simple way to relight the Speedgrade effect? All controls are grayed out.
Kevin
I would say save your Lumetri like a LOOK then. I record my appearance in a Speedgrade file associated with the project that I'm working on. Apart from direct link then, if your lumetri has been disabled, it has been preserved in your saved APPEARANCE. With Speedgrade Look Management window and guide to the saved folder, the look can be double clicked and added to the effect of clip as a folder including all your previous registered the layers, masks, the secondary. Work two ways that eyes can be added in first via effects video effects/color correction/lumetri.
-
After effects layer mask Question.
Hello
I am a novice and will try to explain this clearlyI used this tutorial as a guide for Lightsaber effects. http://www.YouTube.com/watch?v=gQ7dC0gWzG0 07:44 video, he explains how to make the effect of going behind the video using a mask... but not using his video, im using an another clip... anways...
"Layer 3" has my video. I the effect of sword "layer 2", at a point in the timeline, I made a new solid layer with the pen tool master on "layer 1" for the effect of sabre on "layer 2" can get behind the main video image, I cut the points of entry and this (works but). "" "
My question is, can I add another solid to the mask 'layer 1' later in the chronology for sabre effect on "layer 2" can get behind the next point, where it should get behind? ".
The problem I had is that for this mask work "layer 1" would seem to be directly on top of the "layer 2". I tried to make a new mask solid, but as it was not directly above "layer 2", it would not work. So, I wonder how do another mask on the layer 1?
Thank you
Rather than add a new solid, add a second mask to your first solid.
-
Error: not able to analyse the form of mask on Clipboard
can someone tell me why when I opened a new composition, I get an error message that says: "after effects error: could not parse the form of mask on clipboard" then I click ok... which brings me to a new composition, then I try to import an image and it gives me the same message only is not import the image? IM new to this and trying to teach myself, any help much appreciated woould
This has to do with a pixel-image on the Clipboard of the AI. Even if you are trying to paste in AE, AE generates an error. It should give this error until the user actually attempts to access the Clipboard, in my opinion.
After I rebooted my system, it has been resolved. Workaround must be (not tested) to copy some vectorshape the Clipboard to HAVE to get rid of the pixelimage.
-
The effects of a message as lazers and Fireworks do not work
I've updated my phone to iOS 10 but the laser and lights Fireworks and what not effects do not work. Instead, the message shows and in parentheses, it is said (sent with lasers)
Greetings aknopp21,
Thank you for using communities of Apple Support.
I see that upgrade you your iPhone to iOS 10, and laser and impact of fireworks messages do not work. I use these effects a lot on my iPhone when sending messages. So, I understand the importance of them to work on your iPhone.
Please make sure that you have not reduced motion activated. Use section reduce the screen on your iPhone, iPad or iPod touch resolution, specifically, this section:
iOS uses motion effects to create the perception of depth on your home screen and in applications. If you have sensitivity to the effects of movement or movement of screen on your iPhone, iPad or iPod touch, you can use Motion reduce to turn off these effects.
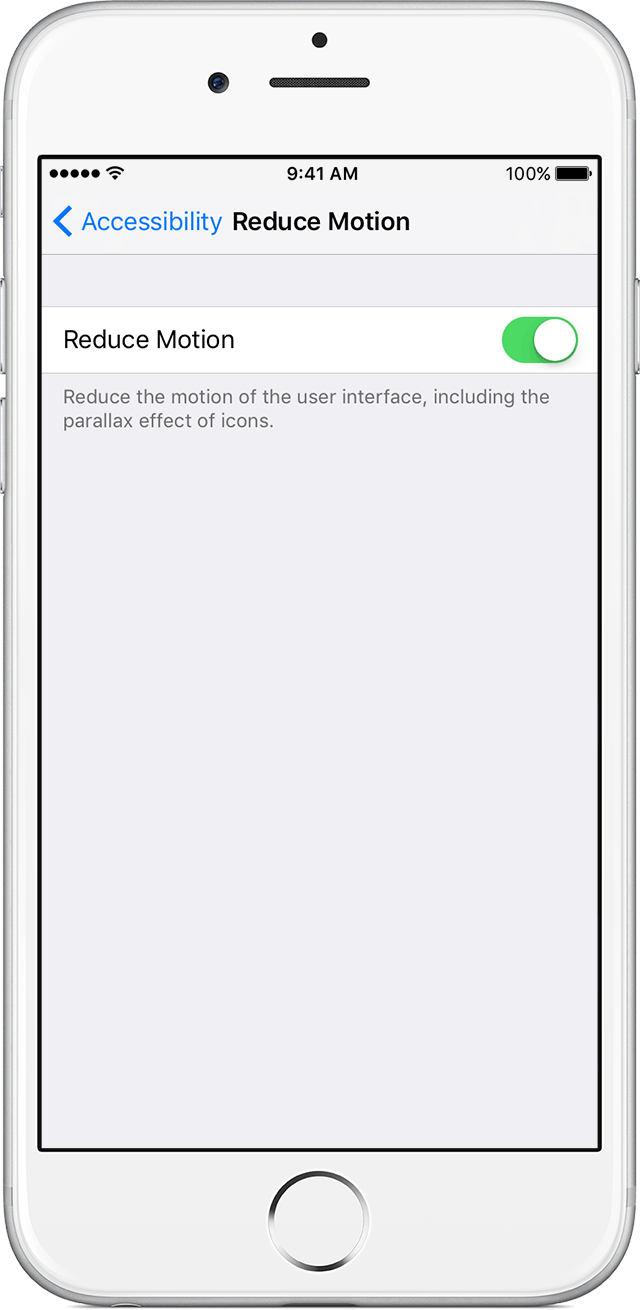
To activate the movement reduce, go to settings > general > accessibility and press the cursor to reduce the Motion.
When reducing Motion is enabled, certain effects screen change or are disabled on your device, including:
- Screen transitions and effects using the effect of dissolving instead of zoom or slide effects.
- Effect of Parallax where your wallpaper, apps and alerts that move or move slightly when you tilt your device are disabled.
- Animation and effects in some applications are disabled. For example:
- Animations of weather in the weather app
- You cannot send or receive effects of bubbles or fullscreen in Messages
If reduced motion turned on, please turn off and then test to see if you get the same result.
Have a wonderful day!


Maybe you are looking for
-
Envy 15-q667nr: 15-q667 envy an IPS monitor?
Greetings. I just bought my laptop of BJs (model T0W20UA #ABA). It is marketed as having: 15.6 "screen diagonal touch screen Full HD IPS backlight WLED - at a resolution of 1920 x 1080. both the site of BJs and the HP support site http://support.HP.
-
I had to reinstall xp pro and windows update said itn has encountered a problem and cannot display the page. I have sp2, what don't get me?
-
my Outlook Express does not respond after opening in Windows XP
After opening Outlook Express, he receives e-mails, but doews fails to read/delete/move.
-
My PC is not running Windows 10, but preparatory downloads have my Windows 7 teacher away.
I have Windows 7 Home Premium instead of Windows 7 Profesional wich that I paid. How can I get that back?
-
I have a problem with the installation of the printer driver.
It is the only computer to windows 7 in the Office I can't install driver HP T920 on. I get an error message. Windows 7 SP1 64 bit Microtour HP 505 b AMD Athlon II X 3 440 processor 3.0 GHz 4 GB OF RAM