Turning a whole tub of Clips 180?
I have a project that contains 5 cameras and 3 those who are GoPro footage - but we were backwards when shot. I have a dozen of Niow clips a camera form that is backwards and that's a real pain when editing in Mufti-camera, is there a way to rotate while the bin before using the clips?
Try a Master Clips Effect on then with rotation applied.
Tags: Premiere
Similar Questions
-
I'm running into a problem when you use the Cilp + in my taking of vehicles and when connecting to my headphone hearing protection for my shop. I have to turn the volume on the Clip + almost all the way (I have the volume set) just to hear the music (I'm not making my ears bleed).
Read the various messages, it seems that I need an amplilfier any to go between the Clip + and the vehicle/helmet.
Is this a correct understanding, if so, is there such a thing on ther and if so, are their suggestions as to brand, brand, model, etc. ?
Thank you
EricBr
You can try the Fiio E5, I use with my Clip + and my Koss PortaPro headphones. It works very well and is pretty cheap.
FiiO E5 3.5 mm earphone Volume Booster power amplifier (black)
Hope that helps you some.
-
Will my projects be exists after reinstalling first clip?
As the title
The short answer: Yes.
The longer answer: If you uninstall first, then all of the projects are removed from the device and will then synchronize down when you reinstall and log on to the same account. Note that assets that Clip recorded in its own Apps folder will also be deleted when uninstalling, then downloaded the cloud after reinstalling. Clip recorded assets in the Apps folder in 3 scenarios:
- When the project was created on another device and automatically synchronized through through creative cloud.
- When assets were imported from creative cloud.
- When assets were imported from Adobe Lightroom.
To be clear, uninstall Clip does not delete any of the assets of film.
If you simply update of Clip without uninstalling/reinstalling does not affect your projects, so they will all be ready to leave immediately at the launch of the new version. (Unless, in other words, you don't have to update Clip since last June, when we changed the system of project management as a whole of the Clip...)
-
Turn an image after you shot a video
If I use Premiere Pro to, indeed, rotate the frame after turning a video? The clip was filmed in a wide 1920 by 1080 high aspect ratio, and after that I straightened the video, the top and the bottom of the clip was not, because of the dimensions of the image of 1920 x 1080. Using Premiere Pro, is it possible to change the dimensions of the image so that they 1080 x 1920 high? I tried to change the image format when preparing to export the clip to MPG2, but the program would not accept 1080 x 1920. Is there another way to solve this problem?
Hi Ron,
When in the new sequence Panel, tab "séquence Presets" is the first active. Click the 'Settings' tab to the right. At the top, under "Edit Mode", select "Custom" in the menu dropdown. Then, you can change such settings as the image size and the pace and such required.
I think I understand what you want to accomplish with your workflow. Could be useful for one see a screenshot of the video to be sure, unless it's hardware owner.
I think the big question is can offer you as 1080 x 1920, that will be the determining factor. If not, then maybe use a smaller size of 16:9 as the 720 p (1280 x 720) image and turn and 1080 material in the small window size. You can then maintain more detail/legibility when rotating the orientation of video.
Thank you
Jeff
-
How can I get an older film clips in a new?
I made a film last week, but the opening and closing clips were not what I wanted. Yesterday, I turned the opening and closing clips again. I don't know how to get both films on the timeline so that I can edit them together.
(Assuming you are using version 11) Just use Add the media to add the new clips in your project, then replace your old on the timeline. Basic stuff.
If there is a part of this process, which is not clear, you can a more specific question.
Otherwise, you can view my free basic training tutorials 8 part.
-
Noise during playback of clips in Source and workspace
I'm new to PP CS5.0 and will use on a MacBook Pro Intel Core i7 2.66 ghz and 8 GB of ram.
I just bought a Panasonic GH2, which is a type AVCHD cam.
The problem is when I play clips in the Source or video noise workspace like rain and turning autour pixels distorts the clip. Rendering in the workspace it plays ok, but is there a problem with my prefs or the configuration that I can fix so clips will play without sound?
In addition, the selection of the parameters of the sequence for my 1080 p 30 (in a wrapper 1080i60) clips I choose the option for AVCHD 1080 p 30 but when I put the clip in the sequence it appears red. My choice is the problem? In a white paper in Adobe it said the 1080 p 30 tho in a 1080i60 wrapper will be recognized, but when I choose the clips of the option to get a yellow bar. What is the choice of setting the proper order?
Any advice or info would be appreciated!
> implements the sequence that is appropriate, but it is a sequence of 60i
I use a Canon Vixia for AVCHD, but hear my camera to shoot in 60i
So, I really can't comment on your files and what body 'should' do - vs - what you see
If you do not have a Redline on the calendar when you 1st import the file, your sequence is correct
http://blogs.Adobe.com/premiereprotraining/2011/02/red-yellow-and-green-render-bars.html
-
How to speed up film clip from inside the container file?
I created a Flash file (which I will call 'film 1') in which a clip was inserted. When I play the whole record, the clip rotates too slowly for my taste, but I noticed that if I go in the original movie clip file (I'll call "movie 2") to slow down and save it, back to the movie 1 and update the clip are impossible due to a motion tween that is bad (no idea about the solution which).
Is it possible to speed up the clip from inside the 1 movie? A kind of script tool or simple? I am a newbie to Flash and maybe there's an easy solution for it. Otherwise I set Movie 2, export it and re-import them inside the 1 film until I am satisfied with the result.
TIA
Kind regards
MOSHthe code below the dotted line adds two new method movieclips, playF() and stopF(). the first allows you to play the m frame movieclip to frame images per second fps n (forwards or backwards).
(for the control of accuracy (then), I have another code autocorrecteur to maintain a precise tempo.)
for use on mc1:
-
Code that can affect both clips
Hello
I have 2 video clips on the stage who act like buttons. I've set up a handler for each, making the rollOver and rollOut effects. As it is now I have the cursor on each clip to run the code. However, I want to put in place so that whenever I turning either one of the clips of film that the TWO video clips would play the rollOver and rollOut. Here's what I've written so far:
Any suggestions,
Thank youI would have tested it myself first, but play around with it and see what some craft if it does not directly at the exit. Him == compound is not a problem, I wonder if the mc are good.
-
El Capitan - quicktime player does not launch
I have a new Macbook Pro with El Capitan. It has very little software installed on it and I did not fundamental changes. I see the QuickTime Player icon in the Applications, but when I select it, it is to open a new search folder. The application does not start. Google and supportive research show no response to this and I can't download or install QT on the web site, as it is said that it is built in. Ideas?
Hi loadtester,.
Sorry for the confusion about QuickTime. Yes, you are right that a Finder window appears. If you had a file that you have wanted to play using QuickTime, select you in the Finder window and choose open. If this is not the case, click done, and then head up to the menu bar in the upper left corner of your screen and next to the word QuickTime, you will see the file. Choose file, and then click the option you want (new movie recording, etc.). But before do you, click the help command on the menu bar, to learn how to use QuickTime Player. The resources below will outline as well:
Use QuickTime Player (version 10) to play, record, edit and share video and audio files on your Mac.
Play
Use the playback controls to play, pause, rewind, fast forward, adjust the volume and take other actions. Controls appear when you move your pointer over the QuickTime Player window, and they hide when you move your pointer away.
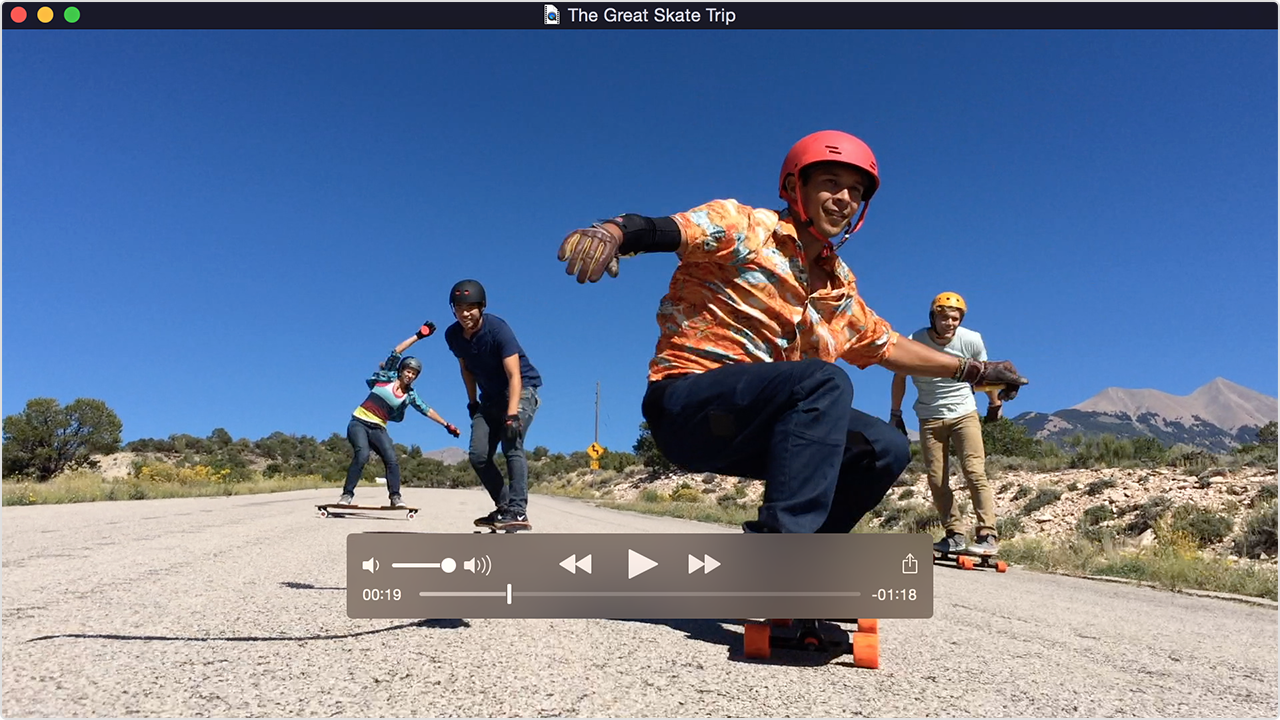
To quickly move forward or backward through the timeline, swipe with two fingers on your trackpad, highlight with your mouse, or drag the handle in the timeline panel. You can also, repeatedly click on fast forward or rewind to increase the speed of reading in increments.
To view a video in full screen, click on the button fullscreen or choose View > enter full screen mode. Beginning with OS X El Capitan, you can also use the screen display shared and videos to Apple TV from QuickTime Player.

Record
QuickTime Player can record a movie from your camera or record the screen of your iPhone, iPad or iPod touch. It can also record audio , microphone or recording of the screen of your Mac.
Record a movie
Video recording works with your built-in camera and many external cameras. If you use OS X Yosemite or later, you can also record the screen of any device iOS (iPhone, iPad, iPod touch with a port of Lightning) and the iOS 8 or a later version.
- Choose file > new movie recording.
- To change the recording settings, click the arrow next to the record button. Then choose your camera or device iOS, a microphone and recording quality.
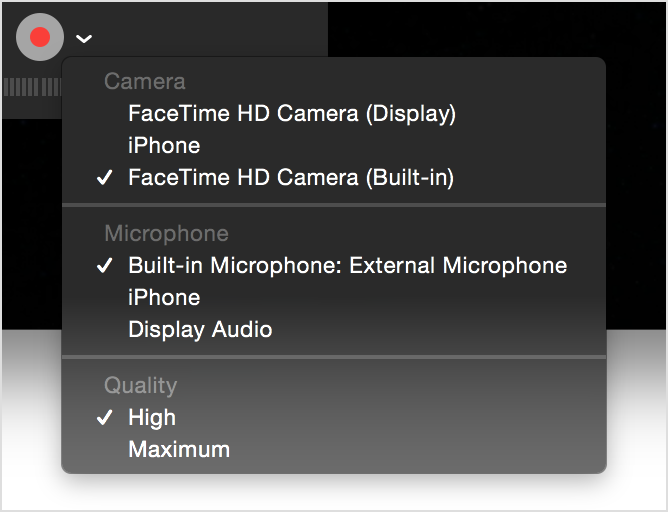
- To monitor the audio while it is registered, use the volume slider.
- Click on the record button
 to start recording. Click to stop recording.
Record audio only
Audio works with your built-in microphone, external microphone or other audio device compatible Core Audio.
- Choose file > new Audio recording.
- To change the recording settings, click the arrow next to the record button. Then choose the quality of your microphone and recording.
- To monitor the audio while it is registered, use the volume slider.
- Click on the record button to start recording. Click to stop recording.
Save your screen
Registration form creates a film of all or part of your Mac screen. To save the screen of your iPhone, iPad or iPod touch, use the video recording function .
- Choose file > new registration screen.
- To change the recording settings, click the arrow next to the record button. If you do not want record a voice or other audio, choose None as your microphone. If you want to display a black circle for each click on the screen, choose display mouse clicks in the record.
- To monitor the audio while it is registered, use the volume slider.
- To start recording, click the Record button , and then click anywhere on the screen to start recording of the entire screen. Or drag to select an area to save, and then click the Start Recording button in this area.
- To stop recording, click the Stop button
 in the menu bar, or press command-control-Esc (Escape).
Edit
QuickTime Player offers several options for editing your film, including cut, divide, cut/copy/paste/deleteand flip/rotation.
Trim
Use the TRIM function to remove the unwanted your movie parts.
- Choose Edition > cut. Yellow bar appears, with handles at each end.

- Drag the handles to select the part to keep. You can also follow these actions:
- Click the Play button to play the selected part.
- Move quickly in the article selected by dragging two fingers on your trackpad, scroll with your mouse, or dragging the cutter bar.
- Choose View > show Audio track to identify quiet sections of the film.
- Click on cut. All the video and audio outside cutter bar are removed. To cancel the trim, choose Edition > cancel Trim.
Split
Use the split function to split your movie into several sections that can be manipulated further.
- To the point in the script where you want to split, and then choose the command Edition > Clip from Split.

- From there, you can take several actions:
- Drag an item before or after another clip.
- Move a clip by hitting to swipe with two fingers on your trackpad or scrolling with the mouse. At any point in the timeline panel, you can choose edition > Split Clip split clip selected.
- Choose View > Trim to cut the clip selected.
- Choose View > show Audio track to identify quiet sections of the clip.
- Select an item and choose other editing in the Edit menu commands, such as cut, copy, paste, and delete.
- Click the play button to play all clips.
- Click done. To review your clips, choose View > show Clips. To cancel your splits, choose Edition > cancel Split Clip.
- Open the file in QuickTime Player and choose file > share.
- Or open the file in QuickTime Player and then click on share
 in the playback controls.
 - Or Ctrl-click the file in the Finder, and then choose sharing from the context menu.
- If QuickTime Player cannot open an audio or video file
- Use the functions of captioning in QuickTime Player
-
Piercing group option not applied when recording in pdf format
Hello!
Worked on a logo that has suddenly brush realistic research - meaning vectorize the characteristics of the project of hundreds of differently shaded layers. The logo features a layer of flower shape to be cut in the logo.
The matter shortly: Is it possible to cut out the outline of the shape on a group that features 'say cent' layers of different colors (30)I tried (without a desired outcome):
-Pathfinder - less before (with click) works only with this group
-Pathfinder - less before (alt/option + click) making it a compound path - does not because it turns the whole group in one color
-Option group piercing under opacity settings, who worked first - but save the file as a pdf, the knockout group option does not work. She is either disabled or forms of flower as group piercing are white.I'm using Adobe Illustrator CC

Thank you!
The purpose of "mask" is not in the area of tile "Opacity mask" in your first image. Make sure you the flower above the layer objects, all select and choose "Make opacity mask" in the Panel flyout transparent menu. This will be above a mask. You can then turn OFF "clip" in order to see the outside part of the mask.
Should look like this:

You can have more than one article on the mask opacity and different values. Color is ignored.
Please note: WHEN you first create an opacity mask will only recognize the subject of top-level (or compound shape). Later, you can edit and create objects on the mask at will, just like in normal mode. By default, only the mask 'effect' is visible. To display ONLY the mask OPTION + click on the thumbnail of the mask.
-
What is the problem with the failure of the 3D rotation in illustrator?
Hello
I was wondering if two different shapes could be using the same center of rotation...
He concluded that the only way to do it is that the two objects should share the same extruded properties...
If I create two objects with independs extrusion effects, I can not turn with a common point of the center of rotation.
Well, if anyone knows how please tell me because I can't begin to believe that such a thing does not exist in Illustrator so it has a 3D feature...
The other thing that frustrates me is that you cannot rotate the forms using a simple keyboard shortcut grrrrrrrrrrrrrrrrrrr...
Thank you
Dominik
Right of JET when he said that my aunt Illie 3D is completely lame.
Read it back. I said it's quite lame in this regard. (limited to a single 3D coordinate system). I do not consider it unnecessary, as I explained here at length several times.
As I said, the uniqueness of the Dimensions (and 3D effect) is the way renders as traces. There are a plethora of affordable modelers 3D (including free open source ones). Some offer a vector output. But none I saw restore vector objects, the way Dimensions / 3D effect: as a set of more similar paths to what attracts you. Contone shaded areas are a bit like normal extended mixes. So after manipulation of the expanded results is usually more convenient than with that of other vector rendering 3D Modelers that make the shading as a mesh of facets.
See also, the me another Modeler based entirely vector 3D making like that and also easily:

... Makes it is even more regrettable than the existing functionality of Dimensions - re have several different objects/parameters resident in the same coordinate space - was so badly weakened as 3D effect. Consider how much more useful, it would be if only we could, for example, to turn this red tube a little further than the green. This is the required functionality.
And I don't even tell the whole thng "living the effect" is unnecessary:

I'm saying that the loss be shot individually-East several 3D objects in the same space is much too high a sacrifice for him to do.
And it's not that you can't build scenes multi-object useful with it; but you can't do it in a unique 3D coordinate system:

Objects like the chess pieces, the afer being expanded and then completely break Flash can do valuable 3D effect the user to Flash the high demands. He might even Dimensions, were its full functionality (already existing), always available and updated for compatibility.
3D effect also suffers from its hideous interface, in particular, the digital rotation fields, which correspond to the axes (as their icons suggest), not to the line of sight. And it must be able to produce objects pipeline extrusion - once again the things that were lost with the removal of the Dimensions.
People regularly here, I'm probably the least "married" to Adobe of all. Frankly, it would suit me very well to use something like the Dimensions of one source other than Adobe. Not every graphics program you use has to come from Adobe. This state of mind is at the heart of the much bigger problem. (And I'm as sick as anyone of incremental updates grossly overvalued Adobe, lethargic product improvement, upgrading more restrictive political pricing and pushing infernal software vendors to a subscription license model). So show me something other than size that works like the Dimensions, and I'll gladly relegate 3D effect with the pile of detritus characteristic never used.
But no, the market (this is why Adobe) trashed the Dimensions. Obviously, he just never sold enough. My argument is that an update Dimensions - if marketed effectively, would be likely to be more successful on the market today (re Flash, etc.) than when it was introduced. It would also be a refreshing sign of life in this segment of vector illustration stagnant.
JET
-
iMovie on her very sweet voice
Hello
I add a voice-over to my movie, I made in iMovie.
I use a tieclip microphone (TCM141). In the meter, I see the signal is there, but the volume is very low.
The volume in the application is set to 100% and in the settings system also 100%.
The microphone is directly attachec to the microphone on the back of my iMac.
The volume is still too low.
I tried to talk to a distance of 1 cm from the mic, but still a very bad signal, unless I shout. Then the inputsignal is red.
The TCM141 is a condenser microphone.Can someone tell me what I am doing wrong?
Hi, wots36,
Don't know what is happening here. Your computer's volume is turned up? Other audio clips play too weak as well? Is this a problem that occurs only on that
project, but not others?
You mentioned that the volume of the project has been set at 100%. You can set it to 400% by selecting the clip, clicking the speaker symbol in the toolbar at the top of your screen, move the volume slider to the right up to 400%. If you have not tried, he could help as a sort of workaround.
-Rich
-
Digital TV does not detect the analogue channels
new digital tv (26AV700A) captures all the available channels, analogue channels in particular. our previous analog tv picked up all the analogue channels when it is connected to the same antenna.
finished installing (Assistant) and auto scan which finds some of the similar, but not all.
the menu of configuration, channels submenu, lack two menu items specified in the manual of the TV - both refer to analog channels, IE
and It seems that some analog key functions are missing - is there a setting that turns the whole thing analog power?
Hello
I don t think you will get the right answer here because it is a forum for Toshiba portable computers/computers and all the stuff that has something to do with it.
If you have some problem with the TV I recommend you to contact your dealer in TV shop. They specialise in these issues and I hope they can help you with this.My friends also Toshiba TV and in the settings there is option where you can activate channel scan for channels analog, digital or both of them. There is also the option of quick analysis. Everything is described in s operating manuals.
-
DesignJet 1050c more: 1050c print head cleaning
Hi all
I recently bought a 1050c more printer in fairly decent condition. I used to use a Roland SP540v at the office but this 1050c was home so I'm somewhat familiar with printers large format.
His print beautifully after I replaced the timing belt, new valves of printhead on the ramasseherbe Assembly and removed all the air from the system. The only thing I noticed when I got all the covers off the coast has been the print head cleaning.
The cleaners C, M and received this pleated filter sitting at the window near the wipers but the black does not. Is this normal? I can see what appears to be a sponge sitting at the front of the vacuum cleaner that I don't see in color.
Refurbishable are printhead cleaning products? I only ask because it will be a unit of the House and I would try save as much as I can where I can.
Kind regards
Select this option.
I just went down and checked on my 1050C cleaners and Yes, they are the same. Also the same on the cleaners of the 5000 series, IIRC. Foam on all colors but black without foam.
Can you tell me where you extracted the floodgates of print head? Also, I have a problem with the air in the lines on my 1050c and seeks to replace the system of whole tube by a refurbished. But if I can try to solve it by simply replacing print head valves, I could even quite a bit of money.
Thank you!
-
Hi all. I am using FCPX in OS 10.11.3 10.2.3.
After all these years, I finally dropped my mini-DV tape camcorder and bought a Panasonic SC-V700 that records to an SDXC card.
So, now I have to learn the best way to import video that produces this camera in the Mac and make enter FCPX.
I would like FCPX to import a single element of every shooting session, even if the camera creates a new video each time I have save and pause, while I find myself with a whole bunch of clips short of each shooting session instead of the single as long as I want.
Here's how I do it now:
After the filming of the videos on the best of the device setting (1080/60 p), I put the SDXC card in a card reader and connect the player to a USB port, which causes a virtual hard disk to appear on the desktop. Inside of this drive icon is a folder marked 'private '. In the private folder is an icon called AVCHD, with a great Q on this (for Quicktime I suppose).
A double click on this icon AVCHD brings up a window full of thumbnails of each clip that was created by the camera.
These vignettes of AVCHD clip cannot be moved, renamed, or modified in any way. A double-click on one it shows to the Quicktime format, and I can then save it in another file as a Quicktime movie.
QT reports that each film is in format 1920 X 1080 'avc1' at 59.56 fps (and I hope that this conversion in a QT film preserves full sharpness of the original AVCHD format).
To follow up all short clips in a long clip, I open each item in QT, copy and attach it to the first clip. Then I can trash all short clips except the first, which contains all now. But it's a slow process.
Finally, I open FCPX and import the QT movie.
Now what I want to know is: is there a better way to do this? Perhaps a third-party converter any? Any advice would be most appreciated.
Tom
'group' your clips with a keyword
not good idea to manually destroy the AVCHDstructure, let go you meta-data, add a step/loss conversion with loss of quality, create defects (green flashing) etc.
Cut, copy, paste, delete
Use cut them, copy, paste them, and remove commands from the Edit menu, when you change to split clips. If you paste an element into another film, you don't have to be changes to clips in this movie: just go to any point in the timeline of the other movie, then paste the clip.
To quickly join films together end-to-end, open the first film, choose the command Edition > Add Clip at the end, and then select the other movie in the file dialog box.
Flip, turn
Use the flip and rotate commands in the Edit menu when you watch a movie or a change in split clips. These commands turn or rotate the whole movie or clip.
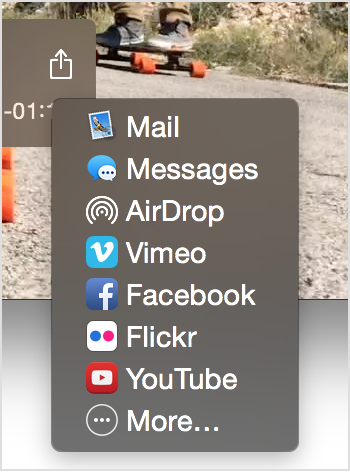
Share
After recording your movie, you can share it by email, Messages, AirDrop, YouTube and other methods:
To learn more
For more information, open QuickTime Player and choose Help > QuickTime Player Help.
Last modified: October 19, 2015
Have a great day!


Maybe you are looking for
-
Trying to set the BIOS to boot from CD with Acronis HD clone software
Want to 700-056. 16 GB of Ram. Qurdro graphic K600. I just installed a 240 gb SSD, Kingston. To move the operating system (8.1), I need to boot from a DVD with Acronis program. Under the legacy in BIOS, Acronis is displayed. I move under the legac
-
Proprietesde Set to call ActiveX
Hello I'm trying to programmatically set the limits Proprietesde of steps in my sequence of in an operation on the API ActiveX TestStand VI. I realize that I am reproducing the functionality included in the property Loader procedure, this is intentio
-
Hello I am currently a program to get data from a weather station and display it in a cluster. So far, the program gets the hexadecimal data, converts to a decimal table and bed table. The problem is that to read the table I need to find the rough da
-
Invoke a problems of default browser with the code 4.5 session
Hello, I uses this simple code to create an icon on the desktop, and then point to an internal URL by invoking the browser of BES. http://www.BlackBerry.com/knowledgecenterpublic/livelink.exe/fetch/2000/348583/796557/800332/800440/... This worked gre
-
Log Insight 3.0 + SNMP vRealize
HelloSorry for my trivial question, but it is possible to receive/collect SNMP interruptions in Insight journal vRealize? For example I want to collect all my logs/pitfalls of my blade servers (ILO and pregnant) in vRLI.