Export the image as a picture quality (72 dpi only?)
Hello
I did experiment with the recording of images of films, but it seems that they cannot be exported to 72 dpi, which makes it identical with a piece of screen basically. So the question is to know if we can save the high quality images for printing. I imported a movie in APP was extracted from a DVD, and recorded in mp4 format.
Thank you!
Gustavo
Santa Fe, NM
Gustavo,
Let's go to this subject in a different way. You use words and we use words and I don't think they mean the same thing for you as they do for us. This is the number of pixels available and I have a feeling that you are looking to create more pixels for what you would call a higher resolution. Stick with me for a while and I think I can clarify this.
You have a video from a DVD. You brought it in Premiere Pro. Let's assume for the moment that this is a standard definition DVD, so you either imported in 720 X 480 or you imported in 640 X 480. You did not, so these numbers may be wrong. But we will use 640 X 480 for example because it uses square pixels and therefore easier to do the math.
Export the 640 X 480 image by clicking on the button to export the image (small camera), then open this file in Photoshop. Under Image / Image size, you'll see a window that looks like this:

Someone to video, the important part of the image window is the pixel Dimensions. We don't care anything else. The resolution of 72 pixels per inch is incidental to us.
However, if I wanted to print the image, things get interesting. As you can see in the window, if I print at 72 pixels per inch, I get an image located at more than 8 X 6 inches. The problem is that nobody prints at 72 dpi. We print at 300 dpi or more.
So what happens. Instead of a nice printed in large print, we get something much smaller as shown below.

Basically, we get a big stamp.
What you may be asking, however, is how to get an image of 640 X 480 pixels, expanded to a size that would print this image, using 300 ppi, to size 8 X 6. The word for that is not exactly resolution. Not for us. The word that is upscale. Make it bigger. More pixels. Pull pixels out of the thin air and assign them to the scene in the picture.
The answer to your question is probably quite simple. No, you can't get better resolution, unless you it upscale in Premiere Pro, and it is not the right program for the task.
It upscale in Photoshop. Or buy an app party designed for high-end frame grab something you can print to a decent size.
Tags: Premiere
Similar Questions
-
I'm retouching of images taken on my iPhone 6 more with Photoshop CS6. I'm doing my color correction and add effects and all that. Before you export the image I review and be sure to what I has no more sharpness and the lines are smooth and it looks good overall. I export it to JPEG, max quality with the establishment of reference standards. I then open the image and it seems fine, as it did in photoshop. My problems begin to occur when I try to download on Twitter as my profile picture. I tried downloading from my office directly on the site via google chrome. When I download the image then begins to have jagged edges and overlooks the tablets. So I thought it was some performance settings, then I tweaked them and restarted a couple of times and still the same result. He would go on my desk but when uploaded to twitter as my profile picture is horrible. So I tried emailing the image of myself and the download through my phone. I opened the image on my iphone and it seemed fine as he did on my desktop but when I downloaded the image it makes then look blurry. I had this problem when downloading photos Twitter via my iphone, so it doesn't surprise me. I have read different forums saying: you must download it from the office, so I thought it would work like this. This could be a problem of twitter than compresses uploaded photos? Other people can do very much the same way, but it does not work for me. Please someone help me before I put my computer in an oven microwave.
This could be a problem of twitter than compresses uploaded photos?
Yes. The rest, we can answer. You wrote a lot, but very little discussion. Instead of accurate information you lose yourself in the vague descriptions. Screw color management to the wrong dimensions that trigger resizing server-side it could be any number of things here.
Mylenium
-
. Files NEF (Nikon D600) in Camera Raw (Adobe CC) appear extremely saturated to the point of loss of data. When exporting, the images are very good. There is no update available.
As it appears in Camera Raw

Exported

In Bridge, open camera raw preferences and uncheck the option of graphics processor at the bottom of the dialog box.
-
How can I change the properties of the image to a picture fill?
I have several images that are inserted in a gallery using the "fill" method However, when I click on the image to select this option to change the properties of the image, I can not select the image. I get the solid red border around the box, but when I double click in the hope of seeing the red dotted lines or tan border border indicating that I have selected the image, nothing happens. When I right click on the solid red border, it only allows me to change the properties of the image because I did not really choose the image, only the holder of the box.
Any help on how to change the properties of the image to a picture fill?
Thank you!
Anita
It is not possible to apply settings to an image set as a background fill, the image is applied using CSS.
David
-
When I import my photos into lightroom, the images are completely black, so I can only see the image in the browser. How can I solve this?
Go to Lightroom preferences
Click the performance tab
Deselect the graphics processor
Restart Lightroom
Kind regards
~ Mohit
-
I have an InDesign document that has anchored two JPG images. An image that has kept the link to the original file, the second image is more linked to the original file and does not exist. Let's say a picture of a tree and the second image that is no longer the link is to a car just for help in this discussion.
When I generate a PDF and run the "Export all Images" function from Acrobat, it exports two JPG images.
How is Acrobat able to export the second image (car) if the original source file no longer exists?
And the other image (tree), which is still included in the InDesign file. It seems that Acrobat exports this dimension and image size defined in the InDesign file. That is totally different from the original JPG file if you open both images in Photoshop.
Just trying to get a better understanding on what Acrobat exported when you use the function "export all Images.
When you generate the PDF file, all image data is stored in the PDF file and in no case is based on an external file. When you export an image from the PDF file, it takes the image data and generates a new file that will be necessarily different from that of the original source file, for a number of possible reasons (different physical size [as in your case], different compression method, subsampling, etc..)
-
When the LR4 CS5 exporting, the Image is modified
When I export my images of LR4 CS5 with the choice of Edit in... , I first of all the .. .can require the... Camera Raw plugin version 7.0... We all know does not exist. Not that it isn't annoying enough (I know - I can't turn off the warning) but the image then PS5 present to the is not the same quality as that I export the LR4. It's almost as if the Lightroom adjustments do not succeed. I tried all three color space options nothing doesn't. Also, I am not be presented with the dialog box asking if I want to edit a copy with Lightroom adjustments. Here are the RAW of Nikon (.nef) files that I work with. Other images that are not RAW files display the dialog box change the Photo with Adobe Photoshop CS5.1 . What I'm missing here?
There are other threads addressing this issue, but install ACR, which is available in final version 6.7 candidate on labs.adobe.com and you can be the same results by both applications.
-
Cannot COPY and PASTE the image into the image folder in PICTURE IT. How to do this?
Have Windows & Home Premium. I can't COPY a picture in my photo folder and paste it in "Picture It" in order to adjust the image to my likeing. How can I do this? I would like to use the copy / paste functionality.
Gene
If you can't find the file in Picture it, drag the file in Picture it.
-
Impossible to export the image in AdobeRGB (1998) and 8-bit.
Hi all
Im trying to export an image from Lightroom with the following file:
-TIFF
-AdobeRGB (1998)
-8 pieces/components
When the image file is exported is rather has sRGB and 24 bits in the settings.
I'm not quite sure where it won't.
I hope that someone of you can help me on this one.
/ Chris


There is a minor bug in LR, on Windows and Mac, you can safely ignore. LR affects an incorrect value for the EXIF:ColorSpace field, and that's what shows Windows File Explorer. But LR includes ICC profile correct, i.e. what color management applications pay attention to. If you open the TIFF exported in Photoshop or some other color management application, you'll see that he thinks that the TIFF format is Adobe RGB (1998).
Note that the Mac Finder or Windows Explorer may be invoked view photo metadata. In this case, Windows File Explorer does not show you the ICC_Profile field and the Mac Finder does not show EXIF:ColorSpace.
Please, vote and comment to this bug report in the Adobe official feedback forum:
Lightroom: Incorrect value for EXIF:ColorSpace in TIFF export
-
Export the image sequence using only certain frames
Hello
I use CS5 (Windows) and I would like to export a video as a sequence of images, BUT I want to set the interval of frame (e.g. export ONLY every 5th image and skip the rest). I guess it's possible to manually delete the images that I need after having exported them however, I have thousands of images and this would help a lot if I could automate it.
Is it possible to do it in Photoshop or shall I seek another software?
Thank you very much.
Nope, PS does not offer this. You can use After Effects or Premiere Pro, and use of time-stretch / time-remapping to 'jump' frames.
Mylenium
-
export the image with an alpha channel in cs3
on the video layer 1 I have a background image and video 2 I have a psd numbered video of maya (is the text animation) with an alpha channel (black is the alpha).
If I export the end frame (even with 1 off video (background)... I don't get a bmp or tiff with alpha channel image. I get the black background.
is it possible to export end frame and keep the alpha channel?
Thank you!
Search millions of colors +, this will give you channel alfa.
-
Export the images embedded without resizing.
An old Enigma illustrator I thought I'd see if anyone has solutions to. It is perhaps something changed in CS5.
When you have an image embedded in an EPS file (for example) and you want to get this image in photoshop and illustrator, but you want that there is no resampling, what are you doing?
That is a pixel is equal to one pixel, not more not less.
The only reliable method I have found is to try to put the image so that the information of 'links' indicates that the scale is 100% x 100% and then export at 72 dpi, with something lossless (or copy and paste to the PS).
The downside is that the mathematics involved are devilishly difficult (at least for me, maybe I wasn't paying attention that day at school).
No idea what the multiplier would be to get up to 100 20.935 (4 point something).
I would like to find a better solution. Or equation, I guess. Ideas anyone?

Save to PDF and open it in Photoshop, where a dialog box appears and offers you the possibility to extract the images to their resolution. Give it a try
-
Move the image in a "Picture" screen with a specific contact point
Hi all
I want to insert 8 images in one. So I have to pass all the image coordinates (X, Y) specific.
By default, the image is centered.
My response is:
I can move an image in a screen 'Image' in the range of vision to the specific point of coordinates (X, Y). If so, how.
Thanks for your help.
Thank you, Andreï Dmitriev, it's ok.
Best regards
-
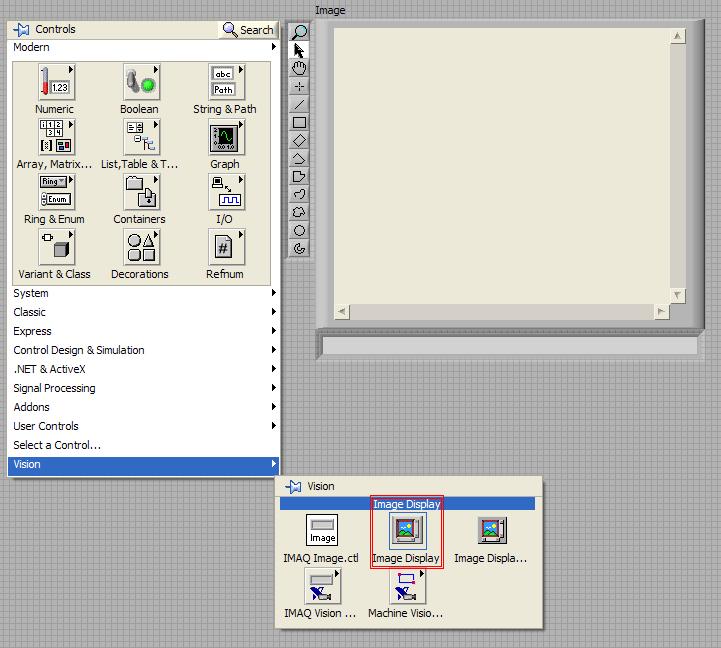
How to export the image of the ring of the photo
Hi all
I have a picture ring, which has several png images.
Now, I want to save these images as separate files. Any way to export them to the ring?
Thank you
Anne
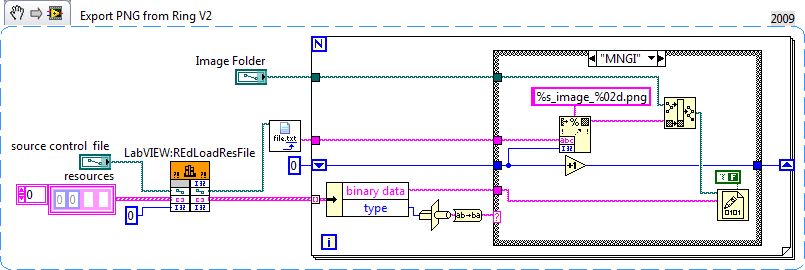
I got rid of it and added a small patch since the result is there are (at least) two different ways that images are stored and I forgot that I usually ditch that VI when anyway because it does not support transparency. VI to 8.5, changes illustrated here:
If you attach your .ctl file I could make sure it works as well.
-
How to export the MTS files without losing quality 1080 p?
I tried to figure this out for weeks with other different publishers, and they always a get reduced in quality or have issues of interlacing. Does anyone have a solution?
Your going about this wrong.
Click on your finished sequence to select.
Go to the file menu > export > Media
When Media Encoder opens, choose the H.264 format and for the preset choose YouTube 1080 p.
Now, look at the summary.
(If you haven't already done so, you will need to complete your You Tube credentials tab publish).
MtD


Maybe you are looking for
-
Windows 7 starts by itself after hibernation when the lid is opened
When I Hibernate my Satellite U500 and close the lid before the hybernation is finished, the laptop turns on automatically when I open again the cover. It's very embarrassing because the lid opens some in my purse and then, after a few hours, I disco
-
WindowsUpdate_0000057E is security update for Microsoft PowerPoint 2007 (KB957789) of the patches for this error. Please, I beg you. YOU
-
Install the 14/02/12 KB2647516 a security update for IE 8 for Windows XP almost brought my computer to complete stop. Took minutes to get any site. Extremely slow... Uninstallled le KB2647516 even and it's back to run again correct. Leave this update
-
How can I get my computer to restart, causing me to keep Logging in every 30 minutes
my computer guard let me connect every time my computer is lit on each 25 min. I tried to put it back at another time then I got the error code buffer overflow that would not allow me to restore so I started ovver all with restoration provided the fa
-
PCI simple communication driver
Pavilion g6 sindows 64 looking for driver PCI\VEN_8086 & DEV_1C3A & SUBSYS_166F103C & REV_04PCI\VEN_8086 & DEV_1C3A & SUBSYS_166F103CPCI\VEN_8086 & DEV_1C3A & CC_078000PCI\VEN_8086 & DEV_1C3A & CC_0780 Thank you