Image editor post images to the size of the thumbnails
Hello
I create an iOS and Android application using the cloud creative image editor.
Everything is done, the application was deployed to production mode.
But there is a problem with the image size and resolution.
All the images I post using the image editor are automatically resized to thumbnails with a decrease of the resolution.
I tried everything, also the projects in the sample attached but no solution could be found.
Will you please help me solve this problem, so I can publish the application soon.
Thank you
Aditya!
The forum of cloud is not on the use of individual programs
The forum of cloud is on the cloud as a delivery & installation process
If you start the https://forums.adobe.com/welcome Forums Index
You will be able to select a forum for the specific Adobe products you use
Click on the symbol "arrow down" on the right (where it is said to see all our products and Services) to open the drop-down list and scroll
Tags: Adobe
Similar Questions
-
Had some problems with the montage of images in the thumbnails slideshow widget
Hello
If someone can maybe give me some advice to fit correctly some photos in the slideshow of thumbnail widget.
Here is the Web page: PORTRAIT of CAROLINE
You will see that some of the images are in place and others do not. I want to keep all the in a square form, but the editing got some problems. I tried to resize the pictures with photoshop without success.
So any tips?
Try to change the orientation of the images and save the same format and then use in miniature.
Thank you
Sanjit
-
Lightroom 2.4 - won't display images in the thumbnail preview and main table
I've included a picture so that you get what I mean?
I am currently using lightroom 2.4 which I updated to 2.2 (2.2 actually had this problem so I decided to bite the bullet and upgrade, but it did not help my problem). I tried to create a new catalog, import a new picture, syncronising files, optimizing the catalog and reinstall lightroom 2.4. I also restore my computer to a couple of days. I know that it worked a few days so im not exactly sure what is happening here.
I opened another program to see if I can view pictures, and yes I can photo editing.
I know that in lightroom when I go to print or web or a slide show, it will show the image, but I do not understand what I can do to solve this problem. I tried searching on google and its making me into the wall.
I hope someone knows what is happening here!Concerning
B
You don't say what operating system you are using, but if Windows it might be interesting to try an another ICC profile for your monitor. The usual choice instead of a specific monitor profile is sRGB.
Edit: this technical note described in more detail: http://kb2.adobe.com/cps/402/kb402376.html
-
How can I change the thumbnail of the mask layer for a thumbnail of the image itself?
Hello
I'm in Photoshop CS5 in Windows, and I've been using Photoshop for a while now. I'm not sure what I've done, but for these days, in my palette of layers, thumbnails that appear are different.
I have attached a small screenshot of my photoshop below. Here in 1 layer, the thumbnail at left (brush) used is that of the opening of the image and the thumbnail in the right used to be an indication of grayscale pixels that have been selected. No idea how to return back?

Hi slaveofphoton,
Go to Options from the layers panel, and choose one thumbnail size other than none.

-
When I open Photoshop CS6, I can't see the image. The thumbnail is visible on the right side and the work area shows file information, but not picture. I've updated PS, my driver. The same goes for the jpg or RAW.
Make sure that your drivers are up-to-date. Try to disable the GPU acceleration in preferences then restart Photoshop.
Benjamin
-
Open the image with the bridge photohsop
I forgot to put in place.
Open the image of the thumbnail (bridge) with Photoshop.
I have set up at work and could not remember now.
Thanks for reading
In Bridge, use Ctrl K to bring up the preferences.
If you want to change the raw files in PS, under "Général", uncheck "Double Click Modify Camera Raw Settings"
For the other files:
"File Type associations," set a Photoshop CS4 for files to open in PS.
-
Cannot get the thumbnail button to appear all THE
Construction of a DVD for the first time in a long time, have only still used a handful of times in the past so I'm not as familiar with it as I would like to be; I'm a long-time user of DVD Studio Pro...
I can't get thumbnails appear in my buttons, and I feel I have tried everything. I use a menu in Photoshop, I did and every button is configured properly in files according to the tutorials I've seen; each button corresponds to a climax (which works) and the thumbnail layer is labeled as "thumbnail of video (%). ». I load the menu and drop my deadlines on the button, they connect properly and the climax works as expected. The sticker changes color to black - but no picture, mobile or not. I put a new image poster on the timeline track, still nothing but black. I tried to drop a jpeg on the button, but it ends up just fill the screen (maybe I do that wrong, but thought I would try it).
Even stranger, when I use one of the templates again and try this miniature video button it does not work either. So I don't think it's my custom menu that is the question - NO menu I try don't suspend the thumbnails.
I know end-of-life, but I don't know if it works fine on my system. Is it possible that it works more correctly? I'm on OS X Yosemite 10.10.5 and running CC15 apps otherwise.
TIA,
JVKIt works for me. I'm on PC, but I don't think it's a problem here.
I get what you're describing, if the first frame of the timeline is black.
If you bind a calendar by dragging the button, the link will be to its chapter 1 even if there are other chapters. Chapter 1 is zero time code - a chapter that first/still sets if you added or not. If you fade to black, you will see a black image in the thumbnail. Make sure you select this chapter 1 when you set the poster frame.
-
DeskJet 2130: The size of the image on the paper...
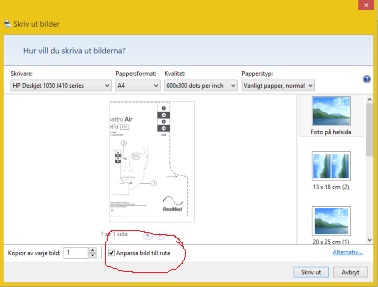
When you try to print an image of my Deskjet 2130 I get the following window. On the stands of low (marked): adjust the image in the frame. What this really means? What image is lying?
My problem is: I want to print an image exactly in the size I chose in my program of paint.net. And not on the overall size of the document. How to handle that?
Peter /Hans
Paint.net is perhaps in the control of its installation. If this is the case, you need to make changes of the program from the Paint.net software behavior.
If the operating system can set the defaults outside the program itself, so maybe it's that you can adjust the default settings for which is called print program.
Control Panel > display icon > Default Programs > set your default programs >
Scroll down, find and click on Paint.net > choose defaults for this program >
view the default values and select
Publishes:
I just downloaded the program paint.net, installed and opened a test image.
The program wants to use Windows Photo Viewer, when you click on print from print.net software. Too bad. From now on, I have not found a way to change this unfortunate behavior.
My suggestions you can set the image as you wish, save this image and open the image in MS Paint to set print settings and submit for printing.
Reference:
Paint.NET - User Documentation
When you see a job that can help,
inspires, gives a cool idea
or you learn something new.
Click the 'Thumbs Up' on this post.
Fixed / responded? Click this post accept as Solution to help others find answers.
-
Remember - this is a public forum so never post private information such as numbers of mail or telephone!
Ideas: can the size of the icons on the screen of welcome is greater? The image of the Welcome screen can be changed?
- You have problems with programs
- Error messages
- Recent changes to your computer
- What you have already tried to solve the problem
No solution to change the size of icons but there is another option to change the login screen, of Tweaks.com.
-
Cannot create images using the Digital Image Standard 2006 Editor
original title: Digital Image Standard 2006 Editor
I have the Digital Image Standard 2006 Editor on my Windows 7 computer and for some reason, the only thing I can't do with it is to create frames and mats. Nothing happens when I click on this option. Everything else works so I am confused. Any suggestions?
Hi Kittea,
Thanks for posting in the Microsoft Communities. The problem description, I understand that you are not able to access some options in editor of Digital Image Standard 2006 application. Before you start the troubleshooting steps, provide the following information:
· Did you do changes on the computer before the show?
· You get the error message? If Yes, what is the full error message?
Follow these methods.
Method 1: Uninstalland reinstall the program.
Method 2: place the computer in a clean boot State to see if there is a software conflict as the clean boot helps eliminate software conflicts.
Note: After completing the steps in the clean boot troubleshooting, follow step 7 the link to start the computer to a Normal startupmode.
I hope this helps. Let us know if you need more assistance.
Thank you.
-
Size of the image in the Module Development vs. explore
I'm taking a 17 MB in LR CC DNG file and export to PS CC or NIK software for editing. I set the preferences of external changes as follows:
Export as TIF, 1998 ADOBE RGB, 600 pixels. When I go on save the file to the NIK Software or PS CC the file size is reduced in a 5 MB file that is unacceptable for printing (for example the grain of the image is an exaggeration). The grain was correct in 17 file DNG LR megabyte but the 5 megabytes of unusable files.Someone asked if the same thing that happens if I go to PS CC and save it as a PSD file:
So I worked the image initially as a DNG file and exported for PS CC and made some minor changes as suggested, and that's what I found:
Get go and open a particular photo in LR and the press 'I' for more information, it shows a megapixel of only 2.8 million pixels (psd). When I go to display the same image by selecting "(afficher dans l'Explorateur-j'utilise un PC) and right click for the properties the megapixel appear as 36 megapixel (psd)." A person in a forum said that LR can be emphasized the wrong file but I do not understand why this would be the case because there is only a single file. Could LR doesn't point to a 'preview' of the vice photo version the original somehow? Why LR show me in the library module or develop a reduction of the size, and then when I go and look at LR said the photo where in Explorer it shows me a much larger file size?
This is driving me crazy.
Thanks in advance.
I guess that my case that from 16 bit to 8 bit TIFF JPEG was much more to cut the size of the file in two (i.e. 17 megs TIFF in 2.8 MB JPEG).
I realize that you did not create a jpg file (at least this isn't what you've posted screenshots of) but a PSD. And this isn't 2.8 MB, but 2.8 megapixel (MP). Megapixels is the number of pixels in an image (see post #1) - MB is the size of the file.
Once again, I invite you to read which is a digital image?
It is absolutely necessary to understand the difference between the two when it comes to digital images.
I do not have the original file to DNG. It is an image that I took years ago. Regarding the 'sharpness on the export", I got the default value set for this parameter.
According to your original message, your source file in Lightroom. is a DNG.
If this is not the case, what kind of file you start with?
To be able to see the problem of grain, you have screenshots of the original (any file that is) post at 1:1, including the details pane and the exported file (which became more grainy), also at 1:1.
So far, you have posted only a screenshot which really is 1:1, and it is unclear whether it is the original, or the exported image reimported into Lightroom.
Regarding output sharpening, I don't know which is the default setting. If you choose export to LR even once, it should still be on the setting you used last. You export, or have you used edit in Photoshop? If you used Edit in PS, no sharpness is added, with the exception of any sharpening you applied to develop.
I'll send the images to print for the first time, and that's how I discovered the spectacular evolution of the size of the files.
What you should be concerned about is the pixel dimensions and allow without print size enlargement.
This image will print at 6,387 x 4.79 inches at 300 dpi. (divide the pixel with 300 dimensions for dimensions in inches)
If this is the case, since some printing companies that I send my images via the internet only take JPEGs must I send my images for businesses that also accept TIFF files to maximize the spectrum of color/quality of my images and also to reduce the amount of grain in my images (i.e. the TIFF converted to 8-bit)?
Most of the images printed fine of a maximum quality jpg, but there are cases where a TIFF file will print better. If you want to be on the safe side, use TIFF. Send files from 8-bit to the printer, but always edit 16 - bit and convert 8 - bit as the last step. Do this on a double, then you will always have the 16-bit file if you want to edit it further.
(1) on the other questions regarding sending the images to printers, can I use the Pro Photo setting... the menu pop up in LR CC suggests that to do this in the menu Preferences.
Most of the printers want files in the sRGB color space, some could use Adobe RGB. Find out what they want.
You can edit in ProPhoto, but the file you send to the printer should be sRGB or Adobe RGB.
(2) my workflow has me usually start LR CC. When you work between LR CC and CC Photoshop must I send files back to PS CC as TIFF files to keep as much as possible of the resolution?
Yes, use 16 bit TIFF.
-
When I resize a photo to the web LR displays a very small image, not the actual size.
When I resize a photo to the web LR displays a very small image, not the actual size that appears when I download on a website! ???
Yes, it should work. It should show you exactly what the image will look like on normal, non-retine displays. At least if you have the resolution of your screen (in preferences-> display system) the value 'best for display '. In this case your computer exactly double the resolution.
The link I posted above is for when you want to go further. In fact, he shows how to send images of different sizes to people looking at your site on the retina against those who seek to your site on normal screens. This will allow a still sharper image that people can get on a display to display. What it basically does is make their web browser asks a 1600 pixel image if only they are viewing on a screen high resolution while asking a low-resolution image 800 pixels for people using normal poster. This example uses all available pixels to choose the type of display. It takes just a bit of HTML and javascript coding. My main site done automatically like smugmug has this built already, but my blog site does not automatically so I had to code around it. This makes your images look amazing on the screens with high resolution such as on the screens of the retina and iPads.
-
Hi, I was working on my wordpress blog that uses the theme "Intrepidity". I wanted to remove a header image I added to the header but could not find a way to remove, so I click right for an option. the option I took was "do you want firefox to block the image? I clicked Yes, and this is the last time I saw a picture on the blog. Firefox has deleted all the images in the blog, even the side bars are gone, the header is not more, every single photo on the post, pages disappeared. The blog is just a shell now. Is there a way I could have restored the blog images. This is the name of the blog:
http://www.weightlosscontrolreviews.com/With the display site, click the site identity button (for more details about what it is to see the How do I know if my connection to a Web site is secure? article), and then click more information. This will open the page info dialog box.
First, select the permissions tab, make sure that 'Load the Images' is set to allow (default selection should work as well)
Then select the media tab, and then click the first item in the list. Use the down arrow key to scroll the list. If any element has the option 'Images of block of (field name)' selected, deselect the option.
This should hopefully solve your problem, but see also the problems that cause to not show images.
Some add-ons can also block images, for example, if you have AdBlock Plus installed, make sure that you have not accidentally created a filter to block images.
-
The file size of Photos library don't to shrink when I remove the images from the library
Subject line pretty much sums up it. Let's say I have create a library of Photos and import of 100 photos. The file "Library.photoslibrary Photos" grows to a certain size, as expected. But if I remove some of these pictures does not take the size of the file photoslibrary. If I import images more library file grows again, but it never reduces when I delete the images from the library. This happens with both a library of referenced files and images copied to the library.
What happens here?
You must either wait 30 days or go to the recently deleted album and remove not for the final to do deletion
and note that Photos doesn't manage referenced good libraries, it was reported here that they can use more space than a managed library and they are not recommended
LN
-
Size of the image in the quiz?
I have pictures of 1028 x 768 and drop them as part of image in the quiz questions. A part of the image presented in the cross-slot and generally that it's Ok. But sometimes the image cannot be used as the required detail is not displayed. Is the size of the image better and has everyone optimized this feature?
Hi kenfromUK,
The resources below explains an option for your photos. The mask tool will allow you to choose which part of the image you want to see the image.
iBooks author: Add and edit photos and other images
Mask (crop) photo
You can crop photos without changing the original image by masking the edges to hide the unwanted parts.
Select the picture you want to hide.
Do one of the following:
Hide the picture with a rectangle shape: click the button mask
 in the bar of the formats. If the format bar is not visible, choose View > show the Format bar.
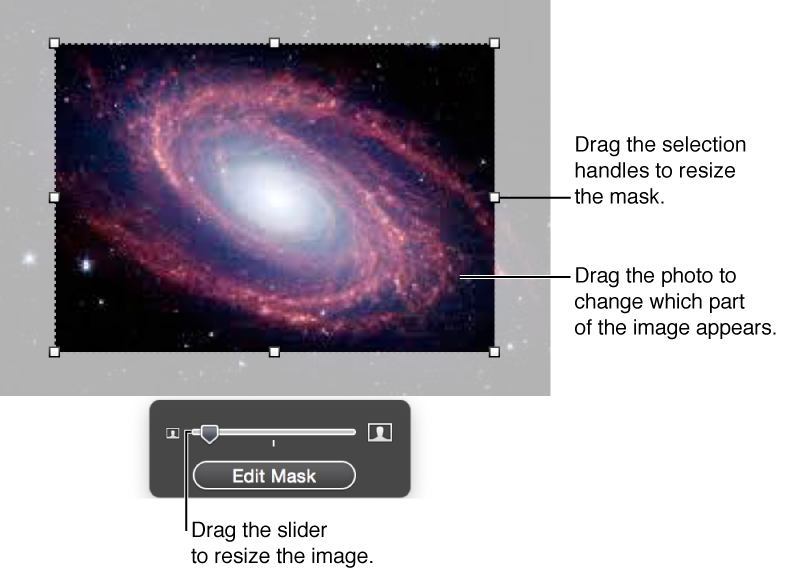
Hide the picture with a form: choose Format > Image > mask with shape > shape.
Do one of the following:
Resize the photo: drag the cursor over the button Edit mask.
Reposition the photo in the frame: drag the photo.
Move the mask: drag the edge of the mask dotted.
Resize the mask: drag the selection handles on the edge of the mask dotted. To constrain the proportions of the mask, hold down the SHIFT key when you drag.
Rotate the mask: hold down the command key when you drag a selection of angle on the master handle.
When you are satisfied with the position and the size of your picture and the mask, do one of the following ways to complete:
Double-click the mask or the photo.
Press return.
Click outside the photo.
Click the input mask.
To remove the mask of the photo, choose Format > Image > unmask.
Hope that helps...
-
How to adapt to the size to display the entire image in the display of the image?
HI, I use a range of control to display my video images using image display. However, the size is always out of proportion. How can I view the entire image in the size of the screen of box. Essentially, in order to adjust the size for the images?
You have this option in the indicator of the Image itself. Right-click on the indicator, you will get an option something like "Image Fit with indicator" (sorry I forgot the actual name)


Maybe you are looking for
-
Satellite A500-1GL - fails self-test on start up
My A500-1GL fails self-test on startup upward and freezes with screen Toshiba is innovation leader displayed. Try F2 for Setup and F12 for the boot menu in which two cases, in what it says entering start menu or enter the setup and remains like that.
-
Solution to lack of Apple TV remote
you pair you apple Bluetooth keyboard enter the pairing code, then you can connect WiFi on your apple tv 3 then you can configure the application remote Apple after setting up your Apple TV with your Bluetooth keyboard it just use the arrow keys and
-
This happens in Outlook Express 6.
-
My laptop hard drive is almost full, any suggestions on the best way to go.
I have a compaq laptop with 140 MB of memory. The hard disk is almost full. I want to buy an external memory but don't know much about them, or if it's the best way to go. Any suggestion would be appreciated.
-
Message-"plug-and-play service terminated unexpectedly and needs to close."
HP laptop, vista, 3 GB of memory, a lot of free space on the disk. Reading random and unannounced and Possible associated with gaming service failures, Service pack 2 installation fails on the first blue screen "do not shut off...» "98%, seems event