resize guidelines 2 at a time
Is it possible to resize the 2 lines of direction at the same time? For example, if you select two anchor points with the direct Selection tool, can then resize you their guidelines both - or you can resize the two steering lines on a single anchor at a time?
You can stagger the guidelines handles without transforming the anchors. But you can't really tilt, rotate or reflect them in the usual sense. Their current angles are limited, no matter what a transformation, you try to perform or what tool of transformation, you drag. So really make sense to use transformations other than scale, unless that anchors (handles not only) are also selected.
- You can perform transformations of scaling on the direction handles numerically by invoking one of the transformation dialog boxes or interactively by dragging one of the transform tools. In both cases, the location of anchor of transformation is respected, and angles of the handles are limited.
- You can also adapt guidelines handles using the arrow keys to move the. Again, this isn't 'move' them in XY directions as you would expect, because their angles are limited. It scales. In doing so, you can get these anchorPoints so-called "illegal", in which their type is smooth, the two handles move when you drag or the other, but the two handles are on the same side of the anchor.
- "DirectSelecting a segment" selects the handles of two direction affecting the segment.
- If a segment contains at least one of its associated extended handles, you can use the white to hang out in the middle of the segment pointer. Doing so scales the lengths of the two handles attached by their respective anchors. (With unpredictable reservations to the so-called retracted cornerPoints.)
- The Select > object > DirectionHandles command will select all the handles of direction of the path, without selecting anchor points. (Wish there was a Select corresponding > object > anchors; so that you could change the type of, or divided or align all both anchor points.) This could be used to circumvent the ignorance of the difference between having anchorPoints Illustrator all the selected and have all of the selected path.) You can then ShiftClick to uncheck unwanted "segments" (pairs of handles).
- When only the handles are ostensibly selected, turn each anchors of transformations, even if the interface shows as not selected. (One of the many situations in the view for selecting of the Illustrator who is.)
JET
Tags: Illustrator
Similar Questions
-
Batch-resizing problem still frames of time in the project overview
Hello dear all,
I had just now ask regular users of the Organization, a question to which I can not solve.
Well, that's the first thing: I use Adobe CS5.5 body of my place of work. OS / Win7
I intend to use the Organization to create a montage of time. I have all my shots right now and take advantage of adobe products to use the Pan & Scan of accompaniment with sequelae. What I can't do usually with QTpro...
I imported my frames in my body, committed to 1frame calendar and works wonderfully.
BUT, here it comes... in the right corner, you have that preview "program: sequence01 ' and my (PORTRAIT) photos must be resized: they do not enter the preview of the image.
I already resized my photos in Photoshop as a batch process, but as Id like to create a Pan & Zoom effect in AfterEffect, so I need to keep a decent resolution larger than the 720 p from my movie.
Now I can resize each frame separately with ease in the preview of the body so that the width and the object of my photos is just the frame, but is it impossible 'batch' resize by certain types of multiple choice in my calendar and then jump in the preview and manually resize them all at the same time?
As said, same resizing in Photoshop is not a solution because my photos are in portrait mode, while the setting of the video is in 16:9 right?
Please find an explicit illustration below, I try to explain this problem as clear as possible, hoping that I was understandable.
I advance thank you very much, I expect your knowledge to teach me

If you want to resize all the clips in your sequence based on a clip in your illustration, just copy the clip you resized, select all the clips in your sequence and choose Edition > paste attributes.
-
Why my taskbar sucks 16 pixels each time when I restart my computer?
Hello world!
My OS is WinXP sp3, I drag my task bar to the right side of my screen, in order to show the date, I resize the toolbar 3 times of the original height (in fact, it is the width, after I drag the taskbar on the right side) and block it. Then comes the strange, I restart the computer, the taskbar remain to the right of the screen but its shrinks the size, only 2 times the width of origin on the left, the date is not visible... I try to resize the taskbar to 4 times the original width, restart the computer it shrinks to 3 times... then I restart again, it reduces to 2 times... and then I restart again, he stayed 2 times the width of origin. How can I keep the taskbar (3 times of the original width) size?
Another strange phenomenon is that I can't resize my taskbar permanently - I drag the border to change the size of the taskbar, but the change in size by time of 16 pixels, for example, the size (width) can only be16 pixel, 32 pixels, 48 pixels, 64 pixels or 16 * N pixels... Are there solutions to solve this problem?
All experiences are made while the taskbar is on the right side of the screen.
I'm waiting for your help, thank you!
Gavin
Hi Kim,
Thank you very much for your help!
The solution that you referred no longer works...
I did a lot of experiments to solve problems, and I understood the reason why I can't changed the size of the permanence of the task bar after I drag it to the right of the screen and the toolbar shrinks itself. All the problems are caused by the language bar, a toolbar that indicates which method of type entry or keyboard that I use, close the status bar (I often have to switch input methods)... If I do not dock the language bar in the task bar (or disable the language bar), then I can change the taskbar size permanently, and the toolbar is no more afraid!
The problems have been resolved by the sacrifice of convenience to indicate the methods of entry.
Thank you once again! And I hope that what I found can help people who get the same problems.
Gavin
PS. Yet, I don't know why the language bar can cause problems... It is perhaps the question now...
-
Is there a way to resize the icons on the desktop only one or two (more precisely, the icons 'Computer' and 'Recycle Bin')? Everything I've tried so far seems to resize all at the same time. I wanted to make these two icons large, leaving the rest of the shortcuts to stay small.
On Friday, April 23, 2010 16:40:11 + 0000, Sethar wrote:
> Is it possible to resize the icons on the desktop only one or two (more precisely, the icons 'Computer' and 'Recycle Bin')? Everything I've tried so far seems to resize all at the same time. I wanted to make these two icons large, leaving the rest of the shortcuts to stay small.
Sorry, no. It's all or nothing.
Ken Blake, Microsoft MVP (Windows desktop experience) since 2003
Ken Blake -
Why the selector tool cannot resize in adobe cc? is this a bug?
I note that selector can resize any shape at the beginning but once I have disable the object it resizes the object. Before he can resize any object at any time, but now the selector tool does not identically before. I'm so strength scale tool allows you to resize any object.
I know shaper tools is good new feature, but I think adobe should all maintaining what is in front.
By chance hide framework encompassing? The toggle to show/hide the rectangle enclosing is Cmd (Ctrl) - SHIFT - B.
-
How can I make my full screen of mobile on Kindle Fire HD 7 apps every time it works?
I tried Capabilities.screenResolutionX and stage.fullScreenWidth, but after sleeping, the Kindle Fire will not launch my full screen app. He abandons the right slide menu black space and the edges of my game show app instead of being off the screen as designed (not obvious with this specific application).
I am including a screenshot of the problem. The problem seems to occur after the Kindle went to sleep and the unlock screen is displayed.

After bricking my Kindle Fire HD 7, I made this change to the code. Not to publish, and leave with the previous solution.
QUESTION:
Kindle Fire HD devices will report stage.deviceOrientation == 'unknown '.
While there are no deviceOrientation, stage.fullscreenWidth does not report the correct values. On my Kindle Fire HD 7 results 1202 instead of 1280. This affects the appearance of full-screen applications as a black empty space remains on the right side of the application for the sidebar of Kindle.
RESOLUTION:
Do not read stage.fullscreenWidth until stage.deviceOrientation is defined, or the bar of Kindle has hidden.
import flash.events.Event;
import flash.utils.Timer;
import flash.utils.TimerEvents;
private var screenWidth:int;
private var screenHeight:int;
private var idleUser:Timer;
public void ClassName()
{
this.addEventListener (Event.RESIZE, setStage);
}
private void setStage(e:Event):void
{
this.removeEventListener (Event.RESIZE, setStage);
userIdle = new timer (500, 8);
userIdle.addEventListener (TimerEvent.TIMER, setFullscreen);
userIdle addEventListener (TimerEvent.TIMER_COMPLETE, lastCall);
}
private void setFullscreen(e:TimerEvent):void
{
If (stage.deviceOrientation == "unknown") return;
userIdle.stop ();
lastCall (null);
}
private void lastCall(e:TimerEvent):void
{
screenWidth = stage.fullscreenWidth;
screenHeight = stage.fullscreenHeight;
startGame();
}
private function startGame (): void
{
userIdle.removeEventListener (TimerEvent.TIMER, setFullscreen);
userIdle.removeEventListener (TimerEvent.TIMER_COMPLETE, startGame);
userIdle = null;
Game init code...
}
-
Executes a loop on all groups in a document. If the parent group is a layer, and the layer is free then clipping mask and resize. Resize function fails as "error 21 undefined is not an object" on the THIRD group in this example.
#target illustrator
IDoc var = app.activeDocument;
var IM = idoc.groupItems;
function meetTheParents (PageItem) {}
If (PageItem.parent.typename = "Layer") {}
return 'layer '.
}
}
function isLayerFree (layer) {}
If (layer.locked == false & & layer.visible == true) {}
var gpa = layer.parent;
isLayerFree (gpa);
Returns true
} else {}
return false
}
}
for (j = gi.length - 1; j > = 0; j-) {}
var Group = gi [j];
If (iGroup.hidden == false & & iGroup.locked == false) {}
If (meetTheParents (iGroup) == 'Layer') {}
If (isLayerFree (iGroup.parent)) {}
iGroup.selected = true;
app.executeMenuCommand ("makeMask");
app.executeMenuCommand ("deselectall");
iGroup.resize (50,50,true,true,true,true,50,Transformation=Transformation.CENTER);
Alert (iGroup.TypeName);
}
}
}
}
He fails ONCE the clipping for this mask so the for loop works correctly. It resizes correctly the first TWO times the resizing function is written correctly. If I have the command of resizing in comment and uncomment the alert of the type name of the Group he managed, so the identity of the group in question is not a problem.
?!?!?!?!?!?
And it works?
(function () {}
var groups = activeDocument.groupItems,
Group,
j;
for (j = 0; j< groups.length;="" j++="" )="">
Group = Group [j];
If (iGroup.hidden == false & iGroup.locked == false) {}
If (meetTheParents (Group) == 'Layer') {}
If (isLayerFree (iGroup.parent)) {}
iGroup.selected = true;
app.executeMenuCommand ("makeMask");
app.executeMenuCommand ("deselectall");
iGroup.resize (50, 50, true, true, true, true, 50, Transformation.CENTER);
}
}
}
}
function meetTheParents (PageItem) {}
If (PageItem.parent.typename = "Layer") {}
return 'layer '.
}
}
function isLayerFree (layer) {}
If (layer.locked == false & layer.visible == true) {}
var gpa = layer.parent;
isLayerFree (gpa);
Returns true;
} else {}
Returns false;
}
}
} ())
-
PS CS6 Panel does not remember when I resize
When I open a properties panel / adjustment layer and I develop the Panel by dragging the corner, when I close the program I have to resize the Panel the next time I used CS6
What Panel specifically do you use? If possible, attach a screenshot of your workspace.
From my experience, if I resize my panels then restart Photoshop, they remain the size I resized the to-to my knowledge, this is standard performance. I have just tried to recreate your issue with the addition of an adjustment of an image layer, expand the properties panel and then close Photoshop. The reopening of Photoshop, the Panel I resized fact not reset, so I don't know why yours isn't doing the same thing.

You can try to reset your preferred workspace by going to window > workspace > Reset [workspace name], then by restarting Photoshop. It may seem ridiculous because resetting the workspace is your problem, but it's worth a try.
I will continue to search to try to find an answer for you - but reset preferences usually does the trick for performace wobbly in Photoshop. And again, it could be useful to transfer your question in the forum Discussion of Photoshop.
Good luck!
Kendall
-
When I use Paste the Image to the Clipboard as stamp tool, I can't resize the image.
Add a picture as a stamp of release in our .pdfs. Normally I can resize the image to fit what I need. Sometimes, it works fine and I can resize the image. Other times I can't. I used "Ctrl-V" to paste. I used paste the image to the Clipboard as stamp - and sometimes it works and sometimes it isn't. I have not been able to find a consistency in when it neither does not let me resize. Thank you!
Resolution: Do not cross the Clipboard. This path does not support maintain them quality image files.
You have a beautiful image that you like. Insert it into a Word file empty.
Size and configure as desired by using the tools that Word provides. Record.
Create a PDF file. With the help of Acrobat create a stamp that uses this PDF file. Record.Be well...
-
Resizing layers using pixels instead of percentages in Photoshop
With the help of Photoshop CS5 for PC.
When I select a layer and look at the info panel, I see that the width and height of the layer is shown apparently in percentages by default. More precisely 100% height and 100% width.
I would have preferred that the info panel shows the height and width in Pixels rather than percentages.
After considering the height and width in Pixels I mean, change the height enter the height in pixels.
How can I do?
I don't want to use a "leader" to do this, I just want to be able to enter the pixels (width and height) I want the resized b layer. For example, when you select a rectangle which is currently 100 pixels high and 50 pixels wide, I want to be able to simply change of 50 pixels wide by entering (in a field) 25 to make 25 pixels wide.
In Fireworks, I resize in pixels all the time. But could not find a method similar to Photoshop.
Thank you
Rowby
Info palette: just click on the drop down next to the display and change the units for playback.
Transformation: just specify the units when you enter the number, '25 px' or '25 pixels.
-
Resize the VARCHAR2 column on a large table
Hello
I need to resize a column VARCHAR2 with a large table (several hundred million lines).
The column will be reduced from VARCHAR2 (40) to VARCHAR2 (50).
Please check if someone has idea, will be this column resizing take a lot of time or a lot of resources that the table is highly accessible.
Thank you.
Kind regards
Tarman.This should be an update of the dictionary: so it should very quickly because the existing data will not be changed.
See http://asktom.oracle.com/pls/asktom/f?p=100:11:0:P11_QUESTION_ID:1542606219593 #1956714100346356542.
-
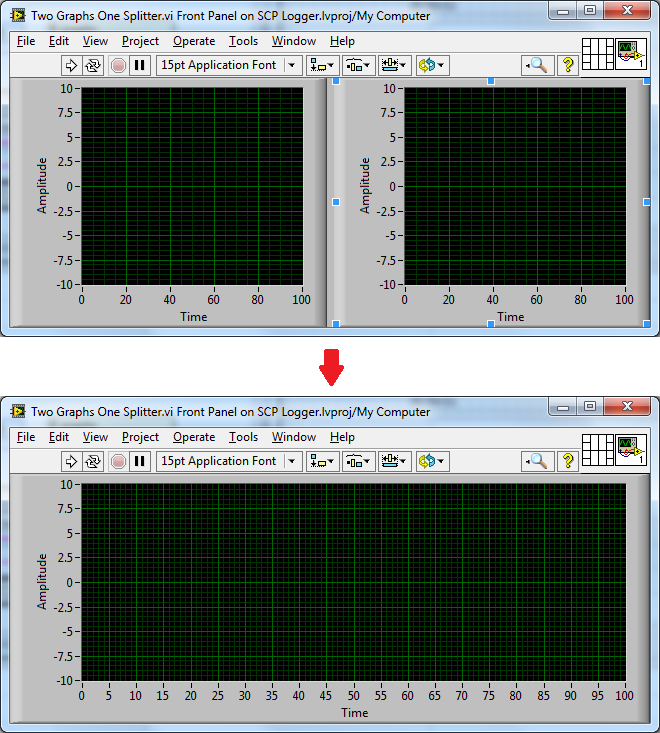
How to complete the Panel two entire component with a graphic?
I am trying to build in the ability to display one or both of these graphs. They are ready to adapt to their respective component. I can't move the separator to the right far enough to not display the right graph. I tried to go through the chart display program, making them invisible, reset the size of the minimum pane, but does not. This is just a small example; I am actually trying to do this with graphs of four to eight, but the same principle of vertical separator applies. Is it possible to fill the entire Board with one of these graphs? Any ideas?
Robert,
By the looks of things we will check that the components are not smaller than the minimum useful size of the controls that are set to scale with component.
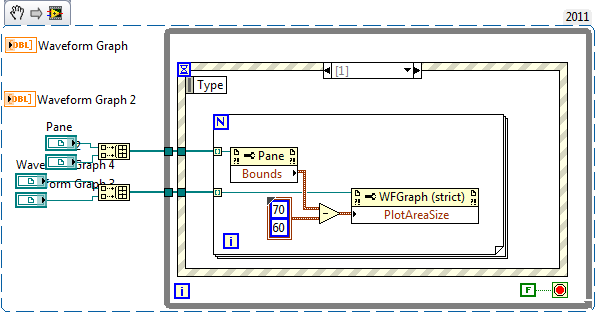
We should examine to determine if this is a bug or not (it wouldn't surprise me if we designed it that way), but in the meantime, there is a solution that can work for you. Disable the option 'Scale with the pane object' and programmatically resize the graphics yourself every time that changes the size of the pane. I have attached a functional demo (LV 2011 format, extract here for those with older versions).
It is of course a workaround and not quite as clean as your solution but expected it should work unless there was another reason why you need auto-scaling with component.
[The structure of the event is the capture of the Resize event of component for both components]
Hope this helps,
Simon
-
Software Security Antivirus from Norton malfunction - any ideas on a Solution?
I had problems with my security software, Norton Antivirus, during 2 months. The members of the forum discussion Norton are reports that my case is isolated and to check with Dell for assistance.
I posted a topic of discussion on the Symantec Web site detailing the specific problem that I am experiencing...
Here's how my Avtivirus Norton (NAV) has been hurt since early November:
Norton (NAV) Avtivirus auto Live Update fails on a regular basis in order to properly install the incremental updates of definition of Virus X 64 (usually less than 1 MB in size), as a result of the awakening of the PC of periods of hibernation / sleep and when you start the PC from a complete stop.
I'm going to run, then Manual Live Update immediately after the updates of definitions of Virus X 64 failed, and manual Live Update downloads / installs a complete definition of Virus X 64 file of 160 MB!
NAV must sometimes update the very large Virus X 64 full definition file, maybe once every month or 2, but not 2 times / day for me sometimes and 20 + times / month for me since November.
Members of the Symantec forum suggested I check with Dell for the latest drivers, which I noticed that Dell has new BIOS (15/10/2013 Release Date), which I have not yet installed.
My Norton Antivirus Version 21.1.0.18 (which is the latest version, comes out in October) should work using the original BIOS, shouldn't it?
Other than this problem for 2 months with my NAV, the Dell Inspiron 17R 2013 5720 bought in January has worked with no other issues to talk about.
What is confusing to me is how/why my NAV worked perfectly, from January to November with the original BIOS, and now it is defective, bad.
So, my question is, will update my PC with the latest BIOS (15/10/2013 Release Date), treat this dysfunction of current Norton Antivirus? Or is there an other driver update that could solve this problem?
Any help is very appreciated.
DD
2013 Dell Inspiron 17R 5720 Windows 7 64-bit SP1
Norton Antivirus Version 21.1.0.18
Hi followed,
It is not uncommon for an anti-virus update several times a day. As long as you meet any other internet connection problems, outside Live updates from Symantec, I can't how your problem can be attributed to drivers of Dell. As ky331 says:
ky331This should have nothing to do with the BIOS. I would not be updated the BIOS unless you are having a problem specifically identified as being fixed by this particular BIOS update.If I were you, I would like to uninstall Live Update, followed by uninstalling Norton and run the removal tool according to the instructions. After the reboot, I would like to install Microsoft Security Essentials. I used it for several years on several computers running Windows 7 Pro 64-bit... If you have not installed Malwarebytes Anti-Malware , it would be good to add. The Pro version along well MSE and the option to automatically resize the image and real time updated. If you prefer the free version, which can be manually updated and run manually.
Good luck. Let us know if you have any additional questions.
-
AI CC, horizontal and vertical guide lines disappear when aligning
Hello
I think I'm exactly as shown. I work with the rules and guidelines. My goal is to start from the upper left corner of the document (white Virgin) and drag the horizontal and vertical guidelines at the same time. Then I press Ctrl + R to hide the ruler guides, use the black arrow to select the guides that intersect (they turn blue), and align the center of vertical positioning. They should then be centered horizontally and vertically, but they disappear completely. I rebooted HAVE him, but that did not help. Kindly help, if I'm having trouble with this... Geez!
Thanks in advance,
Janice
I experienced this with someone a few months ago, and we understand that they are no longer work as expected. After that you align the guides by following the steps you sketched out, zoom all the way (control-) until you can see the full editing table. They are way out of your sight.
As an alternative, until it works again, note the height and width of the artboard and divide by 2. Use the numbers that result to position the guides manually.
-
Cleanup background Studio + tracking
Okay so here's the question, I'm all good enough shoe brands remove paper background, the shot was not locked on a tripod, it was, a pan up + move in shooting at the subject.
I understand that I must use tracking and link it to the brush to cover the marks,
My problem is there are several areas in the background which has brands and each time I used the brush to clean + Clone Stamp tool, under the paint, it created a clone or a layer of brush,.
at the point where I was clean the bottom, I had like 30 among young people, so my question is, is it possible to combine all these in 1 layer, so I can connect to the tracker? or there is a better way to do?
I looked everywhere and got nothing on the cleaning of the multiple tasks.
I use the latest aftermath,
Pls help
Thank you
Philippe

Of after your description of the shot I would probably stabilize (no chain stabilize) the shot so that a time key in the shooting does not move, then export an image that shows the floor area that you want to clean a photoshop file, do your cloning on a layer separate in Photoshop, and then import that layer and place it above the sequence so make any roto you need to do to fix the moving actors or other objects then remove the stabilization and add movement to the layer set with a null value, an expression and parenting.
I know that sounds confusing, so here is a step by step including the expressions you may need to use. If I do not understand your store or if there is a lot of lens distortion will not work. It would really help if we could see the shot. Nonetheless, here goes.
- Open your footage in the footage Panel and set an entry and exit point to the part of the photo that you want to use more handles (a few images to allow the editing)
- Select the footage in the project Panel and choose new comp from selection in the menu, right click or drag the model to the new icon of the model at the bottom of the Panel
- Set the Motion Tracking Workspace
- Select the layer and choose stabilize movements in the follow-up Committee of movement. If there is a change in point of view significant or any rotation, then you'll want to stabilize scale and rotation also
- Choose an area of detail that you want to lock in position. In more detail the better. Make sure that you are followed by a space big enough to get a good lead. If you are stabilizing scale and rotation can choose two points that are horizontal or vertical for a tile call for a pan shot or an angle of tilt for a shot that tilts and pans
- When you get a good solid lead select apply to lock the layer position
- Find a frame that displays most of the word and export that frame a Photoshop file (Note: If the edges of the image will not let you see the entire floor you need to correct, then change the size of the model temporarily)
- Open the image exported in Photoshop
- Create a new layer in Photoshop
- Select the paint brush or clone tool and correct all the flaws you need to repair (works if you set the Clone Stamp tool to use all layers)
- Import the PSD into AE and choose only the fixed layer
- Add the layer to the timeline
- Scrub through the timeline to see if there are places that you must animate the scale, distort the image replacement or rotoscoping the image for once works
- If you have resized the computer it's time to return the original of the model parameters
- Rename your all original images layer "stabilized."
- Add a null value to the composition
- Apply this animation preset to the null: Dropbox - destabilize Rotation Scale.ffx
- Move the CTI to the first image of the model
- Parent the original film and the repaired the null layer to add movement to the repaired layer and return the camera for the original film movement
- Check the model for any problem or the color adjustment you need to do with the repaired layer
That's all.
Here are the expressions that are added to the position of rotation and scale. The position is easy, that you attach just position of the null value to stabilized images Anchor Point. Rotation is also easy, just, you must subtract the value of the rotation of the original images by placing a - int sign the expression before you use the pickwhip to connect the rotation of nulls to the stabilized image rotation. The scale is a bit more difficult. You need to calculate the percentage change and separate values in a table and then reassemble. As long you have renamed the predefined animation film "stabilized" layer will do this for you automatically.
Position:
thisComp.layer("stabilized").transform.anchorPoint
Scale:
x = value [0];
y = value [1];
TX = thisComp.layer("stabilized").transform.scale [0];
Ty = thisComp.layer("stabilized").transform.scale [1];
NX = x / tx x;
NY = y/ty * y;
[nx, ny]
Rotation:
-thisComp.layer ("stabilized") .rotation


Maybe you are looking for
-
Pavilion 23 all-in-one: Bluetooth does not
This driver is appearently obsolete but I can update. How can I reinstall it? Broadcom BCM943228HMB 802.11abgn adapter Wi - Fi 2 x 2
-
Satellite R630-13D: dead pixels and background noise
Hello I got my Satellite R630-13 t today about a week ago. I noticed that I have about 10 + dead pixels already - why? Is that what I can do to sort or should I send it back? I'm not particularly impressed by this when the laptop is barely served. Al
-
Pavilion DM4 - 1173CL p.n.: upgrade to 5 GHz WiFi XH123UA
The service doc list the Intel Centrino Advanced - N WiMAX p.n.: 619997-001, as a wireless card compatible for my phone XH123UA. Is this a plug & play, simple replacement of my Broadcom p.n. origin: 593836-001 card adapter wireless or will I have to
-
Synchronize several 9191 chassis
Hello I have a project where I need to use four 9191 chassis Wi - Fi (each of them is containing a module 9239). Each of them will have the right distance between (20-30 m) How to synchronize acquisition on all four frame? Thank you
-
How to delet an incorrect email address of my Messenger Droid
Same question as the title