Smooth paths
Can smooth you a path without making the paths curve? In this image, A path is the original path, I want to smooth out the path A path B looks like and I can come back to what looks like A path?

You could try object > path > simplify the path with an accuracy of 0 curve.
Tags: Illustrator
Similar Questions
-
Is there a smoother path to 'Publish' the Web?
It is true that I am fairly new to animate the edge, but so far, I found the process of obtaining a published published animation on a Web site online, stimulating and not intuitive.
Published resources are all related to the local HTML file, and if you want to embed the animation in a pag alive who can't be in the same directory, you must change the paths for the .js files and the imags and edge_includes resources. It is particularly difficult with the compressed version of the .js files.
Are there options publish that facilitate this process? If this is not the case, there should be. I am totally open to the Enlightenment on this subject.
Thank you.
Hey Rouvière,.
Thanks for the comments. Currently, there is not a way with the newspapers cleaning tool, but it's something we thought for a future version.
You can find this blog useful in the meantime that gives instructions on how to manually link files to load http://blogs.adobe.com/edge/2013/11/04/want-to-relink-an-project-files-on-a-cdn-its-easier - as-you-can-think /
See you soon,.
Sarah -
Odd spike in the graph of the position when using facilitated easier?
Hello all-
I encounter this problem recently and can't seem to find a solution (TBH don't know exactly how you get it either).
Creating two keyframes for position of a layer, even when the thing is moving in a straight line with no other keyframes, I get this weird effect where the layer of sort of "wanders" out of the way before arriving at its final destination. When I open the graph editor for post curve looks like this:

I want a smooth curve between the two keyframes, or a straight line, but rather boost MI get which is odd. This continues to has and I can not find a coherent reason and its driving me crazy
Thank you very much for your help!
The default spatial interpretation gives the energy of movement. Sometimes when you set or move there is a small delay and you get a little pingpong or unexpected because of the energy in the movement movement when the position is changed by a keyframe. If you zoom in and look in the path, you can see which overlap the Bezier handles on the path. This problem is extremely difficult to fix in the graphics editor by dragging the autour values. When you set the default linear spatial interpretation this energy with all its vectors is removed, so you get straight lines between points. This can work very well for your entertainment, but most of the things I design works best with energy and curves.
If you have a problem like this example and you need to maintain a curve and want to smooth movement, it is generally easier to start in the Composition Panel by examining the path and use the tool (g) feather and modifier keys Alt/Op; ion and Cmnd/Ctrl to set the curve. Take this example:

Correct with the pen tool gives me this:

The other option is to adjust the speed Keyframe or keyframes Interpolation to smooth out the path and movement.

In most cases, if you want a smooth path, then it is better to start with the pen tool in the Composition Panel and then work on schedule. Then you can refine things with the tools of the keyframe. If you need to do a few poles using the graph Editor, it is usually a good idea to have the reference chart (speed in this example) visible and choose Edit Position to the position and the speed of change at the moment.

Because of the energy put into movement along a curved path editing speed or graphics of values can get really confusing. That's why I usually start in the Comp panel.
-
Continuous rasterization with solid hidden
Hello
I have a demo with a masked solid and striped, but in the final model on the scale, "Continuously Rasterize" is not representing the mask on smooth path again. How this is done?
Also, I hold on to return to the original size of the race and do not evolve... is this possible with the race within the demo? With an expression or almost?
Kind regards
Frank
Sorry, I didn't finish my post. I answered my phone. After I said that you don't not just dig deep enough, I wanted to say to give you the solution, or actually two solutions.
The first is to add an expreession the anchor that points to the size of the rectangle. If you divide the value size by 2, and subtract that value today of the anchor the anchor will host as you change the size and the edge of left and top of the rectangle will maintain their position.
This is the expression:
x = value [0] - content("Rectangle_1").content ("mapped Rectangle 1") .size [0] / 2;
y = value [1] - content("Rectangle_1").content ("mapped Rectangle 1") .size [1] / 2;
[x, y];
Change the sign less just before the contents of a plus and the bottom or right edge will maintain the position.
After you create the rectangle and addition of the expression, you must replace the rectangle in your design. I could add a lot of other languages to the expression to maintain its initial position, but frankly, it's a waste of time.
The other option is to hold the Alt/Option key when you design your rounded corner (or any other geometric shape layer) that created a path instead of a rounded Rectangle. When you have a way you can animate all the path choice as many points as you want.
This is a project file (created in CC, but registered as CS6) with both options to see how it works...
-
How to make an outline of a subject/face
Hi all
Okay, so I try to do something like this: http://img5.imageshack.us/img5/8335/headfn.png
I have a picture and I just want to make an outline.
But I have 2 problems:
1. I can't make a smooth path
2. I can't fill the path with color gradient
What is the best way to get a result similar to the image?
You will probably have to do with the pen tool. You can also try your hand with the work path make the selection from the Trace Panel button, but you still have to tweak it a bit to get in a decent shape.
http://help.Adobe.com/en_US/Photoshop/CS/using/WSfd1234e1c4b69f30ea53e41001031ab64-7378a.h tml
Work paths exist outside the structure of the layer so you can't fill them. You will have to turn to a selection and then fill them or, with the selected work path, add a gradient fill layer
-
Illustrator CS2 print help - Epson R1900
Hello
I was printing to my Epson R1900 without any problem since Illustrator CS2 on my Macbook for a year without problem. I got a new Macbook, only a little more recent than the last, reinstalled Illustrator, and my print quality is now in the gutter. I tried to adjust the print settings, that I never had to do before, and it is still very poor. What I am printing are a few graphics, I've drawn on the screen. No images. In the output of print presets section, I can't resolve anything except reading or left reading right. Can anyone help? I don't know what has changed. All printer drivers are the same and are installed. The traits of lines look pixelated, as does the text. I know I could do "Vectorize" to improve the sharpness, but I never had to do that before, and I want to be able to edit the text later.I hope someone can help.
Thank you for your time.
KeliUpgrade you your operating system as well and that's what has changed you will not be able to print the epson R1900 with smooth curved lines or smooth paths.
Simply not possible in the most recent operating system above 10.5.
That's what you need to do, print from Acrobat or if you rasterize the art and print that.
Or save a psd raster and print from Photoshop.
Or buy a software RIP.
-
What is the best way to smooth a path?
After the creation of a path that has many anchor points, which is the best way to smooth this way?
I know the smooth tool under the pencil options. Does the same thing? I hope that there is a better way.
I use Adobe Illustrator cc 2015
Thanks for your help.

You can select the object and try the object > path > Simplify.
-
Traced effect will not smooth out the corners of the path more
Hello
I used "wright - on effect" to draw a path on a map and until this AE ' "my corners rounded, which is exactly what I want, but suddenly with the following key frames he draws the path exactly at the points (without smoothing the corners).
Is there a way to change this?
thinner respectively thicker paths are 2 "write - we separate objects ' (due to the fact I had this problem before, I continued with another)

I use Adobe CS6 AE 11.0.0.378
Kind regards
Guti
Highlight the tops of mask path, right click and change the spation Bezier interpolation. Then use the path updated the mask in Write-On.
-
I'm redoing my old logo in vector, but I get irregular paths, not smooth with the tracking tool
I use the tracking tool of image Adobe Illustrator CS6 to redo my old logo in vector, but I receive paths are not smooth jagged. I have illustrator CS6 on Mac. I tried to break my logo into parts and then join together to make the full logo. one of the parties is an alligator, and when I tried to use the tracking of image tool, I got place sweet but not so rounded lines than I like. I want to get a nice gator with close to the original color of the original JPEG, with well rounded paths in particular around the mid-section, tail and jaw. I don't know what to do? Regarding the font used in the typigraphy in the full logo, I have it already. Help, please! Also, I do not have photoshop CS6 if necessary. ANY HELP IS VERY APPRECIATED!
If you want to help me directly, I can send you my. I send I have now, and I would be VERY grateful for that too! Leave your email in the comments below.


(it's the lower jaw, and a path in staircase instead of a smooth surface very lightly rounded a)


(this is the path in staircase by the tail) (this is the logo that I'm trying to recreate)
BM,
In addition to say Scott and Mike, you can:
(1) draw the left leg first, as is it is left feet weren't there (just connect the pieces that you can do with less care on the invisible parts), you can use the fill;
(2) draw the gator together as a single external shape (on the left leg), you can use the fill;
(3) draw a shape that follows the upper part of the pale belly and continues in the outer form (the outer part can be established with less care;
(4) draw the white in the eyes (the left eye may extend outside the outer form);
(5) draw the dark-eyed;
(6) copy the outside shape at the front, select it and the shape of the belly and Pathfinder > Intersect zones form or the harvest;
(7) do the same for the left eye.
To give you a taste of how to drag the tool pen, it should be an anchor at the corner of the mouth, two at the end of the lower jaw, and one where the jaw meets the neck.
Edit: Hi Scott.
In addition (another), when you are faced with an anchor Point positioning, you can press space and move it while the handles are locked, then let go and adjust the additional handles and tap it and move and so on.
-
Effective way for smooth transitions, straight paths into paths of curves?
Hello world. I use Illustrator for five years now, but this is the first time I was really puzzled about a technique, so I was hoping to see if anyone had some advice on this.
I'm drawing a path that made the rounds of several circles (think magnetic stripe or the movie goes around playheads) in a configuration like this:

(roughly path in red)
I want the transition between straight sections and curved sections to be completely smooth and without interruption. I know how to do that well enough if all "playheads" are at 90 ° or 45 ° angle to the other:

But since the playheads in my illustration are the weird angles to each other, I get some kinks and weird transitions in the path like this:

Has anyone else dealt with this technique before? Tips tool, or advice? that you may know? I tried to use the rounded corners effect, but the results are usually less than satisfactory.
I'm in Illustrator CS5 on Mac OS x (Snow Leopard)
Try the "Common tangents" script by http://park12.wakwak.com/~shp/lc/et/en_aics_script.html
-
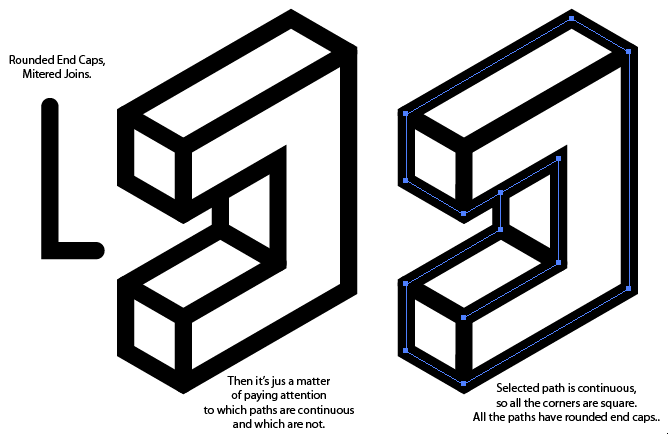
How to reach several paths for the corners are smooth?
I'm doing some isometric letters, but I'm not sure that the best way is to go all by ensuring that the corners do not have it:

I guess it's something to do with the compound forms or the pathfinder, but I was not able to do anything that sets...any suggestions on the best way to go about it are welcome, I don't mind from scratch, if necessary.
Use round caps, joins. Check the continuous paths (joined) where you want the sharp corners.
JET
-
System cannot find the specified file "[path]" \hpzshl.ice_suffix.. ". exe"on Windows 8.1
I've updated my OS to Windows 7 64-bit edition of Windows 8.1 pro 64-bit, and when you try to reinstall the software and the driver for my printer HP Officejet J4580 all-in-one I get all sorts of errors. It worked perfectly on Windows 7.
I get the most common error is: System cannot find the specified file "[path]" \hpzshl.ice_suffix.. ". exe', as well as the facility is abandoned.
I tried a lot of solutions from the HP Web site and these forums, but my problem is still there.
I already tried the long solution presented here:
and
http://support.HP.com/us-en/document/c04206080
I even found the directory where installation has been decompressed and copied to the desktop, but the error persists.
I need the complete software because I need to use my printer Officejet scanner, so I can't just simply print drivers.
I need desperate help on getting this new work.
Specifications of the computer:
CPU: Intel Core i7 - 4820 K Quad-Core 3.70 GHz 10 MB Intel Smart Cache LGA2011
: DDR3 memory / 1866 MHz Quad Channel 16GB (4GBx4)
Printer: HP Officejet J4580 all-in-one; connected via USB
OS: 8.1 Pro 64 bit Windows
GPU: AMD Radeon R9 200 series
I finally solved it by myself after many hours of pain.
I clean any installation of HP from my computer using the HP Officejet software and driver removal utility:
After the computer restarts, I moved on the desktop, the installation directory unpacked that HP printer install wizard for Windows had previously downloaded and launched.
I deleted all files in the directory %Temp%.
I disabled McAfee antivirus real time and Windows Deffender analysis.
I ran the setup.exe in the installation directory in my office.
The installation is smoothly and completed. I have already tested the printer and all features function normally.
I hope these steps help someone with similar problems to get the software installed.
-
Backup files Vista - "Windows could not find any backup sets [file path]."
I have a Vista computer. The hard drive broke so until I replaced it I backed up all the files on the computer to another computer running Windows 7. I did it in the backup and Restore Center. I made a backup of files, not a full backup of the system (I've seen the full backup of the system mentioned in other posts, but that was not an option... maybe which is only available on Vista Premium). In any case, I replaced the hard drive and then try to restore the files, but I get the message "Windows could not find any backup sets [file path]." Anyone have any ideas? Thank you.
Here is an article on the restore procedure:http://www.vista4beginners.com/How-to-restore-files to make sure you do this right. It's a selective restore of a full or selective backup (not a full restore from a full backup) - but since you did a full backup, it matches your process more closely than would a full restore.
Here is an article on the advanced use of restoration (during normal restore does not work):http://www.mayankraichura.com/post/2009/08/06/Avdvanced-Restore-via-Windows-Vista-Backup-and-Restore-Center.aspx.
Restore files from a backup
http://Windows.Microsoft.com/en-us/Windows-Vista/restore-files-from-a-backupBack up and restore: frequently asked questions
http://Windows.Microsoft.com/en-us/Windows-Vista/back-up-and-restore-frequently-asked-questionsI also found the following (but don't know if it of true or not):
1. after the start of "backup and Restore Center."
2. I chose "Advanced Restore"
3. I was did not an administrator password... maybe because my account is an administrator account.
4 choose "files from a backup made on a different computer.
5. in the dialog box indicating "Select the location of the backup to restore", select "hard drive, CD or DVD...". »
6. under the drop-down list box, select your drive/partition and continue
7. If all the backups on your drive, it will show a list of them.
8. in my case, he showed a backup, but in the backup location, it will show "backup location is not available."
9. I was frustrated, but then I somehow just select this backup (Yes... even if he said that thebackup location is not available " ")
10. and you press "next".
11 guess what... no error!
12. a window appeared asking me if I wanted to do a full restore, or I want to select specific folders or files.
13. I selected the folders I wanted to restore and bingo... it their restored smoothly.
14. so that the next time see a mistake, try to continue with him... ;)
I don't know if this will help, but it does not provide much information about the process (when it works). I hope you find any error or discrepancy in your procedure and it will clear up and allow you to restore.
I hope this helps.
Good luck!
Lorien - MCSA/MCSE/network + / has + - if this post solves your problem, please click the 'Mark as answer' or 'Useful' button at the top of this message. Marking a post as answer, or relatively useful, you help others find the answer more quickly. -
Mask path is not correctly copy to a position of the Null object
I created a mask path to an animated logo which is the basic text. To track the letters correctly I created a mask path and used the handles of the tangent to the curve at the edges.
When I copy the mask on a position of objects Null path, it copies OK but all the curves have disappeared. I tried to adjust again with the tangent handles, but it does no good curves, they are still gaps. Is it possible to copy the mask path and keep the curves? I have attached a few photos so that you can see the difference between the two. Any help on this would be appreciated.


AHHHH I got it!
the reason you see this jagged line is the time interval by default of the path to the technique of the post is 2 seconds and there is not enough frames here to cover everything that you hide the curves of the path to a path of accurately. It must simply more images to interpolate exactly as you drew it since there many vertices and not enough frames to store this information in. as soon as you drag the last keyframe of a more reasonable of images amount, your tween will be fine and not serrated.
short time duration - less frames - motion in stairs:

longer time - more pictures - smooth motion:

example of the final result. you have to experiment just how long you need it to be exact vs winding movement you want

-
Hello
I'm running a problem trying to turn two forms (created using Illustrator).
Here are the steps I took: (the problem is in bold)
- Imported two Illustrator files in AE and put them on the timeline in two distinct layers.
- Converted the two forms of vector layers
- Paths of alterations to two shape layers.
- Copy/Pasted the path of Shape1 on the timeline for Shape2.
- Changed 'First Vertex Point' for the two paths so that they are in the corresponding positions.
- After step # 5, morphing between the two railways retained 'twisty - effect' during Interpolation.
I did some research and discovered that the other summits have been numbered probably not elsewhere due to I made them in Illustrator. - To address the problem of summits, I copied the path of Shape2 and stuck in Illustrator, I used the "Reverse Path Direction" tool in the attributes Panel. (To do this, I pasted the path, then you press Command-8, then past the meaning of the path).
- Once the meaning of the path has been reversed, I pasted the path for Shape2 in the timeline for Shape1 and got the desired morph I wanted to (much more natural, non-twisty)
- However, now, the path for Shape2 moves to the upper-left corner of the Composition during Interpolation and I don't know why. I checked and there is no enabled for movement of position keyframes. (Anchor point for path crosses the top left of the computer)
When I try to drag the way back in its normal position, the entire layer is moved.
The problem seems to be solved when I paste the path in a different group in the same layer, however, I still have to manually set the positioning. This workaround is problematic for the project I am working because the forms that I work with several paths. and by dragging each a return to manual position is not accurate, nor it is time-saving. Note: I have not been able to enter values numerically position to solve this problem. He has lived it all physical dragging.)
What is causing the path to move over the Interpolation and how can I prevent it?
I hope I was able to articulate the problems I encounter. Any ideas would be greatly appreciated.
Thanks in advance!
In addition, some other info:
Computer: Macbook Pro 13 retina "(end of 2012)
Processor: 2.9 GHz Intel Core i7Memory: 8 GB 1600 MHz DDR3 (6.5 GB dedicated to active Adobe products)
Graphics card: Intel HD Graphics 4000 1536 MB
Using After Effects CC (13.5.0.347)Thank you, once again!
on the way to Morphing:
to create smoother transitions in the shape on the form, you can use the interpolation of mask - it creates intermediate keyframes between two path keyframes. Read about it here: management and animation of paths form and masks in After Effects . Unfortunately, this is for mask paths and not form. but you're smart - you can copy the path of a mask, do your thing and then paste it back. or maybe you don't have the form anyway. see if it works.
on Offset of the path:
I was able to reproduce the problem. Here's how I see it: when you convert layers have forms Ae, they get some position attributes so that they will be placed in the same position. Note If you click UU you get the changed properties:

When you paste the path of illustrator you paste on a layer that has a lag of transformations and that is why your layer is up there.
This, I do not understand:
"To address the problem of summits, I copied Shape2 path and stuck in Illustrator, I used the"Reverse Path Direction"tool in the attributes Panel. (To do this, I pasted the path, then you press Command-8, then past the meaning of the path). »
you don't need to copy paste EI AI and back when you can copy paste the original layer of AI to Ae. to do this, copy - paste only once. You can copy paste paths of the EI and ch AE too.
Here's my suggested solutions (choose a! not all of them):
1 reverse the way AI - save the file and convert the layer shape again - this way, you have no copy paste the way AI, but only of the Ae.
2 reset the transformations and properties of position for the Group shape. then copy paste will be exactly where is your path.
3. If you don't really need forms, you can work with layer masks and copy paste like crazy to AI without lag


Maybe you are looking for
-
How to install IPX on Windows 7
Want to play on LAN RA2... Thank you... ^ ^
-
Sub - VI implicit calendar within a LabVIEW FPGA SCTL
I have a question about the time of a Subvi in one SCTL when LabVIEW is translated into VHDL. Did the translate Flatten all code within the SCTL effectively remove the Subvi borders, or a Subvi act like a framework unique sequence around this code. F
-
XP Professional Taskbar stuck in Classic Mode
The taskbar repair tool Plus can work for some things, but it does NOT fix a stuck in classic mode - XP taskbar, and I even paid the $5.00 to open this repair option.I'm betting it has something to do with an entry somewhere - but where registry and
-
Finally, the C drive seems to have 55 MB of available space. However, the system restore does not appear to knit - restore points may not be created.
-
BlackBerry smartphones can not open emails
Hi - I can not open my emails this morning. Can see header, but when I try to open nothing happens. All the patches?