Advice of concentric circles
Hello
Im trying to do a series of concetric circles. From 4.5 mm and 104 have circles all together each circle 4 mm larger than the previous. Thought, it would be quite simple using mixture, but for some reason, it's just a little next door (first is 4.5, is then 8 505, 12,51 another and so on). No idea what I am doing wrong? Or y at - it another way to do this?
Thank you
1. draw a circle size: 0.45 cm
2. draw a circle size: 41.65
3 - Select the two circles and vertical and horizontal alignment
Tool 4 - Select smoothing: specified as follows: 102, specified distance: 0.4 cm
5 - If you apply terms to the circle, uncheck the box: use a snippet of the limitations on the General preferences.


Tags: Illustrator
Similar Questions
-
Concentric circles, centering and thickness...
Hello
I would like to create a logo based on the space agency European:

I started on Illustrator and I have your opinion on the best way to reproduce this game of concentric circles... Under I am CS6!
Thank you pour your advice!
Robin
Robin,
If I (put) understand (you want cuts in parts of the shown circles and you want to change the color of these environments), you can fix both if you:
(1) select the clipping mask and object > clipping mask > release.
(2) select the circles and change the color (you can select them with the direct Selection tool without letting go of the mask, but you will need to release anyroad);
(3) create the cuts as described in the first post, in the last paragraph (see below), and then select the entire document and opposition > clipping mask > make to reapply.
Once you have the circles, you can create the circle (or if she) path to the related to them, select all and opposition > clipping mask > make. If you need cutouts like the circle and the e, you can start creating those on top of the track and object encompassing > compound path > make (if you have indications of the exact path, you can correct in the attributes palette if necessary (use Even-Odd winding rule)), or you can window > Pathfinder (pallet) > less front
-
How to draw concentric circles using shapes in illustrator drawing
I am on the iPad and try to draw concentric circles from a diameter of 1 cm
the circle of form Adobe seems to have that one size.
am I missing something?
Hello Gita,
The circles in the menu form from raffle can be resized.
When you click a shape, Slide Touch open with her.
Tap one finger (concentric circles) guides to get the shape you want to change (circles, squares and triangles).
Once you see the shape you want, it can be reduced or enlarged by placing your fingers or the other side of the contour and making dragging/pinch.
You can 'stamp' shape on the canvas by double-clicking on the contour (will be described with all that brush you chose).
If you want to change a circle to an oval, when you have the size you want, now pressure on the main lines. Depending on where the sketch you press you will see either a vertical or a horizontal line in the middle of the form. As soon as you see who... Drag. Give it a try.
Hope that helps.
Sue.
-
How can I create concentric circles in Photoshop CC?
I'm sure that there must be an easy way, but I can't get out :-(
Concerning
Bob
Each circle can be made by using the elliptical selection tool and bearing the same numbers of H & W in the Options bar
Edit > stroke
Place each anywhere in the area of the image, but each on a separate layer
Select all the layers in the layers panel
Use the move tool and in the Options bar, click on the vertical, then horizontal alignment symbols.
Flatten the layers if you wish.

-
Hello
I am trying to create a wheel similar to the image below except that I need three segments instead of twelve. I also need a few lines of text for each segment, but I'm not sure that the best way to insert it. I tried to use the 'polar grid tool' and using 'Text on path', however, I am not able to type within a segment / arc without the text goes around the circle.
Does anyone have suggestions as to how I can go about this? (I hope that's clear!)
Thanks in advance
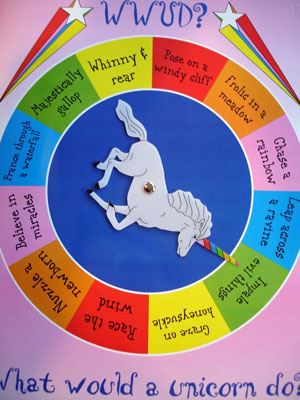
Three groups ar easy once you.
Back to the polar grid tool.
Set it to the desired diameter.
set the radial dividers to 3 and concentric circles on "0".
draw an ellipse size you want the internal diameter must be
align the two using the Align Panel (center vertical and then centered horizontally.)
Select the inner circle and and polar grid object and click on theLive paint bucket tool to turn it into a live paint group
You can fill out any section with any desired shade, including a background or outline of none.
Very easy to do with the live paint group. (Note that I completed the sections of Center with a fill of none).

The text describes earlier if you want to make the curved text and I think you want to do with only the sections tree due to the amount of curve sections require.
You make to concentric circles which will reflect the amount of attack between two text lines that you must ad the size necessary to correctly place
the sections.you place these two concentric circles on the cut circle you have done as a live paint group.
Locks the live paint group
with the scissors tool, cut you concentric circles at the sections radial dividers
then turn them into text paths
then the pair the two in each of the sections by making text son Type > text Thread > Create
Now, type your text for each section. You can do this with two triangles if you want the text to the right

-
Follow the circle with overlay
Hello
I have a few messy data a camera. It's a pattern of concentric circles that changes with the times - each ring splits into two, each of these components of movement away form between them. I want to set up a set of these rings.
Someone could point me in the right direction or have any advice for a strategy game start? I thought I could use the superposition of the ring the user select a set of rings, and then somehow have the overlay 'follow' the data he was moving (easy or hard?).
I removed the components of acquisition IMAQ and took a series of images, load them into a loop to try to show the effect as an animation (vi and associated data).
Any help would be appreciated.
I watched this example: http://forums.ni.com/t5/LabVIEW/Fit-2D-data-in-to-Circle/td-p/668858/page/2?view=by_date_ascending
who can be of some use if I manipulate data, but is it the right way to go?And have tried to use machine vision-> analytic geometry-> control 'IMAQ made circle 2', but there is no example vi or tutorial for this control (or most of the other tools of analytic geometry).
so not sure exactly how it works.
Thank you
I'd probably watch the line profile. If it is noisy or has spots, you might on average several radial lines (up, down, left, right) to get more consistent data.
Ridge detection would probably find the part the clearest of each circle and could find maximums the. You could treat these to find what you are looking for. Two very close circles would probably be identified as a single peak. Looking at the data would be the first step.
You can use overlays draw the circles located on the original image. This would help you to know if you followed them correctly.
Bruce
-
How to make the curved arrows in the circle?
Hi, I want to make four curved arrows that lead each other. Ideally, arrowhead would be just a > shape at the end of the line that is the same width as the line (i.e., like a straight line was cut at the end, so no advice or gaps.) I drew a circle with the ellipse tool, but I can't understand how to cut properly. A file HAVE that sort of shows what I mean is to https://www.onlinefilefolder.com/2swDvNSyBkcsXd
Thanks in advance for any help!
You're welcome, Neil and no need to apologize.
You can have a look at the link of Jeanette in post #4; It shows the final results.
Here are the instructions in the first post with an extension of 3):
(1) create the circle with the width desired form of weight of the race;
(2) create a V-shaped path with two segments on top of the circle where the first gap should be, longitudinally extending outside the race of the circle and with a weight of race for the gap;
(3) copy and place in order to have all forms of V where you want the gaps; You can do that by rotating round copies in the center of the circle 1), this can be done in different ways, one being to create a concentric circle of the auxiliary that extends beyond the V shape and rotation of the copies of the V shape using the object and which > transform > Rotate and insert the desired values and then remove the auxiliary circles;
(4) select all and object > path > Outline Stroke.
(5) pathfinder > before (subtraction of ares of form in older versions, perhaps by pressing Alt/Option to extend).
-
Hello
How can you do concentric circles as image 1 ?
And how are padded as le Photo 2 ?Photoshop cs6
Thank you :-)
I think it more accurate to define the guide line by using the new guide dialog box and enter the exact location using numbers. Here I put guides at 25%, 50% and 75% vertically and horizontally on a high 1024px by 768px wide document. I created an action of the two step. Step 1 the path with brush, 2 transform Path width and height of 140%. I chose the toolset 4px round 100 hard brush mix normal mode 100% flow and opacity. Set the foreground color of red. I filled the white paper for I can see the guidelines. Then used the Ellipse tool to draw on a track of circle of 30px at one of the intersections of line nine guide. I played the action recently and has stopped playing the action when the work path went out of the surface of the canvas. Then I deleted the way to work and repeat the process of drawing on a track of 30px circle and play action for the othet 8 junctions.

-
Repeating circles / wave patterns
Found these lovely patterns - a "zig - zag" concentric circle design and a wave of "credit card" style in a template Illustrator - but I don't know how they did it, can someone give me a hint?
https://www.dropbox.com/s/5s4fe7nnuawhiva/nice%20Business%20card.AI
Thank you very much
Those are blends.
-
What is the best way to draw this diagram - circles within circles?

Please do not draw for me - I need instructions that I met this kind of diagram often and feel powerless and stressed out whenever I see them!
It should be easy - circles in circles which are then cut to the top.
Thank you very much
James,
For simple divisions of concentric circular rings like those of the OP, you can:
(1) create the necessary concentric circles (including duplicates) and create complete rings,
2) slide the Center with the tool in line where you want to cut and object > path > divide objects below.
Before dividing, hide/lock parts only not to cut, like the ring to analyze it.
This works in all versions.
-
Weird iPad icon after installation
I just downloaded the Australian National Public Toilet soft to my computer and dragged to my iPad to install. While the icon has the right work during installation, it changed a gray grid square with an X across the middle and a series of concentric circles that are bunk. I did not lose any internet connection and have tried several approaches, including downloading directly on iPad, reset using the home and sleep buttons remove and reinsert. Does anyone have an idea what could be the cause of this?
iTunes does not support drag and drop.
Delete it app can download it directly from the App Store on your iPad.
-
The basics - how a packet is forwarded on the RF support - help please
Hello world
Please could you help me understand a concept that can be the basis for most of you, but for me, I don't understand.
When a packet is transmitted to a NETWORK card wireless on a PC to an AP, is a copy of the package even get transmitted several times in many directions by the wireless NETWORK card or antenna?
Please can you be kind and look at the photo I created.
This is how it works.
Also, if this is correct, the number of copies of the antenna package would send?
Thx a lot for all your help,
Kind regards
Ken
Hi Ken,
Here's a useful analogy that could be a bit overused, but I think it is still good :)
Imagine a lake with calm waters. You pick up a stone in the Chuck and it creates waves that radiate outward. It is a very ideal situation for the wireless, with no obstacles and no impedance, the waves continue outward far enough, depending on the size of the stone (the power of radio, if you want).
Now imagine you have an obstacle, say a big rock sticking above the surface of the water. If you chuck now a stone in, waves radiate outward like before. However, when they hit the rock, what happens? You probably already know - the kind of waves to bounce off the rock, but they did this also around him. In fact, apart from a small "shadow" directly behind the rock, the waves actually bend around and 'cover' behind him. In the end, you will see those concentric circles that extends well beyond the rock, once again as long as there was enough power behind the stone falling into the water.
When the waves wireless struck a barrier, there are differences, but the concepts are essentially the same. Some waves will bounce, and others will bend around it. Some go through the object if possible. That's why the WiFi waves can spread throughout a building. This wavelength waves work a little differently than visible light. The color blue, for example, is about 450 nm in length. It is not really possible for the color to penetrate opaque objects and refract around so much as a wave of 12 cm is able to do. You can't really think WiFi waves such as visible light.
Finally, this stone fall to created a disturbance, but it was a unique force which disappeared pretty quickly. Now, imagine a large mast which ensures the pump vertically in the middle of the Lake. As it pumps up and down, it creates wave radiating outward. If she pumped up and down, it can create big waves, but if it goes up and down, it can create small. Regardless of the size of the wave that is created, it's the same wave that spreads everywhere.
Wireless is a kind of push/pull the concept, where electricity is applied to an antenna and it pushes a wave wireless outwards. The electricity is off and the wave interrupts as well. So anything that radiates outwards will always be the same wave, until this wave hits a barrier or obstacle, as described above.
Sorry, that was a bit long. :( Who help me at all, and which is what you are looking for?
The f
-
I know there is a way to tell Windows (7, anyway) you want a locator (concentric circle which shrinks) animation make more visible the location of the mouse pointer when you press a CTRL key combination, but I can't find documentation of this feature anywhere
Go to the Control Panel, [view by - small icons, as applicable], mouse, tab pointer options, set the box see the map by clicking on the hold control key .
-
Mouse Sonar: Registry key? Specify the location of the pointer when I press the CTRL key
Windows 7 Home Premium 64-bit
(But this feature existed for several years, at least as old as XP).In Control Panel mouse pointer Options tab, there is a checkbox option:
[b] "see the location of the pointer when I press the CTRL key". [/ b]
When this field is selected, pressing the CTRL key causes concentric circles around the mouse pointer, to help you find it quickly. HE often called mouse Sonar.
I want to activate this option, but my mouse control panel does not have a pointer Options tab. I installed a mouse of third-party providers of hardware, software and drivers, and they hid the pointer Options tab. If I knew that the registry key for this option, I can activate it via regedit.
Someone knows the active registry key or disables this option?
This option is stored under this registry key:
HKCU\Control Panel\Desktop\UserPreferencesMaskHowever, it is coded to store several variables, and this direct modification is very far from a supported scenario. You can try to install the Microsoft IntelliPoint software instead. -
How can I see more detail in the historic window?
Photoshop CS6.
I know how to display the history window, but there is not much information at this location.
By this, I mean that there is no detailed information about what I did with each layer.
For example, my image contains a number of differently colored concentric circles, each on its own layer.
Each layer was created using Ellipse > fixed size, then edit > stroke to color.
My question: is it possible that I can go back and see the details of these actions? Type, size of the Ellipse, the color and the line width, etc.?
I remember that there is some kind of system like this in early versions of Photoshop, where the history of layer was very detailed.
Or am I wrong to remember :-)?
Just to be sure: that will not be reflected in the history panel, but the newspaper.


Maybe you are looking for
-
I would like to export an audio clip file so that I can work with it in WavePad. From what I found on the internet, this seems to have been simple in earlier versions of FCPX but not the version I have 10.2.3
-
I try to download and install Firefox beta 3 for Android 2.3 on Sony Ericsson X 10. I am able to access the site of the Chamber of combustion/m well but when to download, I get the error message "not found - the requested item is not found."
-
Satellite A200 - no lights, no fans
Hello world I have a toshiba satellite a200-244, and after about 15 months of use it allows to turn off his own time. I have half of heart sought the problem but could not get through to the main problem that I discovered later was dust in the coolin
-
Login screen does not load and cannot access my desktop after downloading the Microsoft Fixit tool
Please can someone tell me how to get the login screen / print this page, because I do not that! I tried to use the command prompt, system, 'lusrmgr.msc' recovery option and the message comes up, "... is not recognized as internal or external command
-
Windows Photo Viewer cannot open *.tif files
Hi Windows Photo Viewer don't open no * tif files on computers Dell desktop running Windows Pro 8.1 and Windows 7 Professional. Do not use a drive. Tried system restore, but does not solve the problem. Windows posted a temporary fix (https://support.